Disclaimer – This article is reproduced here from IPMS Stockholm without permission – I know this is a really bad thing to do, but SO many good articles have disappeared from the internet over the years, and I couldn’t stand to lose this one, so I have saved a back up copy of it here.
PLEASE Visit IPMS Stockholms original article by Omami HERE.
 Replicating elements of nature in miniature is one of the more tricky aspects of modelling, requiring not only the “engineering” knowledge of a subject but also a bit of artistic sense.
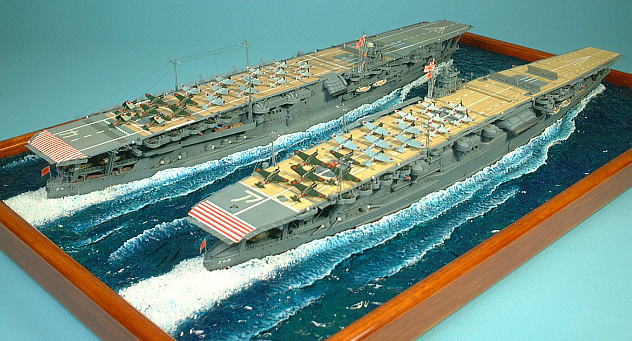
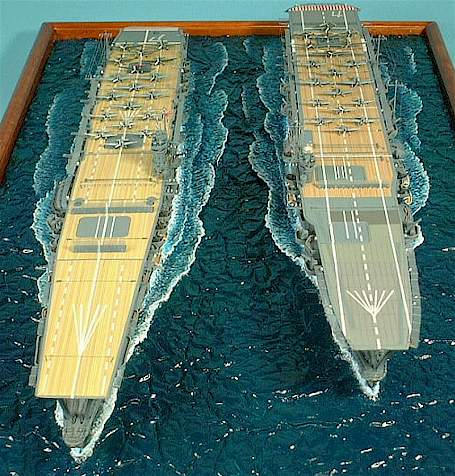
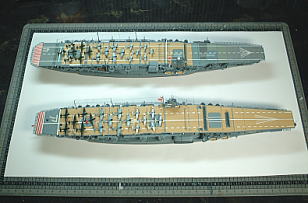
For ship model builders such as myself, water base can really make or break a good model. In this article I would like to show you how to produce a realistic sea base for ship model, with rough water surface, surf and wake. I have perfected these techniques during my own project of modelling the IJN Task Force, Carrier Division 1. The Task Force consists of the aircraft carriers Kaga and Akagi steaming side-by-side on a single base.
Before we begin, let’s consider the qualities of our subject.
Despite of what we all know about water, deep water basins seldom look transparent, especially when seen from a distance. Rather than that, water has colour and forms a glossy, highly reflective surface. These qualities of water are especially appropriate to replicate in scale, particularly when dealing with ship models in smaller scales such as 1/700.
Having performed this most basic analysis, let’s move to a step-by-step description of how to produce a convincing sea base.
Step 1: Basics
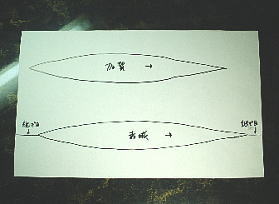
First you will need to establish the composition and layout of your base. Most of the times this is simple: place the model on the sheet of paper of the same size as the intended base, and outline its hull along the waterline. If you have any other elements such as peers, shoreline etc, trace them on paper, too.
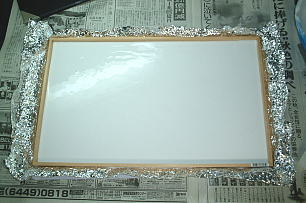
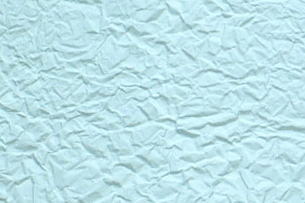
 Now comes the fun part: making the sea surface. A piece of kitchen aluminium foil is wrinkled thoroughly, and then stretched on a flat surface. Then, a wooden frame the size of the base is placed on top of it. The frame and the foil together form a mould for the sea surface.

For moulding, I use fine-grade plaster of Paris. It is blended with water as per instructions and poured into the frame. As plaster is quite brittle, I usually reinforce the mould by adding a cotton gauze on top of the poured liquid. Adding an additional layer of plaster over it can help to blended the gauze invisibly into the moulding.
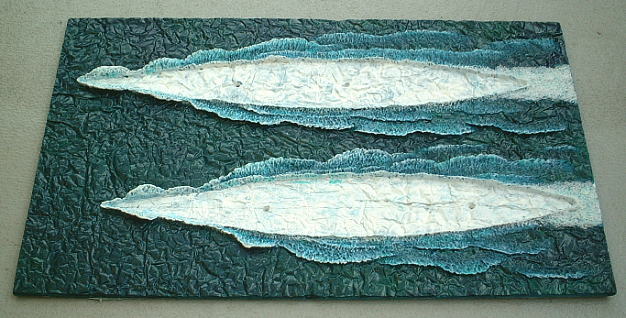
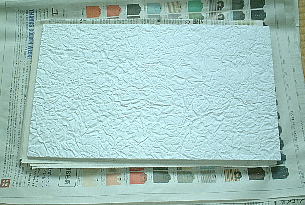
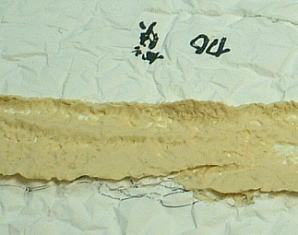
It takes about 30 minutes for the plaster to harden so that it can be removed from the frame. However, it is necessary to wait additional 3 days before it is completely cured. Flipping the mould to its “right” side, you will see the effect that the wrinkled foil had on the surface. It will replicate the multitude of short irregular waves caused by wind blowing over sea surface.
Step 2: Bow wave et al.
Now it is time to replicate the prominent waves caused by the ship’s movement in the water: the bow wave, wave pattern along the hull and the wake. These waves can be sculpted from epoxy putty.
The highest white-crested wave will surround the bow, usually with overhang on its top part. To maintain strength, I first model the “body” part of the wave, adding the top 1/3rd only after it has hardened. The shape of the wave is first formed with fingers, then the surface is sculpted using a spatula, see photos below.
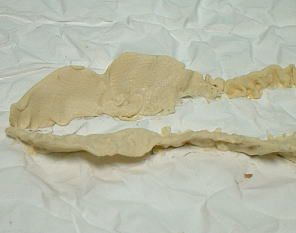
 The bow wave should be spreading into the fan shape towards the rear. The sides of the hull will also induce smaller waves along its length. It is helpful to draw the wave pattern on the plaster base with a pencil so that you ensure maintaining the uniform (but not symmetrical) look of the waves on both sides of the hull.
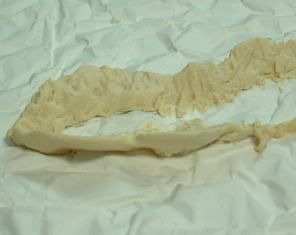
These waves can be modelled similarly to the bow wave, using the spatula to create crests and patches of foam. Be careful to work on a small area at a time – once the epoxy putty hardens, it becomes almost impossible to work with.
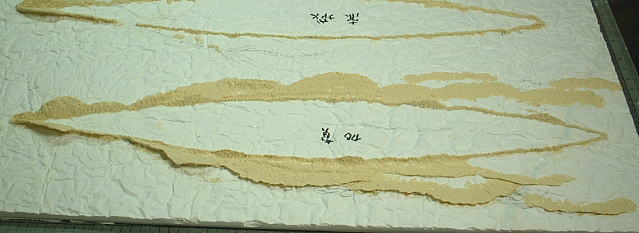
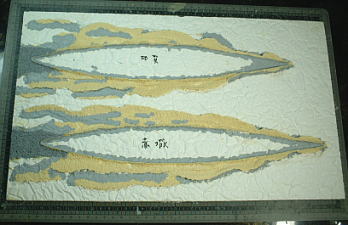
 The following photo shows the completed waterline of Kaga, with in-progress waterline of Akagi in the background.
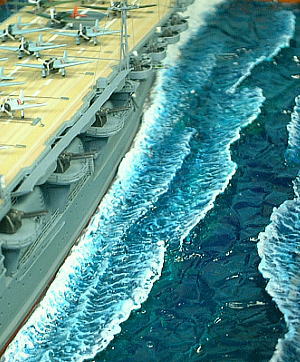
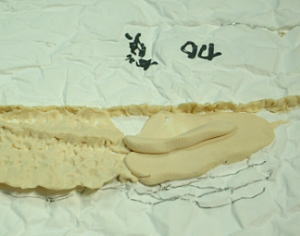
Step 3: The wake
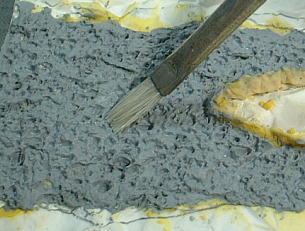
The wake of the fast-going ship is different from other waves on our base in that it its area will be almost completely covered with white foam. Switching to the ordinary thinner-based modelling putty, I apply a generous coat of it to the area behind the stern, and then mould the wake by poking it with toothpicks. Chances are that the surface structure obtained but this method is too rough, but it is easy to “soften” the effect by brushing thinner over it.

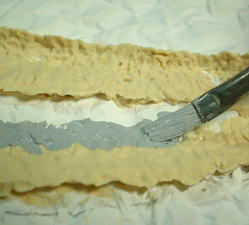
 To complete the waves, a coat of Gunze Mr. Surfacer 500 liquid putty is applied in selected areas to smooth out the edges between the epoxy putty and plaster.
 Step 4. Painting
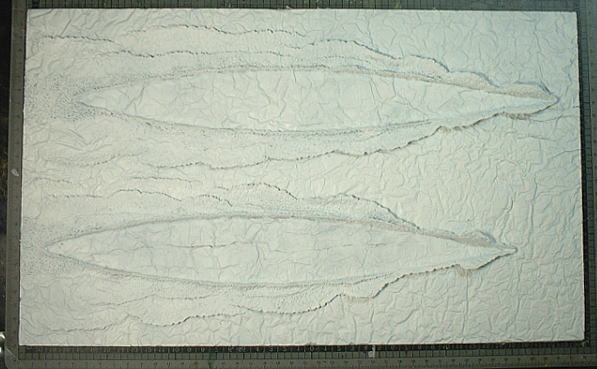
First I coat the entire base with white primer. It allows me to discover any remaining joint marks, fingerprints and other blemishes. If found, these are treated with liquid putty. The completed base prior to painting looks like this:
 Painting is a tricky problem. Replicating the softness of water in hard material is difficult, and it is all won or lost in the painting phase. Therefore I used to consider my options carefully and test all the steps before applying them “full-scale”. For the first attempt, it may be a good idea to produce a scrap plaster base alongside your main project to practice your painting techniques safely.
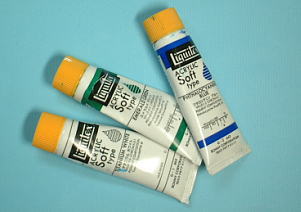
I use Loquitex acrylic soft type artists’ colours. Loquitex acrylics are very suitable for the purpose because they retain a rich “moistened” look when dry. The colours I used for the Kaga/Akagi base were Titanium White, Phthalocyanine Blue and Emerald Green.
 Another principal decision was the choice of a brush rather than airbrush. Brush painting is able to produce colour depth which is simply unobtainable by airbrush application – a fact well known to figure builders.
For the base colour of the Carrier Division base I used a mixture of Phthalocyanine Blue and Emerald Green. The colours were applied by brush and mixed directly on the surface of the base to create uneven rather than uniform colour.

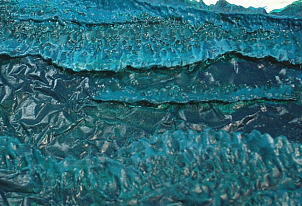 After covering the entire base, I returned to selected spots with more contrasting tones to add depth. First I went through trough (lowest) spots with the darker tone of blue. Then the wave crests were brushed with progressively brighter shades, creating gentle gradation of colour from dark to light.
Loquitex acrylics dry to a matt finish, which is inappropriate for the glossy sea surface. Therefore the entire base was spray-painted with gloss clear varnish at this point.
Step 5. Finishing
At this point your sea should already look quite convincing . But bear with me, it can be made so much better by adding the final step – painting of the wave crests. It does just as much to enliven the sea surface as “weathering” does to models in general.
The idea is to suggest patches of white foam at the wave crests, and this is best done with dry-brushing. You should start with a mixture of your base colour and white, and progressively add more white in the consecutive dry-brushing passes. I have used four different shades for my base shown here. The result after the 4th shade of blue is shown on the second photo below.
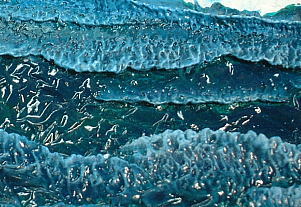
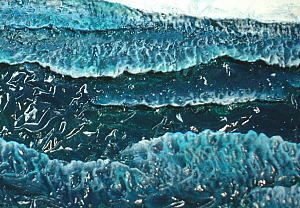 The last touch is the application of pure Titanium White on the brim of each wave. You should take care to vary the quantity of white depending on the size of each wave – the largest ones with pronounced brims should get more foam than the smaller waves. The effect is shown on the right photograph.
The massive amounts of white foam in the wake area should be emphasized even more. My method is to coat the wake area with diluted white glue and then sprinkle on the white snow powder used for diorama models.
Another few coats of clear gloss varnish and the base is finished. The complete item is shown below, with pre-drilled holes for screws attaching the models. I hope that you will agree that the result is a quite realistic rendition of an open sea swept by keen wind!