
![]()
THERE IS AN UPDATED VERSION OF THIS ARTICLE FOR FEBRUARY 2022 USING HANDBRAKE VERSION 1.5.1 HERE
This is a simple easy guide on how to make the best encodes with the smallest file size in Handbrake without having to know or understand all of the settings. Just copy my settings and you’re done!
**NOTE** – These settings are for DVD Video ONLY – You can find a Blu Ray Tutorial HERE.
Video encoding is a topic a lot of people are very passionate about. Factors like TV size, Viewing distance, hardware, drive space restrictions and a plethora of other concerns are all valid. But if you are like me, and just want to reduce your episodes to a more manageable size, whilst retaining most of the quality, here’s how to do it.
PLEASE NOTE – This method will produce very nice quality videos, that will look good on 1080p TV’s, but may take 2 hours or more to process each hour of video, so my advice is to let it run whilst you are sleeping each night.
Once you have ripped your Disks to MKV files with Make MKV, Open Handbrake (You can download the latest version for free HERE) then press the source button and select the file you want to convert, or if you want to do a batch of files, select the folder that contains all of your ripped MKV’s. Handbrake will import them all, but you will only see the first one. Now it’s time to make some adjustments to the settings.
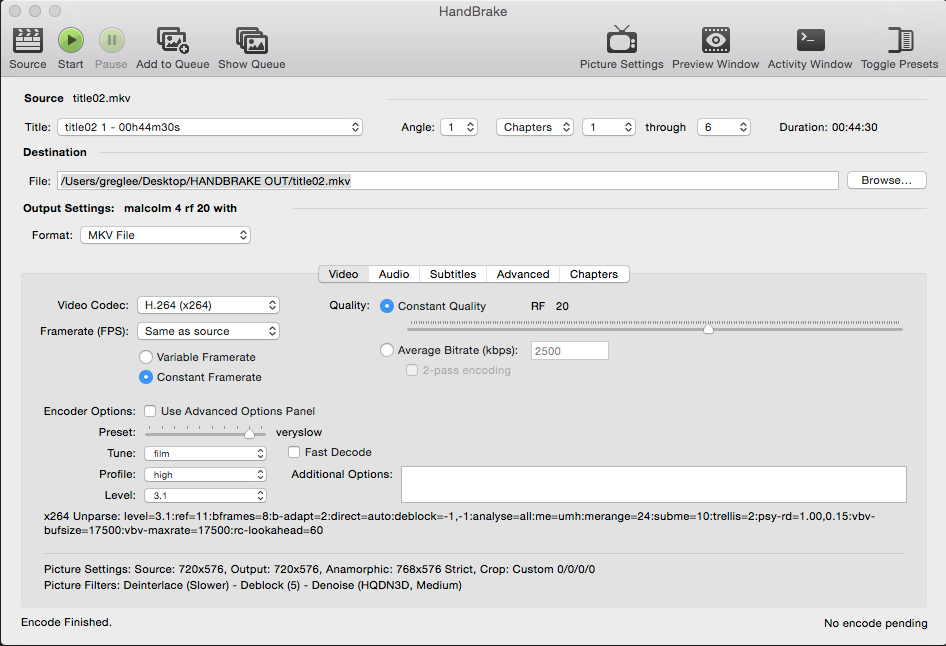
All of your settings should look like the above screen grab – Click it to enlarge.
1. Set the output format to MKV File
2. Click the button that says “Video”. Make sure the video codec is H.264 (x264)
3. The frame rate should be “Same as Source” and Constant Framerate should be selected.
4. Check Constant Quality and adjust the slider until the RF number goes to 20
5. For the encoder options, slide the preset slider to Very Slow. Trust me, it takes a while, but the quality is far superior, and usually yields a smaller file size. Unfortunately it is a trade off for speed vs quality. Like I said, run it while you are sleeping.
6. Leave “Fast Decode” unchecked.
7. Set Tune to Film
8. Set Profile to High
9. Set Level to 3.1
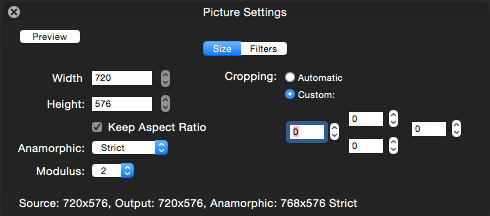
10. Now click the “Picture Settings” button in the top right side of the window.
![]() A new window will open. Change all of your settings look like this
A new window will open. Change all of your settings look like this
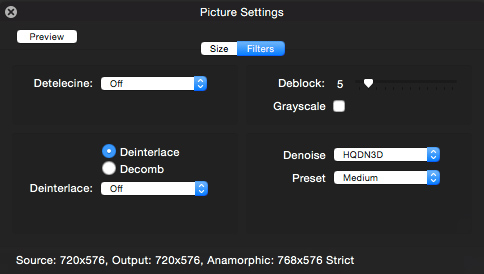
 11. Whilst in the picture settings window, click “Filters” and change all of your settings to look like these as well. Denoise and Deblock will make the picture look SO much better when viewed on larger 1080p TVs.
 **If you are in the USA you can skip this step, but for the rest of us, we need to know if our video is progressive or interlaced (the method used to draw each frame of video)**
If your video is progressive, you can skip this step, but if it is interlace, you will definitely want to de-interlace the video before you watch it on a 1080 screen, otherwise you will see all kinds of ugly horizontal lines in fast moving scenes like the image below.
 (If you dont know whether your video is interlaced or progressive, Mac users can use Video Spec to find out, and Windows users can use G-Spot to find out)
If your video is interlaced, make sure “Deinterlace” is checked and select “Slower” for best results.

12. Now you can close out the Picture Settings window and select the “Audio” tab in the main window.
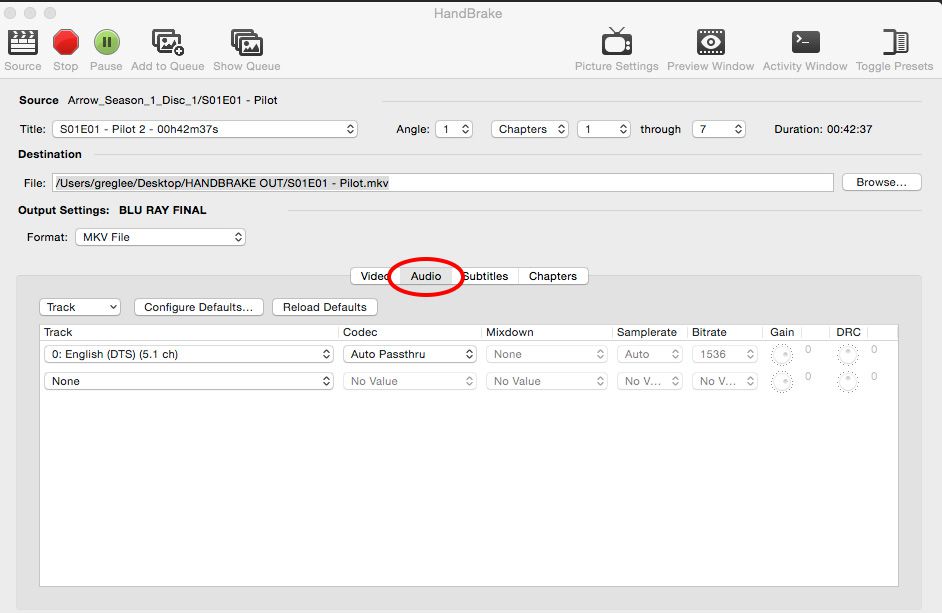 I am a real Audiofile, I love the Dolby Digital and DTS 5-7 channel audio tracks in movies, so I select “Auto PassThru”. But, if regular 2 channel Stereo is ok for you, you can configure that in this area if you want. I figure you are converting a DVD, so you might as well have the best sound quality available. Just select the Dolby Digital or DTS sound track from the drop down window, and choose “Auto Passthru”
13. Click the “Subtitles” tab and select none
14. Click the “Chapters” tab and make sure “Create Chapter Markers” is un-checked.
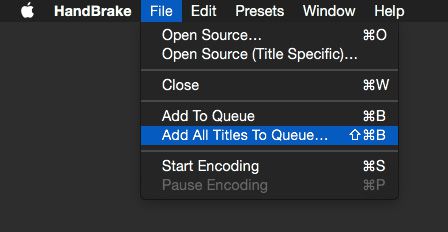
15. You are now ready to start encoding. If you are only doing one file, just press the “Start” button and Handbrake will start encoding. If you are doing a batch of files, open the File Menu and select “Add All Titles To Queue”
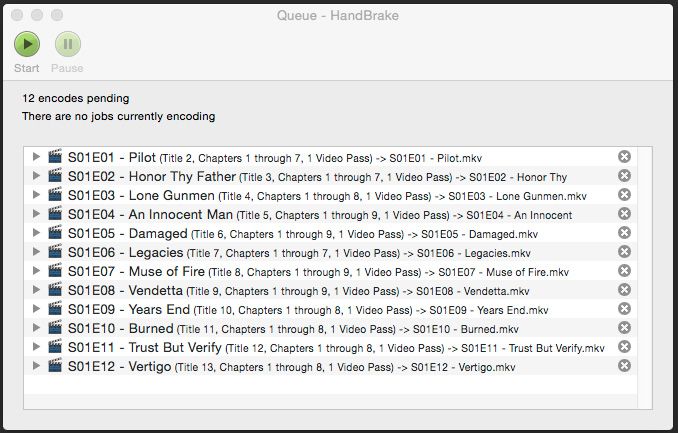
 16. Press the “Show Queue” button to see all your files waiting to be encoded
 17. Press the “Start” button and your encoding session will begin.
THERE IS AN UPDATED VERSION OF THIS ARTICLE FOR FEBRUARY 2022 USING HANDBRAKE VERSION 1.5.1 HERE
what version is this?
It is Version 0.10.0 x86_64 (2014112200) running on a Mac Pro
Tried this settings on a Macbook Pro on a DVD of Gandhi. Movie is 3 just over 3 hours. Encoding will take 13 hours.
Hi Jeff, Thanks for commenting. As I wrote after the green words that say PLEASE NOTE,
2 hours OR MORE for each hour of video! That is why I suggested to run it at night while you are asleep. Time Vs Quality is a sliding “trade-off” scale in video encoding. Faster encodes equal degraded quality, slower encodes gives your computer time to produce a better result.
What is the best setting for Kindle Fire hdx. Every time i decode now i dont get a full screen of the movie. Bars on top and bottom
I am starting from ISO files and using windows. I usually output to M4V. Is MKV a Mac output? Will all of your settings with the exception of M4V be good? What would be the difference? Also, will this output work okay on android/apple tablets?
Thanks!
Hi Jason. These settings are designed for optimum playback on a 1080 HD TV, and probably wont work very well on your Kindle. I dont have a Kindle so very hard for me to recommend settings. Have you tried looking on some Kindle specific forums for more info?
Hi Kevin. Like I said to Jason, these settings are optimised for 1080, so the filesizes may be unmanageable on handheld devices. MKV is not really just a Mac format, it will play on most systems if you have the right player. I would recommend MP4 for your handheld devices as it is a bit more universal.
Question,
When opening the picture setting I had another Height and Width as well as cropping. compared to the guide above. Tried to change to exact setting according to guide but it looked like I couldn’t change the height and width setting. When you write change “the settings” to the guides values does that included also height width or was it just the deblock denoise you ment?
Hi Gustav, The size is set automatically in relation to the source file. You do not need to worry about matching those numbers.
Works Great excellent output! just curious whats the out come if we cropped out the black bars?
Hi. I don’t understand the very first instruction (“Once you have ripped your Disks to MKV files with Make MKV, Open Handbrake”). Surely you’d just load the VOB files directly into Handbrake?
Also, with an old 4:3 movie on DVD am I correct in saying that Anamorphic may be set to ‘None’?
Kind regards
Alex – the program “MakeMKV” will rip the movie / tv episodes from the DVD as multiple VOB files into a single MKV file – but it is a 1:1 copy, so does not compress it. Handbrake compresses the video and audio still into MKV(or MP4) format so it is smaller.
Hi gizmomelb. Yes, I understand that. But why load a ‘1:1 copy’ into Handbrake when you can just load the original VOB files from the DVD? Handbrake can handle multiple VOBs…
In most cases the vob files would be locked. Makemkv strips out the copy protection.
Ah, fair enough. I’ve got a ‘special’ dll file in my Handbrake folder that gets round that. It’s easily found…
Any particular reason you recommend .mkv over .mp4?
Habit and previous experiences with my system. I personally get good results and less playback issues with MKV. Some people who stream may get better results with MP4. Just my personal preference.
You say that Video Spec will tell you if the video is progressive or interlaced. Just ran Video Spec and I did not see anything there that would tell me that. Looked on the Video Spec website, too, and nothing there as well. So how does Video Spec tell you progressive or interlaced? Thank you.
It’s There!
Hi Greg, First of all – thank you! This is an awesome guide. I’m really new to all of this and I’m an actor trying to rip DVDs of student films and theater work so I can put together a demo reel. I was wondering what settings you would recommend using if I want to retain quality but for playback on computers/mobile devices. I will be uploading things to either YouTube or Vimeo, and I noticed YouTube does not support mkv, so, I converted in VLC to MP4 and from what I can tell it’s ok, but I wonder if there is another way to do all of this. Thanks again!
Hi Juan, For optimised playback on mobile devices your best choice is something like “Any Video Converter” (Free for Mac and Windows) – It has built in profiles to suit most devices. You just drop your source file into it, select the profile for the devices you want it to output for, and it will do the rest. I think it even has a optimised profile for Youtube as well. You can download it HERE.
Just trans-coded my Star Wars DVD set using H.264 encoding in a MKV wrapper according to this article. Very pleased, looks great for SD, with a small file size of 1-1.3 each. Very good guide.
Now on to my Blu Ray collection and your other article. Did one already, Tomorrowland, took one of my older PCs over a day but approx 30GB file ripped from a DVDFab9 file to a 10.2GB file. Looks great and can now watch from a modest network file server now. Looks like my Ubuntu PC with a Core i3 will do it much faster.
Thanks a lot
I’m ripping my DVD set of an old 80’s show so I can bring it with me when traveling. I want to be able to watch it on my HD laptop screen as well as on an android tab. Are these settings suitable for that purpose or would you suggest any changes?
I personally would stick with these options – I created them with HD viewing in mind
I forgot to say thank you for the guide. I’m doing the first season and it’s roughly working it minute for minute, so it’s taken about 11 hours to encode 22x25mins of video. Not bad at all in my opinion. So a big thank you for this guide, especially appreciated the deinterlacing thing as it made the video that much more watchable.
Do you just use the default settings in MakeMKV when doing your 1:1 version prior to compressing or do you make an tweaks there too?
Hi Kykk – Glad the settings work well for you!
Hi J-Bird, Yes, I just use the defaults. I’m sure some things could probably be tweaked to improve performance, but at this stage it is working for me and have had no real need to delve deeper.
Thanks for the fantastic walkthrough. Would like to add a comment noting that video encoding is highly CPU dependent — if you are still running an old processor these settings are likely to be unbearably slow if you do a lot of ripping and encoding.
As a point of comparison, I’m running a new system with a i7 6700k at 4.5 gHz and each minute of encode using these exact setitngs takes about 30 seconds. There is obviously some variability depending on what you are encoding but this is one instance where processing power makes a significant difference.
hey thanks so much for posting this incredibly helpful information. No way I’d figure this out by myself.
I wonder if I’m doing something wrong: I just copied a 100 minute movie in just under an hour using my 3 year old iMac.
“Once you have ripped your Disks to MKV files with Make MKV, Open Handbrake (You can download the latest version for free HERE) then press the source button and select the file you want to convert, or if you want to do a batch of files, select the folder that contains all of your ripped MKV’s.”
So how do you rip your disks to MKV files? I put the DVD in my computer drive, clicked on “source” and selected the DVD. Is that not correct?
I wouldn’t just skip past the subtitles. At least check the forced only box or you’ll loose foreign translations.
hi greg, thank you for the help. if i am going to use mp4 will the quality still be better with your settings instead of default?
After having configured all of the settings, I found it useful to save them as a new preset (Preset Menu->New Preset).
I’m in the USA and my DVD is standard NTSC 720×480 What should I set picture size, anamorphic and modulus to? I tried some test encodes and the person on the DVD looks squished vertically so I’m not sure what I’m supposed to do…
Hi Nick, yes, the quality will be better, and file size will be smaller than if you use the default hi def profile.
Hi Ted, Great idea to make a preset once done! Thanks for contributing that tip!
Hi Mike, Regarding size, I think I need to modify the post as it is a bit misleading. I generally leave the width and height alone, and exactly as they come up as once I load the source video file, and I also leave “keep aspect ratio” checked. Leaving those numbers alone in combination with keeping cropping values at zero, and the anamorphic value “strict” should give you the same frame size and ratio as the source file.
Greg, actually no, I found the best size setting is 656×480 with the aspect ratio unchecked. I was finding that people looked vertically squished if I left the aspect ratio on.
Mike – Did your source file looked squished, or was it only after the Handbrake conversion?
The source file was DVD video, i.e. 720×480 4:3. It looked fine on the DVD. Only after encoding with handbrake did the people look squished. After much research, I learned to set it to 656×480 and it fixes the problem. I don’t know why, but that’s what I’m going with for all the conversions I need to do…..
That’s weird. I’m wondering if the file is getting messed up during ripping? I will keep my eyes out for a solution. Thanks for sharing your experience.
I’m using DVD Decrypter to take the chapters off the DVD, then I edit the video in Vegas (fix audio and color correction stuff) and then frameserve to handbrake.
Hi Greg,
Why set subtitles to none? Once I do this, do I lose the ability to add subtitles?
Thanks so much for this guide. I’m curious both with Gordon’s question above, and why you prefer to remove any cropping. What is the purpose of removing the black bars?
Removing subtitles is a personal preference – I never use them so I remove them to reduce file size. If you use them, leave them in. Regarding cropping, I do it that way to preserve aspect ratio, and to have the image fill the screen. An argument could also be made that removing black bars can help reduce file size.
The reason for cropping is to reduce file size by not having to encode those areas. Any player will automatically put dark areas based on the screen size/aspect ratio being displayed on. The cropped video file has the picture size and video aspect ratio embedded in it so the players fill out the rest of the space on the screen with the black areas. This cropping will NOT fill the display screen unless the aspect ratio of the encoded cropped video is the same as the aspect ratio of the screen being displayed or you have the Fill/Zoom setting on in the play screen.
I am having issues getting makemkv to work. It is loading the disc and telling me its there but when I open the files to select the ones i need there is only one .ifo file I can select. All the others are listed just unelectable. Do you know how to fix/get around this? I have tried multiple dads and they are all the same. I am using a macbook air, with OS X El Captain.
Can you use all the settings you have made, and leave it as a .m4v file?
Great tutorial, thanks for sharing your settings / best practices!
Thanks a lot mate! I’ll make some test and start my work. You exactly resumed what I needed to know.