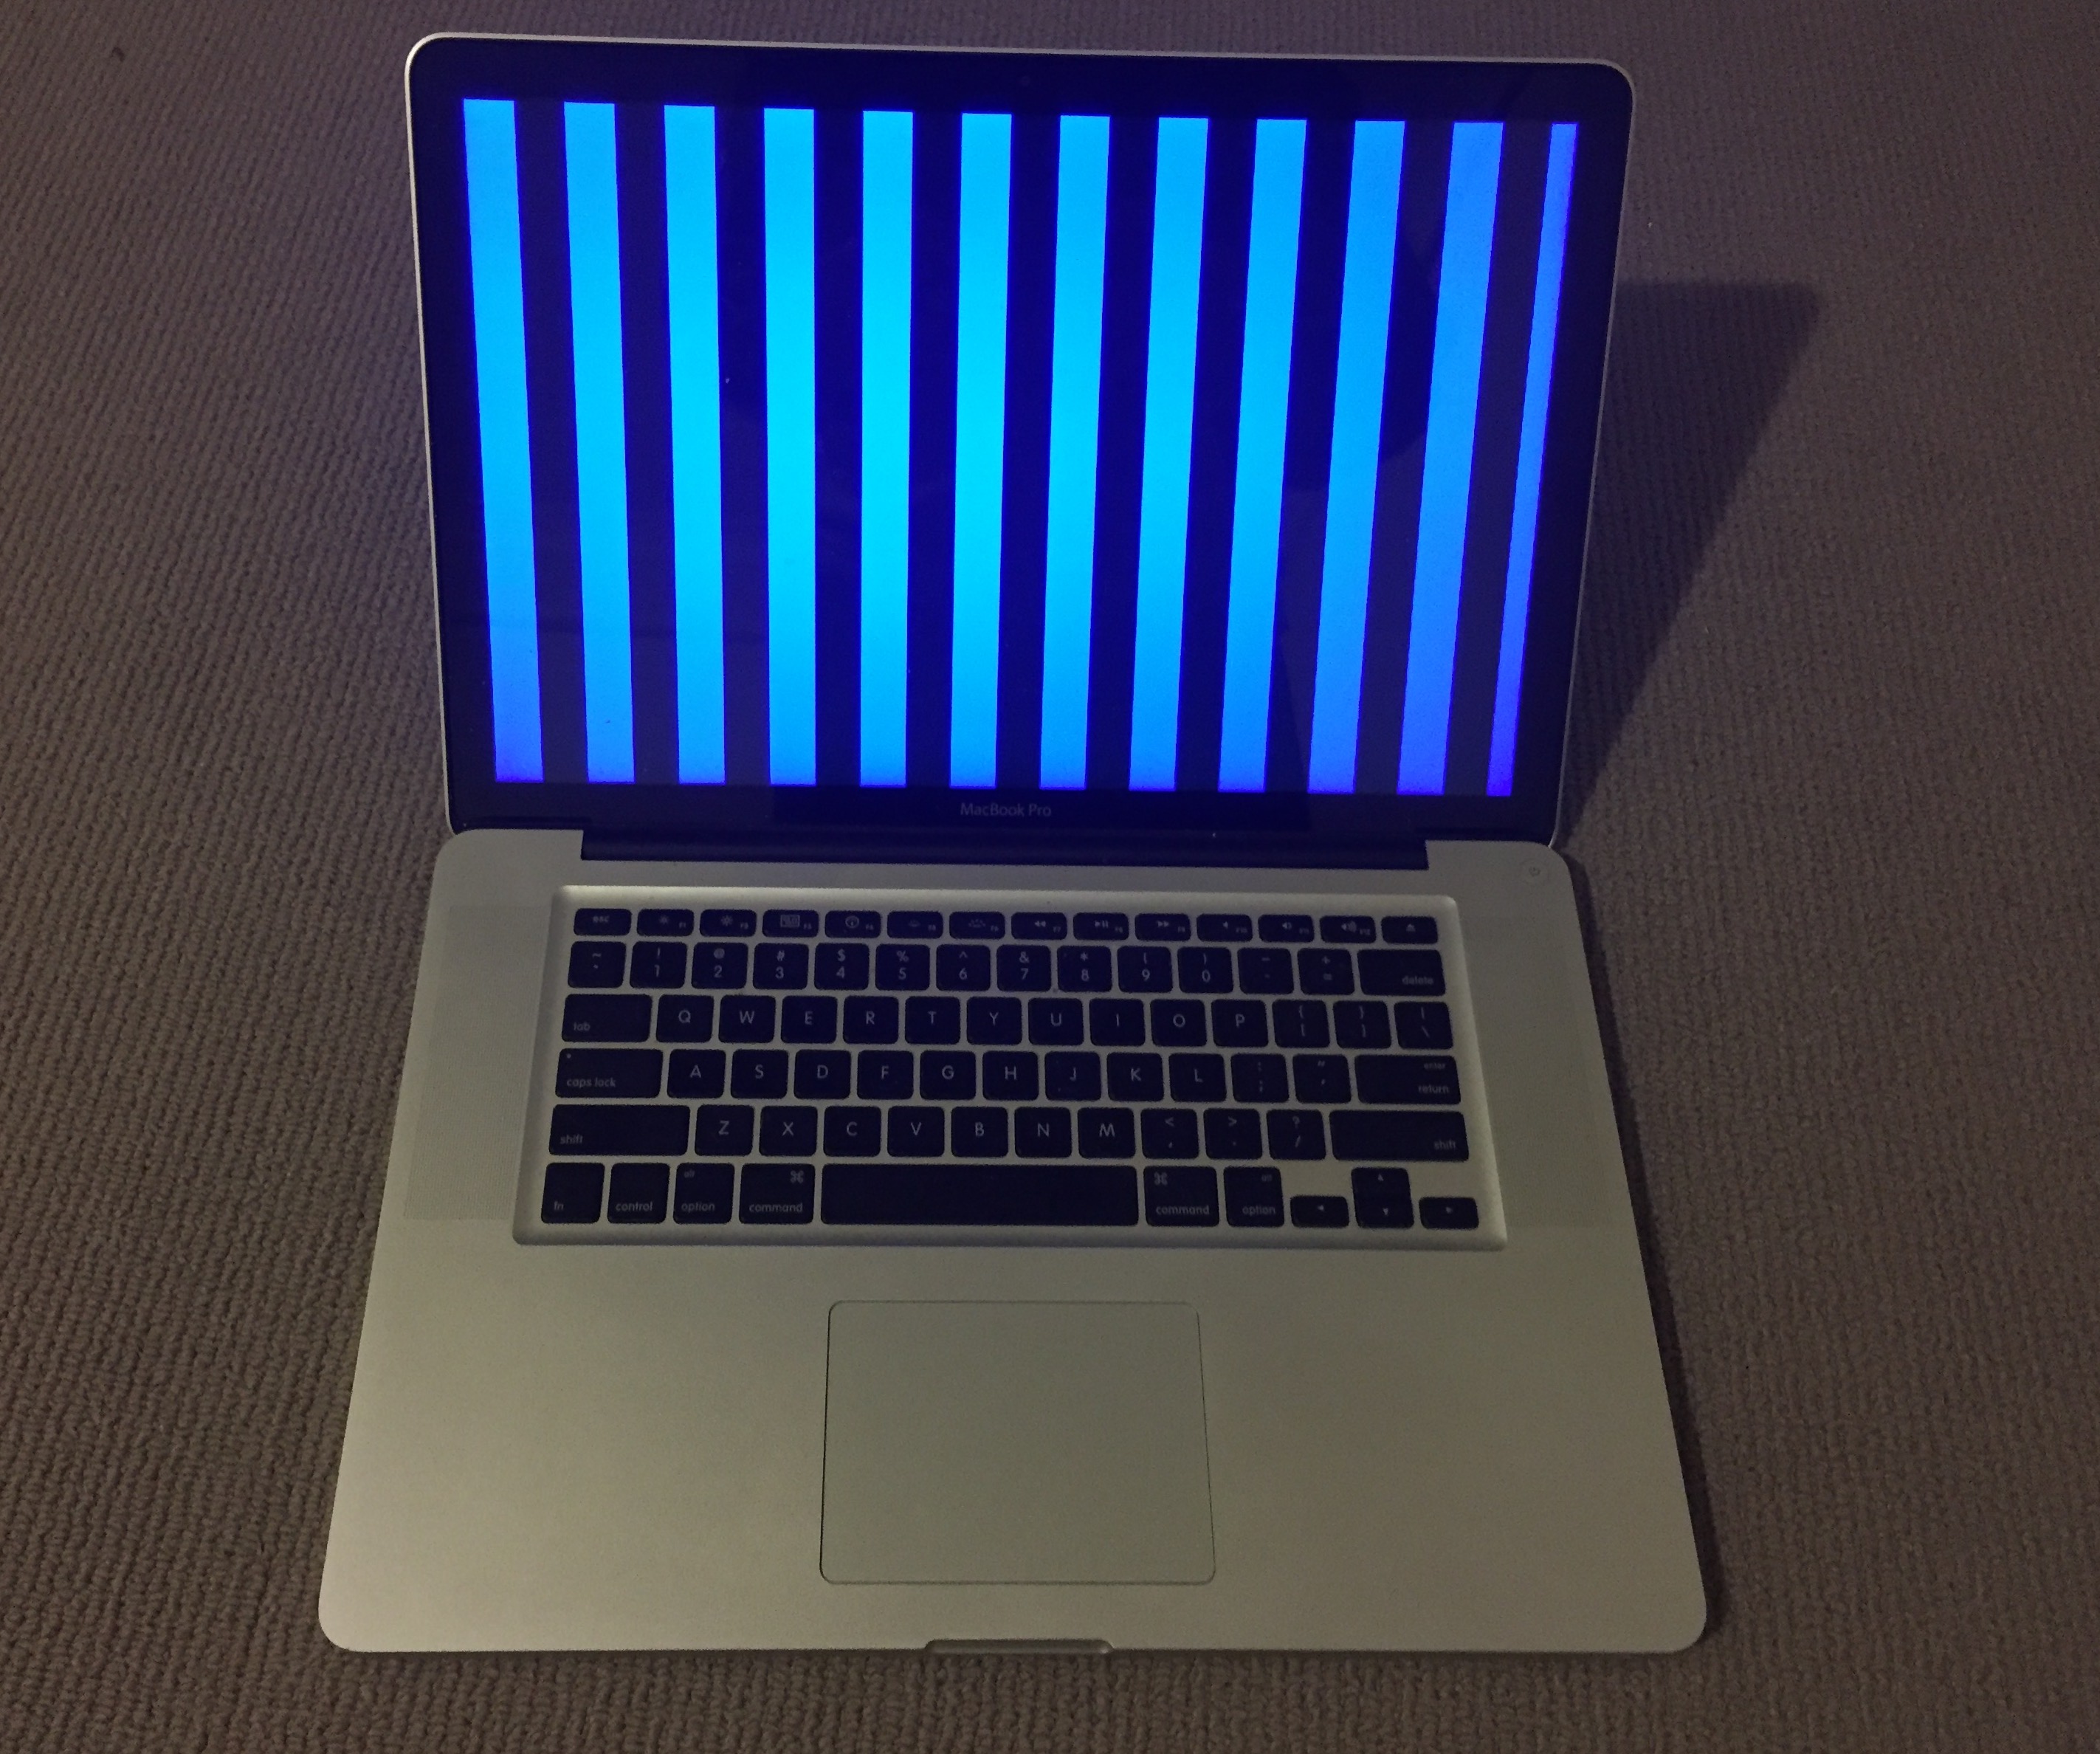
If you are reading this, there is a good chance it is because your 2011 Macbook Pro bit the dust big time, just like mine did. I paid over $3000 for it, and whilst it is 6 years old now I have grown incredibly fond of it, and I really wanted to revive it.
The problem stems from the Graphics Card. There are actually two graphics processors in these machines, the Discrete Card which is an ATI Radeon (This is the one that fails) and an Integrated one, which is an Intel Chip integrated into the motherboard. The reason Apple included two graphics processors is that the ATI Radeon is super fast, which is great for the gaming experience and video, and when you are working on spreadsheets or sending emails, the integrated Intel processor uses way less power and considerably increases battery life. The truth of the matter is, if you aren’t a gamer, the Integrated Intel Graphics Processor is just fine, and thankfully this chip is what allows you to get your machine up and running again.
**THIS HAS WORKED FOR ME – I HOPE IT WORKS FOR YOU, BUT I CANT GUARANTEE IT**
This is not a guaranteed permanent fix – But it has been working for me, and hopefully you experience similar results.
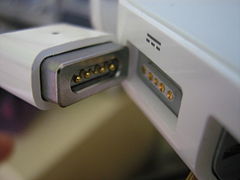
My machine kept crashing not long after it would boot, which made it impossible to work on, until I found out that if you don’t have it plugged in to the power, it should boot using the integrated graphics. When its plugged in the power hungry faulty card is used, so disconnect from power.
Disconnect The Power
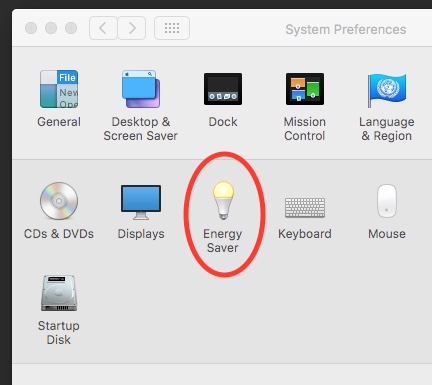
Once you get it booted go into system preferences and look for “Energy Options”
There are plenty of articles on the internet that provide you with many ways you can attempt to reclaim data from a dead or dying hard drive. Everything from putting the platters in a new drive casing to bagging the drive up and placing it in the freezer for 20 minutes. These all seem to be fairly extreme measures to me, so here’s a quick tip I have discovered recently by accident which may help.
I have a number of old drives I have been using as storage, and I recently needed to access a file on one, and when I plugged the drive into my USB dock it spun up but would not mount. I re-tried several times and it refused to load. Needless to say I was pretty unhappy. I kept coming back to it over the next few days, trying again and again, hoping it would mount so I could “just get that one file”. A few weeks later, whilst having a clean up, I decided to give it one more try and if it didn’t work, I was going to throw it away.
I plugged the drive in, it spun up, and again it refused to mount. At this point I was called away quiet urgently, and I left with the drive plugged in and turn on. After about 4-5 hrs I returned, and found the drive had some heat in it. Wondering if this might yield a result I switched off the drive, then switched it on again, and it mounted, and I was able to get the file!
I seized the opportunity to copy off all the other data on the drive, and then I started to wonder…
I had two other drives that I had deemed dead in the past, so I plugged those in and left them to warm for a few hours. After restarting them, both of them mounted as well. One mounted and appeared to work well, but the other mounted just long enough for me to drag a few files off, and then it ejected itself again. In the week or so since, I have been able to reconnect and use two of the three drives normally.
I’m wondering if tarnish might have built up on the read/write head over the period when it was not in use, and a little bit of heat might have been all it took to break it down enough for it to be able to read again? Either way, if your drive spins up but wont initialize, this method might be well worth trying before you take extreme action.
Over time I have sent a lot of email from my iPhone, and it seems like iOS4/5 remembers every one of them fondly. As soon as I start typing an address it offers me a list of all of those email addresses that I sent one email to 3 years ago, instead of the one I want, and use regularly. In this post I am going to show you how I cleared that list on my phone.
As you would expect, you need to download a third party app and hack into the bowls of your phone to do this. And if you do decide to do this, you do so at your own risk ok!
I found a program called iBackUpBot, which lets you modify a number of aspects of your iOS4/5 device. Its not a free program, but there is enough functionality in the trial version so you can clear your recent emails list though. There is a Windows and a Mac version, so the procedure will work on both systems. Download and install.
Once you have downloaded, plug your phone in, and open iTunes. The first thing you need to do is make a back up, because its the back up files you will be working on. To force a back up, Right click on your device in the iTunes side bar and select “Back Up” from the context menu.
Once the back up is complete, you can close out of iTunes, but leave your phone connected. Now open up iBackUpBot. You will need to select the back up file you just created (by device name, date and time) and click it. It will then start analyzing your back up file. Once it has finished analyzing you will see a whole bunch of entries appear on the right. Dont worry about these, as we wont be using them for this procedure. The next step is to select “Plug In” from the menu, and then select “Recent Email Addresses”.
You will be confronted with a window that prompts you to purchase the program, you can click the cancel button to make it go away. Once it disappears, a window called “Recent Email Address Viewer” will pop up and you will see the list of recent email addresses stored in your phones memory. You can now go through the list and delete the ones you don’t want to see any more, and keep the ones you do. Just click on the offending address then hit your delete key. Once your finished, click the “Close Database” icon to save your changes and close out the window.
Now it’s time to reload your modified file back to your phone. Click the “Restore Backup To iPhone” button to begin. You will have to click OK/Accept in a dialogue box, and it will take a little while, so be patient.
Once everything is finished, you can close iBackUpBot, disconnect your phone and try it out!
If your like me and run Windows on your Mac using VMWARE Fusion, you have probably been getting really frustrated lately at the blank black screen you see when you try to run your virtual machine. I haven’t found a permanent fix for this, and I hope the folks at VMWare are looking into it, but I have found a workaround, which has worked for me.
TRY THIS AT YOUR OWN RISK – I ACCEPT NO RESPONSIBILITY IF YOU BREAK SOMETHING – THIS IS MERELY A RECOUNT OF HOW I WAS ABLE TO RESOLVE THE ISSUE – YOUR RESULTS MAY BE VERY DIFFERENT!!!
I have performed this workaround not only on my Macbook Pro, but on my Mac Pro as well – it worked in both instances.
To begin, I went back to VMWare’s site HERE and re-downloaded VMWare Fusion 4 (I use the lite version without McAfee)
Once the download was complete, I mounted the .dmg and tried to simply drop the app icon onto the Applications Folder……..FAIL!
I cant stress enough, I accept NO responsibility if you try this and it fails for you ok!
At this point I opened up my Applications folder and dragged the VMWare app to the trash – I had to type in my admin password before the system allowed this. Initially I was worried that my license would get deleted as well, but I had a hunch the license would be stored elsewhere deeper in the bowels of my Mac, so I pressed on.
After the app was successfully moved to the trash, I was able to drag the VMWare logo from the .dmg into the Applications folder. Again, I was asked to type in my Admin password.
Once it had completed copying, I unmounted the .dmg, and clicked the icon in my dock to boot my Windows XP Virtual Machine. An alert popped up telling me that VMWare had to update some resources, and again I had to type my Admin password……………..AND THEN…..
LOOKIN GOOD……………….
YES! Back in the game!
Since I discovered this workaround about 10 days ago, my Mac Pro hasn’t skipped a beat. I updated my Macbook Pro last night with new iCloud features, and my Virtual Machine Black Screened again this morning. So I re-tried the work around for the creation of this article and It worked again for the second time.
I know its a pain to perform, but it did work for me, and if I have to choose between not using my Virtual Machine at all, or spending three minutes performing the workaround to get going again, I know what I would prefer to do.
Lets hope the folks at VMWare sort this one out soon!
I learned this week that “Automatic” often means “Crap” in the world of network auto negotiations – I have a new internet connection, and when I allow my modem to auto-negotiate a connection, it gets “taken for a fool” by my ISP. I guess the ISP want’s to stop me from using all of the bandwidth I pay for, so they “encourage” customers modems to auto negotiate a slower connection. Upon digging into my ADSL 2+ modems settings, I found that under the “Line Mode” option in the ADSL Parameters menu, I could FORCE my modem to negotiate the ADSL2+ connection I am paying for, instead of the slower standard generic ADSL profile my ISP sneakily seems to want the device to auto negotiate.
If your connection seems to be slow, check your ADSL Parameter settings and make sure your line mode is equivalent to the ADSL plan you are paying for.
As mentioned in THIS post, I bought a WD TV Live Hub unit a month ago, and I have been fairly happy with it so far. The premise/purpose of the unit is good, it is well featured in hardware, but the firmware/operating system is not as good as it could be, given the potential of the units hardware capabilities. I have found it to be slow, kinda clunky, and a bit frustrating when it comes to finding media quickly, as I have a large collection. The current version at time of writing is 2.07.17. Since purchasing the machine I have tried several versions of the firmware, and have settled/rolled back (using WD’s own rollback instructions and previous OS builds on the WD Firmware Rollback Page) to version 2.04.13, which in my opinion, and the WD Community opinion, seems to be the best offering so far.
Last week however, my 3 week old unit simply refused to boot. It didn’t work. I would press the power button on the remote and see the screen above, and then the unit would just turn itself off. I tried the using the power button on the unit, and it yielded the same result, automatic shut down after the loading screen. I was quiet enraged. My wife gathered up the units box, dug the receipt out, and was set to drive me back to the store to exchange the unit, when I proceeded to do what any grumpy male geek with a failing piece of technology would do – I took to it with a screwdriver, pried it open and voided the warranty!
I did learn a lot about this unit during this process though, and will share it with you now – and as always, I am sharing MY experience! Should you CHOOSE to try to replicate my experience with your device, and FAIL, it is completely your own fault, and I take no responsibility what so ever!
After Googling the symptoms, it appears that this is a VERY common problem with this unit, and the folks at WD refuse to acknowledge it as an issue. However, there is a VERY simple fix, but it does involve opening the unit. Inside the box is the main PCB (Printed Circuit Board), and there is a smaller PCB for the POWER button connected to the main PCB with a few wires. This seems odd for the power button to be on a different board, but it is a gift from god that it has been designed this way. It seems that something on the smaller power PCB, or perhaps the power button itself shorts/fails, hence as soon as you start the unit, the switch thinks its been pressed and it turns the unit off.
The cure, simply disconnect the smaller power button PCB. YES, you read correctly, just disconnect it! There is a power button on the remote you can use to switch the unit on and off anyways. The ironic part of this is that I actually found it harder to open the unit than disconnect the power button PCB. My first instinct was to crank on the thick chunky bit of plastic with the scallop shapes, but I soon learned that this was just an aesthetic, the actual lid is the thin piece above the groove in the aesthetic scallop bit.
To open the case, take your preferred case opening screwdriver and insert it between the thick bit and the thinner top panel at the back of the unit above the composite (yellow) video output.
Once you have made a gap you will see the fastening tabs that hold the lid on, and its just a matter of forcing the top upwards and gently pushing the fastening tabs towards the inside of the case. Below shows you the different types of tabs you will need to defeat to lift the lid.
Once you have the lid off, its a simple matter off locating the power button PCB, and the wires that join it to the main PCB. The power button PCB wires mount to the main PCB underneath, but the white terminal is easily visible, and requires little effort to disconnect. I just flicked it of with the screwdriver I used to open the case.
Once the wire is disconnected, you can re-fit the top panel, plug the box in again, and watch your unit boot back into that familiar home screen!
Now, if you want to win a prize (Charlie Sheen’s Tiger Blood), look closely at the photo’s in this article and be the first to comment with the reason why everybody who reads these articles should take extra special note of my disclaimers, and why Australian Geek Guys die younger than American Geeks!
We use cookies on our website to give you the most relevant experience by remembering your preferences and repeat visits. By clicking “Accept”, you consent to the use of ALL the cookies.
This website uses cookies to improve your experience while you navigate through the website. Out of these, the cookies that are categorized as necessary are stored on your browser as they are essential for the working of basic functionalities of the website. We also use third-party cookies that help us analyze and understand how you use this website. These cookies will be stored in your browser only with your consent. You also have the option to opt-out of these cookies. But opting out of some of these cookies may affect your browsing experience.
Necessary cookies are absolutely essential for the website to function properly. This category only includes cookies that ensures basic functionalities and security features of the website. These cookies do not store any personal information.
Any cookies that may not be particularly necessary for the website to function and is used specifically to collect user personal data via analytics, ads, other embedded contents are termed as non-necessary cookies. It is mandatory to procure user consent prior to running these cookies on your website.