The Webernets has been running a bit slow lately, so I started looking at ways to speed things up. I stumbled on an article on WPMUDEV titled “How To Massively Reduce Your Images For A Faster WordPress Site“, and I thought I would put it to the test. I downloaded my entire images folder from my server, and here are the beginning stats.
As I am using a Mac, I downloaded the free app recommended in the article called ImageOptim (The article recommended Caesium as a free alternative for Windows users). I was impressed to read on the download page that “ImageOptim is lossless — it compresses image files without changing pixels.”
Opening the program shows a pretty familiar looking window.
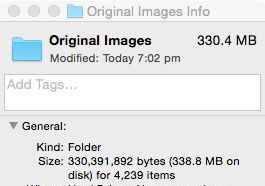
I dropped the whole folder in using the default settings and away it went. It took about 50 minutes, and here is the summary it displayed when finished.
And this is the specs on the folder from the finder.
63.9 MB saving is nothing to sneeze at, but I was interested to see if I could push it any further. In the settings, I found a “Quality” slider for Jpegs. By default, it is set to 100% hence the claim to lossless, So sliding it down to 80% will obviously reduce the quality and void the lossless claim, but is the trade off for file size justifiable?
With the Jpeg Quality Slider set to 80, I ran the program again on a copy of the original folder I made before the first optimization run. It took about 60 minutes this time, and here is the summary from the window footer
And here is how the Finder views the folder
110.5 MB Saving on a 330.4 MB original file size is impressive. That’s 1/3! I went through a number of files to check the quality, and even though there is a slight difference if you look hard, for the most part the quality is good.
Like many others, recently I have found I am unable to Add Media and Add Tags to my WordPress posts. The first thing I did was disable all of my plugins to make sure there wasn’t a conflict. In my cases there wasn’t, but its well worth trying this first. The next thing I did was switch my theme to the built in 2015 theme, and this fixed the problem. So I went to my normal theme creators web page and found that the theme had an update available, so I have downloaded and installed it this morning and everything is working fine again.
So in short, if you are having the same problem, try switching to another theme!
**NOTE** – THIS ARTICLE VERSION IS WRITTEN FOR MAC USERS – WINDOWS VERSION COMING SOON
PART 1 – Setting up MAMP (Experts Shortcut – Install MAMP and proceed to step 2)
If you have a WordPress Blog or Web Site, it can be VERY handy sometimes to be able to take your live published site and copy onto your local computer. This enables you to play with, set up and assess plugins, try out new themes and layouts, and generally mess with your site without affecting your real live site.
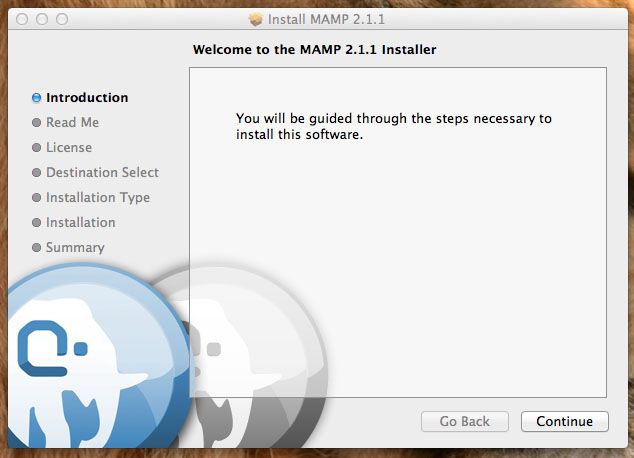
To get started you need to create an environment that will allow your site to function on your computer. The two main ingredients to a WordPress installation are PHP (web language) and SQL (Database). To get these two engines running on your computer you need to download some free software that installs them as part of a server. MAMP (Macintosh + Apache + MySQL + PHP) is excellant for this. It is available free from MAMP.info HERE. The free version and the paid version are bundled together, but for our purpose here, the free version will be fine, so lets go ahead and install that. Once you have downloaded MAMP, Unzip the zip file and run the installer package.
Click continue.
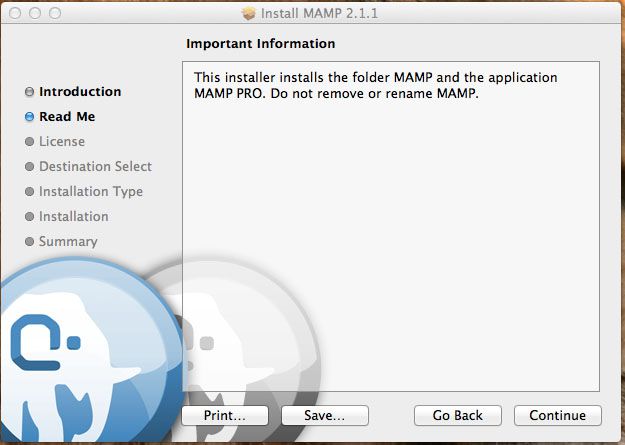
Click Continue.
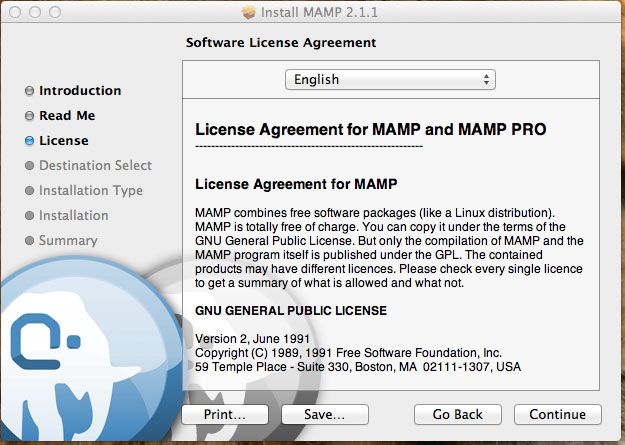
If you agree, click continue.
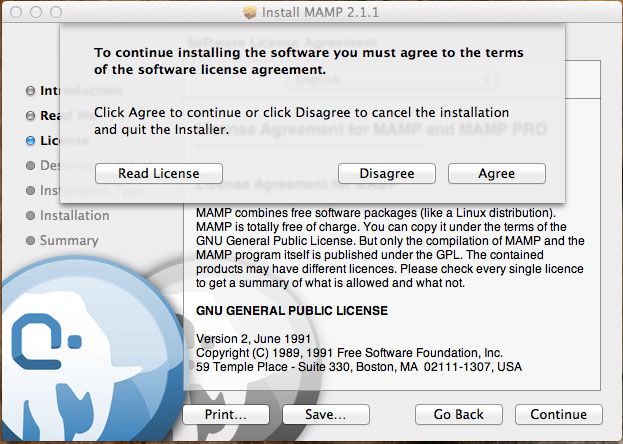
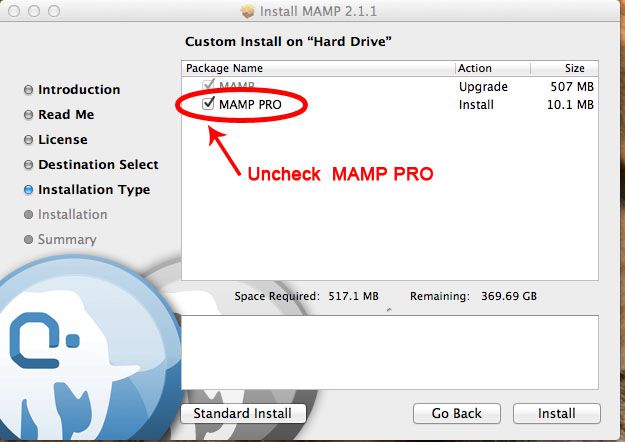
Confirm you Agree……click continue……And once you arrive at the screen below, we will tell the installer not to worry about MAMP PRO, and to just install MAMP Free. (If you want to try MAMP PRO free for 14 days, skip the following 2 steps).
Click the “Customize” button in the left.
Uncheck the “MAMP PRO” option.
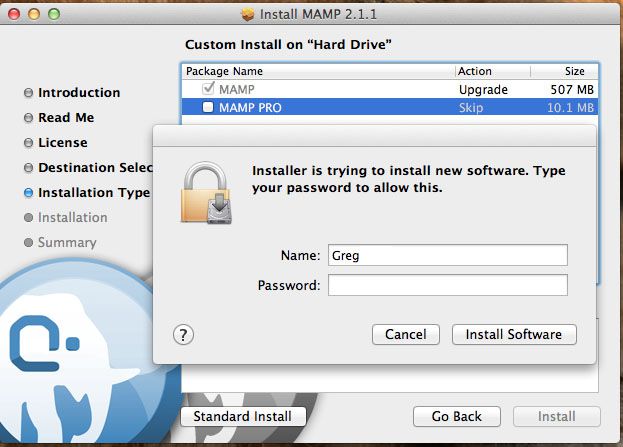
Type your password to allow the installer to run.
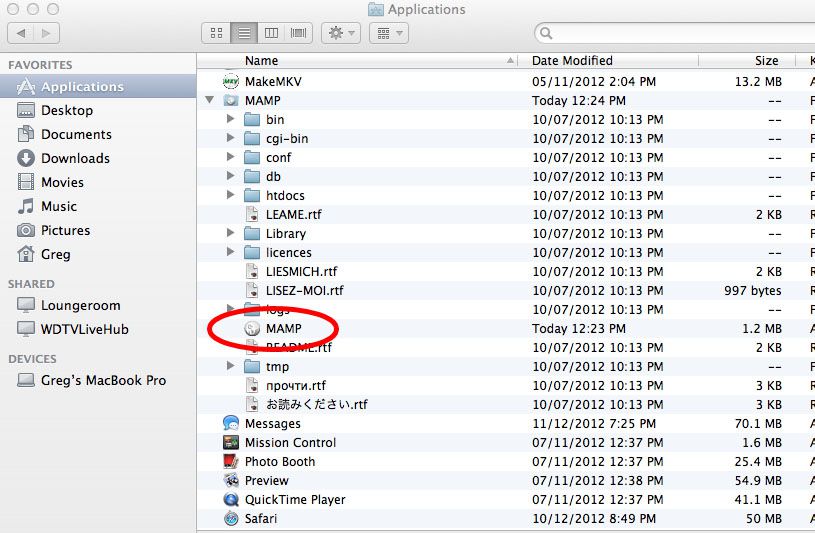
Once the installer has finished, click “Close” in the lower right hand corner. You can now open a new finder window, and in your Applications folder you will see a new folder called “MAMP”.
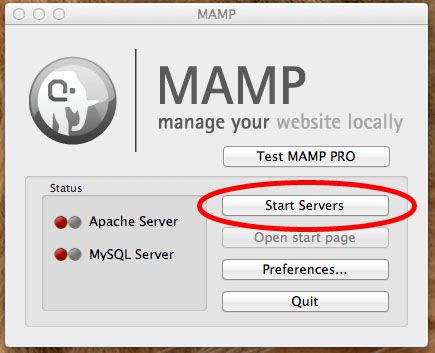
Double click the “MAMP” application to start it up.
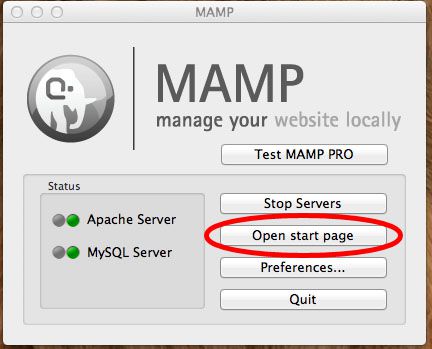
Now click the “Start Servers” button.
Once you have green lights, click “Open Start Page’. this will open your browser to a page that will tell you if all your services (IE PHP and SQL) are up and running on your machine.
WOOHOO! We’re ready to start copying our web site!
PART 2 – COPYING LIVE SITE
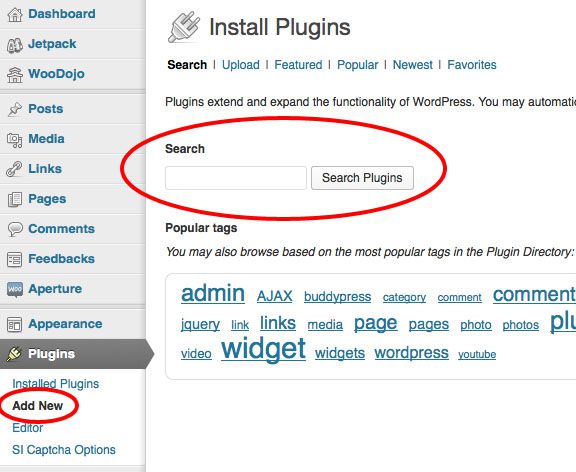
Its now time to copy over the files from the site we want to clone. To get started, log into that site, For this tutorial, I am going to use my Photography and Design site Gruffpuppy as an example. Once logged in, click “Plugins” and select “Add New”
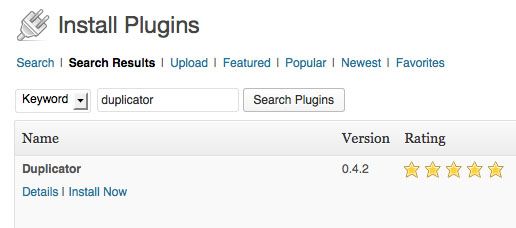
In the search field type “Duplicator”.
Once Duplicator is found, Install and then Activate the plugin.
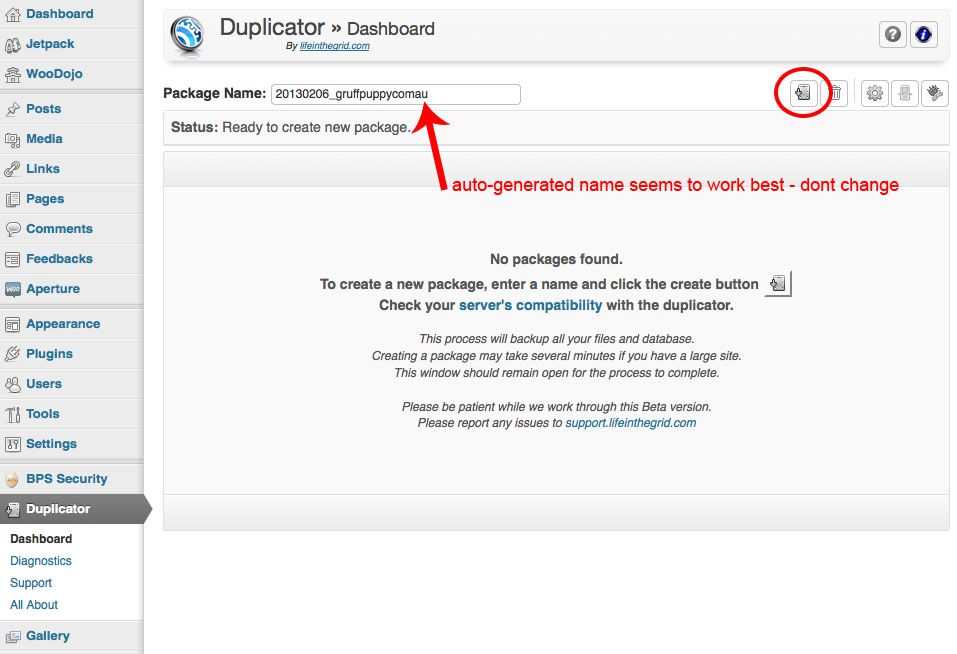
When activated a new item will appear in the Column Menu on the left side called “Duplicator”. Click it, and you will be brought to the main screen of the plugin. To begin downloading a copy of your live site, the Duplicator asks you to name the back up package. You can change the default name, but in my experience the default auto generated name that is already in there seems to work without error. If you are happy with the name, click the “Create” button, the first in the top right row.
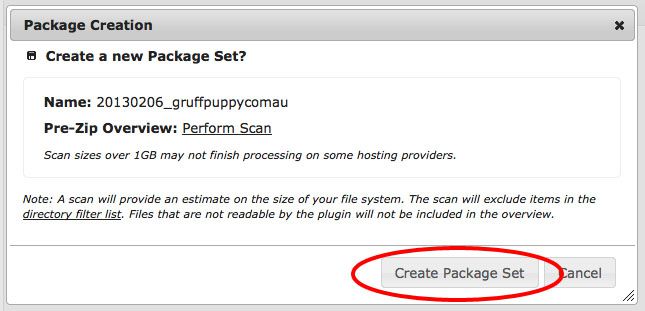
You will now be asked to confirm, and Duplicator will start compressing your entire site into a zip file, ready for download. This can take a while, so now is a good time to stretch your legs and get a drink. Once it has finished compressing, the screen will update automatically with your available downloads.
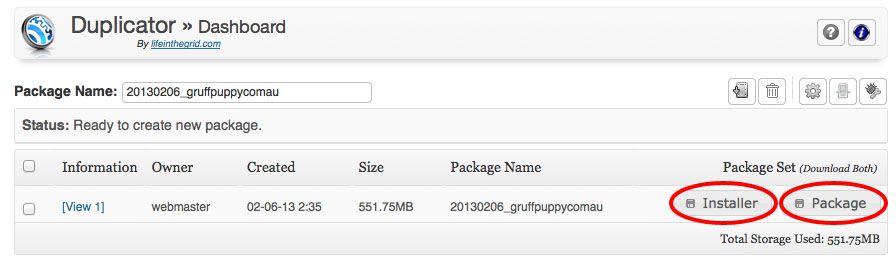
You will need to download both files (Installer and Package) to your desktop. If you have a large site, the package file can take some time to download. Once your files are downloaded, there’s one more small task.
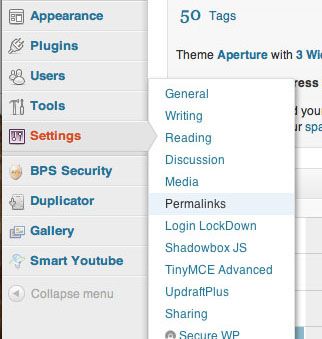
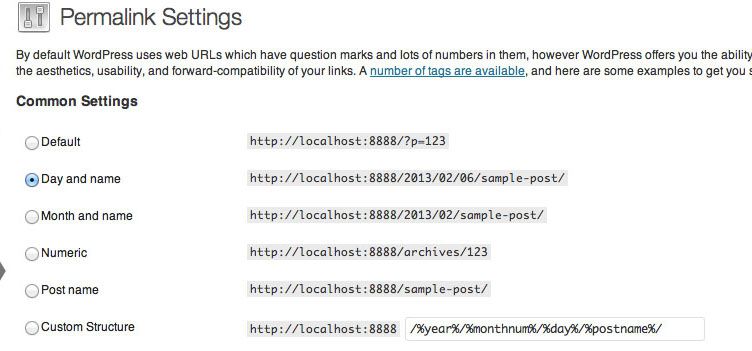
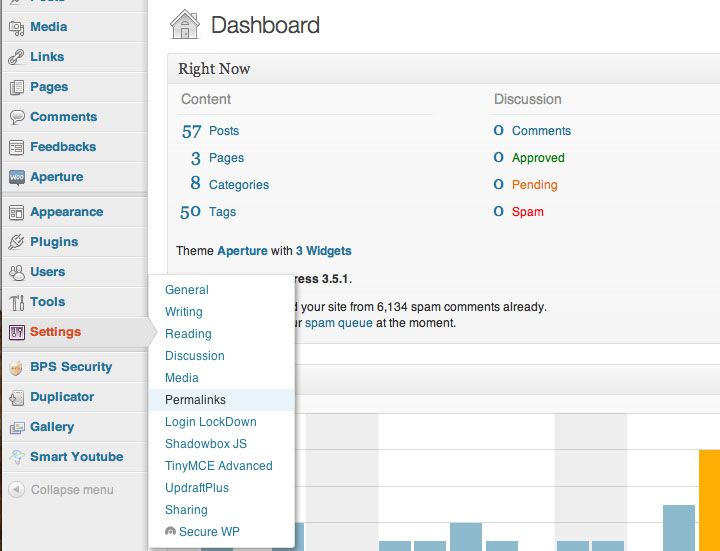
Select “Settings” from the column menu on the left and then “Permalinks”.
Although no action need be taken, It is important to take note of the setting. As you can see, mine is set to “Day and Name”, but yours could be different. We need to know this setting when we recreate and activate the copy/clone of our site later. Once you have written down or memorized your permalinks setting, you can log out of your site.
PART 3 – SETTING UP A DATABASE FOR YOUR CLONE
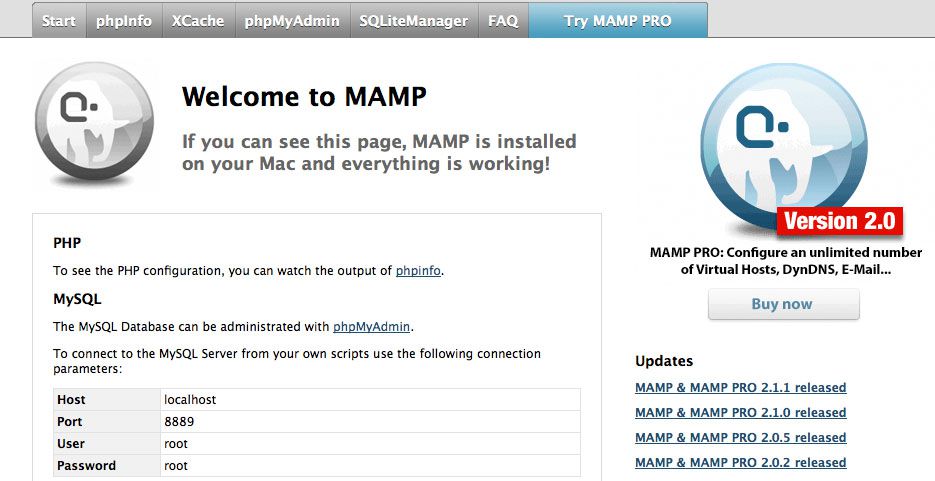
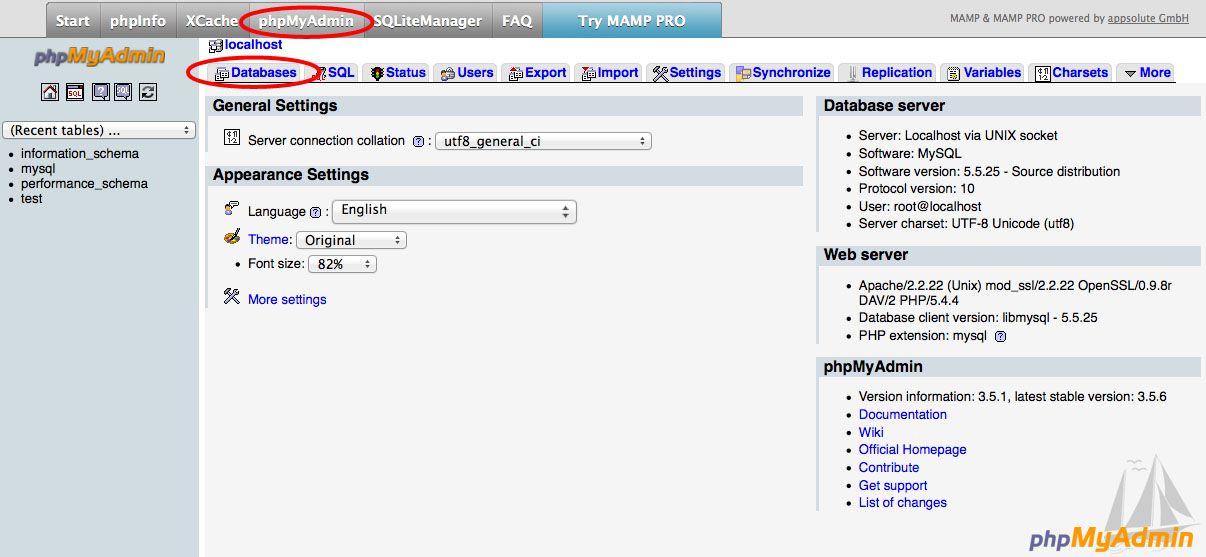
The next step is to set up a blank SQL database on your computer. With MAMP running, click the “Open Start Page” button again, and click “phpMyAdmin” from the top menu of the page that opens.
Now, click “Databases”.
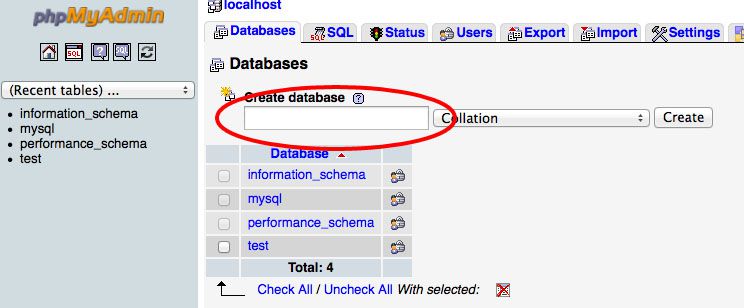
In the create databases field, type a name for the new database. It can be whatever you want, but it is important that you write it down, as we will need to use the name later. Im calling mine “gruffpuppy”, one word, all in lower case. Then click the “Create”. Once this is done, close out of the web browser window. There is no need to create “Users” for the database as we will use the root/default user account, which is automatically created for every database.
PART 4 – CREATE THE COPY/CLONE OF YOUR SITE
With MAMP still running, and your server active (Green Lights) , its time to move the files “Duplicator” created to your local server directory.
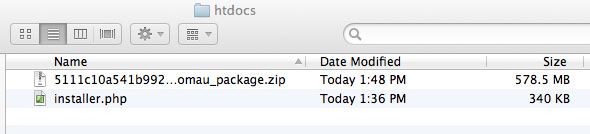
Open a new finder window, and go to “Applications”, open the “MAMP” folder, and then open “htdocs”.
Drop the zip folder and the “installer.php” file Duplicator created in and close the finder window.
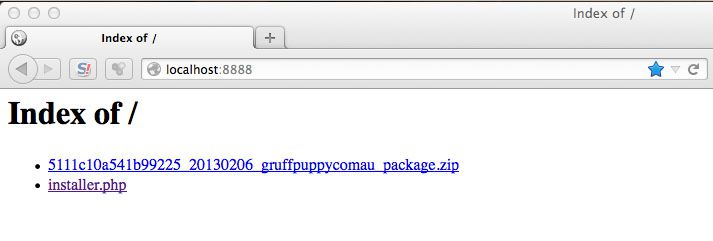
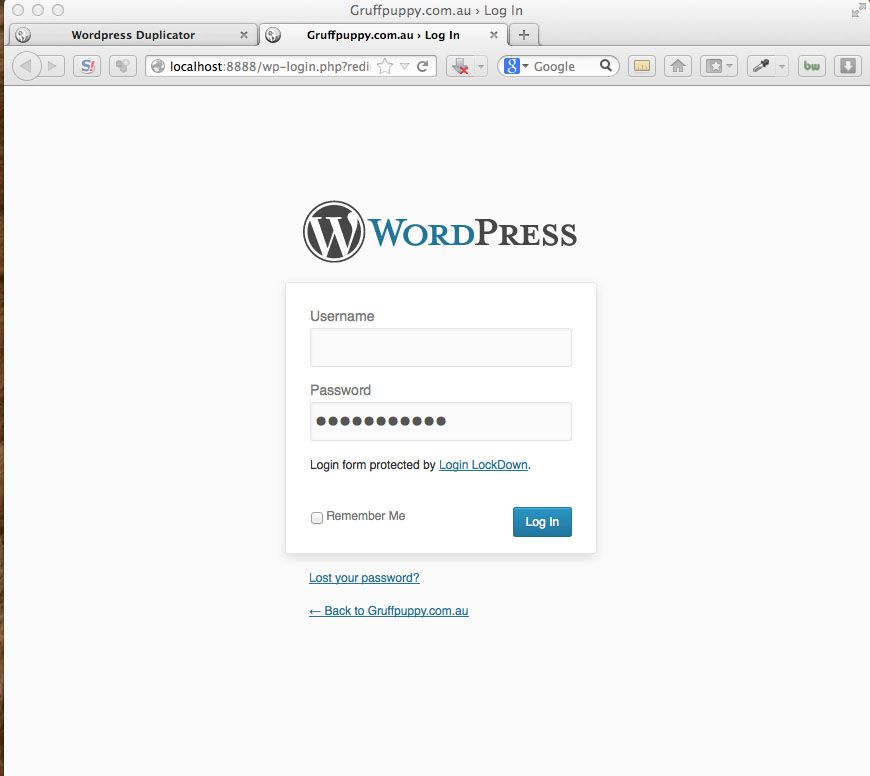
Open up your favorite web browser (For this tutorial I will be using Firefox, as there’s a little bug I want to show you, that doesn’t seem to appear in Safari) and in the address bar type “localhost:8888” and you will see a directory listing of your “htdocs” folder.
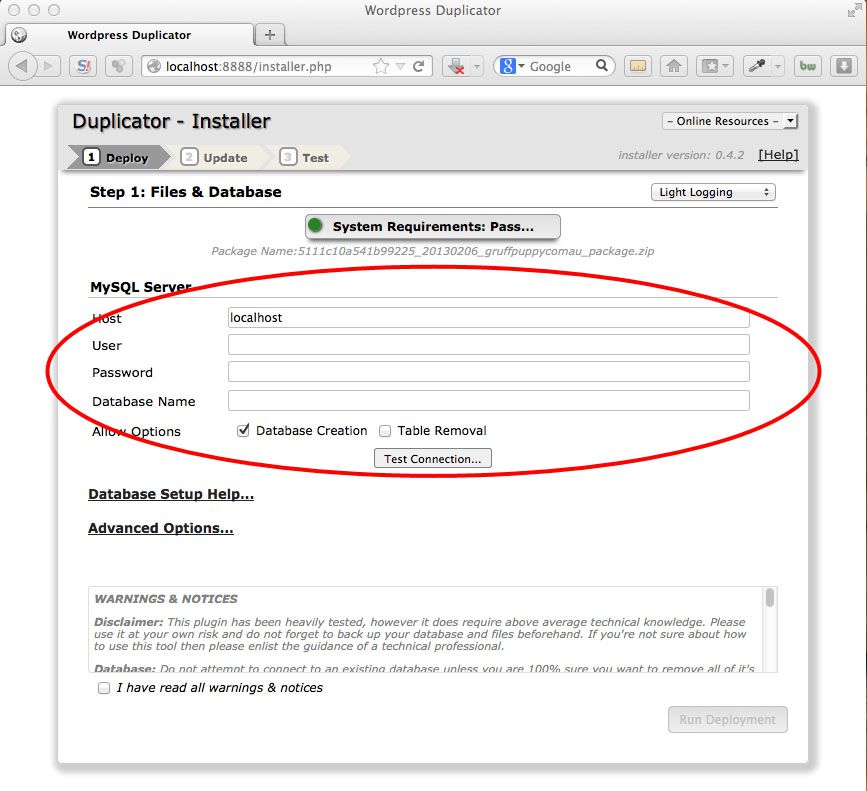
Double click the “installer.php” file and the Duplicator installer will open. YAY! This means your server is all working great, and you are viewing your first web page on your local server. Now it’s time to set up the database connection. In the MySQL Server area, leave “Host” set to localhost. in “User” type “root”, as we will be connecting using the automatically created user profile I mentioned earlier. In “Password” type the word “root” again, and for “Database Name” you need to type the name you specified earlier in phpMyAdmin. I used “gruffpuppy” so that’s what I am typing here. When your done, press “Test Connection”.
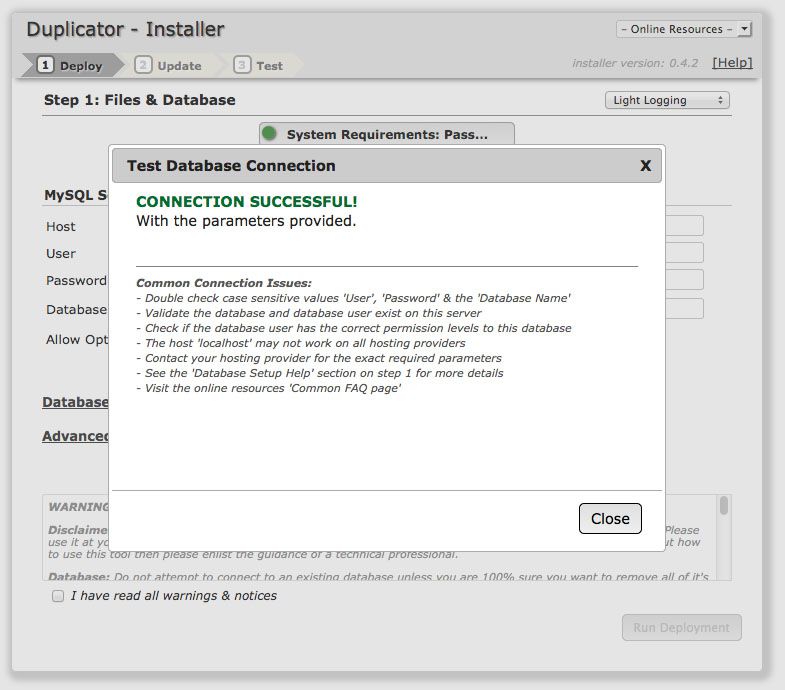
As you can see, my connection is good and I am ready to move on to the next step. If you receive an error here, you need to go back and check your credentials. It’s usually a typo of your credentials or database name. Once you have a successful connection click the “Close” button.
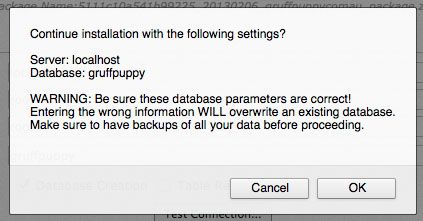
Check the warning box and click “Run Deployment”.
Another warning will pop up, which is irrelevant to this project, so go ahead and click “OK”.
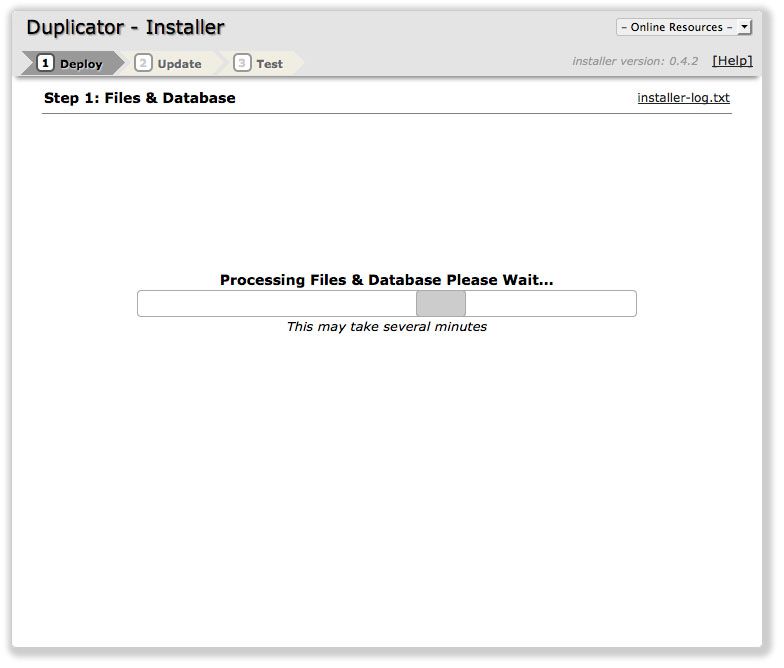
Duplicator will now start building the copy of your WordPress Web Site. This can take a while so be patient.
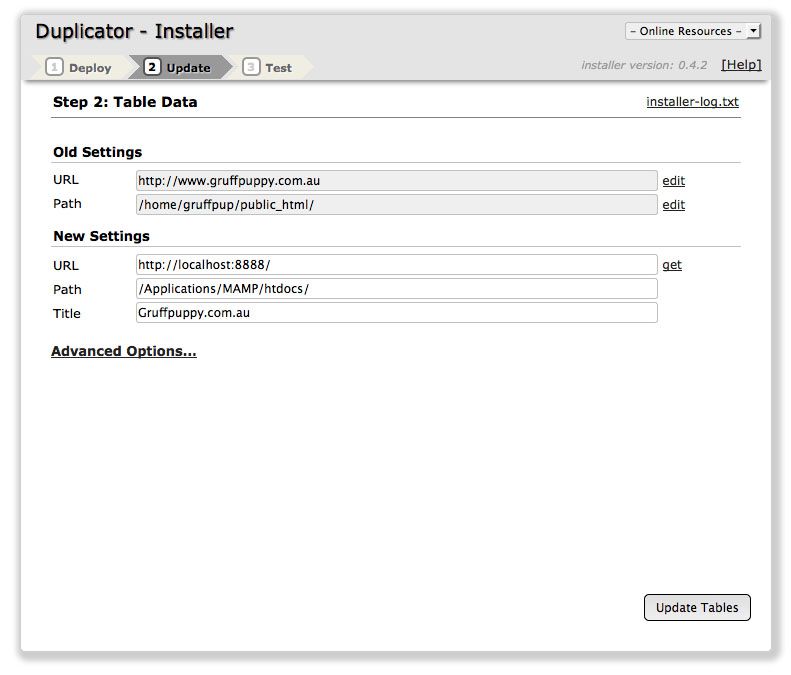
Once installation has finished, you are given an opportunity to change some parameters. Unless you have some special circumstances outside of the scope of this tutorial, your fine to accept the default settings. Click “Update Tables”
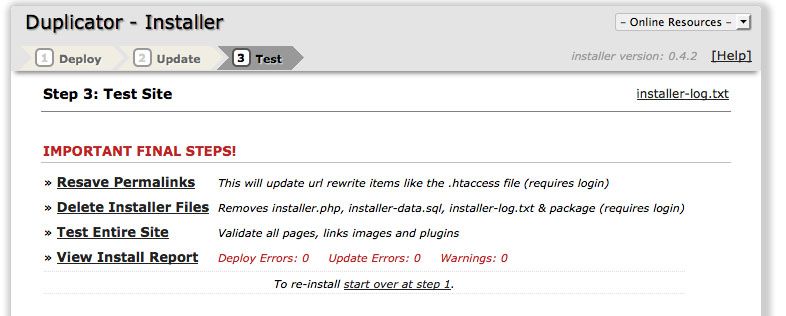
The next screen means the duplication of your site is now complete, and there’s just a little bit of house keeping to be done before you can use your site.
STEP 5 – FINISHING UP THE INSTALL
At this point, I recommend closing all open windows of your web browser and opening one new window with your default homepage showing, and then clear your browser history, cache and cookies etc. More often than not in Firefox the next step will yield an error in the process and you will not be able to continue. It looks to me like something that is kept in your browsers memory blocks the CSS (cascading Style Sheets) from loading and your site looks like this:
If you are using Firefox, Select “Tools” from the menu bar and then “Clear Recent History” gets you going, and in Safari, Click “Safari” and then “Reset Safari” to bring up the browser cleaning options. Once you are all cleaned up, type “localhost:8888/wp-admin” in your web browsers address bar and VOILA!
Log in to your site with your regular username and password.
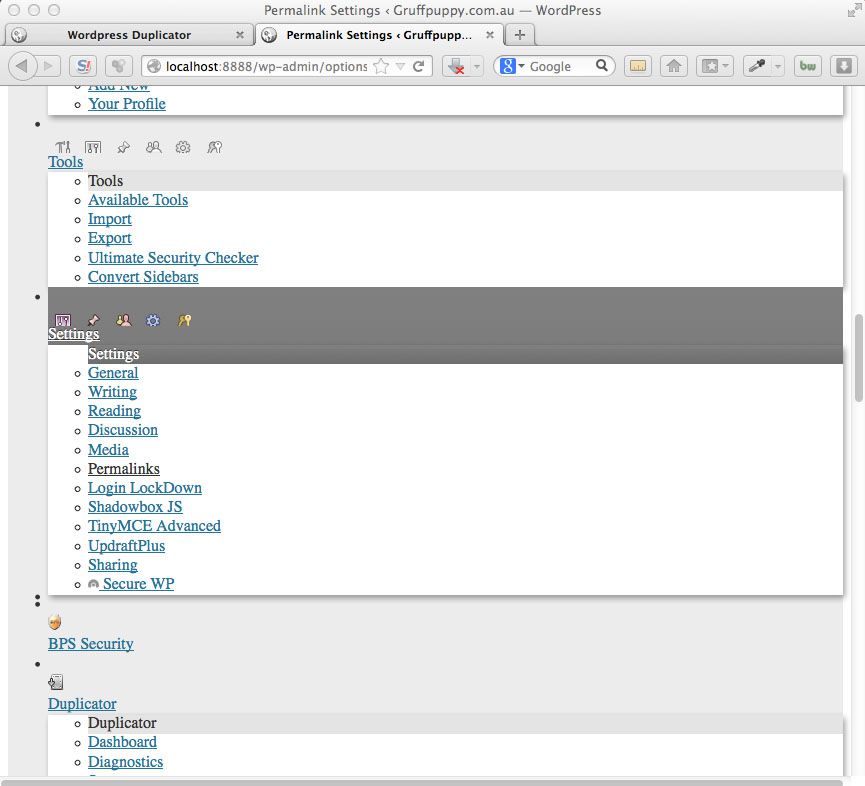
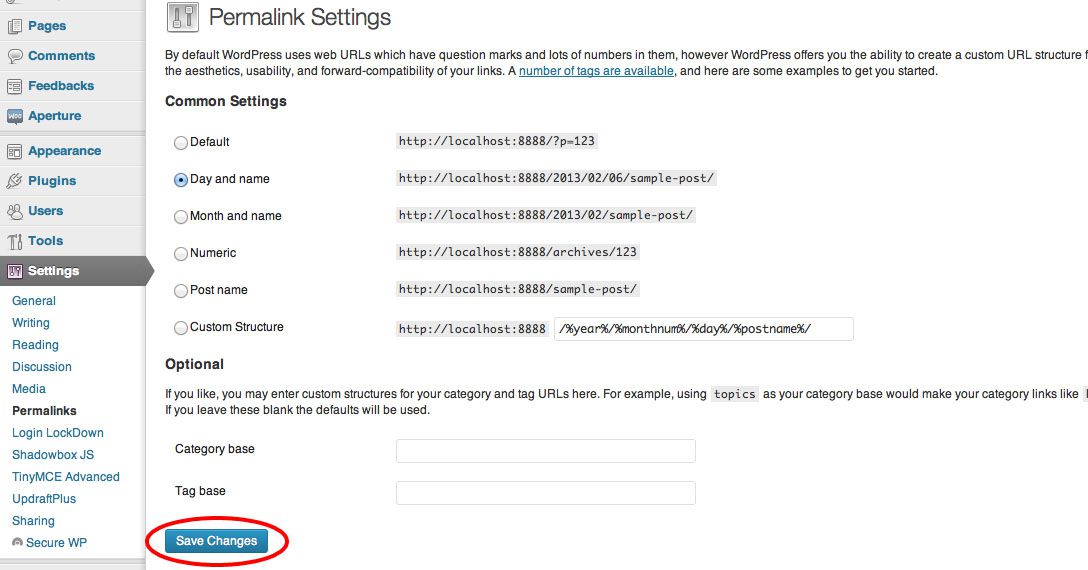
From the menu column on the left select “Settings” and then “Permalinks”.
Referring back to the note we made in step 2, make sure the appropriate setting is selected (mine was Day and Name) and press “Save Changes”. Even if your setting is already selected, it is still important to press the “Save Changes” buttons so the option is written to the database.
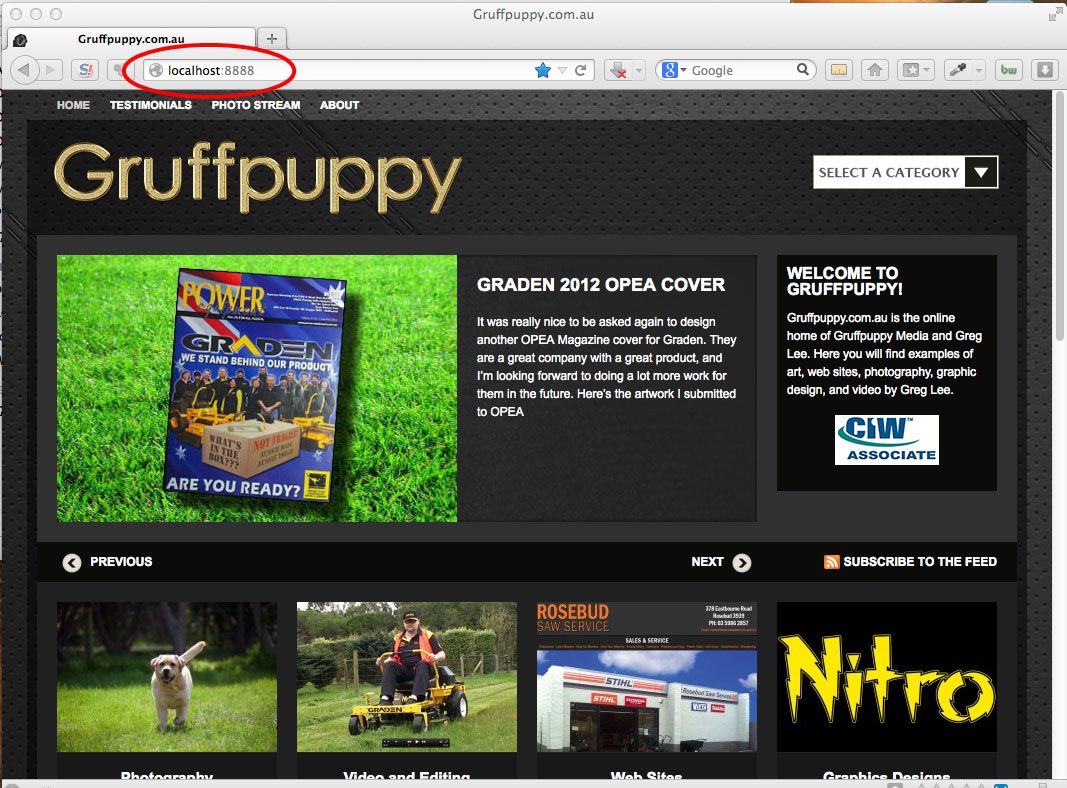
Your site is now completely cloned/copied to your local machine and you can mess with it until the cows come home without affecting your live site in any way.
STEP 6 – HOUSEKEEPING
The last step is to delete your install files from your “htdocs” folder.
Locate the “installer-data.sql”, “installer-log.txt” and “installer.php” files, move them to the trash and give yourself a pat on the back! YOU DID IT!
For the two of you out there who are looking at this blog, you might be thinking “Whoa, where did the dog with the iPhone 4 go?”
Well, it turns out that I can design the most visually spectacular web site themes in existence, but not the most SEO and Ad friendly themes. So with that in mind, tonight I have purchased Stuart Wider’s ass kicking Heat Map Theme.
Stuart, you had me at “23 Widget Positions”.
Please excuse the mess whilst I renovate. It’s business as usual though!
And if your 40 Years old, and a geek, you will love this! Otherwise, just dis-regard, you had to be there (the 80’s that is)
Two years ago I was telling everybody how I thought Twitters days were numbered, and I expected it to be swallowed up by the Facebook Juggernaut, but today it seems to me like it has justified itself, and holds steady as a platform of its own (Watch the bird fall off it’s perch tomorrow now I have said that). I am noticing more and more now sites that are feeding updates to Twitter, and I have created a Twitter account for The Webernets as a result.
My Question now, is, what is the best plugin/method to pipe your WordPress posts to Twitter?
We use cookies on our website to give you the most relevant experience by remembering your preferences and repeat visits. By clicking “Accept”, you consent to the use of ALL the cookies.
This website uses cookies to improve your experience while you navigate through the website. Out of these, the cookies that are categorized as necessary are stored on your browser as they are essential for the working of basic functionalities of the website. We also use third-party cookies that help us analyze and understand how you use this website. These cookies will be stored in your browser only with your consent. You also have the option to opt-out of these cookies. But opting out of some of these cookies may affect your browsing experience.
Necessary cookies are absolutely essential for the website to function properly. This category only includes cookies that ensures basic functionalities and security features of the website. These cookies do not store any personal information.
Any cookies that may not be particularly necessary for the website to function and is used specifically to collect user personal data via analytics, ads, other embedded contents are termed as non-necessary cookies. It is mandatory to procure user consent prior to running these cookies on your website.

 As I am using a Mac, I downloaded the free app recommended in the article called ImageOptim (The article recommended Caesium as a free alternative for Windows users). I was impressed to read on the download page that “ImageOptim is lossless — it compresses image files without changing pixels.”
 I dropped the whole folder in using the default settings and away it went. It took about 50 minutes, and here is the summary it displayed when finished.
 And this is the specs on the folder from the finder.
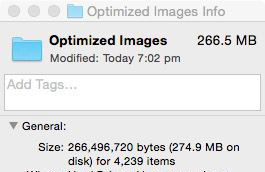 63.9 MB saving is nothing to sneeze at, but I was interested to see if I could push it any further. In the settings, I found a “Quality” slider for Jpegs. By default, it is set to 100% hence the claim to lossless, So sliding it down to 80% will obviously reduce the quality and void the lossless claim, but is the trade off for file size justifiable?
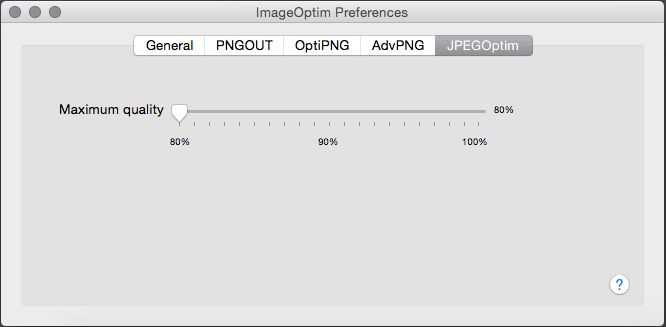 With the Jpeg Quality Slider set to 80, I ran the program again on a copy of the original folder I made before the first optimization run. It took about 60 minutes this time, and here is the summary from the window footer
 And here is how the Finder views the folder
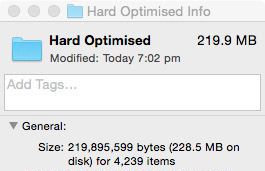 110.5 MB Saving on a 330.4 MB original file size is impressive. That’s 1/3! I went through a number of files to check the quality, and even though there is a slight difference if you look hard, for the most part the quality is good.