Long story short, as I am a beta tester for Micro$oft I previously installed a preview version of Windows 10. My life circumstances have changed since, so I haven’t been keeping up with its development, nor have I been updating the brand new HP PC I bought for it.
So today (Some time after the trial version has expired) I turned on the machine……BRICK…….nothing.
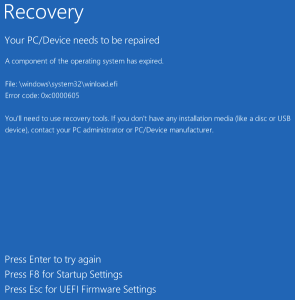
Couldn’t boot from disk, couldn’t boot from a USB drive, NOTHING but:
“a component of the operating system has expired”
The bottom line, if you want to reclaim your files and reinstall or upgrade, just boot into BIOS and set the date to JUNE 2015.
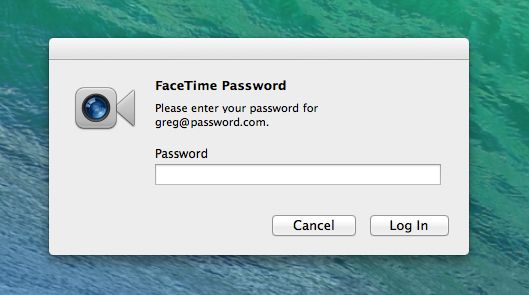
All of a sudden, when I turn on/log in on my Macs that are running OS X Mavericks, I am getting a window that asks me to input the password for FaceTime. This really started driving me crazy, as I don’t use FaceTime, and I don’t even have a camera connected to my Mac Pro.
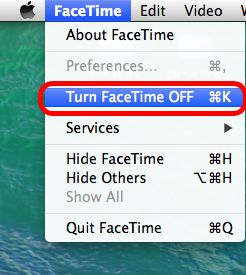
To stop this from happening, I just turned FaceTime off. To do this, open a new finder window, and then open your Applications folder. Now click/open FaceTime. Click and drag down the “FaceTime” menu option and simply select “Turn FaceTime Off”.
UPDATE – **I HAVE TESTED THIS METHOD WITH OS X MAVERICKS AND IT WORKS GREAT!**
This tutorial was written using Mountain Lion as an example, but it works for Mavericks as well – just follow the same process
Just like OS X Lion, it is really important to save your OS X Mountain Lion and Mavericks “Install File” BEFORE you install it. Without it, you can not make an install disk, and it is deleted automatically once you install your new operating system.
Once you have purchased Mountain Lion or Mavericks, your purchase/price button will turn into a “downloading” button.
A short time after, your launchpad may spring open and show you the downloads progress.
You can leave it open and watch the progress if you want. Close it up when your finished watching, or when the file has completely downloaded.
**CRITICAL** – When the file has finished downloading, a window will pop up and ask you if you want to go ahead and install the new software. QUIT THE INSTALLER IMMEDIATELY! This can be done by clicking the file menu and selecting the “Quit” option.
Don’t worry, you are not going to loose the program you just bought, you are just telling your computer that you want to install later. Once you have closed out of the installer, open a new finder window, then open your “Applications” folder. Inside this folder you will see your OS X Mountain Lion or Mavericks Install File.
Right click and “Copy” the installer file, then “Paste” it onto your desktop.
Once the file finishes copying to the desktop, you can go back into your applications folder and double click and run the installer, if you are ready to install your update.
If you want to make a bootable install DVD disk or a USB Key, the easiest way to do this is with Disk Maker X (Formerly called Lion Disk Maker).
Go to the Disk Maker X web site HERE and download the latest version of the program. Once downloaded, unzip and run the program.
TO MAKE A DVD DISK:
With Disk Maker X open, select Mountain Lion to make a Mountain Lion DVD, Or Mavericks to make a Mavericks Install DVD.
Once you select your Operating System, the program will try to locate the install program automatically. It doesn’t matter if it uses the one in your Applications folder, or the one on your desktop. In my case, it found the one on my desktop.
The next step is to tell Disk Maker X if you want to make a DVD or a USB key. Keep in mind, if you want to make a DVD you will need a 8.5gb Dual Layer DVD, and a Dual Layer DVD Burner, as the installer will not fit on a single layer 4.7gb DVD.
Click “Burn A DVD”. Disk Maker X will ask you to select your Burner.
You will now be prompted to insert a disk, and begin the burning process.
TO MAKE A USB KEY:
With Disk Maker X open, select Mountain Lion to make a Mountain Lion USB or Mavericks to make a Mavericks install USB key.
Once you select your operating system, the program will try to locate the install program automatically. It doesn’t matter if it uses the one in your Applications folder, or the one on your desktop. In my case, it found the one on my desktop.
The next step is to tell Disk Maker X if you want to make a DVD or a USB key. Keep in mind, if you want to make a USB Key you will need a 8gb thumb drive, due to the size of the installer. Click “Create a Boot Disk”.
Next, Disk Maker X will ask you about your Thumb Drive. In keeping with the recommendations of the makers of the program, we will select “8gb USB Thumb Drive”.
(My understanding is, that this option will completely erase the entire USB drive, and ALL existing data will be over-written. If you have a larger drive, which is divided up into partitions, and you do not want to erase the whole drive, use the “Another kind of disk” option. IF this is incorrect, or there is also another reason, please reply in comments.)
You will now be asked to confirm your drive selection, and its location.
One last warning! Your thumb drive will now be erased COMPLETELY!
Disk Maker X will now begin crunching files to make your USB Installer.
During this process, particularly towards the end of the process, a lot of new windows and “Get Info” dialogues will pop up, and disappear. This is normal. This is just your computer acknowledging the creation and mounting of new drives and volumes.
Once it is all completed, you will hear Homer yelling “WooHoo!” and see your new USB drive ready to go!
Isn’t it nice when something just works! I have recently moved house, and in my previous home I had a very elaborate security system which included infra red video cameras with motion detection (so I know when the Feds/Aliens are trying to sneak up on me to steal my brain waves). In actual fact, the cams were simply so my wife and I could check in on our doggies whilst we were out, night or day. I set up a web server for my cam feeds, and we can see the dogs on our iPhones (pretty cool, and VERY easy to do – will post article soon). The problems is though, I haven’t had a chance to recreate this monster system in our new house, but we still want to be able to see the pups.
I managed to find the XP based computer (the heart of the security system) in amongst all of the moving madness, and plugged in a few cams to get something going. A real bonus in our old house was that the walls were just filled with Ethernet cable going in every direction, it was quiet a work of art actually. Sadly, Not so much in the new place. So to get connected quickly I plugged in a Netcomm NP900n wireless dongle I have, and the machine was connected quickly and easily. I reconfigured my web server with the my new I.P and other info regarding my new internet connection, and with an average amount of fuss (to be expected when dealing with all matters tech) we were able to spy on our doggies from anywhere in the world again. Feeling very pleased with myself, and my superior knowledge of port forwarding and other gunk most people don’t even know exists, I ran disk clean up, defragged, and went through my regular “Window Cleaning” routine. Now, I have the computer set to “Auto Reboot on Power Failure” in bios, and my video cam server program shortcut is in “Start Up Items”, so if there is a power failure, the machine restarts and my servers run up the moment the power is restored. After my maintenance routine completed, I chose to “restart” the computer, as you do. Here is where the fun starts.
When this machine was using a wired connection, the Gigabit network connection was up immediately on start up, the internet connection was available to the web server when it was launched, so it began serving up the CCTV feed with no problems. I have learned this week, that it takes a lot longer for a wireless connection to handshake and initialise. When programs start with windows, they are often ready to go before the wireless internet connection. If the connection isn’t present when they are ready to go, they assume there isn’t a connection, will never be a connection, and don’t go looking for one at regular intervals. That is the shortened version of what really happened, with all of the profanity removed:)
Armed with this new knowledge I turned to Google and searched for “start up delay”. The first result was R2 Studios Startup Delayer. I downloaded it, installed it, told it that I wanted it to start my web server 5 minutes after the machine starts…………AND IT DID! No questions asked! I just love it when this stuff happens, as it just doesn’t usually happen at all these days.
This program has a free and a paid version, both of which do far more than I require in this instance, but I will delve in deeper and do a more concise review in a later post. It was a very easy install. It requires Dot Net 2 (free from Microsoft, and installed automatically if you don’t already have it), and once installed, it is just a matter of telling it what programs and processes you want it to start, and when you want it to start them. It is so easy to use!
Now, you might be thinking “I don’t have webcams” or “My internet connection is wired”, and you think you may not have a use for this program. But what you really need to think about here, is that when windows boots, almost EVERY program you have on your computer is not only using up your CPU starting up, but it is also phoning home to validate, looking for updates, your antivirus and anti spyware is looking for updates, Microsoft/Windows Updates is checking to see whats going on, and dozens of other “services” you don’t even realise are running on your computer are ALL trying to get started, and get on the internet at the same time.
BOTTLENECK!
Have you ever wanted to just turn on your computer and check your email, or Google something real quick and then shut off? Maybe you want to spend 3-5 minutes on your computer to look at something, or find an answer, but your computer takes 3-5 minutes to even become useable because it is Soooo Slooow when it starts up. Maybe you want to be on your computer all day, but you would just like to be able to use it in less 10 HOURS OF TURNING IT ON!!!
Wouldn’t it be good if you could tell ALL of those other offending programs and services to wait a while before they do their business? Maybe even stagger them so instead of them all trying to start up at once, they do it one at a time in an orderly manner?…………Now your getting it!
The free version will do pretty much everything you want, but I will be buying the pro version anyway (only $20) because I believe these people deserve a little something for their efforts, it really is a great piece of software!
As mentioned in THIS post, I bought a WD TV Live Hub unit a month ago, and I have been fairly happy with it so far. The premise/purpose of the unit is good, it is well featured in hardware, but the firmware/operating system is not as good as it could be, given the potential of the units hardware capabilities. I have found it to be slow, kinda clunky, and a bit frustrating when it comes to finding media quickly, as I have a large collection. The current version at time of writing is 2.07.17. Since purchasing the machine I have tried several versions of the firmware, and have settled/rolled back (using WD’s own rollback instructions and previous OS builds on the WD Firmware Rollback Page) to version 2.04.13, which in my opinion, and the WD Community opinion, seems to be the best offering so far.
Last week however, my 3 week old unit simply refused to boot. It didn’t work. I would press the power button on the remote and see the screen above, and then the unit would just turn itself off. I tried the using the power button on the unit, and it yielded the same result, automatic shut down after the loading screen. I was quiet enraged. My wife gathered up the units box, dug the receipt out, and was set to drive me back to the store to exchange the unit, when I proceeded to do what any grumpy male geek with a failing piece of technology would do – I took to it with a screwdriver, pried it open and voided the warranty!
I did learn a lot about this unit during this process though, and will share it with you now – and as always, I am sharing MY experience! Should you CHOOSE to try to replicate my experience with your device, and FAIL, it is completely your own fault, and I take no responsibility what so ever!
After Googling the symptoms, it appears that this is a VERY common problem with this unit, and the folks at WD refuse to acknowledge it as an issue. However, there is a VERY simple fix, but it does involve opening the unit. Inside the box is the main PCB (Printed Circuit Board), and there is a smaller PCB for the POWER button connected to the main PCB with a few wires. This seems odd for the power button to be on a different board, but it is a gift from god that it has been designed this way. It seems that something on the smaller power PCB, or perhaps the power button itself shorts/fails, hence as soon as you start the unit, the switch thinks its been pressed and it turns the unit off.
The cure, simply disconnect the smaller power button PCB. YES, you read correctly, just disconnect it! There is a power button on the remote you can use to switch the unit on and off anyways. The ironic part of this is that I actually found it harder to open the unit than disconnect the power button PCB. My first instinct was to crank on the thick chunky bit of plastic with the scallop shapes, but I soon learned that this was just an aesthetic, the actual lid is the thin piece above the groove in the aesthetic scallop bit.
To open the case, take your preferred case opening screwdriver and insert it between the thick bit and the thinner top panel at the back of the unit above the composite (yellow) video output.
Once you have made a gap you will see the fastening tabs that hold the lid on, and its just a matter of forcing the top upwards and gently pushing the fastening tabs towards the inside of the case. Below shows you the different types of tabs you will need to defeat to lift the lid.
Once you have the lid off, its a simple matter off locating the power button PCB, and the wires that join it to the main PCB. The power button PCB wires mount to the main PCB underneath, but the white terminal is easily visible, and requires little effort to disconnect. I just flicked it of with the screwdriver I used to open the case.
Once the wire is disconnected, you can re-fit the top panel, plug the box in again, and watch your unit boot back into that familiar home screen!
Now, if you want to win a prize (Charlie Sheen’s Tiger Blood), look closely at the photo’s in this article and be the first to comment with the reason why everybody who reads these articles should take extra special note of my disclaimers, and why Australian Geek Guys die younger than American Geeks!
We use cookies on our website to give you the most relevant experience by remembering your preferences and repeat visits. By clicking “Accept”, you consent to the use of ALL the cookies.
This website uses cookies to improve your experience while you navigate through the website. Out of these, the cookies that are categorized as necessary are stored on your browser as they are essential for the working of basic functionalities of the website. We also use third-party cookies that help us analyze and understand how you use this website. These cookies will be stored in your browser only with your consent. You also have the option to opt-out of these cookies. But opting out of some of these cookies may affect your browsing experience.
Necessary cookies are absolutely essential for the website to function properly. This category only includes cookies that ensures basic functionalities and security features of the website. These cookies do not store any personal information.
Any cookies that may not be particularly necessary for the website to function and is used specifically to collect user personal data via analytics, ads, other embedded contents are termed as non-necessary cookies. It is mandatory to procure user consent prior to running these cookies on your website.