I have been reading on forums lately how some people would like to be able to run their USB Mic through their external hardware mixing desks, and it is relatively easy to do.
httpvh://youtu.be/K9vqNj0_CuU
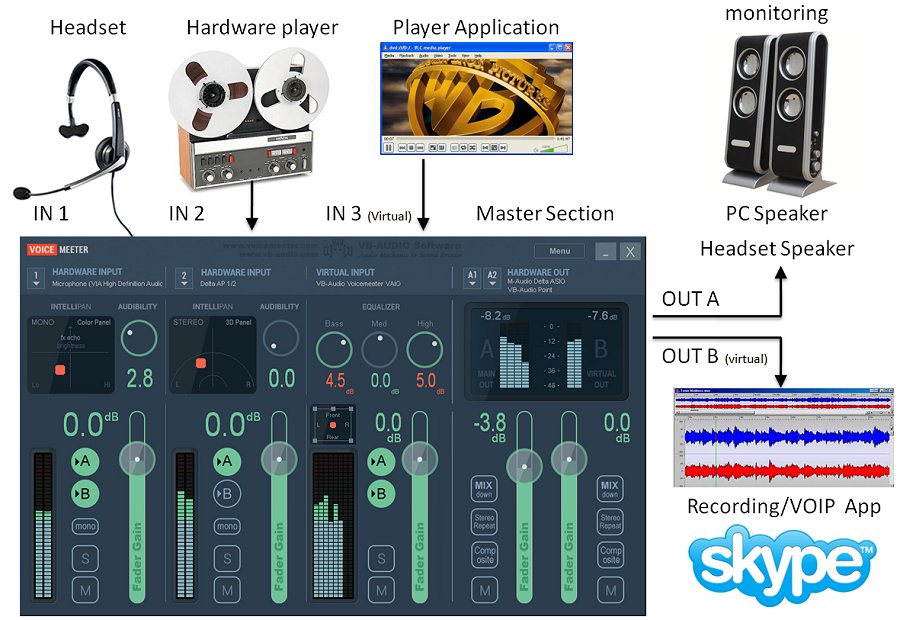
Below is a diagram on how to run your wiring between the devices.
Plug your USB Mic into a USB Slot, run an appropriate lead from the Line Out/Headphone Out of your computer into a stereo input channel on your mixer. If your mixer has only mono channels, use channel one for your left, and channel 2 for your right. Next, run wires from the Main Output of the mixer to your Line in/Mic In on your computer, and the physical part is done.
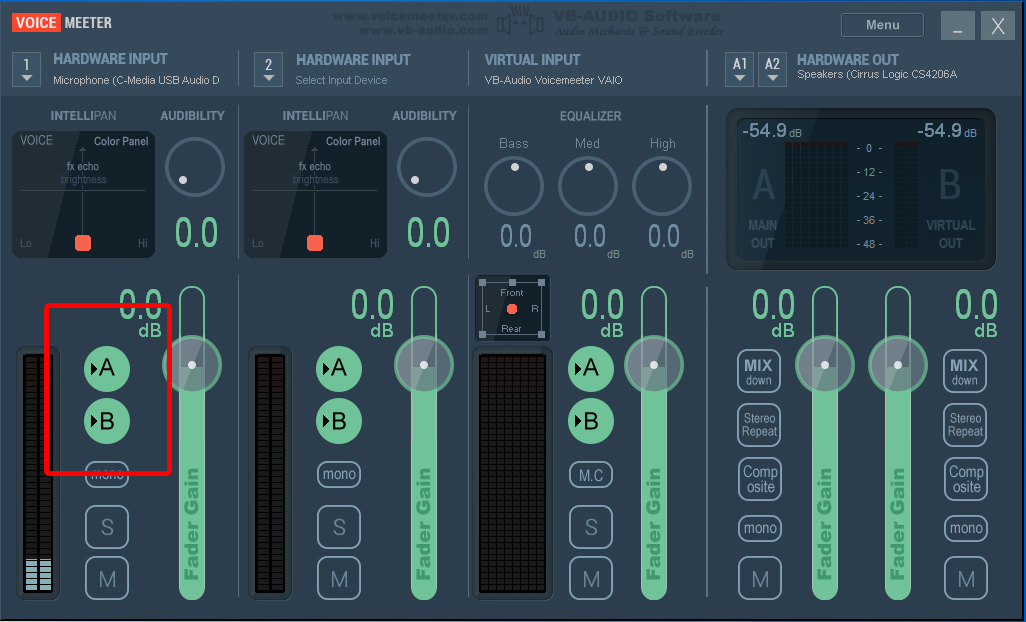
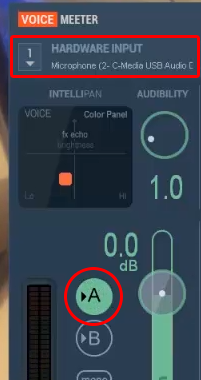
Next, open up Voicemeeter (If you don’t have Voicemeeter you can download it free at VB-Audio.com) and select your USB Mic as the device for channel 1. Make sure “A” is selected/highlighted and “B” is not selected.
Then, select your Line Out/Headphone Out jack as the device for Voicemeeters Main Output, “A1”.
Now it is time to select your Line In/Mic in as the device for Channel 2. Make sure that “A” is not selected, and “B” is selected.
All that is left is to open up the app you want to use (eg – Skype, Vidblaster, or some other Web Cam program) and select Voicemeeter’s Virtual Device (Output “B” in Voicemeeter) as the input source audio device.
Voicemeeter can be downloaded FREE HERE at vb-audio.com. Don’t forget to make a donation – the programmer deserves a little something for a program this good!
How to use a USB Mic AND Mixer together in Skype or Vidblaster
Web cam software like Skype and Vidblaster only allow for one audio source, so if your mixer is coming into the computer via the line input, and your mic is coming in through USB, you are generally out of luck….until now.
httpvh://youtu.be/rtWqR_AWV4M
I recently stumbled upon a free piece of software called Voicemeeter which makes it incredibly easy to solve this problem. It is basically a software mixer that will allow you to take various inputs as well as your system sound and mix them with a great deal of control into one “Virtual” sound device, which you can then select as your audio input device in your web cam program.
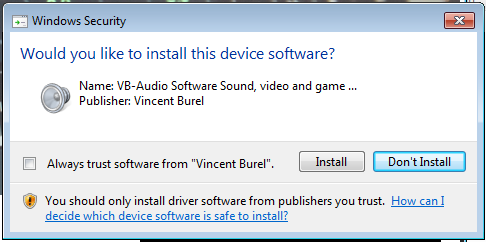
To get started, Download your free copy of Voicemeeter HERE.During installation, you will get some dialogue boxes telling you it wants to install some drivers, this is completely normal.
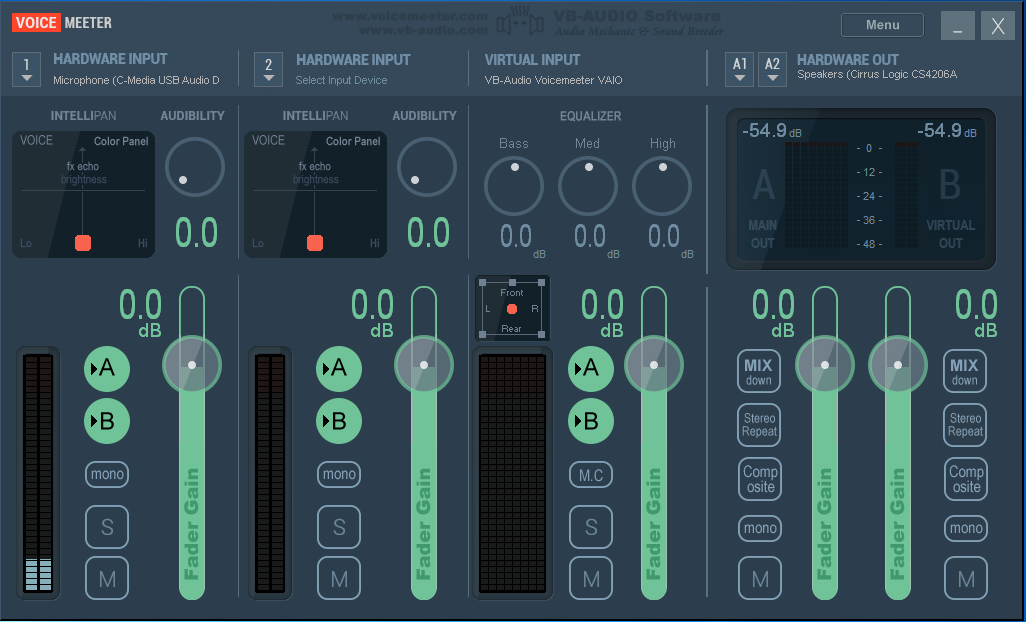
Once you have installed it, you will need to restart your computer so the virtual drivers can register in your system. Once you have rebooted, open up Voicemeeter and you will see the mixing console.
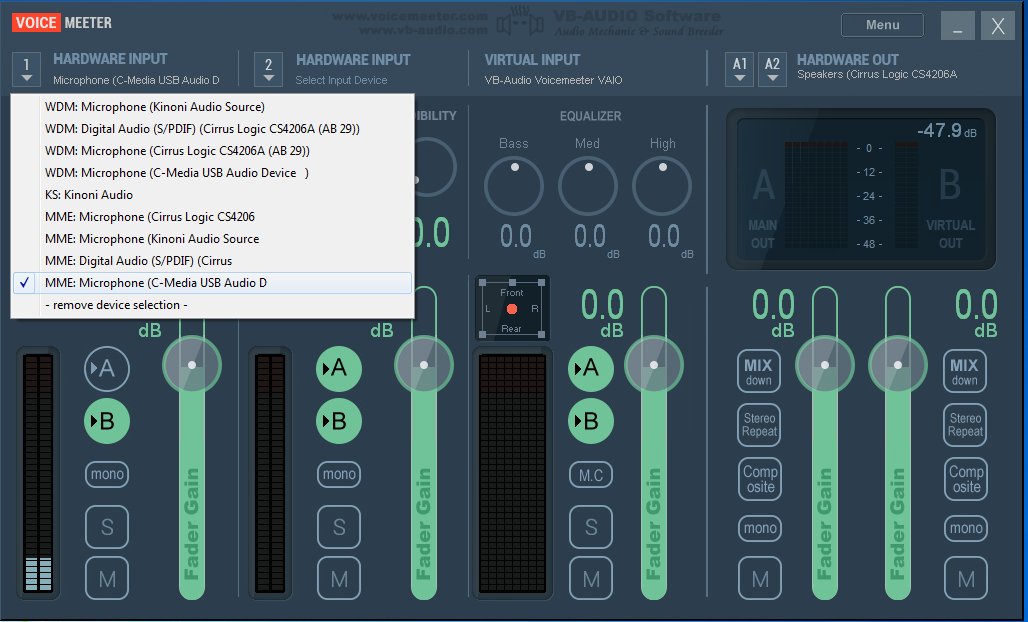
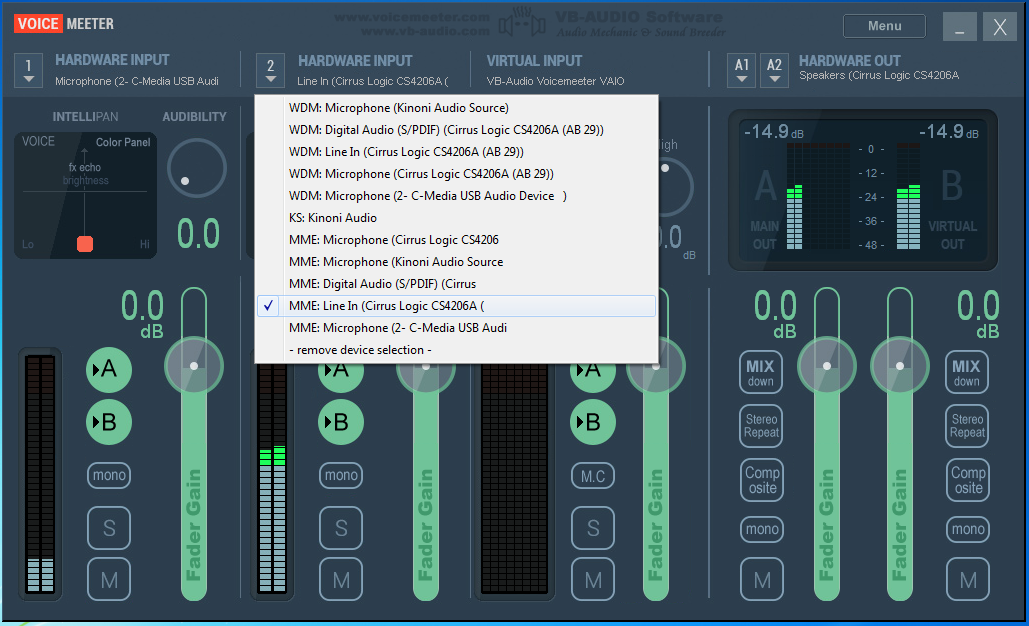
Looks cool doesn’t it! In short, you have two hardware inputs and one virtual input. The virtual input seems to be your system sound, so anything that tries to output through your computers speakers, like Winamp or Windows Media Player, can be fed into your mix here if you want it, if not, just mute this track by pressing the “M” button at the bottom next to its slider. To mix your Mic and Line In (Mixer) click where it says “1 Hardware Input” and select your USB Mic from the drop down list.
The next step is to select your line in/mixer device in “2 Hardware Input”
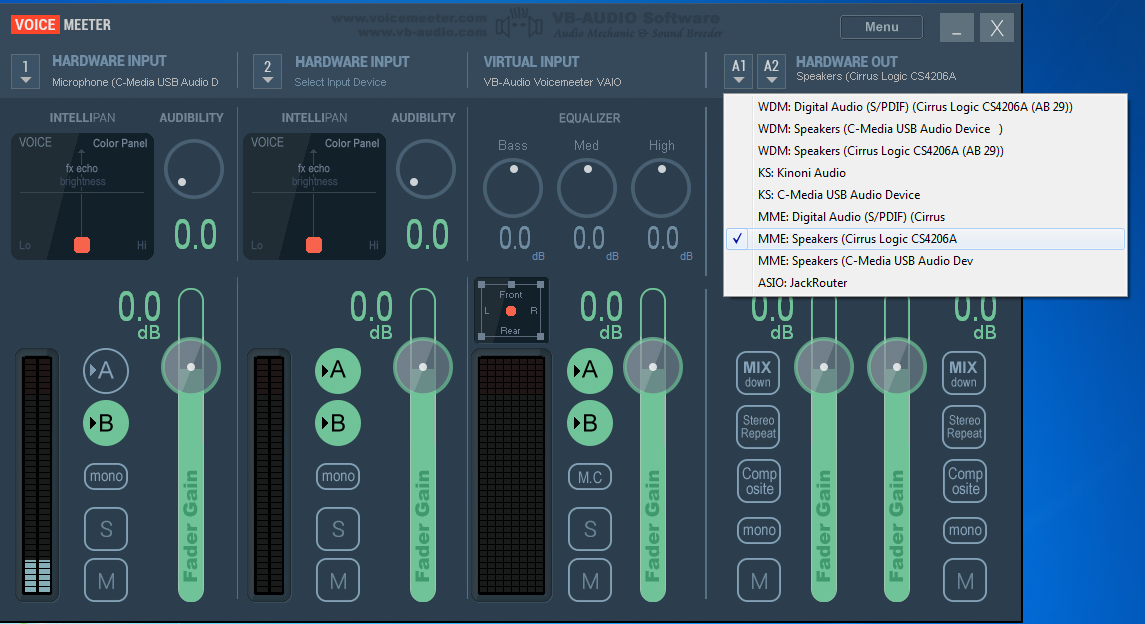
Now its time to tell Voicemeeter where your speakers are. Select them from the drop down menu that says “Hardware OUT”
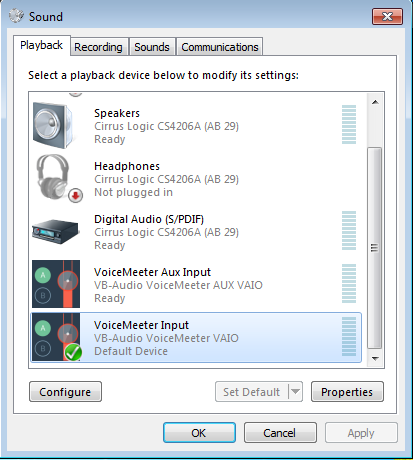
The last step to making this all work is to open your Windows menu and select control panel. When this opens select the sound icon to open your computers sound preferences window. In the “Playback” section select “Voicemeeter Input” and then set it as the default device.
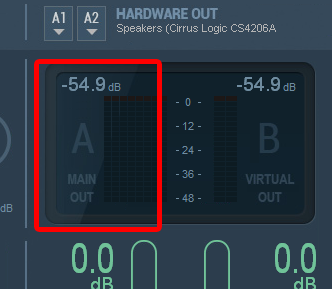
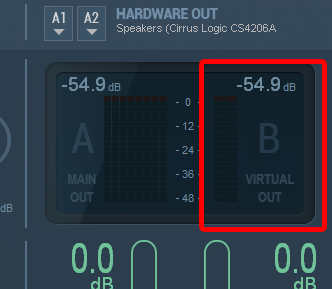
Now you are all configured, you just need to do a small adjustment in Voicemeeter to stop feedback loops. The output of Voicemeeter has two channels, “Main Out” which will go to your speakers, and “Virtual Out” which is what will go into web cam software (Skype, Vidblaster etc….)
In the “1 Hardware Input” channel, it is wise to de-select “A” as this will stop your mic from being played out aloud through your speakers. This will prevent feedback, but still allows your USB Mic to feed into your web cam program through the Virtual Out.
Now, all that’s left is to open your web cam program, Skype or Vidblaster etc, and select Voicemeeters output as your input device, and you can now use your USB Mic AND your external hardware mixer.
Voicemeeter can be downloaded FREE HERE at vb-audio.com. Don’t forget to make a donation – the programmer deserves a little something for a program this good!
This video will show you step by step how to download and install software that will allow you to use your iPhone, Android Phone, or Nokia Smart Phone as a camera in Vidblaster.
**NOTE** – Your phone and computer need to be connected to the same wifi network
To get started, download the free Epoccam App from your devices app store and install it. Then, on your computer, browse to kinoni.com to download the free virtual device drivers. The software relies on Apple’s Bonjour networking technology, and if it isn’t already on your system, the installer will download and install it automatically for you. Don’t worry, it’s harmless!
Once everything is installed, open the app on your phone, then open Vidblaster, and add a new camera module and select “Kinoni Video Source” and you should be up and running.
In this video I show you how to add additional cameras to your Vidblaster setup in either Windows or Mac, and how easy it is to switch between them.
Note to Pros – These articles are aimed at beginners, who wish to spend little or no money until they have a grasp on the topic, and are hoping to learn how to get started quickly and easily, using equipment they most likely already have.
httpvh://youtu.be/VTpJ5ZkTShQ
You can also use your iPhone, Android and Nokia smart phones as cameras by using Epoccam as shown in this tutorial.
httpvh://youtu.be/Z5E-vEalubM
You can download a free unrestricted trial copy of Vidblaster from vidblaster.com
Part 1 – Selecting Video Switcher Production Software – The Heart of Vidcasting – VIEW HERE Part 2 – Installing Vidblaster, Connecting Your Webcam, Switching and Interface Basics – VIEW HERE Part 3 – Adding Additional Cameras – VIEW HERE Part 4 – Mixing Audio, Mics, and Avoiding Looping in Software – VIEW HERE Part 5 – Desktop and Browser Capture – VIEW HERE Part 6 – Connecting Guests Via Skype – VIEW HERE Part 7 – How To Make A Lower Third Overlay – VIEW HERE Part 8 – Adding flair with Effects, Soundboards and Chat Streams – COMING SOON! Part 9 – Green Screen/Chroma Keying and Virtual Sets with iClone – COMING SOON! Part 10 – Recording and Streaming – COMING SOON!
PART 2 – Installing Vidblaster, Connecting Your Webcam, Switching and Interface Basics
In this tutorial I show you how easy it is to install Vidblaster in both Mac and Windows, and get started with some basic switching between modules, adding a title, playing a video and showing a picture.
Note to Pros – These articles are aimed at beginners, who wish to spend little or no money until they have a grasp on the topic, and are hoping to learn how to get started quickly and easily, using equipment they most likely already have.
httpvh://youtu.be/wk7UC-ZVHeI
You can download a free unrestricted trial copy of Vidblaster from vidblaster.com
Part 1 – Selecting Video Switcher Production Software – The Heart of Vidcasting – VIEW HERE Part 2 – Installing Vidblaster, Connecting Your Webcam, Switching and Interface Basics – VIEW HERE Part 3 – Adding Additional Cameras – VIEW HERE Part 4 – Mixing Audio, Mics, and Avoiding Looping in Software – VIEW HERE Part 5 – Desktop and Browser Capture – VIEW HERE Part 6 – Connecting Guests Via Skype – VIEW HERE Part 7 – How To Make A Lower Third Overlay – VIEW HERE Part 8 – Adding flair with Effects, Soundboards and Chat Streams – COMING SOON! Part 9 – Green Screen/Chroma Keying and Virtual Sets with iClone – COMING SOON! Part 10 – Recording and Streaming – COMING SOON!
3D video is becoming popular again, and with the tools already available to most of us, its pretty easy to get started making your own 3D movies. There are a lot of programs available that will take your current 2D video and convert it to 3D with varying levels of success, but if you are interested in actually filming in 3D using a stereoscopic camera set up, this is the article for you.
Getting started making 3D can be a bit confusing for beginners. But if you have a PC and a couple of web cams, you are two thirds of the way there. It is really helpful if your webcams are the same to, and a lot of webcams are available in twin packs now as well (one for you, one for your friend), so these are a good place to start.
I had a security camera set up at the last place I lived, and two of the cameras are identical. For 3D filming it is critically important that both cameras are aligned, and looking at exactly the same view. I joined the two together by screwing them to a flat piece of steel at their mounting point, and they lined up quiet well.
In order to achieve the 3D effect your cameras will need to be spaced about 65mm apart. You can technically use any two cameras, but it just makes it a lot easier if they are the same. Once your cameras are mounted together its time to connect them to your computer. If they are USB cams just plug them in, but in my case I had to use a Pinnacle Dazzle for the left camera, and a Easy Cap USB interface I got from Ebay for the right camera, in order to be able to use them. My cameras have a coaxial cable output, and the Dazzle/Easy Cap act like adapters that allow me to plug the cams into them, then they plug into the computers USB port. Once you are all plugged in, the next step is to download a program that will let you view your cams, align them, and eventually record your video. I looked at a lot of programs, and there is only one that gets my thumbs up, and that is Stereoscopic Multiplexer. The only down side is that it doesn’t record audio, so you will need to use a stand alone audio recorder to capture the sound, and then ad it back in processing later. You can download the program and try it out with no restrictions other than a watermark in the image. If you really get the hang of things and want to buy it, you can, and the watermark will be removed. But if you just want to try this out and experiment, you can download it and test it at no cost.
Once Stereoscopic Multiplexer is installed, open it up, and the configuration wizard starts. This is where you can tell it which camera is going to be the left camera, and which is going to be the right camera.
The next step is to select a capture format.
This is basically telling the program the format and quality your webcams can deliver. In my case, my cameras are PAL, and the image size they deliver is 720 pixels wide by 576 pixels high, so I use YUY2 720×576 pixels. The next few windows are OK to leave at the default settings, so keep clicking OK until you get to the preview window. If everything has configured correctly, you will now see a preview window of what your cameras see.
As you can see from my preview, I spent a lot of time making sure the image from the left camera is identical to the right. The pole on the right of the view is the same distance from the edge of the frame in both, as is the positioning of the back of the chair on the left, and the doggy bowl at the bottom.
Now that everything is lined up, its time to start recording. When you click the red record button another window will appear asking you how you want the video compressed.
If you have a fast processor the Cinepak Codec by Radius seems to be pretty good, but in my case I have to record uncompressed. Its a lot faster, but the file sizes are huge. I use Ojosoft Total Converter to compress the videos once I have finished shooting, so the file sizes are more manageable. Make sure you have your preferred compression method highlighted, and you have given your file a name and a “save to” location before you try to click start, otherwise it wont work. Below is a sample of the raw video footage I captured.
httpv://youtu.be/xn0DCKzFw7Q
Stereoscopic Multiplexer is great because your left and right cam footage is in sync, and saved side by side into one file (Hence the frame size of 1440 x 576 when recording from two 720 x 576 cameras). If you were to use two regular video tape cameras, you have to try and match the videos so they both play at exactly the same time, which is not impossible, but is difficult and ads more steps to the process.
Now it’s time to process the raw video – Stay tuned for Part Two!
We use cookies on our website to give you the most relevant experience by remembering your preferences and repeat visits. By clicking “Accept”, you consent to the use of ALL the cookies.
This website uses cookies to improve your experience while you navigate through the website. Out of these, the cookies that are categorized as necessary are stored on your browser as they are essential for the working of basic functionalities of the website. We also use third-party cookies that help us analyze and understand how you use this website. These cookies will be stored in your browser only with your consent. You also have the option to opt-out of these cookies. But opting out of some of these cookies may affect your browsing experience.
Necessary cookies are absolutely essential for the website to function properly. This category only includes cookies that ensures basic functionalities and security features of the website. These cookies do not store any personal information.
Any cookies that may not be particularly necessary for the website to function and is used specifically to collect user personal data via analytics, ads, other embedded contents are termed as non-necessary cookies. It is mandatory to procure user consent prior to running these cookies on your website.

 I have been reading on forums lately how some people would like to be able to run their USB Mic through their external hardware mixing desks, and it is relatively easy to do.
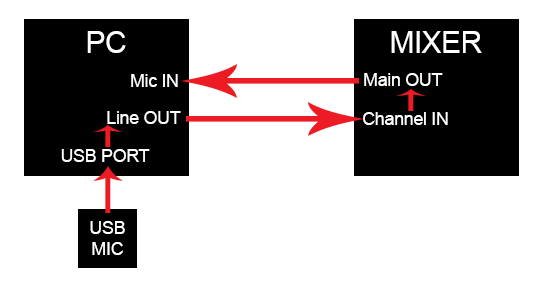
 Then, select your Line Out/Headphone Out jack as the device for Voicemeeters Main Output, “A1”.
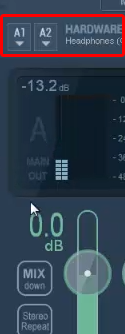 Now it is time to select your Line In/Mic in as the device for Channel 2. Make sure that “A” is not selected, and “B” is selected.
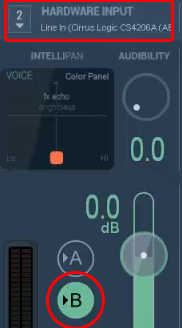 All that is left is to open up the app you want to use (eg – Skype, Vidblaster, or some other Web Cam program) and select Voicemeeter’s Virtual Device (Output “B” in Voicemeeter) as the input source audio device.
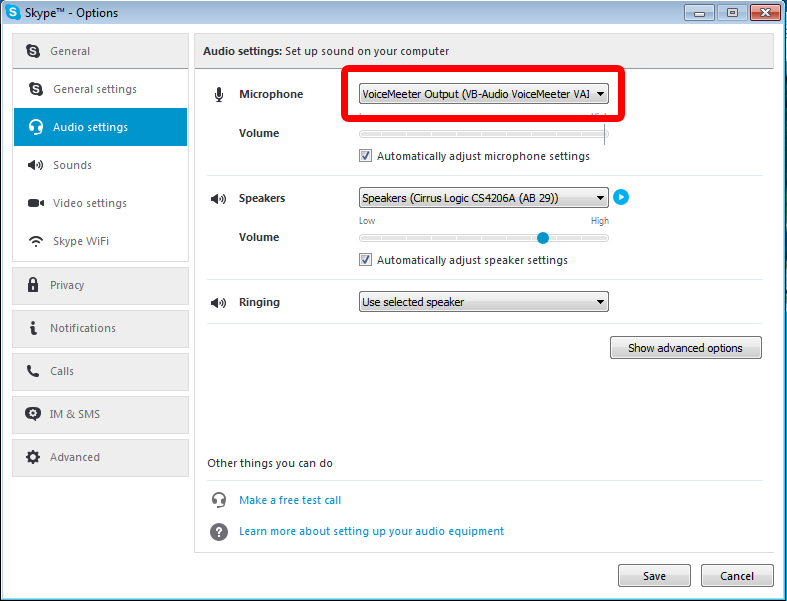 Voicemeeter can be downloaded FREE HERE at vb-audio.com. Don’t forget to make a donation – the programmer deserves a little something for a program this good!