
httpvh://youtu.be/-WXs6ZiM6_A
Tag: Capture
How To Make Your Own Internet TV Show – Part 6 – Connecting Guests Via Skype
![]() Part 6 – Connecting Guests Via Skype
Part 6 – Connecting Guests Via Skype
In this tutorial I show you how you can capture a video conversation from Skype and include it in your broadcast
Note to Pros – These articles are aimed at beginners, who wish to spend little or no money until they have a grasp on the topic, and are hoping to learn how to get started quickly and easily, using equipment they most likely already have.
httpvh://youtu.be/tVqZSYP1V_w
**UPDATE** – As of VidBlaster version 4.05, a new “Screen Capture” module has been added which replaces the old method. If your version of VidBlaster is 4.05 or above, see the following video.
![]()
You can download a free unrestricted trial copy of Vidblaster from vidblaster.com

Part 1 – Selecting Video Switcher Production Software – The Heart of Vidcasting – VIEW HERE
Part 2 – Installing Vidblaster, Connecting Your Webcam, Switching and Interface Basics – VIEW HERE Part 3 – Adding Additional Cameras – VIEW HERE
Part 4 – Mixing Audio, Mics, and Avoiding Looping in Software – VIEW HERE
Part 5 – Desktop and Browser Capture – VIEW HERE
Part 6 – Connecting Guests Via Skype – VIEW HERE
Part 7 – How To Make A Lower Third Overlay – VIEW HERE
Part 8 – Adding flair with Effects, Soundboards and Chat Streams – COMING SOON!
Part 9 – Green Screen/Chroma Keying and Virtual Sets with iClone – COMING SOON!
Part 10 – Recording and Streaming – COMING SOON!
How To Make Your Own Internet TV Show – Part 5 – Desktop and Browser Capture
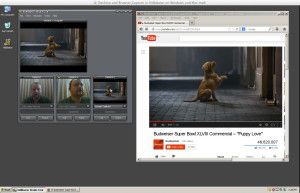
Part 5 – Desktop and Browser Capture
In this video I show you how to capture your desktop, and incorporate your web browser into your Vidblaster setup in either Windows or Mac, so you can include media (Such as Youtube) in your broadcast.
Note to Pros – These articles are aimed at beginners, who wish to spend little or no money until they have a grasp on the topic, and are hoping to learn how to get started quickly and easily, using equipment they most likely already have.
httpvh://youtu.be/b9IieU22bF8
You can download a free unrestricted trial copy of Vidblaster from vidblaster.com
Part 1 – Selecting Video Switcher Production Software – The Heart of Vidcasting – VIEW HERE
Part 2 – Installing Vidblaster, Connecting Your Webcam, Switching and Interface Basics – VIEW HERE Part 3 – Adding Additional Cameras – VIEW HERE
Part 4 – Mixing Audio, Mics, and Avoiding Looping in Software – VIEW HERE
Part 5 – Desktop and Browser Capture – VIEW HERE
Part 6 – Connecting Guests Via Skype – VIEW HERE
Part 7 – How To Make A Lower Third Overlay – VIEW HERE
Part 8 – Adding flair with Effects, Soundboards and Chat Streams – COMING SOON!
Part 9 – Green Screen/Chroma Keying and Virtual Sets with iClone – COMING SOON!
Part 10 – Recording and Streaming – COMING SOON!
Screen Captures on iPhone and iPad
 Have you ever been browsing in Safari on your iPhone, iPod Touch or iPad and wanted to capture a screen shot of a web page? Perhaps you have transferred some money in your bank accounts and want a quick grab of the reference number? This is actually a feature that is built right into iOS4!
To capture the screen of your device to a JPEG picture image at any time, all you have to do is hold down the “Home” button, then press the top button, and release them both together. Your screen will flash, the device will make the camera “snap/click” sound, and the screen will be saved as a JPEG image in your camera roll, to do with what you please.

COOL HUH!
Mac Grab Sceen Capture Utility

The amount of goodies tucked away in Mac OSX never ceases to amaze me. There have been so many times I need a app, only to find the good folks in Cupertino have already included what I need as a standard utility. Grab is one of those apps. It is a simple and very good screen capture utility. It can capture a selection, a window, or your entire screen, and even has a ten second automatic screen capture timer if you need to set something up before your capture. The default capture format is TIFF, which is great for capture quality, but can get a little annoying if you need to capture a lot of things and convert to JPG for web. I noticed last time I was playing around in “Tinker Tool” (A free program to unlock hidden features in OSX) that it will allow you to change the format of the captured image, but when I set it to JPG, it still saved as TIFF for me.
So there you have it, a really cool and very useful utility that you probably didn’t even know you had! There’s heaps of cool stuff in that Utilities folder so open your Applications folder, then Utilities, and take a look around!