Have you ever had a large USB drive that only shows 200mb when you plug it into your Windows computer? Frustrating isn’t it!
And what makes it worse is that nothing you try in the “Format” utility will change it – it always says 200mb in the capacity drop down.
The reason this happens is that in some stage in the USB Drive’s life it has been plugged into a Mac, and it has done “Mac Things” to the drive. Thankfully, there is an easy way to fix it.
There are plenty of articles on the internet that provide you with many ways you can attempt to reclaim data from a dead or dying hard drive. Everything from putting the platters in a new drive casing to bagging the drive up and placing it in the freezer for 20 minutes. These all seem to be fairly extreme measures to me, so here’s a quick tip I have discovered recently by accident which may help.
I have a number of old drives I have been using as storage, and I recently needed to access a file on one, and when I plugged the drive into my USB dock it spun up but would not mount. I re-tried several times and it refused to load. Needless to say I was pretty unhappy. I kept coming back to it over the next few days, trying again and again, hoping it would mount so I could “just get that one file”. A few weeks later, whilst having a clean up, I decided to give it one more try and if it didn’t work, I was going to throw it away.
I plugged the drive in, it spun up, and again it refused to mount. At this point I was called away quiet urgently, and I left with the drive plugged in and turn on. After about 4-5 hrs I returned, and found the drive had some heat in it. Wondering if this might yield a result I switched off the drive, then switched it on again, and it mounted, and I was able to get the file!
I seized the opportunity to copy off all the other data on the drive, and then I started to wonder…
I had two other drives that I had deemed dead in the past, so I plugged those in and left them to warm for a few hours. After restarting them, both of them mounted as well. One mounted and appeared to work well, but the other mounted just long enough for me to drag a few files off, and then it ejected itself again. In the week or so since, I have been able to reconnect and use two of the three drives normally.
I’m wondering if tarnish might have built up on the read/write head over the period when it was not in use, and a little bit of heat might have been all it took to break it down enough for it to be able to read again? Either way, if your drive spins up but wont initialize, this method might be well worth trying before you take extreme action.
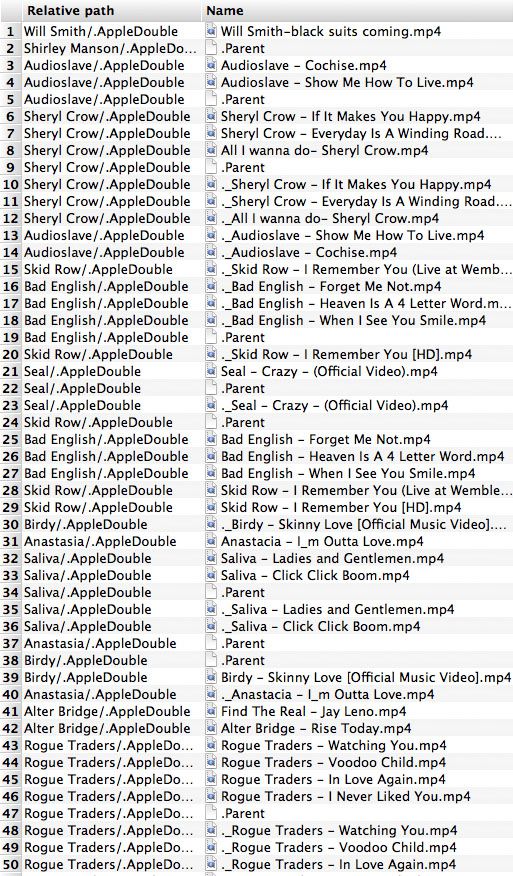
Lately, My WDTV Live Hub has been REALLY slow. In an effort to see what was going on, I mounted the drive in my FAV Linux distro PUPPY LINUX. What Puppy Linux showed me, was ALL of the thousands of files that my Windows and Mac OS X computers had been creating and hiding on my drive without my knowledge. When I have accessed my shared drive with my Mac, it had been creating DS-Store files and .AppleDouble files in each folder, and my Windows machines have been creating Thumbs.db files.
It was pretty easy to delete these files, but my question was “How can I stop this Madness from happening again?”. After a little Googling I found a program called BlueHarvest. I downloaded the trial version, and I have to say, within 15 minutes, I had paid my $15 US and had a license key that was good for 3 different Macs. If You are sharing drives or a server in a Mac/Windows/Linux environment, YOU NEED THIS PROGRAM!
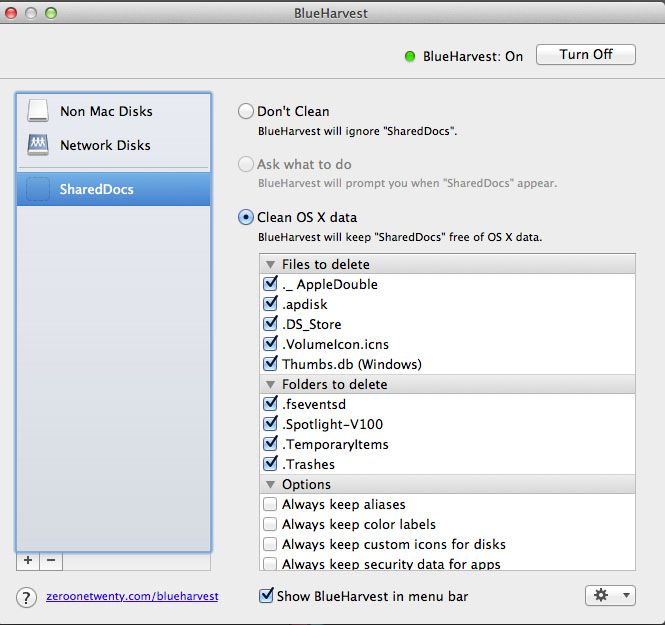
After installing, you tell BlueHarvest which drives and folders you want it to monitor, and the file types you want it to clear, and it deletes them as soon as they are created.
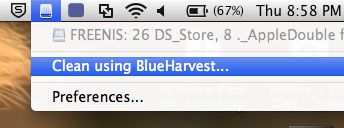
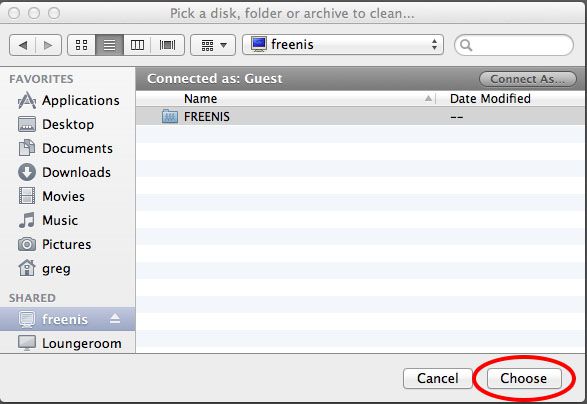
BlueHarvest not only prevents these files, it is also the quickest and easiest way there is to clean up a drive of existing files. I have a 8TB server running FREENAS, and to clean it up, all I did was click the BlueHarvest icon in my menu bar and select “Clean Using BlueHarvest”
Then I selected my server…
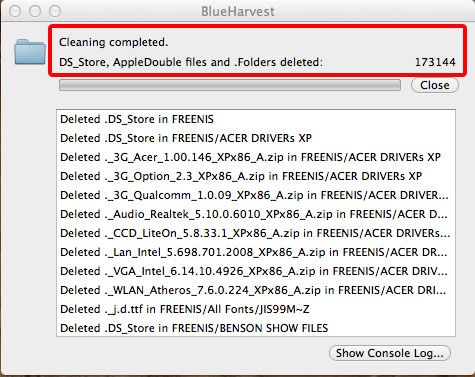
And then BlueHarvest went to work – check out the result!
It cleaned out 173144 files from the drive!
And at $15, BlueHarvest is a gift! Download the 30 day trial HERE.
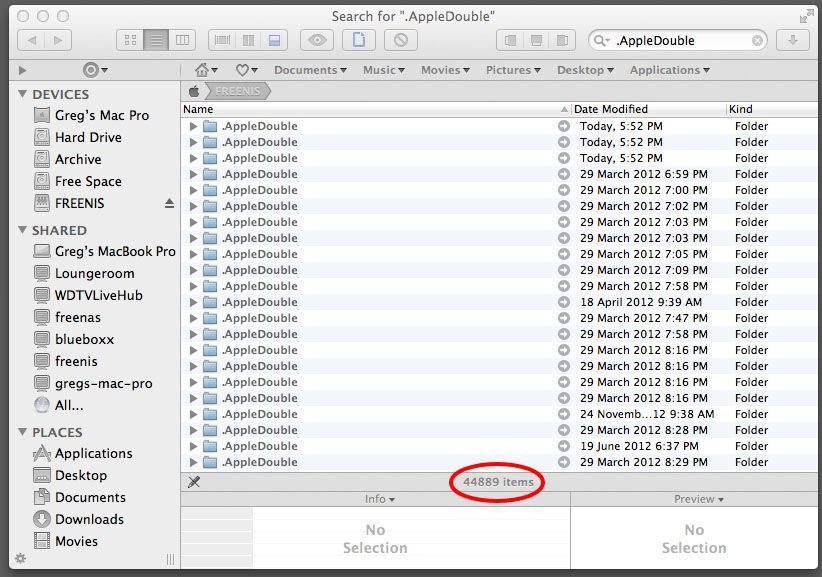
**UPDATE** – Ive been using this program for a few days now, and it has been really cool watching it delete these annoying files as soon as they are created. That part has been working great. However, I have been playing around with a program called Total Finder today, and it shows Hidden/Invisible files. I ran it on my Freenas server and to my surprise, it turned up nearly 45000 .AppleDouble files.
I opened up BlueHarvest and initiated another clean on the drive, and after it scanned it reported it had cleaned 4 files. I ran Total Finder again, and it still came back with almost 45000 files.
In my opinion, the best first step to speeding up your Mac is to repair your permissions and run disk repair as outlined in my article Speed Up Your Mac Article HERE.
The next step is to clean your caches, rebuild your indexes, and run your macs daily, weekly and monthly maintenance scripts. This can all be done easily with the FREE and very powerful ONYX.
Once you have ONYX downloaded and installed, its a good idea to make sure that you have backed up ALL of your stuff. Like using any cleaning program, things can get moved or lost, so make sure you don’t get caught!
When you are satisfied your files are safe, go ahead and open ONYX. The first thing you will see is a alert box that asks if you want ONYX to check the S.M.A.R.T status of your hard drive. S.M.A.R.T stands for Self-Monitoring, Analysis and Reporting Technology. Most hard drives these days monitor their own performance and try to anticipate if a failure is imminent, and if their is something wrong with your drive, you will be notified after this test. It is well worth doing.
Once this has completed, the next alert will ask if you want to verify your drive. If you have already performed this task because you are following on from my first “Speed Up Your Mac” article this is not necessary. If you haven’t already done this, it is well worth doing as it will find any drive errors. This process can take some time, and it will require all other programs to be closed, so if you decide to run it, go get yourself a coffee and some fresh air after you begin.
When Verification has finished, ONYX will ask you to type in your password to give it permission to make changes and clean thing up.
You will now see the main menu bar for ONYX.
As you can see, this program has a lot of in depth features and can do a lot of different things, but for this tutorial, we will focus on cleaning up quickly and easily. To start cleaning, press the “Automation” button. You will now see the Automation screen.
The safest way to proceed is to accept the defaults and press “Execute”. If you are following on from my first “Speed Up Your Mac” article you might want to un-check “Repair Permissions” as you will have already done this. Other wise, leave it checked. If you are like me and like living on the edge, you can go ahead and check/un-check the items you feel necessary.
*BE WARNED* – As with every clean up program, there can be unwanted side effects, so proceed with caution!
For me personally, I do change it up as I like to clean my system deeply, and I am happy to put things back how I like them after the cleaning (such as re-arranging my icons how I like them on my desk top again). I also like to execute my Macs built in daily, weekly, and monthly maintenance scripts. Below is how I use ONYX.
*NOTE* – I take no responsibility if you copy my settings and loose something.
When you are happy with your cleaning options, its time to press execute.
ONYX will tell you it is going to close any other programs that are open, so again, make sure you have saved your work.
ONYX will now start performing maintenance. In most cases this will take some time, so if you didn’t stretch your legs, get a coffee and some fresh air before, now is the time. When ONYX has finished, a dialogue box will appear. Click OK.
Earlier today I tried to copy a large file I had made in Photoshop and I was told that the operation couldn’t complete because there wasn’t enough room on my hard drive for it. So, I needed a way to get a lot of space back, but I wasn’t sure what was taking up all of the room. I set about looking for ways to see what was going on on my drive and I happened upon some really great tools to help you visualize all your files. The process is called “Treemaps”.
I managed to find free Treemap programs for Windows, Mac and Linux platforms. For Windows users, you need to get a copy of WinDirStat (Windows Directory Statistics) HERE. Once installed, you can start it up and tell it to either analyze your whole drive, or specific folders. Here’s how it looks.
There is two options for Mac users. Grand Perspective (Gets up and going really quickly, easy to use) and Disk Inventory X (Longer to scan but a more thorough and detailed interface). Here’s how Grand Perspective looks.
And this is how Disk Inventory X Looks.
For Linux users, you can get KDirStat HERE. I havent tried it yet, but it looks very similar to WinDirStat. This screen capture is from their site.They are all fairly easy to use. Just roll your cursor over the big ones and the filename appears in the bottom left corner of the window. You can then decide which files you want to delete, and start enjoying some free space on your hard drive again.
UPDATE – **I HAVE TESTED THIS METHOD WITH OS X MAVERICKS AND IT WORKS GREAT!**
This tutorial was written using Mountain Lion as an example, but it works for Mavericks as well – just follow the same process
Just like OS X Lion, it is really important to save your OS X Mountain Lion and Mavericks “Install File” BEFORE you install it. Without it, you can not make an install disk, and it is deleted automatically once you install your new operating system.
Once you have purchased Mountain Lion or Mavericks, your purchase/price button will turn into a “downloading” button.
A short time after, your launchpad may spring open and show you the downloads progress.
You can leave it open and watch the progress if you want. Close it up when your finished watching, or when the file has completely downloaded.
**CRITICAL** – When the file has finished downloading, a window will pop up and ask you if you want to go ahead and install the new software. QUIT THE INSTALLER IMMEDIATELY! This can be done by clicking the file menu and selecting the “Quit” option.
Don’t worry, you are not going to loose the program you just bought, you are just telling your computer that you want to install later. Once you have closed out of the installer, open a new finder window, then open your “Applications” folder. Inside this folder you will see your OS X Mountain Lion or Mavericks Install File.
Right click and “Copy” the installer file, then “Paste” it onto your desktop.
Once the file finishes copying to the desktop, you can go back into your applications folder and double click and run the installer, if you are ready to install your update.
If you want to make a bootable install DVD disk or a USB Key, the easiest way to do this is with Disk Maker X (Formerly called Lion Disk Maker).
Go to the Disk Maker X web site HERE and download the latest version of the program. Once downloaded, unzip and run the program.
TO MAKE A DVD DISK:
With Disk Maker X open, select Mountain Lion to make a Mountain Lion DVD, Or Mavericks to make a Mavericks Install DVD.
Once you select your Operating System, the program will try to locate the install program automatically. It doesn’t matter if it uses the one in your Applications folder, or the one on your desktop. In my case, it found the one on my desktop.
The next step is to tell Disk Maker X if you want to make a DVD or a USB key. Keep in mind, if you want to make a DVD you will need a 8.5gb Dual Layer DVD, and a Dual Layer DVD Burner, as the installer will not fit on a single layer 4.7gb DVD.
Click “Burn A DVD”. Disk Maker X will ask you to select your Burner.
You will now be prompted to insert a disk, and begin the burning process.
TO MAKE A USB KEY:
With Disk Maker X open, select Mountain Lion to make a Mountain Lion USB or Mavericks to make a Mavericks install USB key.
Once you select your operating system, the program will try to locate the install program automatically. It doesn’t matter if it uses the one in your Applications folder, or the one on your desktop. In my case, it found the one on my desktop.
The next step is to tell Disk Maker X if you want to make a DVD or a USB key. Keep in mind, if you want to make a USB Key you will need a 8gb thumb drive, due to the size of the installer. Click “Create a Boot Disk”.
Next, Disk Maker X will ask you about your Thumb Drive. In keeping with the recommendations of the makers of the program, we will select “8gb USB Thumb Drive”.
(My understanding is, that this option will completely erase the entire USB drive, and ALL existing data will be over-written. If you have a larger drive, which is divided up into partitions, and you do not want to erase the whole drive, use the “Another kind of disk” option. IF this is incorrect, or there is also another reason, please reply in comments.)
You will now be asked to confirm your drive selection, and its location.
One last warning! Your thumb drive will now be erased COMPLETELY!
Disk Maker X will now begin crunching files to make your USB Installer.
During this process, particularly towards the end of the process, a lot of new windows and “Get Info” dialogues will pop up, and disappear. This is normal. This is just your computer acknowledging the creation and mounting of new drives and volumes.
Once it is all completed, you will hear Homer yelling “WooHoo!” and see your new USB drive ready to go!
We use cookies on our website to give you the most relevant experience by remembering your preferences and repeat visits. By clicking “Accept”, you consent to the use of ALL the cookies.
This website uses cookies to improve your experience while you navigate through the website. Out of these, the cookies that are categorized as necessary are stored on your browser as they are essential for the working of basic functionalities of the website. We also use third-party cookies that help us analyze and understand how you use this website. These cookies will be stored in your browser only with your consent. You also have the option to opt-out of these cookies. But opting out of some of these cookies may affect your browsing experience.
Necessary cookies are absolutely essential for the website to function properly. This category only includes cookies that ensures basic functionalities and security features of the website. These cookies do not store any personal information.
Any cookies that may not be particularly necessary for the website to function and is used specifically to collect user personal data via analytics, ads, other embedded contents are termed as non-necessary cookies. It is mandatory to procure user consent prior to running these cookies on your website.

 Have you ever had a large USB drive that only shows 200mb when you plug it into your Windows computer? Frustrating isn’t it!
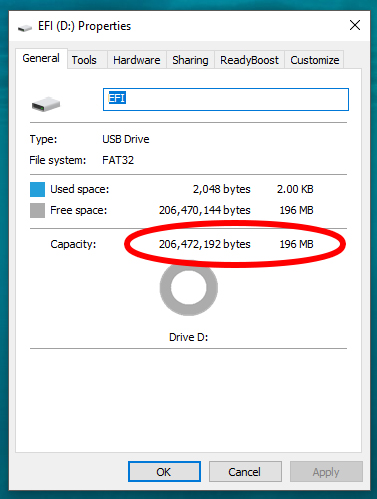 And what makes it worse is that nothing you try in the “Format” utility will change it – it always says 200mb in the capacity drop down.
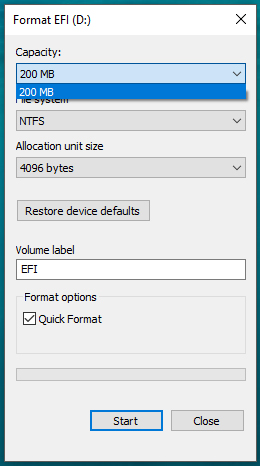 The reason this happens is that in some stage in the USB Drive’s life it has been plugged into a Mac, and it has done “Mac Things” to the drive. Thankfully, there is an easy way to fix it.