How to paint Realistic Wood Scale Ship Model Decks by Loren Perry

**NOTE** – This article was written by Loren Perry many years ago, for another web site which unfortunately is no longer available. I was very glad to have found the article on an old floppy disc recently, and post it here now for the benefit of all.

Please visit Loren Perry and buy the best Ship Model Photo Etch parts at – Gold Medal Models


arizona
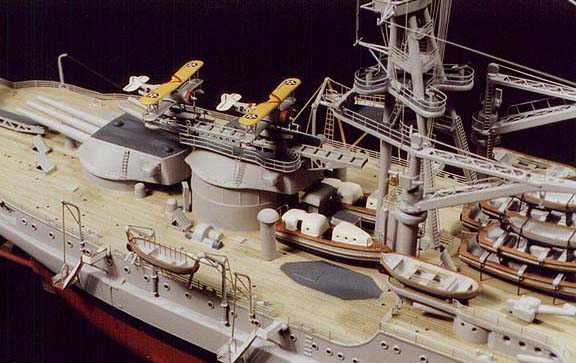
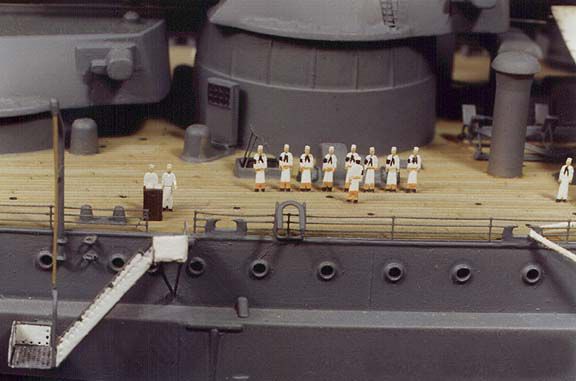
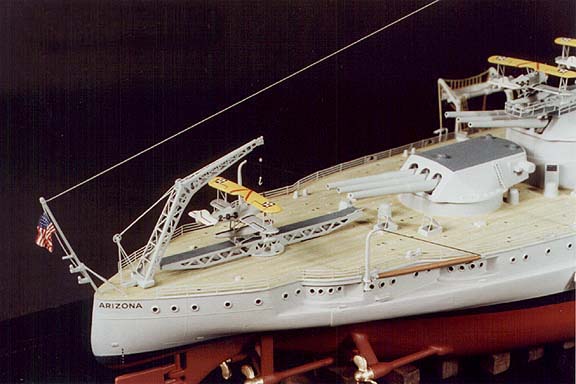
Wooden deck on the fantail of Loren Perry’s 1934 Arizona, built from the Revell 1/429 kit

One of the three colors is a paint, the other two are from Floquil’s range of model “stains”. They are: 1. “Mud” (a model railroad weathering paint), 2. “Driftwood” (a light gray stain), and 3. “Walnut” (a brown stain.) The entire process can be boiled down to four simple steps:* 1. Airbrush the deck with Mud.
* 2. Streak the deck with Driftwood.
* 3. Streak the deck with Walnut.
* 4. Repeat steps 2 and 3 as necessary.

This method is, fortunately, very simple and very forgiving. First one must airbrush the deck with Mud and allow it to dry at least 24 hours. In fact, this will be the very first color painted on the entire model – the grays, blacks, and other colors come after the deck has been prepared first. Once the Mud paint has dried, select your smallest tipped brush and open the bottle of Driftwood. You then dip the brush into the stain and then wipe the tip of the brush lightly over a paper towel until only a small amount of wet stain remains in the bristles. Now use the brush to streak the stain in narrow strips lengthwise along the deck (or parallel to the planking). Use random strokes until the deck is evenly streaked over is entire surface. When finished (the stain dries very quickly), open the Walnut stain and repeat this step. If the deck appears too dark, repeat the streaking process with the Driftwood until the deck starts to lighten up. If you want the deck to return more to the shade of the Mud paint, streak the deck with Mud in the same manner as the stain. By alternating back and forth between these three colors, you’ll find you have great control over the final appearance of the model’s wooden decks. And so long as you keep the stains and paint nicely thinned, there will be no visible buildup of pigment to obscure detail. And remember to keep the brush strokes about the width of a plank, or no more than two planks.

Some advantages of this technique: A. no great artisitic skill is necessary, only the ability to apply random paint streaks in parallel lines; B. a damaged area can easily be blended into the rest of the deck by applying more strokes in alternating colors as above; C. the process goes quickly – one Arizona model had its deck fully painted and streaked in about an hour (after the original Mud application had dried, of course.) A tip: purchase an inexpensive kit to use as your “guinea pig”. Use this kit’s parts to test your technique and refine it before you move onto your main project. You’ll find, as I did, that the final appearance of your model’s planked deck looks exceptionally convincing, both in photographs and to the viewer seeing it on display.

arizona_003arizona_002

How to make Real Realistic Looking Water Base for Ship Model Diorama

Disclaimer – This article is reproduced here from IPMS Stockholm without permission – I know this is a really bad thing to do, but SO many good articles have disappeared from the internet over the years, and I couldn’t stand to lose this one, so I have saved a back up copy of it here.

PLEASE Visit IPMS Stockholms original article by Omami HERE.


tech_seawater_01Replicating elements of nature in miniature is one of the more tricky aspects of modelling, requiring not only the “engineering” knowledge of a subject but also a bit of artistic sense.

For ship model builders such as myself, water base can really make or break a good model. In this article I would like to show you how to produce a realistic sea base for ship model, with rough water surface, surf and wake. I have perfected these techniques during my own project of modelling the IJN Task Force, Carrier Division 1. The Task Force consists of  the aircraft carriers Kaga and Akagi steaming side-by-side on a single base.

Before we begin, let’s consider the qualities of our subject.

Despite of what we all know about water, deep water basins seldom look transparent, especially when seen from a distance. Rather than that, water has colour and forms a glossy, highly reflective surface. These qualities of water are especially appropriate to replicate in scale, particularly when dealing with ship models in smaller scales such as 1/700.

Having performed this most basic analysis, let’s move to a step-by-step description of how to produce a convincing sea base.

Continue reading “How to make Real Realistic Looking Water Base for Ship Model Diorama”

Total Offline Geocaching on iPhone with Looking 4 Cache App

Looking For Cache Icon

Recently I was made aware of a great Geocaching App for iPhone called Looking 4 Cache. It has quickly become my favorite Geocaching App, and not by a little. I think it is easily the “Ultimate” application for Geocaching on the iPhone at the moment! There is one thing this App can do, that the others can’t, that places it head and shoulders above the rest – 100 Percent Complete Total OFFLINE Geocaching!

homer-woohooNow that I have satisfied the “SEO Gods” with my first paragraph, let’s get down to business. To begin with, I downloaded the free version, Looking 4 Cache lite. My first impression of Looking 4 Cache Lite was not good. I didn’t find it intuitive. As I had previously been using iGeoknife, I thought Looking 4 Cache’s interface was ugly by comparison, and I actually deleted it from my phone. It was only after discussing offline caching on a Facebook group that I learned the Full version/Pro version offered offline maps. I then paid my $10, bought the Pro version, and gave it another go. This was a big enough feature to force me to revisit and re-assess my opinions on this application.

Looking 4 Cache Screen CaptureNot only do I find the App’s Icon to be somewhat disturbing, Initially, and still today, the interface looks somewhat like a “Pirate Map” to me… Perhaps that is what the developer was going for, and I can see why – Geocaching is somewhat of a “Treasure Hunt”. Having just played with iGeoknife (A far more polished, but considerably less capable app) prior to Looking 4 Cache (from hereon referred to as L4C), it’s cleaner and sharper (especially on iPad) appearance was still at the forefront of my mind. The first thing I did with each App, was to go and look for a cache. I am sure you will agree, the appearance of the compass in iGeoknife slaughters L4C’s offering.

iGeoknife vs Looking 4 Cache Compass ComparoIn my opinion, opening L4C for the first time is confusing, un-intuitive, and messy.

BUT……………….

If you can get past that, and give it a few minutes, and try and dig down into it, once the penny drops and you get the gist of how it is laid out, you will quickly forget the initial awkwardness forever, and like me, will also forget every other Geocaching App (Including the Official Geocaching App) you have ever tried.

Unlike the Official Geocaching App (Which is the biggest data allowance gulping app on my iPhone), L4C seems to be built on the concept of low/no data usage. If you are caching online, it saves your “Live” searches, so if you leave your current location, and come back another day, those results are still available to you (assuming you haven’t cleared them). You might be thinking “but I wont be seeing the latest logs”. L4C gives you the option to update or reload the cache you are chasing, to get the latest information (obviously you need connectivity for this). Just hit the “Reload” icon in the top right corner.

L4C ReloadIf you are using “Live” maps, it also seems to “Cache”…(pardon the pun) the map tiles as well, so once they are downloaded, it doesn’t appear to have to re-download them again whilst you are still active in that area.

Where L4C cements itself as the number one Geocaching App, is it’s ability to download very detailed maps, and save them for offline use. The Map Download Centre gives you the ability to download detailed offline maps from pretty much everywhere in the world. But, be warned, as you would expect, detailed maps equals big impact on free space! If you want to cache offline, it is going to take up some room to do so! The offline Australia map is 3.3Gb! You cant have one without the other!

Map-Download-CentreCombine this with its ability to digest/ingest pocket queries from the Geocaching web site, as well as GPX files and databases that you might create using GSAK (Geocaching Swiss Army Knife), and you have got a 100 Percent Totally Offline solution.

L4C-PQsYou can now go Geocaching literally in the middle of nowhere, completely cut off from the internet, provided you have your maps and pocket queries in order before you leave. Once you have found your caches you can create “Found It” logs as you go, and once you have data coverage again L4C will send them off to geocaching.com automatically. Cool Huh!

L4C has a website you can check out Here.