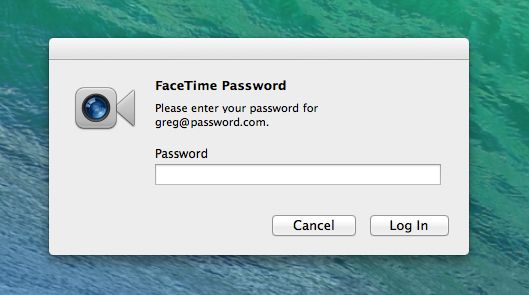
All of a sudden, when I turn on/log in on my Macs that are running OS X Mavericks, I am getting a window that asks me to input the password for FaceTime. This really started driving me crazy, as I don’t use FaceTime, and I don’t even have a camera connected to my Mac Pro.
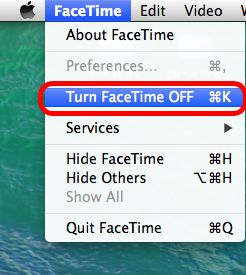
To stop this from happening, I just turned FaceTime off. To do this, open a new finder window, and then open your Applications folder. Now click/open FaceTime. Click and drag down the “FaceTime” menu option and simply select “Turn FaceTime Off”.
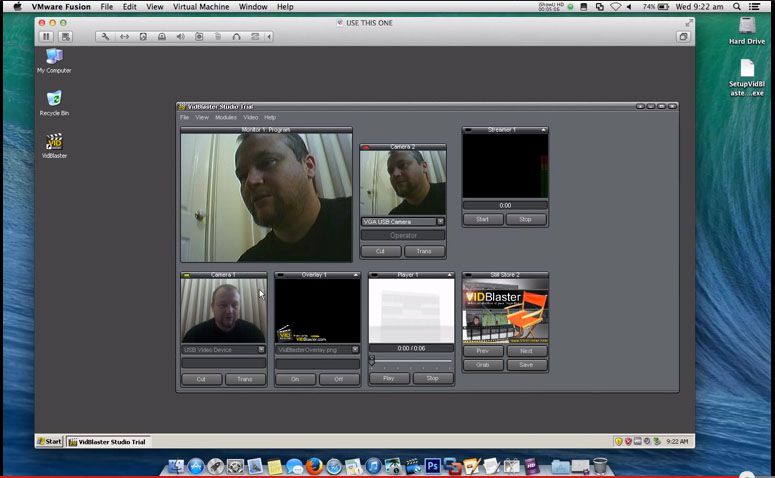
In this video I show you how to add additional cameras to your Vidblaster setup in either Windows or Mac, and how easy it is to switch between them.
Note to Pros – These articles are aimed at beginners, who wish to spend little or no money until they have a grasp on the topic, and are hoping to learn how to get started quickly and easily, using equipment they most likely already have.
httpvh://youtu.be/VTpJ5ZkTShQ
You can also use your iPhone, Android and Nokia smart phones as cameras by using Epoccam as shown in this tutorial.
httpvh://youtu.be/Z5E-vEalubM
You can download a free unrestricted trial copy of Vidblaster from vidblaster.com
Part 1 – Selecting Video Switcher Production Software – The Heart of Vidcasting – VIEW HERE Part 2 – Installing Vidblaster, Connecting Your Webcam, Switching and Interface Basics – VIEW HERE Part 3 – Adding Additional Cameras – VIEW HERE Part 4 – Mixing Audio, Mics, and Avoiding Looping in Software – VIEW HERE Part 5 – Desktop and Browser Capture – VIEW HERE Part 6 – Connecting Guests Via Skype – VIEW HERE Part 7 – How To Make A Lower Third Overlay – VIEW HERE Part 8 – Adding flair with Effects, Soundboards and Chat Streams – COMING SOON! Part 9 – Green Screen/Chroma Keying and Virtual Sets with iClone – COMING SOON! Part 10 – Recording and Streaming – COMING SOON!
I am sure there are dozens of methods, and dozens of programs and apps that do wonderful things for your Mac computer running OS X Lion/Mountain Lion, but in my opinion, the folks at Apple have built in the best, quickest, and easiest way to give your Apple computer a boost. It’s called “Repair Permissions”.
A few years ago I was involved heavily in editing high def video for a motorsport operation, and it never ceased to amaze me how much quicker and happier my mac pro was after a permissions repair.
**NOTE** – It can take a while for this operation to complete, so make sure you have plenty of down time before tying up your computer with this procedure.
The good thing about OS X Lion/Mountain Lion is that you don’t have to go and find your install disk to do this anymore (Like you used to have to do with Snow Leopard, Leopard and Tiger). When you installed Lion/Mountain Lion, it created a rescue partition for you, and to access this partition, and speed up your mac, all you gotta do is hold down your “ALT” key, and turn your mac on! Once you here the “BONG” sound, you will see this:
When your Mac boots, it selects the regular hard drive automatically. But when you hold down the ALT key, your telling your Mac that you want to see what other devices you can boot. Lion/Mountain Lion creates a very small “Virtual” hard drive, that you can boot into instead of your normal hard drive and operating system, that lets you perform maintenance operations. To restore your permissions, click the arrow for “Recovery HD”. Your computer will boot from this second partition, leaving your main partition unmounted, so you can perform maintenance.
Once your computer has booted up from the Recovery Hard Disk you will see Utilities Window.
To get started, select the “Disk Utility” option, then click continue in the bottom right corner. The Disk Utility will now open.
Select/Highlight your main hard drive partition (the one you want to speed up) in the left side of the window, and click “First Aid” to get to the repair window. Here you can verify/repair the condition of the disk. I usually just hit “Repair Disk” and let it do its thing. This can take a bit of time, so go put the coffee on!
You will see all kinds of activity, but the only thing you need to worry about is that green text that says the disk is ok, and that the repair is complete. The next step is to click “Repair Permissions”. Again, this may take some time, but when it is complete it will tell you down the bottom of the window in bold font.
When its done, Quit out of Disk Utility using the “Disk Utility” menu bar option.
Then Quit out of the Utilities Window from the Mac OS X Utilities menu bar option.
The final window/step is to click “Restart” from the “Choose Start Up Disk” Window. As we didnt permanently change the start up disk, there is no need to change any other parameters here, just click Restart.
Your computer will now restart (It may take a little longer than normal to do so – so don’t worry if it does!) and hopefully you will notice a pleasant increase in performance!
UPDATE – **I HAVE TESTED THIS METHOD WITH OS X MAVERICKS AND IT WORKS GREAT!**
This tutorial was written using Mountain Lion as an example, but it works for Mavericks as well – just follow the same process
Just like OS X Lion, it is really important to save your OS X Mountain Lion and Mavericks “Install File” BEFORE you install it. Without it, you can not make an install disk, and it is deleted automatically once you install your new operating system.
Once you have purchased Mountain Lion or Mavericks, your purchase/price button will turn into a “downloading” button.
A short time after, your launchpad may spring open and show you the downloads progress.
You can leave it open and watch the progress if you want. Close it up when your finished watching, or when the file has completely downloaded.
**CRITICAL** – When the file has finished downloading, a window will pop up and ask you if you want to go ahead and install the new software. QUIT THE INSTALLER IMMEDIATELY! This can be done by clicking the file menu and selecting the “Quit” option.
Don’t worry, you are not going to loose the program you just bought, you are just telling your computer that you want to install later. Once you have closed out of the installer, open a new finder window, then open your “Applications” folder. Inside this folder you will see your OS X Mountain Lion or Mavericks Install File.
Right click and “Copy” the installer file, then “Paste” it onto your desktop.
Once the file finishes copying to the desktop, you can go back into your applications folder and double click and run the installer, if you are ready to install your update.
If you want to make a bootable install DVD disk or a USB Key, the easiest way to do this is with Disk Maker X (Formerly called Lion Disk Maker).
Go to the Disk Maker X web site HERE and download the latest version of the program. Once downloaded, unzip and run the program.
TO MAKE A DVD DISK:
With Disk Maker X open, select Mountain Lion to make a Mountain Lion DVD, Or Mavericks to make a Mavericks Install DVD.
Once you select your Operating System, the program will try to locate the install program automatically. It doesn’t matter if it uses the one in your Applications folder, or the one on your desktop. In my case, it found the one on my desktop.
The next step is to tell Disk Maker X if you want to make a DVD or a USB key. Keep in mind, if you want to make a DVD you will need a 8.5gb Dual Layer DVD, and a Dual Layer DVD Burner, as the installer will not fit on a single layer 4.7gb DVD.
Click “Burn A DVD”. Disk Maker X will ask you to select your Burner.
You will now be prompted to insert a disk, and begin the burning process.
TO MAKE A USB KEY:
With Disk Maker X open, select Mountain Lion to make a Mountain Lion USB or Mavericks to make a Mavericks install USB key.
Once you select your operating system, the program will try to locate the install program automatically. It doesn’t matter if it uses the one in your Applications folder, or the one on your desktop. In my case, it found the one on my desktop.
The next step is to tell Disk Maker X if you want to make a DVD or a USB key. Keep in mind, if you want to make a USB Key you will need a 8gb thumb drive, due to the size of the installer. Click “Create a Boot Disk”.
Next, Disk Maker X will ask you about your Thumb Drive. In keeping with the recommendations of the makers of the program, we will select “8gb USB Thumb Drive”.
(My understanding is, that this option will completely erase the entire USB drive, and ALL existing data will be over-written. If you have a larger drive, which is divided up into partitions, and you do not want to erase the whole drive, use the “Another kind of disk” option. IF this is incorrect, or there is also another reason, please reply in comments.)
You will now be asked to confirm your drive selection, and its location.
One last warning! Your thumb drive will now be erased COMPLETELY!
Disk Maker X will now begin crunching files to make your USB Installer.
During this process, particularly towards the end of the process, a lot of new windows and “Get Info” dialogues will pop up, and disappear. This is normal. This is just your computer acknowledging the creation and mounting of new drives and volumes.
Once it is all completed, you will hear Homer yelling “WooHoo!” and see your new USB drive ready to go!
Lately I have been backing up a lot of files to DVD for archiving. I was looking for a quick easy way to print out a list of all of the files on each disk that I could slip into the jewel case as well, so I know what is on it at a glance.
The simplest solution I could find was to open the folder in the finder, select all with command A, then command C to copy. Now that all of the files are in memory, open TextEdit and create a new text file. To paste in a “Listing” of the file names only, press command-option-shift and then V. You can now save and/or print if required.
This method works well so long as all of the files are in the same folder. If you want to print out a listing from a folder that has sub-folders, you will only get the sub-folders names, it will not display the names of the files in the sub-folders.
Do you know of a better method? Is there a program you know of that will do this better?
We use cookies on our website to give you the most relevant experience by remembering your preferences and repeat visits. By clicking “Accept”, you consent to the use of ALL the cookies.
This website uses cookies to improve your experience while you navigate through the website. Out of these, the cookies that are categorized as necessary are stored on your browser as they are essential for the working of basic functionalities of the website. We also use third-party cookies that help us analyze and understand how you use this website. These cookies will be stored in your browser only with your consent. You also have the option to opt-out of these cookies. But opting out of some of these cookies may affect your browsing experience.
Necessary cookies are absolutely essential for the website to function properly. This category only includes cookies that ensures basic functionalities and security features of the website. These cookies do not store any personal information.
Any cookies that may not be particularly necessary for the website to function and is used specifically to collect user personal data via analytics, ads, other embedded contents are termed as non-necessary cookies. It is mandatory to procure user consent prior to running these cookies on your website.

 To stop this from happening, I just turned FaceTime off. To do this, open a new finder window, and then open your Applications folder. Now click/open FaceTime. Click and drag down the “FaceTime” menu option and simply select “Turn FaceTime Off”.