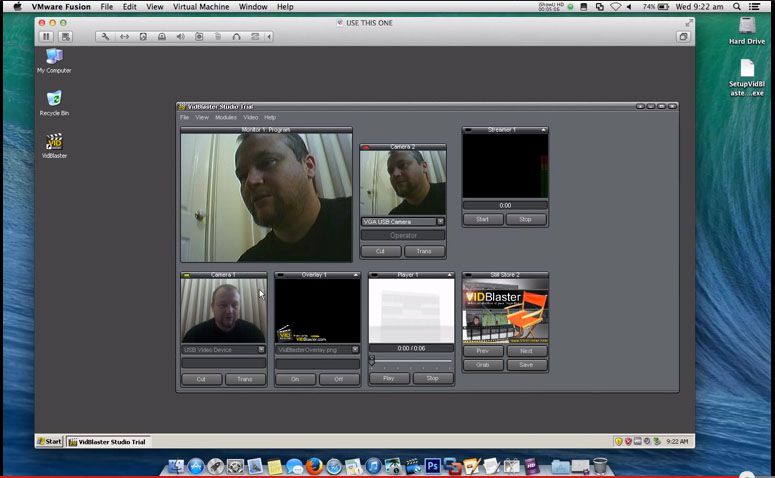
In this video I show you how to add additional cameras to your Vidblaster setup in either Windows or Mac, and how easy it is to switch between them.
Note to Pros – These articles are aimed at beginners, who wish to spend little or no money until they have a grasp on the topic, and are hoping to learn how to get started quickly and easily, using equipment they most likely already have.
httpvh://youtu.be/VTpJ5ZkTShQ
You can also use your iPhone, Android and Nokia smart phones as cameras by using Epoccam as shown in this tutorial.
httpvh://youtu.be/Z5E-vEalubM
You can download a free unrestricted trial copy of Vidblaster from vidblaster.com
Part 1 – Selecting Video Switcher Production Software – The Heart of Vidcasting – VIEW HERE Part 2 – Installing Vidblaster, Connecting Your Webcam, Switching and Interface Basics – VIEW HERE Part 3 – Adding Additional Cameras – VIEW HERE Part 4 – Mixing Audio, Mics, and Avoiding Looping in Software – VIEW HERE Part 5 – Desktop and Browser Capture – VIEW HERE Part 6 – Connecting Guests Via Skype – VIEW HERE Part 7 – How To Make A Lower Third Overlay – VIEW HERE Part 8 – Adding flair with Effects, Soundboards and Chat Streams – COMING SOON! Part 9 – Green Screen/Chroma Keying and Virtual Sets with iClone – COMING SOON! Part 10 – Recording and Streaming – COMING SOON!
A OSX Lion Virtual Machine running on OSX Lion I hear you cry? Why?
Much like Windows (but not quiet so bad) Mac OSX creates support files for most program you install. Even though a lot of programs you download seem like a self contained package, and if you don’t like it, you just trash it and its gone, that isn’t really the case. Like Windows, your mac has a large amount of hidden files, and new ones are created with most programs you run. Things like preferences files, registration data, and a swag of other stuff that hangs around after the main app file has been deleted.
(If you are interested in viewing this sort of stuff, and easy way to get started is to Download Tinker Tool, set it to “Show Hidden Files and Folders”, click “Relaunch Finder” and open up hard drive/library folder. BE WARNED! – You can do a LOT of damage in there, tinker with care!)
If you are like me, and feel uncomfortable with the possibility that clutter and orphaned files may be affecting your systems performance, a great way to test out new programs to see if you want to commit to them long term is to try them in a Mac Virtual Machine. This way, all of the files stay in the Virtual Machine, and you can roll back to a previous snapshot, or even delete it when your done, and your live system hasn’t been modified at all.
It’s pretty easy to install a Mac OSX Lion Virtual Machine in VMWare Fusion………as long as you managed to intercept/save your “Install Mac OS X Lion” Installer app from your Applications folder before you installed OSX Lion on your computer.
The problem here, is that a lot of us didn’t. I certainly didn’t. And for some reason it seems to be automatically deleted once you have installed it. I tried lots of methods that claimed to be able to reclaim the installer app, but none of them really worked. I ended up wiping my hard drive completely, re-installing Snow Leopard, then going back into the App Store and re-downloading the Lion Installer App, and saving it out before I ran it. As I had already purchased it, there was no cost, but it was still a lengthy process.
Once you have the Lion Installer app, open VMWare Fusion and click “Create New” in your virtual machine library to create your new Virtual Machine.
The next Window will ask you for your installation file. As you most likely don’t have OSX Lion on a disc, you will need to point it to your Lion Installer App. Click “Continue Without Disc”
Next, select your installer app’s location from the drop down menu and click continue.
The installer is pretty clever at picking what operating system you want to install, so in most cases you can just click “Continue” once it has correctly identified the installer.
The next window allows you to customize aspects of the new virtual machine. You can assign more memory, more hard drive space, and a lots of other variables by clicking “customize settings”. Again, VMWare is pretty clever about choosing the best settings for you, so feel free to accept them and click “Finish”. You can always change them later if you need to by right clicking your virtual machine in the virtual machine library and selecting “Settings”.
The final step is to name your virtual machine. VMWare Fusion selects a default name based on your operating system, but you will probably want to change it to something a little more meaningful. In my case, I changed it to “Lion Test Area”, as this is where I will be testing software.
And now it begins!
And before too long, your in business! You now have a sand-boxed version of OSX Lion running inside of OSX Lion!
Now, again, if your like me, your probably thinking “Can I use the same technique to run Leopard or Snow Leopard in Lion so I can use my old PPC apps?” At this stage, I am not aware of any simple easy way to make Leopard or Snow Leopard run. I am looking into it though, and if you already know, please let us know!
Something else that has been bugging me lately about OSX Lion is that “One Finger Tap Dragging” has changed to “Click and Drag”. By default, you can’t just move the cursor to the windows top bar, tap once and drag it around the screen. It’s really difficult to break the habit if you have been a Mac user for several years. Thankfully, it is still available in Lion, but it is REALLY hidden away.
I spent ages going through every aspect of the “Trackpad” preferences pane, and watching all the little videos on gestures, but it turns out that this feature isn’t even in there. To turn One Tap Dragging back on, you need to go into “Universal Access”! How do you like those APPLES! Thanks APPLE!
Once you have opened Preferences and clicked Universal Access, click the “Mouse & Trackpad” tab, and then “Trackpad Options” towards the bottom.
Now, by checking one simple checkbox, all of that anguish and suffering will go away! Simply check the box next to “Dragging” and One Tap Dragging is restored. And if you were used to the “Drag Lock” feature in previous versions (where you have to tap again to release”, you can also restore that feature in the drop down to the right of “Dragging” as well.
Below is a screen capture of an option I would REALLY like to see Apple implement in coming versions of their operating system.
Mac Mail has a feature now that groups emails with the same subject line together into a collapsed “forum thread” like manner, which saves space when you are looking at your inbox. The problem I find with it is that there just aren’t enough bells, whistles and foghorns to catch my attention when a new email arrives and its a reply to something in that thread. I need more than just the number in the bottom right corner incrementing. As a result, I have lost/not read some emails lately.
Thankfully, there is a solution for this, but it requires a bit of patience to implement as it is not a global fix. For some reason, emails are grouped by default, and you have to ungroup on a thread by thread basis…….Thanks Apple.
To do so, highlight the thread you want to ungroup, then in the menu bar select “View” and uncheck the option that says “Organise by Conversation”
Now you will see each email as a single item in your inbox again, and new and unread emails will go back to having that little blue dot to the left. If you want to continue to see threads from specific contacts in an ungrouped way, you can just ad a rule (in the rules tab in mail preferences pane) to highlight email from them with a unique background colour.
Again, as I said, this isn’t global, its thread by thread. So if you REALLY hate this feature, a quick way to start making it go away is to select all messages in your inbox simulataneously (Highlight one, then click command and A) and then uncheck “Organise By Conversation”.
If you are using Mac Mail as an RSS reader, this method also works to ungroup new posts on sites you are following.
If you have any other idea’s on how to work around this annoyance, please reply in the comments.
I know that dialogue warning boxes are there for a reason, and they protect us from accidentally deleting stuff we don’t really want to delete, but I work with dozens of files, and dozens of versions of files at a time. If you are someone who has the need to delete files a lot, and likes to see the “Empty” trash can icon (like me) it is possible to disable that annoying “Are you sure you really want to empty your trash can, even though you just specifically right clicked on the icon and purposely selected the “empty trash” option?” dialogue box.
Click on your desktop to activate the finder, then under the “Finder” menu, select preferances.
Once you have selected “Preferences” and the preferences pane is open, its just a simple matter un-checking the “Show warning before emptying the Trash” option.
Its only a little thing I know, but if you are a true “Power-User”, this is a godsend that can save you a lot of extra clicks.
If your like me and run Windows on your Mac using VMWARE Fusion, you have probably been getting really frustrated lately at the blank black screen you see when you try to run your virtual machine. I haven’t found a permanent fix for this, and I hope the folks at VMWare are looking into it, but I have found a workaround, which has worked for me.
TRY THIS AT YOUR OWN RISK – I ACCEPT NO RESPONSIBILITY IF YOU BREAK SOMETHING – THIS IS MERELY A RECOUNT OF HOW I WAS ABLE TO RESOLVE THE ISSUE – YOUR RESULTS MAY BE VERY DIFFERENT!!!
I have performed this workaround not only on my Macbook Pro, but on my Mac Pro as well – it worked in both instances.
To begin, I went back to VMWare’s site HERE and re-downloaded VMWare Fusion 4 (I use the lite version without McAfee)
Once the download was complete, I mounted the .dmg and tried to simply drop the app icon onto the Applications Folder……..FAIL!
I cant stress enough, I accept NO responsibility if you try this and it fails for you ok!
At this point I opened up my Applications folder and dragged the VMWare app to the trash – I had to type in my admin password before the system allowed this. Initially I was worried that my license would get deleted as well, but I had a hunch the license would be stored elsewhere deeper in the bowels of my Mac, so I pressed on.
After the app was successfully moved to the trash, I was able to drag the VMWare logo from the .dmg into the Applications folder. Again, I was asked to type in my Admin password.
Once it had completed copying, I unmounted the .dmg, and clicked the icon in my dock to boot my Windows XP Virtual Machine. An alert popped up telling me that VMWare had to update some resources, and again I had to type my Admin password……………..AND THEN…..
LOOKIN GOOD……………….
YES! Back in the game!
Since I discovered this workaround about 10 days ago, my Mac Pro hasn’t skipped a beat. I updated my Macbook Pro last night with new iCloud features, and my Virtual Machine Black Screened again this morning. So I re-tried the work around for the creation of this article and It worked again for the second time.
I know its a pain to perform, but it did work for me, and if I have to choose between not using my Virtual Machine at all, or spending three minutes performing the workaround to get going again, I know what I would prefer to do.
Lets hope the folks at VMWare sort this one out soon!
We use cookies on our website to give you the most relevant experience by remembering your preferences and repeat visits. By clicking “Accept”, you consent to the use of ALL the cookies.
This website uses cookies to improve your experience while you navigate through the website. Out of these, the cookies that are categorized as necessary are stored on your browser as they are essential for the working of basic functionalities of the website. We also use third-party cookies that help us analyze and understand how you use this website. These cookies will be stored in your browser only with your consent. You also have the option to opt-out of these cookies. But opting out of some of these cookies may affect your browsing experience.
Necessary cookies are absolutely essential for the website to function properly. This category only includes cookies that ensures basic functionalities and security features of the website. These cookies do not store any personal information.
Any cookies that may not be particularly necessary for the website to function and is used specifically to collect user personal data via analytics, ads, other embedded contents are termed as non-necessary cookies. It is mandatory to procure user consent prior to running these cookies on your website.


 - Panthera leo")


