I was lucky enough to go and see Aerosmith at Melbourne’s Rod Laver Arena – It was a KICK ASS show!
After the show, we really wanted to have a souvenir, and thanks to Youtube, we got one. Some other folks at the show recorded it on their phones and uploaded it. Using Flash Video Downloader I was able to download their vids, and using the awesome and FREE MacX Video Converter, I was able to save the audio from their video files to MP3, then to iTunes, and then sync the songs to our iPhones, so we have a playlist of the show. How cool huh!
The problem was, that the songs played in alphabetical order instead of the order they played the songs on the night (Track number order).
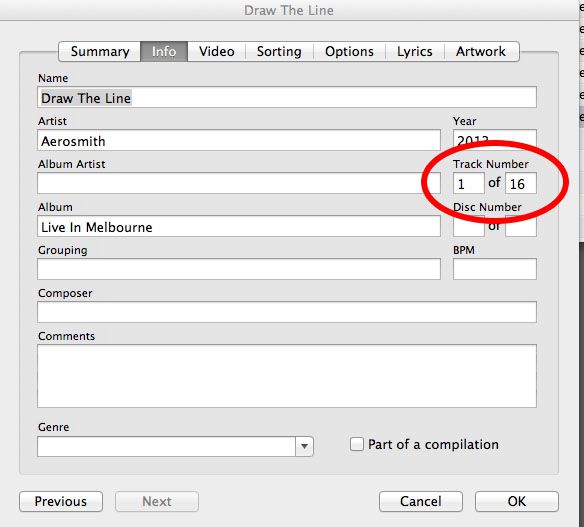
I did the whole Get Info thing in iTunes and set the track numbers….which didn’t work….
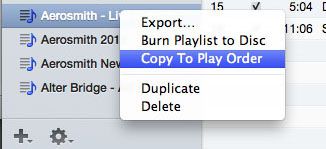
I sync’d and sync’d to no avail. And then out of the blue, I right clicked the playlist, and there it was….PLAY ORDER!
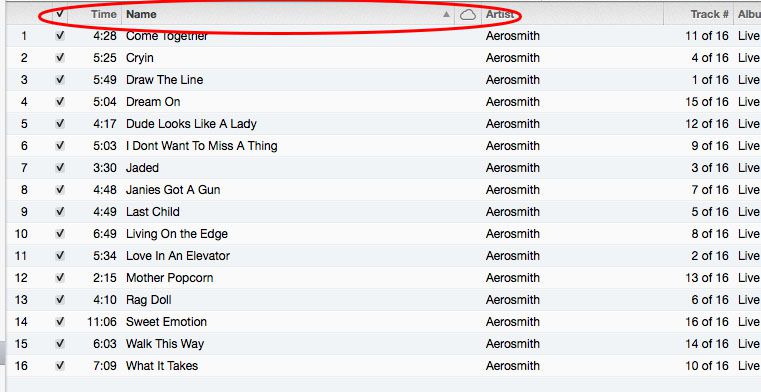
This is SO hidden! I learned that if your songs are listed in alphabetical order in the album view in iTunes, with the highlight in the song name column, and you right click (command click) the playlist and select “Copy To Play Order”, and then sync your device your songs will play in alphabetical order.
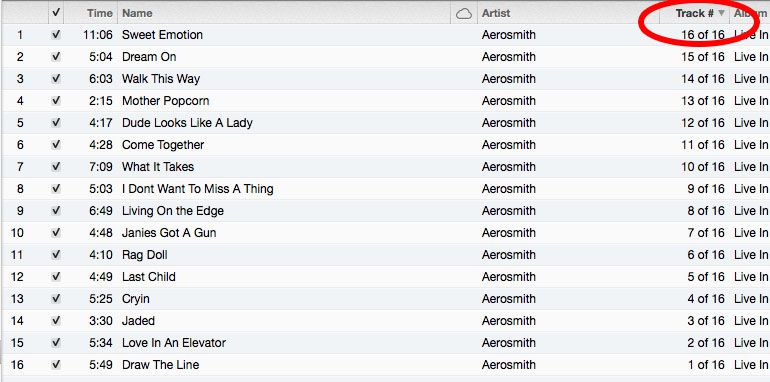
If you want your songs in your playlist to play in track number order on your device, click and highlight the track number column in iTunes,
Then right click (command click) the play list and select “Copy To Play Order”
If you have a camera capable of taking 3D photographs, and a Apple Computer, I have just found the simplest, quickest, easiest way to view your photos, It’s called ShowMe3D. Ever since I got my 3D camera I have been longing for a way to just unload my pics, and view them in 3D straight away, without having to jump through a million hoops, and this is it!
Open up App Store on your Mac and search for ShowMe3D, or click this link to Download ShowMe3D from the Mac App Store. It’s not free, but at just $4.99, it really is a bargain.
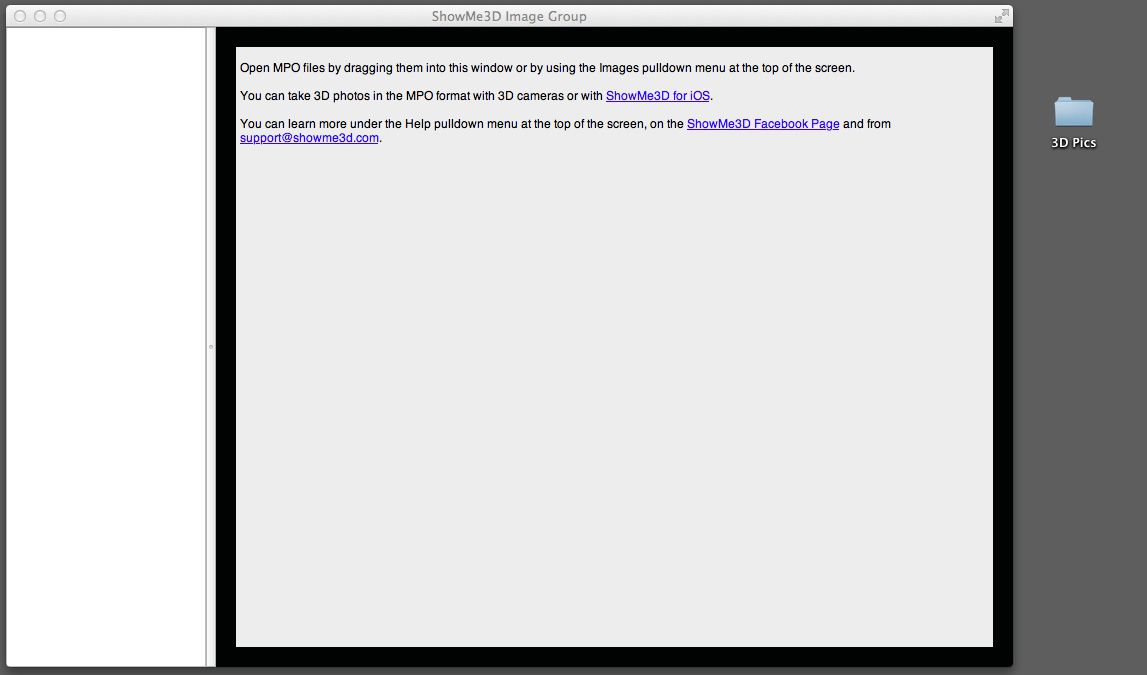
Once you have downloaded and installed ShowMe3D, open it up and you will see the main screen.
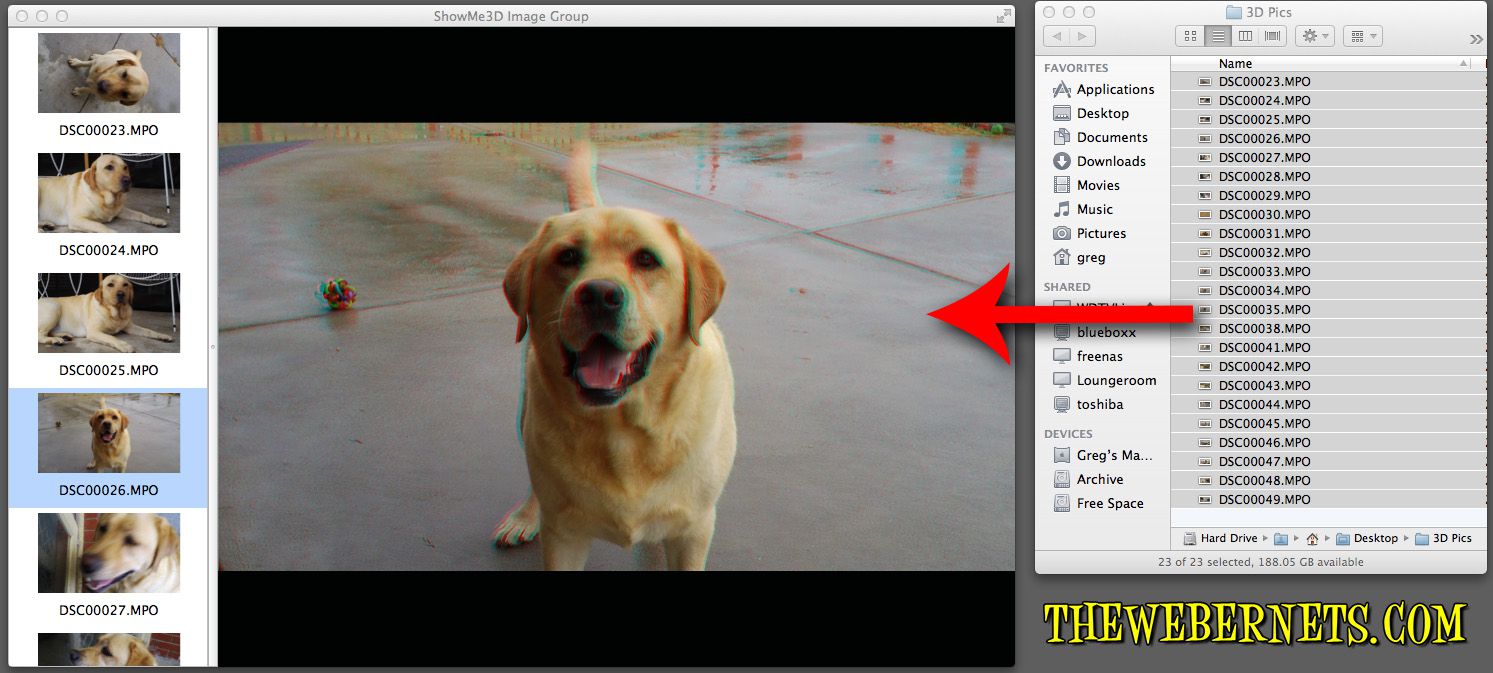
Now, open the folder that contains the .mpo files (Multiple Picture Object) from your camera, and drag the pics you want to view onto the open window and put on your 3D glasses.
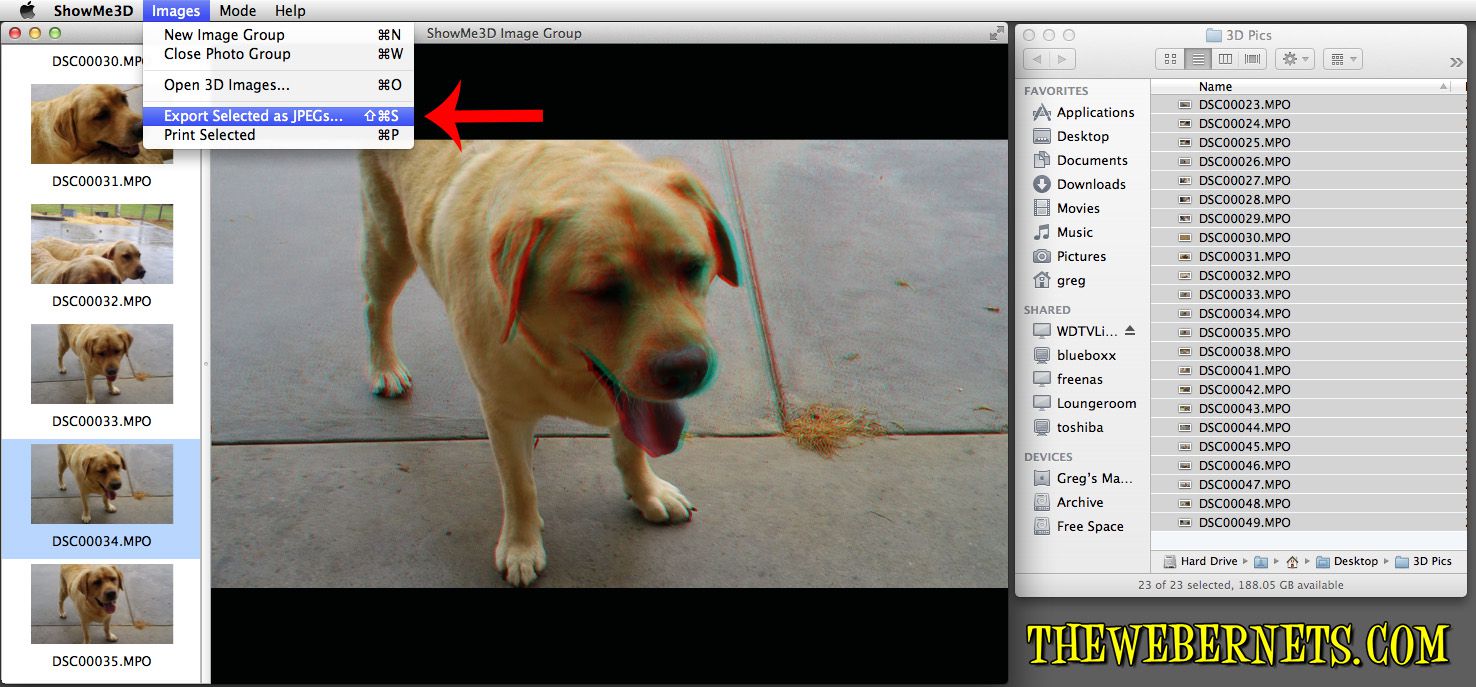
Instantly, you can view your 3D photos in 3D, and scroll through them in the same way you would using the “Preview” app. A feature of this program that I really like, is it also allows you to Export your .mpo files as Anaglyph Jpegs, so you can quickly and easily convert your .mpo’s to regular jpegs – cool huh!
Here’s a Anaglyph 3D Jpeg I converted from an .mpo file using ShowMe3D – It’s my dog Benson.
So now you have created your 3D video file, its time to watch it back and see how it looks. If you try to open it using Quicktime or Windows Media Player, you will see your two camera feeds simultaneously in “Side by Side” format.
In order to see the 3D effect, and watch your video in 3D you will need to use a player that is capable of handling Stereoscopic Video files. There are quiet a few out there, but my Favorite is called BINO. I like it because it is really easy to use, can play your side by side video file back in lots of different flavors of 3D (like red/cyan, amber/blue, green magenta), there are versions for Windows, Mac and Linux/Unix, and the best part, its completely free!
You can download BINO from the bino3d.org web site HERE.
Once you have downloaded, extracted and installed BINO you can launch it, and from the file menu select your Side By Side video file, and the player will appear. You now need to set only two parameters, you need to tell BINO what kind of file it is you want to play, and how you want it played back.
In the “Input” drop down menu, select “Left/Right Half Width”, and in the “Output” drop down menu, select the display method that corresponds to the 3D Glasses you will be using to watch the video. I have the ones with the Red and Blue lenses, so I use Red/Cyan High Quality mode. Now, just push play and see how you did.
You can make your video go full screen by double clicking the playing video. Double clicking on it again takes you back to window mode.
Almost all of us were, and are still using Windows based computers, even though we have locked ourselves firmly into the Apple world by buying iPhones and iPads. I am sure you have noticed (Like I Have) there are definitely some issues that arise by being “Multi Platform”. Slowly but surely, the software writers of the world are delivering apps that allow your iPhone and Windows 7 Laptop to co-exist a little more seamlessly.
For over a decade now, all of the home video I have, all of my DVD backups, TV programs I have recorded, in other words, my entire video collection is in AVI format. My movies are in DIVX format (I bought Dr DIVX years ago to rip my DVD’s and have stuck with it), and everything else is in XVID. That’s just the way it has ALWAYS been! And I sure as heck aren’t going to convert them all to Quicktime, I’ll be dead before it finishes re-encoding.
Enter Buzz Player, or in my case, Buzz Player HD for iPad. Buzz Player is an app for your iPhone/iPod Touch/iPad (Even iPhone 3GS) that will allow you to create folders, copy movie files to your device, and play them seamlessly without the need for jail breaking your device! And my favorite part, it will even stream from your network shares!
To get started watching AVI files on your iPad/iPod Touch/iPhone, download the correct version of Buzz Player for your device from the iTunes app store, and in my opinion, the nominal fee of $2.99 for this app is ridiculously low for the functionality it provides.
Once it is installed and open, you can start creating and organizing folders for your local media (media that is physically on your device), or if your like me, your gonna want to start watching stuff from Desktop and your Media Server. To watch stuff from other devices (In my case, my Western Digital WDTV Live Hub) click the icon that says “SMB/FTP”. This will query your home network and display a list of all devices that are set up to serve media on your home network. It also tells you the protocol they are using to serve.
I noticed that some devices appear more than once, and I expect that is because they broadcast different services that they are able to provide. I selected my WDTV’s Samba feed, and was asked to input credentials.
As my network shares are not password protected within my own home network, I used “Guest” as my username, and left the password blank, and was able to connect easily. I tried to click “Connect As Guest” but that didnt work. I guess my WDTV needed to have at least the username of Guest. If your shares are password protected, this is the place to enter them to gain access. Don’t worry, Buzz Player can remember your devices and logins if you want it to, so you only have to do it once. Just remember to add it to your source list before you disconnect.
Once you have connected, you can see a list of all of the available drives/folders/files being shared.
Now, Its just a matter of selecting the file you want to watch from the appropriate directory, and selecting it. What comes next is pretty cool! Buzz Player asks you if you want to copy the file to your device, or if you want to watch it from a stream! YEAH BABY!
In my case, Im happy to watch the stream, so when you click play, it spends a few seconds buffering the file, and then starts to play your video!
As you can see from the above screen cap, I’m streaming Family Guy “Death Has A Shadow.AVI” over Samba, and watching it flawlessly on my iPad!
Buzz Player supports: .mpv, .mov, .mp4, .m4v, .3gp .avi, .divx, .dat, .vcd, .wmv, .bin, .iso, .vob, .mkv, .rmvb, .ogg, .flv, .swf, .rm, .ts, .nsv, .ram, .vfw, .mpg, .mpeg, .m1v, .m2v, .dv3, .gp, .mqv, .ogm, .ogv, .asf, .dvr-ms, .m2t, .m2ts, .rec, .bik, .dv as well as many audio codecs.
**HINT** – If your playback is choppy and/or breaks during playback, CHECK YOUR NETWORK!!!!!! I’ve seen a lot of people slagging this app because they cant stream a 2GB 720HD video over their 802.11g networks! VIDEO FILES ARE HUGE! Your network might not be capable of streaming it in real time, so COPY it to your device, and then watch it uninterrupted.
If you have a Windows based computer, and someone sends you a Quicktime video, or if you have a Mac, and you want to watch an AVI or a WMV video, your computer just isn’t going to play it for you without some additional software. Over the years I have experimented with a lot of different programs, but there really is only one program users of all platforms require – Videolans VLC Media Player. It will play just about everything (including DVD’s and Audio Cd’s), regardless of your operating system and installed codecs, it supports playlists for audio and video, supports sending and receiving streams, and has tons of tweaks to allow you to adjust everything from brightness and contrast, to Digital Audio pass-thru for those of us using Dolby Digital/DTS enabled audio cards with Digital Coax or Fibre Optical SPDIF audio outputs. Below are the supported video playback formats:
And the supported audio playback formats:
These are the supported Audio/Video outputs:
There are also some filters that you can apply to the playback.
The main one I find useful is the de-interlace filter, which stops you getting the “stripped” effect when watch fast moving scenes in a interlaced video (like shown below)
VLC Media Player also supports many formats of subtitles:
But the best part about VLC Media Player, it is ABSOLUTELY FREE!
We use cookies on our website to give you the most relevant experience by remembering your preferences and repeat visits. By clicking “Accept”, you consent to the use of ALL the cookies.
This website uses cookies to improve your experience while you navigate through the website. Out of these, the cookies that are categorized as necessary are stored on your browser as they are essential for the working of basic functionalities of the website. We also use third-party cookies that help us analyze and understand how you use this website. These cookies will be stored in your browser only with your consent. You also have the option to opt-out of these cookies. But opting out of some of these cookies may affect your browsing experience.
Necessary cookies are absolutely essential for the website to function properly. This category only includes cookies that ensures basic functionalities and security features of the website. These cookies do not store any personal information.
Any cookies that may not be particularly necessary for the website to function and is used specifically to collect user personal data via analytics, ads, other embedded contents are termed as non-necessary cookies. It is mandatory to procure user consent prior to running these cookies on your website.

 I was lucky enough to go and see Aerosmith at Melbourne’s Rod Laver Arena – It was a KICK ASS show!
 I sync’d and sync’d to no avail. And then out of the blue, I right clicked the playlist, and there it was….PLAY ORDER!
 This is SO hidden! I learned that if your songs are listed in alphabetical order in the album view in iTunes, with the highlight in the song name column, and you right click (command click) the playlist and select “Copy To Play Order”, and then sync your device your songs will play in alphabetical order.