Native 3D Editing in Premiere Pro with Vision 3 QuickS3D Plug-In

QuickS3D Plug In Sceen ShotRecently I learned about Vision 3’s QuickS3D plug-in, which provides the ability to edit 3D Multiple Streams (Stereo Pairs) and Side By Side (Multiplexed) video natively in Adobe Premiere Pro and After Effects.

After Watching several demonstration videos about the plug-in, and reading Vision 3’s site, I just had to have it. There are two different versions of the plug-in, A Lite version aimed at home users for $49, and a Pro version for $299. Most users will get the functionality they need in the Lite version.

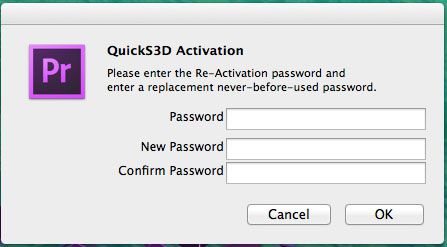
There is no trial version of the software available, so I decided to jump in and purchase the Lite version for $49. Within minutes, I had a link to download the plug-in, as well as my activation key. I downloaded the software, and it installed easily. Upon opening Premiere Pro I was asked to supply my activation key, and upon submitting, I was presented with another window asking me for a password?

Quicks3d-activation-window
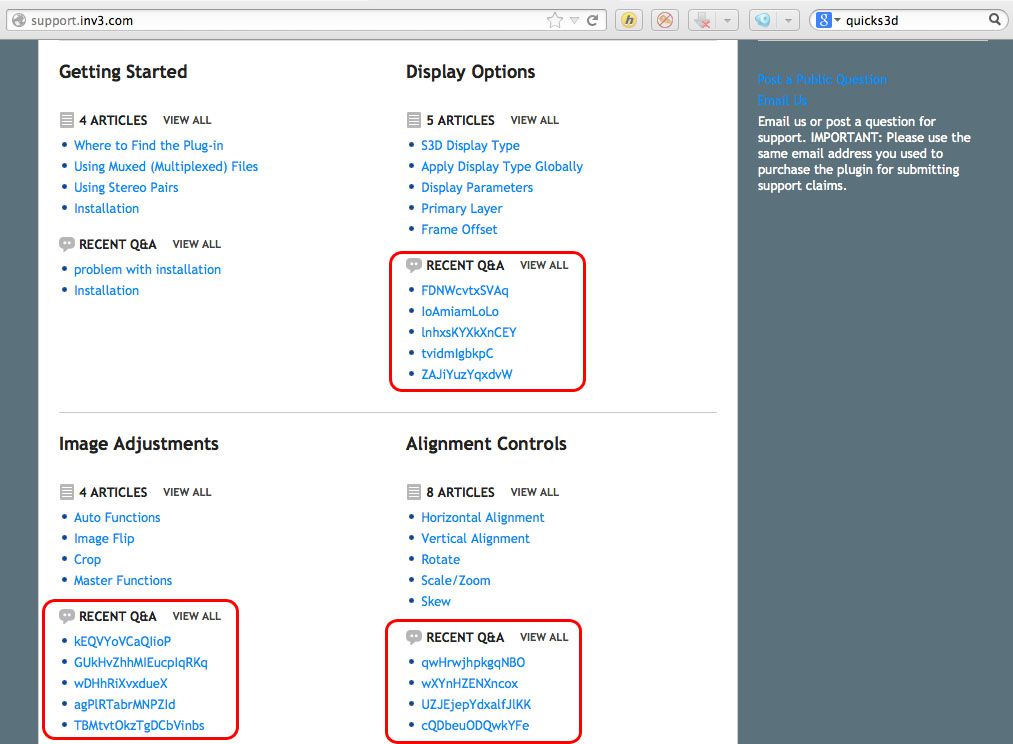
At first I was confused as to the purpose of this secondary password request window, so I began to search through the documentation supplied with the plug-in, read the EULA, and found no reference to it. I searched the Vision 3 website, and the support forums, and again, no information was found. I did notice the forum had been spammed though.

QuickS3D Forum 
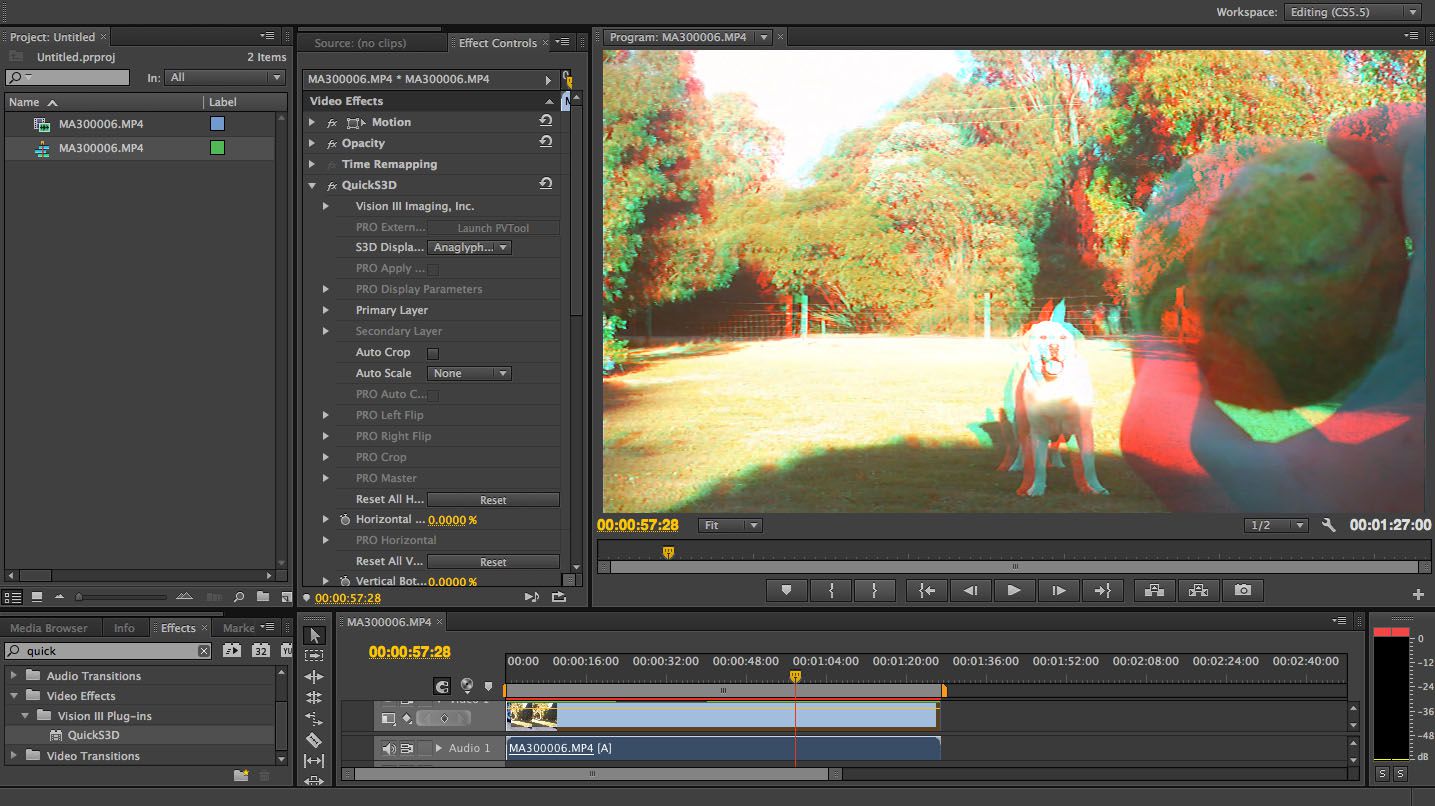
After spending some time contemplating the situation, I entered some passwords and it activated, and Premiere Pro opened up. I imported some Side By Side 3D video and started playing with it. As claimed, the QuickS3D does indeed provide the ability to edit 3D video natively. I especially liked the way I was able to add titles to my video, apply the plug-in, and create a really nice 3D effect between the text and the background video. It felt like the text was jumping out of the screen at me.

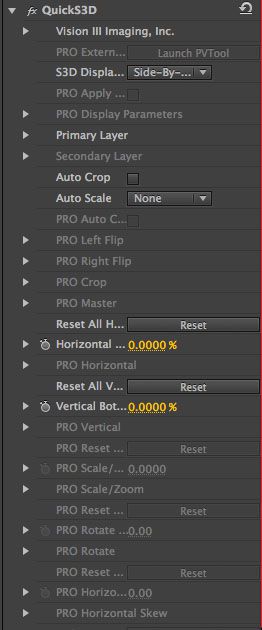
What I didn’t like on first glance, which became incredibly annoying after applying the plug-in a few times was seeing all of the “PRO” version options greyed out. Screen real estate is at a premium in Premiere Pro anyway, but seeing so much space taken up by information which is irrelevant to me became infuriating quickly, and started to feel like a “In App Advertisement” designed to frustrate me into spending another $250 upgrading to the “PRO” version.

Quicks3d-optionsThe basic functionality of the plug-in felt a bit buggy to me at first, as quite a few times my video seemed to automatically revert back to Side By Side, not long after switching to Anaglyph mode. Having said that, this behavior did settle down after a while. I guess I might have been dragging across the “Display” option drop down somehow and once I got used to the plug-in a little more I stopped doing it? Maybe…But probably not…

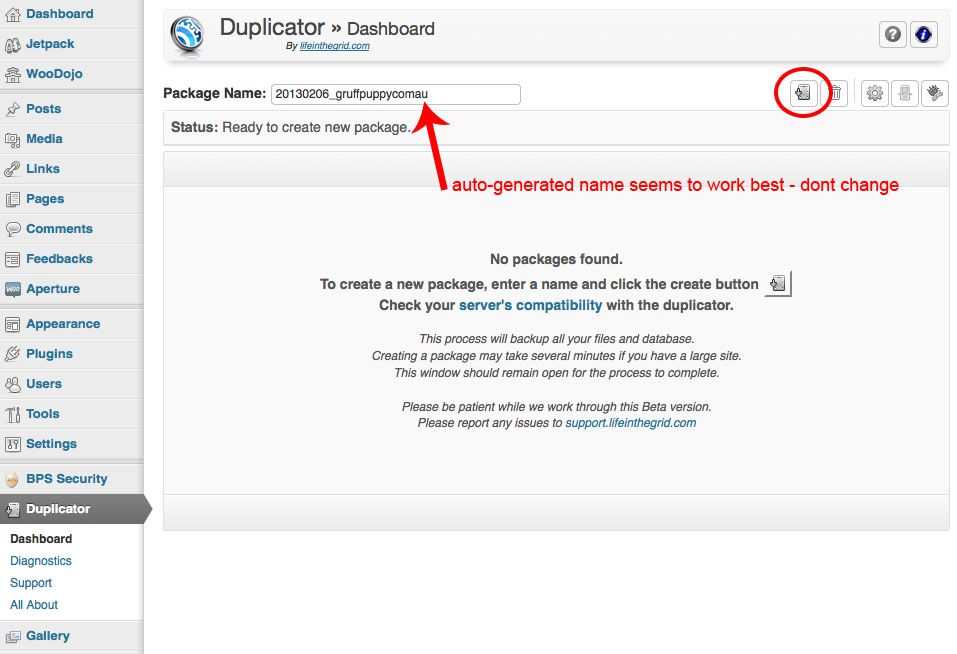
Of the few options available in the Lite version, the basic tasks most of us will want to use are available. Features as listed from the Vision 3 Website:

Display Features

  • Top/Bottom
  • Side – by – Side
  • Frame Offset to Sync
  • Work with Stereo Pairs or Multiplexed file
  • Onion Skin (50-50)
  • Anaglyph (Red/Cyan)
  • v3 Parallax

Image Adjustments

  • Auto Crop
  • Scale to Fit
  • Scale to Fill
  • Stretch to Fit

Alignment Tools

  • Percent Only
  • Horizontal/Vertical Only

A feature I really liked is the auto crop option. This comes in very handy when adjusting the horizontal and vertical placements of the left and right channels. Using “Scale To Fit” the plug-in will scale your video so both channels fit correctly in the frame.

At this point, I was quite happy with my purchase, and decided to grab my Macbook Pro to write a review. After pondering the implications of the “Passwords” dialogue box, I came to the conclusion that the developer must have been taking a sensible approach to licensing, by allowing us the opportunity to transfer our single machine license to another machine, giving us the option to “Choose” which single machine we use our license on, as Adobe does… WRONG!

After installing the plug-in on my second machine, I tried to input my passwords from my first machine to no avail, I tried to create new passwords to no avail, and after 3 attempts, the plug-in no longer worked on EITHER machine!

Quite concerned, I re-read the documentation that came with the software, double checked the website and forum, Googled my problem, and found nothing. Under the “Support” option on Vision 3’s website I selected “Email Us”, and sent in a request for support/clarification regarding the purpose of the “Passwords” dialogue box. A few minutes later I received an automated reply with a Ticket number saying I would receive support soon…..

After a few days I still had not heard back, and sent of another request for support. 3 WEEKS LATER I have still yet to hear back from Vision 3 regarding this issue! And not surprisingly, the spam has not been cleaned/removed from the support forum.

The Bottom Line – In My Humble Opinion: Vision 3’s buggy QuickS3D Plug-In, whilst bursting with potential, is yet another piece of potentially excellent software crippled with anti-piracy measures to the point where those that have purchased it are “Guilty until deemed Innocent”. Vision 3 has no interest in supporting it’s paying customers or keeping a secure spam free support forum, they are interested only in getting your money. VERY DISAPPOINTING!

Easiest and Best way to copy and run a live published WordPress blog web site on your local MAC computer for testing and development

Wordpress-logo

super-detailed

**NOTE** – THIS ARTICLE VERSION IS WRITTEN FOR MAC USERS – WINDOWS VERSION COMING SOON

PART 1 – Setting up MAMP (Experts Shortcut – Install MAMP and proceed to step 2)

If you have a WordPress Blog or Web Site, it can be VERY handy sometimes to be able to take your live published site and copy onto your local computer. This enables you to play with, set up and assess plugins, try out new themes and layouts, and generally mess with your site without affecting your real live site.

To get started you need to create an environment that will allow your site to function on your computer. The two main ingredients to a WordPress installation are PHP (web language) and SQL (Database). To get these two engines running on your computer you need to download some free software that installs them as part of a server. MAMP (Macintosh + Apache + MySQL + PHP) is excellant for this. It is available free from MAMP.info HERE. The free version and the paid version are bundled together, but for our purpose here, the free version will be fine, so lets go ahead and install that. Once you have downloaded MAMP, Unzip the zip file and run the installer package.

MAMP-INSTALL-1

Click continue.

MAMP-INSTALL-2Click Continue.

MAMP-INSTALL-3If you agree, click continue.

MAMP-INSTALL-4Confirm you Agree……click continue……And once you arrive at the screen below, we will tell the installer not to worry about MAMP PRO, and to just install MAMP Free. (If you want to try MAMP PRO free for 14 days, skip the following 2 steps).

MAMP-INSTALL-5a

Click the “Customize” button in the left.

MAMP-INSTALL-6Uncheck the “MAMP PRO” option.

MAMP-INSTALL-7Type your password to allow the installer to run.

MAMP-INSTALL-8Once the installer has finished, click “Close” in the lower right hand corner. You can now open a new finder window, and in your Applications folder you will see a new folder called “MAMP”.

MAMP-INSTALL-9Double click the “MAMP” application to start it up.

MAMP-INSTALL-10a

Now click the “Start Servers” button.

Mamp-11Once you have green lights, click “Open Start Page’. this will open your browser to a page that will tell you if all your services (IE PHP and SQL) are up and running on your machine.

MAMP-RUNNING

WOOHOO! We’re ready to start copying our web site!

PART 2 – COPYING LIVE SITE

Its now time to copy over the files from the site we want to clone. To get started, log into that site, For this tutorial, I am going to use my Photography and Design site Gruffpuppy as an example. Once logged in, click “Plugins” and select “Add New”

1In the search field type “Duplicator”.

2Once Duplicator is found, Install and then Activate the plugin.

3When activated a new item will appear in the Column Menu on the left side called “Duplicator”. Click it, and you will be brought to the main screen of the plugin. To begin downloading a copy of your live site, the Duplicator asks you to name the back up package. You can change the default name, but in my experience the default auto generated name that is already in there seems to work without error. If you are happy with the name, click the “Create” button, the first in the top right row.

4

You will now be asked to confirm, and Duplicator will start compressing your entire site into a zip file, ready for download. This can take a while, so now is a good time to stretch your legs and get a drink. Once it has finished compressing, the screen will update automatically with your available downloads.

5

You will need to download both files (Installer and Package) to your desktop. If you have a large site, the package file can take some time to download. Once your files are downloaded, there’s one more small task.

permalinks-2Select “Settings” from the column menu on the left and then “Permalinks”.

permalinks-1Although no action need be taken, It is important to take note of the setting. As you can see, mine is set to “Day and Name”, but yours could be different. We need to know this setting when we recreate and activate the copy/clone of our site later. Once you have written down or memorized your permalinks setting, you can log out of your site.

PART 3 – SETTING UP A DATABASE FOR YOUR CLONE

The next step is to set up a blank SQL database on your computer. With MAMP running, click the “Open Start Page” button again, and click “phpMyAdmin” from the top menu of the page that opens.

php1Now, click “Databases”.

php2In the create databases field, type a name for the new database. It can be whatever you want, but it is important that you write it down, as we will need to use the name later. Im calling mine “gruffpuppy”, one word, all in lower case. Then click the “Create”. Once this is done, close out of the web browser window. There is no need to create “Users” for the database as we will use the root/default user account, which is automatically created for every database.

PART 4 – CREATE THE COPY/CLONE OF YOUR SITE

With MAMP still running, and your server active (Green Lights) , its time to move the files “Duplicator” created to your local server directory.

duplicate-wordpress-website-3

Open a new finder window, and go to “Applications”, open the “MAMP” folder, and then open “htdocs”.

duplicate-wordpress-website-4Drop the zip folder and the “installer.php” file Duplicator created in and close the finder window.

duplicate-wordpress-website-6Open up your favorite web browser (For this tutorial I will be using Firefox, as there’s a little bug I want to show you, that doesn’t seem to appear in Safari) and in the address bar type “localhost:8888” and you will see a directory listing of your “htdocs” folder.

duplicate-wordpress-website-7Double click the “installer.php” file and the Duplicator installer will open. YAY! This means your server is all working great, and you are viewing your first web page on your local server. Now it’s time to set up the database connection. In the MySQL Server area, leave “Host” set to localhost. in “User” type “root”, as we will be connecting using the automatically created user profile I mentioned earlier. In “Password” type the word “root” again, and for “Database Name” you need to type the name you specified earlier in phpMyAdmin. I used “gruffpuppy” so that’s what I am typing here. When your done, press “Test Connection”.

duplicate-wordpress-website-8

As you can see, my connection is good and I am ready to move on to the next step. If you receive an error here, you need to go back and check your credentials. It’s usually a typo of your credentials or database name. Once you have a successful connection click the “Close” button.

duplicate-wordpress-website-9Check the warning box and click “Run Deployment”.

duplicate-wordpress-website-10Another warning will pop up, which is irrelevant to this project, so go ahead and click “OK”.

duplicate-wordpress-website-11Duplicator will now start building the copy of your WordPress Web Site. This can take a while so be patient.

duplicate-wordpress-website-12Once installation has finished, you are given an opportunity to change some parameters. Unless you have some special circumstances outside of the scope of this tutorial, your fine to accept the default settings. Click “Update Tables”

duplicate-wordpress-website-13The next screen means the duplication of your site is now complete, and there’s just a little bit of house keeping to be done before you can use your site.

STEP 5 – FINISHING UP THE INSTALL

At this point, I recommend closing all open windows of your web browser and opening one new window with your default homepage showing, and then clear your browser history, cache and cookies etc. More often than not in Firefox the next step will yield an error in the process and you will not be able to continue. It looks to me like something that is kept in your browsers memory blocks the CSS (cascading Style Sheets) from loading and your site looks like this:

duplicate-wordpress-website-15a

If you are using Firefox, Select “Tools” from the menu bar and then “Clear Recent History” gets you going, and in Safari, Click “Safari” and then “Reset Safari” to bring up the browser cleaning options. Once you are all cleaned up, type “localhost:8888/wp-admin” in your web browsers address bar and VOILA!

duplicate-wordpress-website-14Log in to your site with your regular username and password.

duplicate-wordpress-website-16From the menu column on the left select “Settings” and then “Permalinks”.

duplicate-wordpress-website-17

Referring back to the note we made in step 2, make sure the appropriate setting is selected (mine was Day and Name) and press “Save Changes”. Even if your setting is already selected, it is still important to press the “Save Changes” buttons so the option is written to the database.

duplicate-wordpress-website-18Your site is now completely cloned/copied to your local machine and you can mess with it until the cows come home without affecting your live site in any way.

STEP 6 – HOUSEKEEPING

The last step is to delete your install files from your “htdocs” folder.

duplicate-wordpress-website-15Locate the “installer-data.sql”, “installer-log.txt” and “installer.php” files, move them to the trash and give yourself a pat on the back! YOU DID IT!


WordPress to Twitter

TwitterTwo years ago I was telling everybody how I thought Twitters days were numbered, and I expected it to be swallowed up by the Facebook Juggernaut, but today it seems to me like it has justified itself, and holds steady as a platform of its own (Watch the bird fall off it’s perch tomorrow now I have said that). I am noticing more and more now sites that are feeding updates to Twitter, and I have created a Twitter account for The Webernets as a result.

My Question now, is, what is the best plugin/method to pipe your WordPress posts to Twitter?

Adminimize – WordPress Super Plugin

Adminimize WordPress PluginI have written about some bad WordPress plugins, so I thought it was time I wrote about a good one, and oh boy, is this a good one. This is one of those plugins that is “Bigger than Ben Hur”. If you are building a WordPress site for someone who is a bit of a newb, or in my case an editor of a major print magazine and celebrity national television sports commentator, who has no interest in the back end, and just wants a word processor to update their site,  you NEED this plugin.

The point of Adminimize is to minimize the admin, or back end of a WordPress site. This is great for multi user sites. As an admin, you can decide what site users get to see, and more importantly, what they don’t get to see in their dashboard. In my case, my  client comes from a purely editorial background. He wants to write his articles, and moderate his readers, and that’s it. So with Adminimize, I have been able to remove all of the other WordPress features such as the Plugins panel, Pages panel, Appearance panel, Tools, Settings, and the menu/settings entries for the twenty something other plugins I have had to install to make the site work to his requirements. He can create new posts, reply to comments, and ad links to his blogroll, because that’s all he wants to do. What I really like about this plugin, is that when you install other plugins, it knows about them upon a refresh, and you can decide how much of their admin capabilities is available to your different user levels as well.

You can remove that pesky admin bar, screen options, or admin colour schemes, and many other of WordPress’s “features” (depending on whether you love them or hate them) not only globally, but on a user level as well. So you can have the admin bar for yourself as an admin, remove it for your editors, and enable it for authors, if that’s what you want to do.

Adminimize Screen ShotThis plugin is one of those ones that I just can’t believe is free. There is a “Donate” option on the settings page, and I believe this one is well worth leaving a few bucks for the authors – It’s a killer plug in! Just one word of warning though, on installation and activation, you will be confronted with literally hundreds of check boxes. Even though it will appear overwhelming, it’s not. Keep in mind there is 5 check boxes, one for each user lever, per option. Just remember the options are down the left hand side in column one, and the rows are for user levels that you want to allow/disallow the privileged. Give it a go, and look at it one option at a time, and before long not only will you understand its simple layout (which appears complicated because there are hundreds of choices), but you will see why I hereby officially give Adminimize “5 Paws Up”!

5 Paws Up AwardAdminimize is available for download at the WordPress repository HERE.

Chameleon CSS

Chameleon CSS LogoUpon building a site for a client who wanted different backgrounds and headers on his site for different occasions, I came across the Chameleon CSS plugin. Put, very simply, it allows you to automatically schedule the use of different CSS Style sheets at different times (Time, Date, Day and Month). Its compatible with WP Super Cache, and is really easy to use.

Chameleon CSS Screen ShotCheck it out now in the Plugin Directory – Chameleon CSS.

WordPress Plug In SPAM alert – Post Page Associator 1.3.21

This is so disappointing. Dennis Hoppe has written a really really good plugin. Post Page Associator allows you to create a “page” in WordPress, and place content from one, or multiple categories on it, and by modifying the associated CSS file (or creating your own template) you can make it look just the way you want. It truly is a great plug in. There is a paid version, and a free version. The free version is where my issue with this plugin begins. Now, WordPress is created and made available for free, not to be sold. Even though some plugins on third party sites are commercial, plugins that appear in the Official WordPress Plugin Repository are also meant to be free. This plugin appears in the repository HERE. On the authors own site, he bills the program as free from the repository:

Dennis Hoppe Site GrabSo imagine my surprise when I activated the plugin and saw this in my Dashboard:

Dashboard Spam Screen Capture from WordPress DashboardNot only did it appear in the Admin dashboard, it also appeared under the “Editor” permissions group as well. Thankfully, I don’t have “subscribers” activated on this particular site, as I expect (but can not confirm) it would appear in the subscriber dashboard panel as well. If this isn’t bad enough, should you choose not to donate to the author, and click the button in the bottom right labelled “No thanks, Remove this box now!”, as expected the box goes away……..and so does the plug in!  It de-activates itself!

RANSOM and ULTIMATUM! Pay up, don’t use it, or live with a very large obtrusive and ugly nag screen in everybody’s dashboard,  that’s your choices.

I believe this is a violation of the spirit and terms of WordPress, and I call this “Dashboard SPAM”. I have no problems with plugin authors including a “Donate” button on their plugins “settings” page, or an advertisement for their plugins paid version, and its benefits over the free version, but I feel what the author has done in this case oversteps the mark. At no point during my selection and installation of this plugin was I asked to accept this term/condition.

I have just been looking to see if the author has made a note anywhere about how to remove the spam part, and I stumbled upon THIS thread. The first thing that caught my attention is that the author does indeed provide a way for you to remove the spam when asked – his answer:

How To Remove Spam GraphicAnother suggestion in the thread states that removal of the “donate.php” file is all that is required to make it go away. This may have been true of previous versions, but in the current 1.3.21 version, no such file exists. In the current version, the author has renamed this file to “contribute.php”, and now, simply deleting this file will crash your entire WordPress install. The author has written it in such a way that there is code in this file that code elsewhere in other files looks for, and if it doesn’t find it, it WordPress crashes.

Post Page Associator is not, and will not be used on this site.