Since updating to iOS 7, a lot of iPhone users are finding that iMessage does not send their messages. It looks like it is sending, but stops or freezes at last minute. I have discovered a work around, I am not sure if it is a “Fix” but I have had good results using this method, and have tried on on some friends phones with success as well. I hope it works for you!
httpvh://youtu.be/Y0JZ0R51e9I
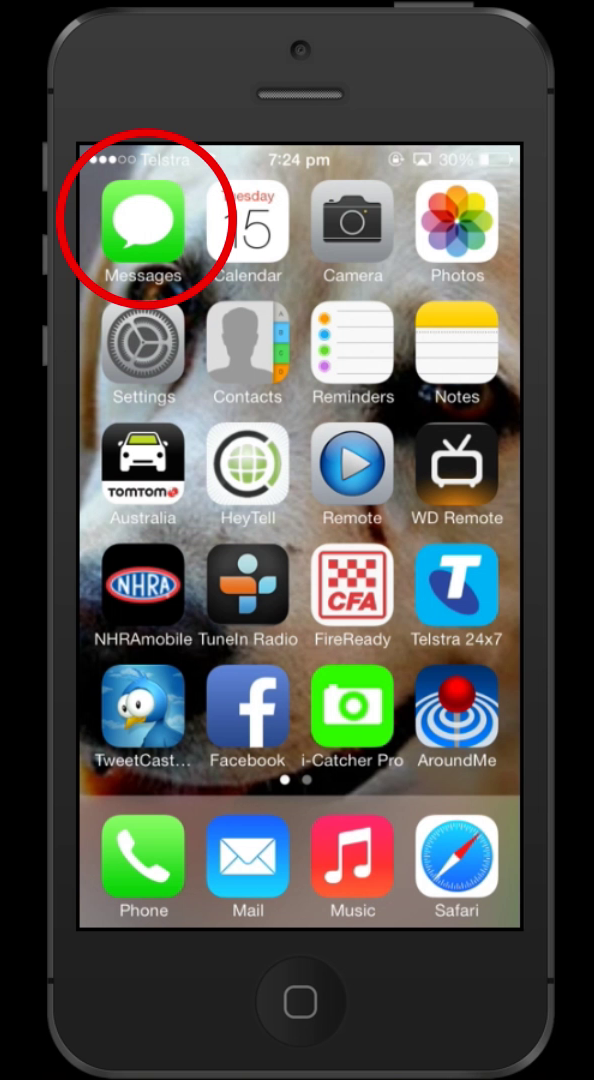
Firstly, go into iMessage on your iPhone.
Clear off ALL messages and threads by swiping to the left on each conversation to make the “delete” option appear.
and then press delete.
Now go into settings.
Then select “Messages”
Turn “iMessage” option OFF
Now turn your phone off by pressing and holding the power button on the top right edge, and then swipe across the red “Slide To Power Off” message on your screen.
Once your phone has completely powered off, you can press the power button again to restart it. Once your phone has booted up again, select “Settings”
Go back into Messages
Turn on the “iMessage” option and you will see your phone re-activating and syncing with the iMessage server.
When it has finished, it you should see confirmation that you can now use iMessage.
Earlier this week one of my favorite movies “The Scorpion King” was on TV, and as I recently bought a new digital set top box with USB recording capabilities, I thought I would give it a try. I remember when I saw The Scorpion King at the movies it was in a very widescreen aspect ratio, and it looked great! But, as soon as it started on Sunday night, I could tell something was not right. Rock Johnson looked more like a character from Avatar than the WWF! He seemed over 10 feet tall and as skinny as a broom handle, which as we all know, isn’t the case!
My suspicion is that someone at the TV station got lazy, or maybe a setting in my set top box was wrong, but the bottom line is I have a 2+ gigabit video file of one of my favorite movies, and it is virtually unwatchable because the aspect ratio is way off.
Thankfully, there is a nice easy way to straighten things out. Now, If I intended to watch the video file on my computer, I would use VideoLAN’s VLC Player, because it’s free, it plays practically everything, and it has nice built in feature’s that amongst dozens of other tricks, will adjust your movies aspect ratio on the fly, so no re-encoding is required.
VLC Player falls into my “I can’t Believe it’s free” category. No matter what OS your running, they have a player for you that will knock your socks off. But if you want to watch that distorted video file on something like a WDTV, or plug a USB key into your flat screen TV, your gonna have to re-encode it and repair the problems.
Luckily, my set top box records in MP4 format, so my tall and skinny video file will drop straight into a really cool, and again FREE program, called MPEG Streamclip, which is what I am going to use to fix my aspect ratio problem in my video file.
Thankfully, MPEG Stream not only fixes tall and skinny video’s, but short fat ones too 🙂
To get started, if you don’t have it already, get your free copy of MPEG Stream clip right HERE! You can do a bunch of cool stuff with it, it’s free, so there is no reason not to have it in your video tool kit! Once your installed, FIRE IT UP!
Once the main window is open, drag your wonky video clip into it, and you will see a preview window.
To begin reshaping, open the file menu and select “Export to MPEG-4”, or if you want to cross encode to another format, you can choose it here instead.
Once you have selected your preferred export format, a new window will pop up where you can adjust your settings, and de-distort your movie.
As you can see from the above capture, my video was recorded in 720px wide by 400px high, so I am now thinking I really do need to go and take a look at the default settings on my set top box. To start repairing the problem, I clicked “Other”, left the width at 720px, and started to play with the vertical height. After I changed the setting, I clicked “Preview” to see if my changes made the aspect ratio better.
A new window popped up and the movie started to preview, and I noticed a secondary window which looked like it had already begun encoding, but this doesn’t appear to be the case. It seems to me that it is just encoding your preview while you are watching it, but its not the final pass.
If the preview looks good, or even if it doesn’t, click the stop button after you have assessed your changes. If you want to re-adjust your settings, you can go back and do so, or if you are happy with your changes, go ahead and click “Make MP4” in the bottom right hand corner, and give your FIXED video a new unique name.
Like most video encoding, it will take some time to process the file and apply your changes. But when it’s done, everything will look like it should again.
As mentioned in THIS post, I bought a WD TV Live Hub unit a month ago, and I have been fairly happy with it so far. The premise/purpose of the unit is good, it is well featured in hardware, but the firmware/operating system is not as good as it could be, given the potential of the units hardware capabilities. I have found it to be slow, kinda clunky, and a bit frustrating when it comes to finding media quickly, as I have a large collection. The current version at time of writing is 2.07.17. Since purchasing the machine I have tried several versions of the firmware, and have settled/rolled back (using WD’s own rollback instructions and previous OS builds on the WD Firmware Rollback Page) to version 2.04.13, which in my opinion, and the WD Community opinion, seems to be the best offering so far.
Last week however, my 3 week old unit simply refused to boot. It didn’t work. I would press the power button on the remote and see the screen above, and then the unit would just turn itself off. I tried the using the power button on the unit, and it yielded the same result, automatic shut down after the loading screen. I was quiet enraged. My wife gathered up the units box, dug the receipt out, and was set to drive me back to the store to exchange the unit, when I proceeded to do what any grumpy male geek with a failing piece of technology would do – I took to it with a screwdriver, pried it open and voided the warranty!
I did learn a lot about this unit during this process though, and will share it with you now – and as always, I am sharing MY experience! Should you CHOOSE to try to replicate my experience with your device, and FAIL, it is completely your own fault, and I take no responsibility what so ever!
After Googling the symptoms, it appears that this is a VERY common problem with this unit, and the folks at WD refuse to acknowledge it as an issue. However, there is a VERY simple fix, but it does involve opening the unit. Inside the box is the main PCB (Printed Circuit Board), and there is a smaller PCB for the POWER button connected to the main PCB with a few wires. This seems odd for the power button to be on a different board, but it is a gift from god that it has been designed this way. It seems that something on the smaller power PCB, or perhaps the power button itself shorts/fails, hence as soon as you start the unit, the switch thinks its been pressed and it turns the unit off.
The cure, simply disconnect the smaller power button PCB. YES, you read correctly, just disconnect it! There is a power button on the remote you can use to switch the unit on and off anyways. The ironic part of this is that I actually found it harder to open the unit than disconnect the power button PCB. My first instinct was to crank on the thick chunky bit of plastic with the scallop shapes, but I soon learned that this was just an aesthetic, the actual lid is the thin piece above the groove in the aesthetic scallop bit.
To open the case, take your preferred case opening screwdriver and insert it between the thick bit and the thinner top panel at the back of the unit above the composite (yellow) video output.
Once you have made a gap you will see the fastening tabs that hold the lid on, and its just a matter of forcing the top upwards and gently pushing the fastening tabs towards the inside of the case. Below shows you the different types of tabs you will need to defeat to lift the lid.
Once you have the lid off, its a simple matter off locating the power button PCB, and the wires that join it to the main PCB. The power button PCB wires mount to the main PCB underneath, but the white terminal is easily visible, and requires little effort to disconnect. I just flicked it of with the screwdriver I used to open the case.
Once the wire is disconnected, you can re-fit the top panel, plug the box in again, and watch your unit boot back into that familiar home screen!
Now, if you want to win a prize (Charlie Sheen’s Tiger Blood), look closely at the photo’s in this article and be the first to comment with the reason why everybody who reads these articles should take extra special note of my disclaimers, and why Australian Geek Guys die younger than American Geeks!
We use cookies on our website to give you the most relevant experience by remembering your preferences and repeat visits. By clicking “Accept”, you consent to the use of ALL the cookies.
This website uses cookies to improve your experience while you navigate through the website. Out of these, the cookies that are categorized as necessary are stored on your browser as they are essential for the working of basic functionalities of the website. We also use third-party cookies that help us analyze and understand how you use this website. These cookies will be stored in your browser only with your consent. You also have the option to opt-out of these cookies. But opting out of some of these cookies may affect your browsing experience.
Necessary cookies are absolutely essential for the website to function properly. This category only includes cookies that ensures basic functionalities and security features of the website. These cookies do not store any personal information.
Any cookies that may not be particularly necessary for the website to function and is used specifically to collect user personal data via analytics, ads, other embedded contents are termed as non-necessary cookies. It is mandatory to procure user consent prior to running these cookies on your website.

 Clear off ALL messages and threads by swiping to the left on each conversation to make the “delete” option appear.
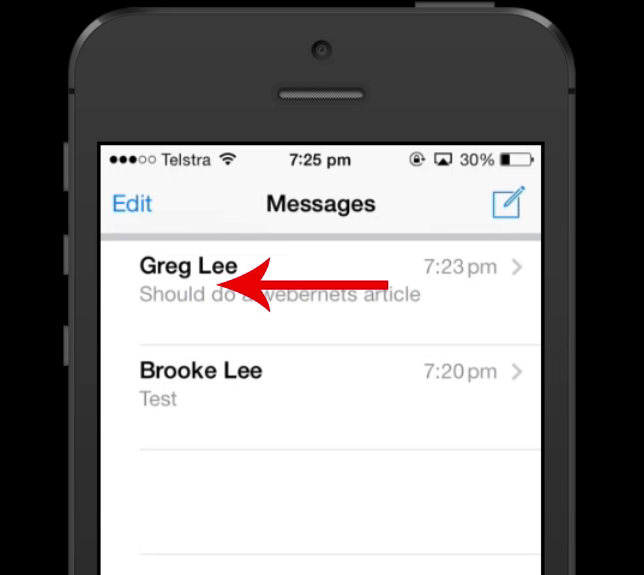 and then press delete.
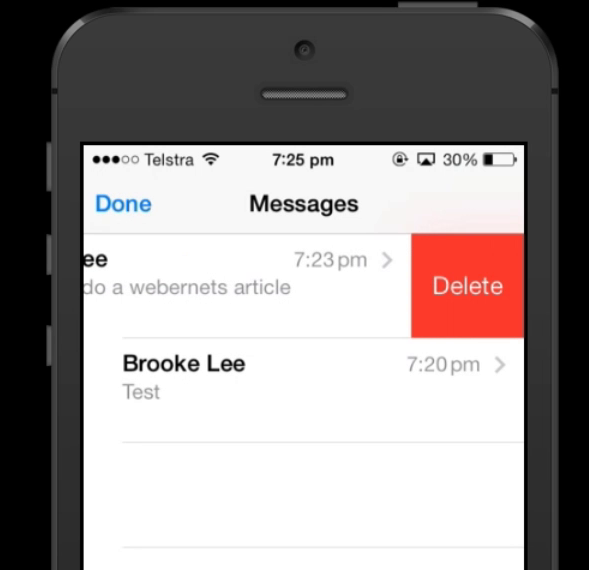 Now go into settings.
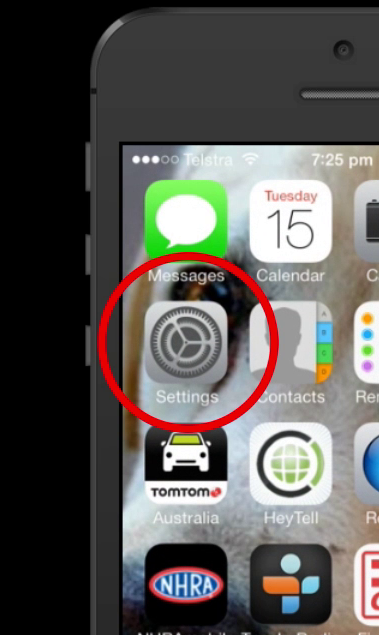 Then select “Messages”
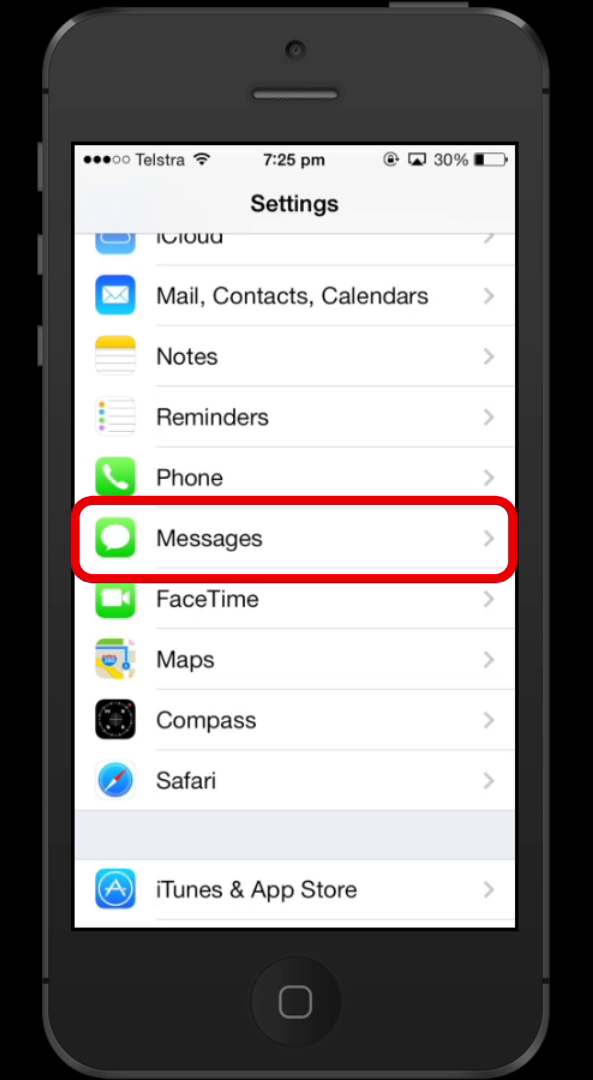 Turn “iMessage” option OFF
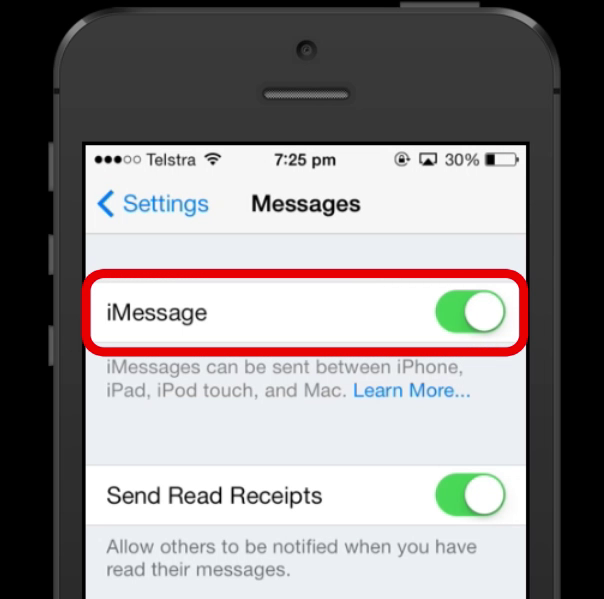 Now turn your phone off by pressing and holding the power button on the top right edge, and then swipe across the red “Slide To Power Off” message on your screen.
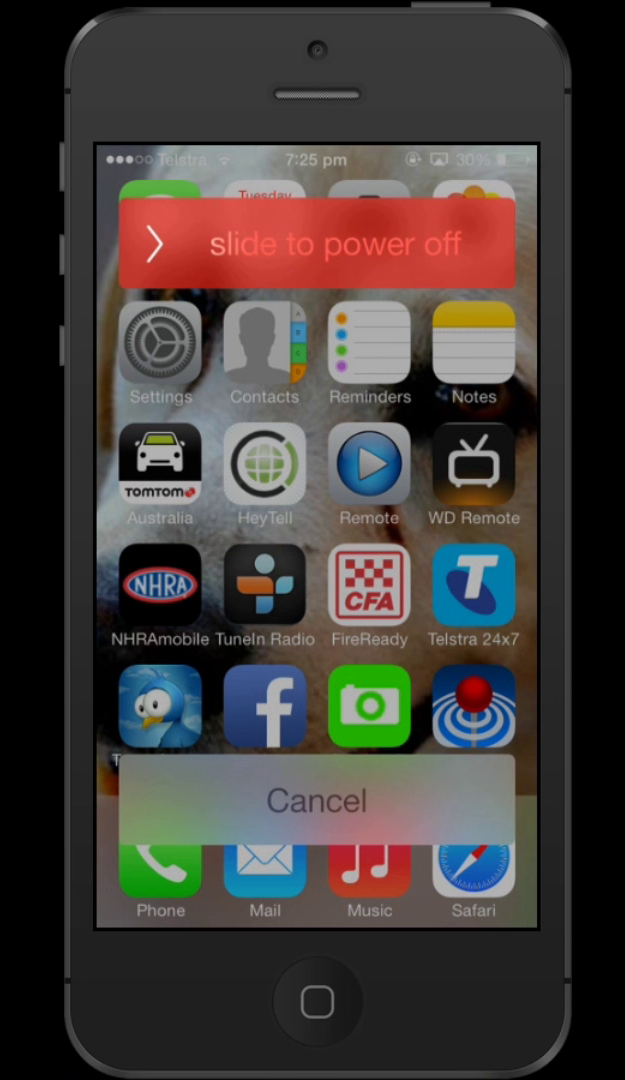 Once your phone has completely powered off, you can press the power button again to restart it. Once your phone has booted up again, select “Settings”
 When it has finished, it you should see confirmation that you can now use iMessage.
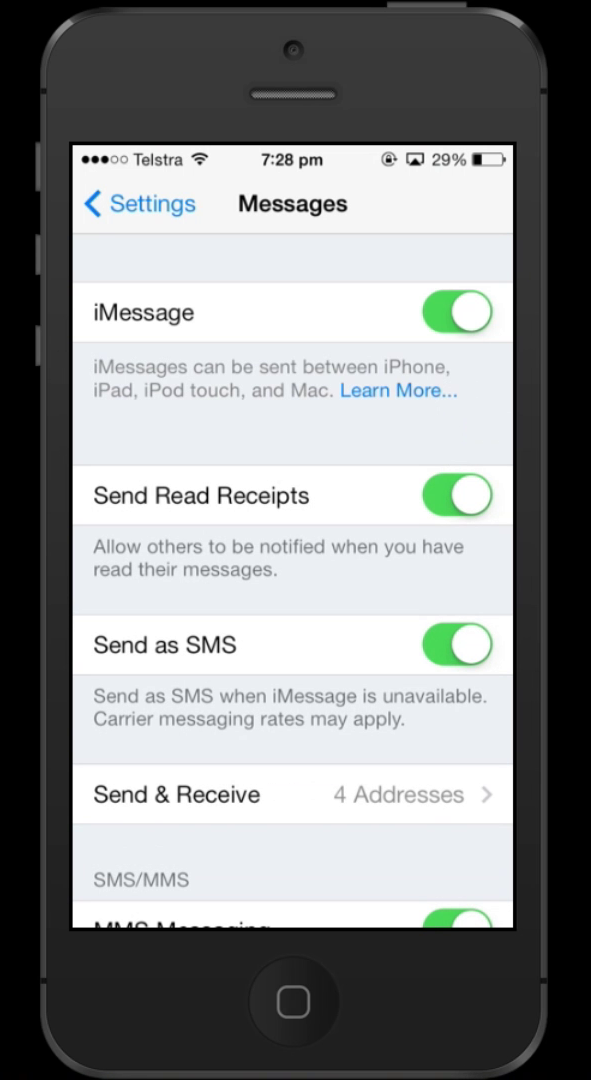 Now, Hopefully, you should be back in business.


