The Webernets has been running a bit slow lately, so I started looking at ways to speed things up. I stumbled on an article on WPMUDEV titled “How To Massively Reduce Your Images For A Faster WordPress Site“, and I thought I would put it to the test. I downloaded my entire images folder from my server, and here are the beginning stats.
As I am using a Mac, I downloaded the free app recommended in the article called ImageOptim (The article recommended Caesium as a free alternative for Windows users). I was impressed to read on the download page that “ImageOptim is lossless — it compresses image files without changing pixels.”
Opening the program shows a pretty familiar looking window.
I dropped the whole folder in using the default settings and away it went. It took about 50 minutes, and here is the summary it displayed when finished.
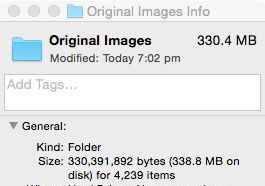
And this is the specs on the folder from the finder.
63.9 MB saving is nothing to sneeze at, but I was interested to see if I could push it any further. In the settings, I found a “Quality” slider for Jpegs. By default, it is set to 100% hence the claim to lossless, So sliding it down to 80% will obviously reduce the quality and void the lossless claim, but is the trade off for file size justifiable?
With the Jpeg Quality Slider set to 80, I ran the program again on a copy of the original folder I made before the first optimization run. It took about 60 minutes this time, and here is the summary from the window footer
And here is how the Finder views the folder
110.5 MB Saving on a 330.4 MB original file size is impressive. That’s 1/3! I went through a number of files to check the quality, and even though there is a slight difference if you look hard, for the most part the quality is good.
Power Cycling sounds like riding a bike really fast up a hill, but in the technology field it refers to a way to get everything back online when things aren’t working right, or you have to recover from a failure or freeze.
A Power Cycle is achieved by turning everything off safely, disconnecting the power sources, and leaving everything to sit for a in-determined amount of time (some say 30 seconds, some say 30 minutes).
I find Power Cycling makes all my devices talk to each other quicker. As I have a somewhat sophisticated home network, yanking the cord on everything from time to time allows new routing tables to be created, and old machines that are no longer connected to the network (That may have been a Master Browser (Machine that tells other machines where everything is located)) to be removed from the environment.
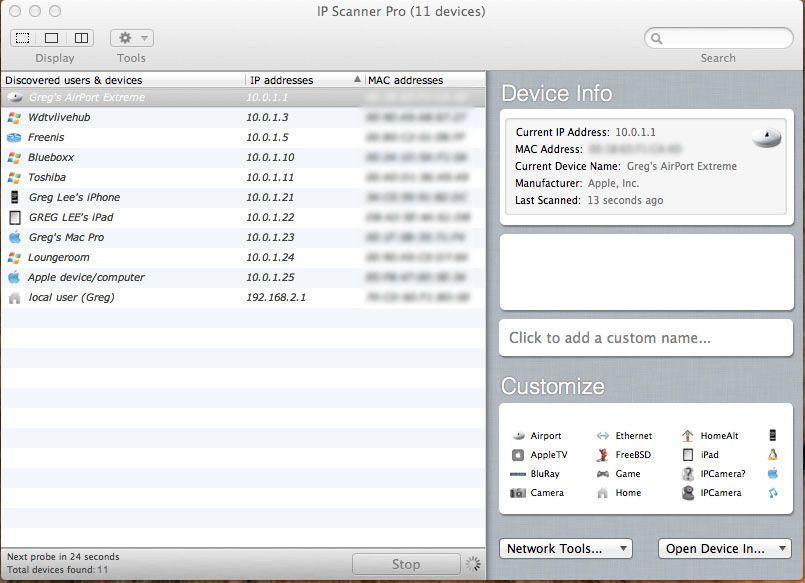
We’ll use my network as an example to go through the procedure, as things do need to be done in a specific order. Using a IP Scanner (There’s lots of free ones available – just Google IP Scanner) I generated this view of my home network.
To begin a Power Cycle, I turn all off the Computers and my Server off. Once they are safely and completely shut down I yank the power cords from the sockets (This is important, if it is still plugged in, there is still power going in, keeping things in memory – So YANK IT!). With my Laptops, I take the batteries out. Next, I shut down and unplug my WD TV media machines and the “Elements” hard drives attached to them. My iPhone and iPad are now shut down by Pressing and holding the Sleep/Wake button (Power Button on top right side of device) for a few seconds until the red “slide to power off” slider appears, and then slide the slider. Lastly, My Airport Extreme Router, D-Link Switch, and ADSL Modem are all disconnected from the outlets.
Now I go throw a tennis ball with my Dog Benson for about 10 minutes. This allows plenty of time for any power left in the devices to drain away, and all caches and memory to clear.
After playtime I get ready to restart everything. First, I plug the modem back in and let it initialize and connect to the internet. Then I turn on my Switch, and my Airport Extreme Router is next. When they are all operational and happy, I turn my computers on one at a time, beginning with the one I use most, first (So it can become the Master Browser). Once it is up and connected to the internet, I turn the next one in my usage order on, and let it connect, then the next, etc, etc. Then, I boot up my WD TV Live Hub and reconnect the “Elements” storage drives, and lastly, I power on my iPhone and iPad by holding down the Sleep/Wake (Power Button on top right side) for a few seconds until I see the silver Apple logo appear.
Everything should be back up, running, and happy!
Some people will tell you there is no advantage to power cycling. I personally, do believe it helps, and if you are undecided, Try it for Yourself and make up your own mind! What have you got to loose?
Lately, My WDTV Live Hub has been REALLY slow. In an effort to see what was going on, I mounted the drive in my FAV Linux distro PUPPY LINUX. What Puppy Linux showed me, was ALL of the thousands of files that my Windows and Mac OS X computers had been creating and hiding on my drive without my knowledge. When I have accessed my shared drive with my Mac, it had been creating DS-Store files and .AppleDouble files in each folder, and my Windows machines have been creating Thumbs.db files.
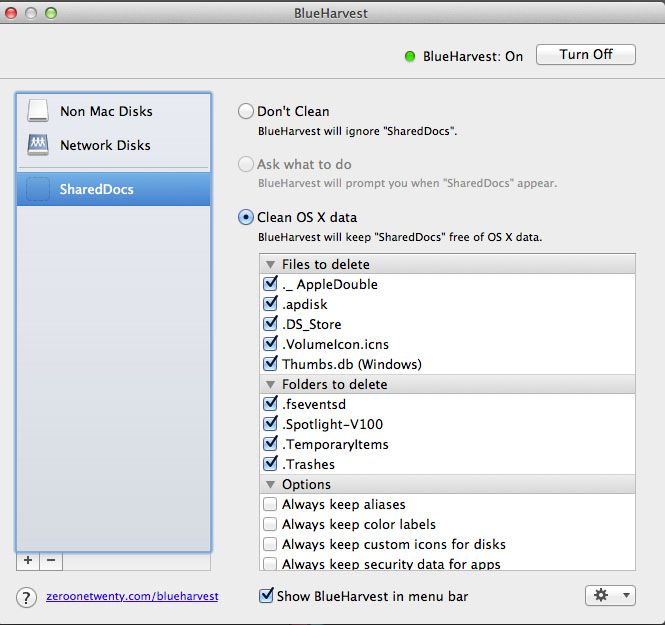
It was pretty easy to delete these files, but my question was “How can I stop this Madness from happening again?”. After a little Googling I found a program called BlueHarvest. I downloaded the trial version, and I have to say, within 15 minutes, I had paid my $15 US and had a license key that was good for 3 different Macs. If You are sharing drives or a server in a Mac/Windows/Linux environment, YOU NEED THIS PROGRAM!
After installing, you tell BlueHarvest which drives and folders you want it to monitor, and the file types you want it to clear, and it deletes them as soon as they are created.
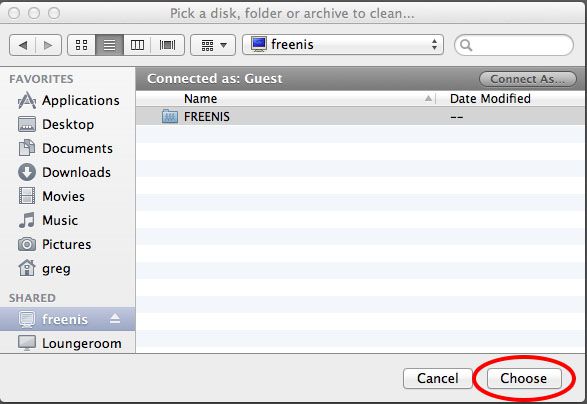
BlueHarvest not only prevents these files, it is also the quickest and easiest way there is to clean up a drive of existing files. I have a 8TB server running FREENAS, and to clean it up, all I did was click the BlueHarvest icon in my menu bar and select “Clean Using BlueHarvest”
Then I selected my server…
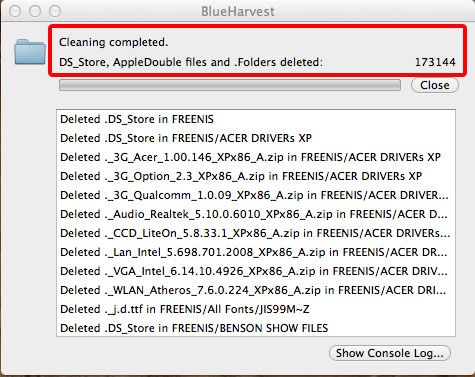
And then BlueHarvest went to work – check out the result!
It cleaned out 173144 files from the drive!
And at $15, BlueHarvest is a gift! Download the 30 day trial HERE.
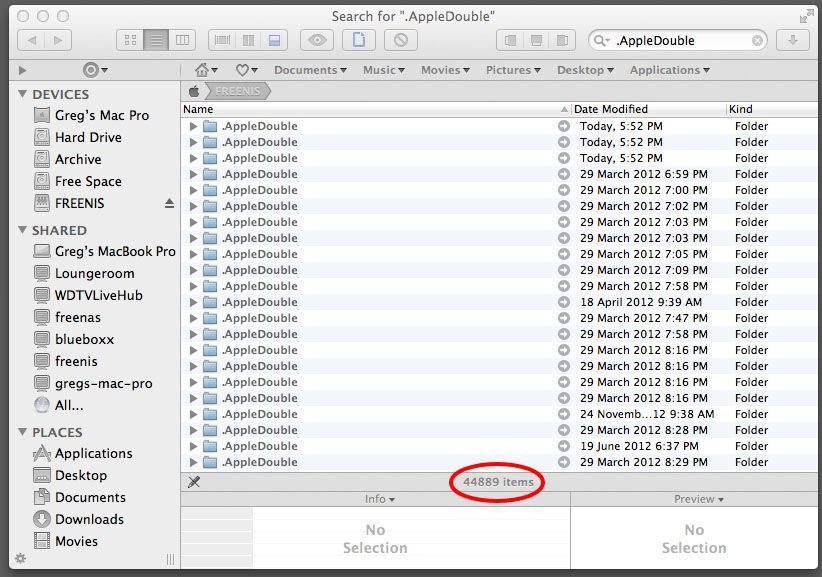
**UPDATE** – Ive been using this program for a few days now, and it has been really cool watching it delete these annoying files as soon as they are created. That part has been working great. However, I have been playing around with a program called Total Finder today, and it shows Hidden/Invisible files. I ran it on my Freenas server and to my surprise, it turned up nearly 45000 .AppleDouble files.
I opened up BlueHarvest and initiated another clean on the drive, and after it scanned it reported it had cleaned 4 files. I ran Total Finder again, and it still came back with almost 45000 files.
In my opinion, the best first step to speeding up your Mac is to repair your permissions and run disk repair as outlined in my article Speed Up Your Mac Article HERE.
The next step is to clean your caches, rebuild your indexes, and run your macs daily, weekly and monthly maintenance scripts. This can all be done easily with the FREE and very powerful ONYX.
Once you have ONYX downloaded and installed, its a good idea to make sure that you have backed up ALL of your stuff. Like using any cleaning program, things can get moved or lost, so make sure you don’t get caught!
When you are satisfied your files are safe, go ahead and open ONYX. The first thing you will see is a alert box that asks if you want ONYX to check the S.M.A.R.T status of your hard drive. S.M.A.R.T stands for Self-Monitoring, Analysis and Reporting Technology. Most hard drives these days monitor their own performance and try to anticipate if a failure is imminent, and if their is something wrong with your drive, you will be notified after this test. It is well worth doing.
Once this has completed, the next alert will ask if you want to verify your drive. If you have already performed this task because you are following on from my first “Speed Up Your Mac” article this is not necessary. If you haven’t already done this, it is well worth doing as it will find any drive errors. This process can take some time, and it will require all other programs to be closed, so if you decide to run it, go get yourself a coffee and some fresh air after you begin.
When Verification has finished, ONYX will ask you to type in your password to give it permission to make changes and clean thing up.
You will now see the main menu bar for ONYX.
As you can see, this program has a lot of in depth features and can do a lot of different things, but for this tutorial, we will focus on cleaning up quickly and easily. To start cleaning, press the “Automation” button. You will now see the Automation screen.
The safest way to proceed is to accept the defaults and press “Execute”. If you are following on from my first “Speed Up Your Mac” article you might want to un-check “Repair Permissions” as you will have already done this. Other wise, leave it checked. If you are like me and like living on the edge, you can go ahead and check/un-check the items you feel necessary.
*BE WARNED* – As with every clean up program, there can be unwanted side effects, so proceed with caution!
For me personally, I do change it up as I like to clean my system deeply, and I am happy to put things back how I like them after the cleaning (such as re-arranging my icons how I like them on my desk top again). I also like to execute my Macs built in daily, weekly, and monthly maintenance scripts. Below is how I use ONYX.
*NOTE* – I take no responsibility if you copy my settings and loose something.
When you are happy with your cleaning options, its time to press execute.
ONYX will tell you it is going to close any other programs that are open, so again, make sure you have saved your work.
ONYX will now start performing maintenance. In most cases this will take some time, so if you didn’t stretch your legs, get a coffee and some fresh air before, now is the time. When ONYX has finished, a dialogue box will appear. Click OK.
I am sure there are dozens of methods, and dozens of programs and apps that do wonderful things for your Mac computer running OS X Lion/Mountain Lion, but in my opinion, the folks at Apple have built in the best, quickest, and easiest way to give your Apple computer a boost. It’s called “Repair Permissions”.
A few years ago I was involved heavily in editing high def video for a motorsport operation, and it never ceased to amaze me how much quicker and happier my mac pro was after a permissions repair.
**NOTE** – It can take a while for this operation to complete, so make sure you have plenty of down time before tying up your computer with this procedure.
The good thing about OS X Lion/Mountain Lion is that you don’t have to go and find your install disk to do this anymore (Like you used to have to do with Snow Leopard, Leopard and Tiger). When you installed Lion/Mountain Lion, it created a rescue partition for you, and to access this partition, and speed up your mac, all you gotta do is hold down your “ALT” key, and turn your mac on! Once you here the “BONG” sound, you will see this:
When your Mac boots, it selects the regular hard drive automatically. But when you hold down the ALT key, your telling your Mac that you want to see what other devices you can boot. Lion/Mountain Lion creates a very small “Virtual” hard drive, that you can boot into instead of your normal hard drive and operating system, that lets you perform maintenance operations. To restore your permissions, click the arrow for “Recovery HD”. Your computer will boot from this second partition, leaving your main partition unmounted, so you can perform maintenance.
Once your computer has booted up from the Recovery Hard Disk you will see Utilities Window.
To get started, select the “Disk Utility” option, then click continue in the bottom right corner. The Disk Utility will now open.
Select/Highlight your main hard drive partition (the one you want to speed up) in the left side of the window, and click “First Aid” to get to the repair window. Here you can verify/repair the condition of the disk. I usually just hit “Repair Disk” and let it do its thing. This can take a bit of time, so go put the coffee on!
You will see all kinds of activity, but the only thing you need to worry about is that green text that says the disk is ok, and that the repair is complete. The next step is to click “Repair Permissions”. Again, this may take some time, but when it is complete it will tell you down the bottom of the window in bold font.
When its done, Quit out of Disk Utility using the “Disk Utility” menu bar option.
Then Quit out of the Utilities Window from the Mac OS X Utilities menu bar option.
The final window/step is to click “Restart” from the “Choose Start Up Disk” Window. As we didnt permanently change the start up disk, there is no need to change any other parameters here, just click Restart.
Your computer will now restart (It may take a little longer than normal to do so – so don’t worry if it does!) and hopefully you will notice a pleasant increase in performance!
Isn’t it nice when something just works! I have recently moved house, and in my previous home I had a very elaborate security system which included infra red video cameras with motion detection (so I know when the Feds/Aliens are trying to sneak up on me to steal my brain waves). In actual fact, the cams were simply so my wife and I could check in on our doggies whilst we were out, night or day. I set up a web server for my cam feeds, and we can see the dogs on our iPhones (pretty cool, and VERY easy to do – will post article soon). The problems is though, I haven’t had a chance to recreate this monster system in our new house, but we still want to be able to see the pups.
I managed to find the XP based computer (the heart of the security system) in amongst all of the moving madness, and plugged in a few cams to get something going. A real bonus in our old house was that the walls were just filled with Ethernet cable going in every direction, it was quiet a work of art actually. Sadly, Not so much in the new place. So to get connected quickly I plugged in a Netcomm NP900n wireless dongle I have, and the machine was connected quickly and easily. I reconfigured my web server with the my new I.P and other info regarding my new internet connection, and with an average amount of fuss (to be expected when dealing with all matters tech) we were able to spy on our doggies from anywhere in the world again. Feeling very pleased with myself, and my superior knowledge of port forwarding and other gunk most people don’t even know exists, I ran disk clean up, defragged, and went through my regular “Window Cleaning” routine. Now, I have the computer set to “Auto Reboot on Power Failure” in bios, and my video cam server program shortcut is in “Start Up Items”, so if there is a power failure, the machine restarts and my servers run up the moment the power is restored. After my maintenance routine completed, I chose to “restart” the computer, as you do. Here is where the fun starts.
When this machine was using a wired connection, the Gigabit network connection was up immediately on start up, the internet connection was available to the web server when it was launched, so it began serving up the CCTV feed with no problems. I have learned this week, that it takes a lot longer for a wireless connection to handshake and initialise. When programs start with windows, they are often ready to go before the wireless internet connection. If the connection isn’t present when they are ready to go, they assume there isn’t a connection, will never be a connection, and don’t go looking for one at regular intervals. That is the shortened version of what really happened, with all of the profanity removed:)
Armed with this new knowledge I turned to Google and searched for “start up delay”. The first result was R2 Studios Startup Delayer. I downloaded it, installed it, told it that I wanted it to start my web server 5 minutes after the machine starts…………AND IT DID! No questions asked! I just love it when this stuff happens, as it just doesn’t usually happen at all these days.
This program has a free and a paid version, both of which do far more than I require in this instance, but I will delve in deeper and do a more concise review in a later post. It was a very easy install. It requires Dot Net 2 (free from Microsoft, and installed automatically if you don’t already have it), and once installed, it is just a matter of telling it what programs and processes you want it to start, and when you want it to start them. It is so easy to use!
Now, you might be thinking “I don’t have webcams” or “My internet connection is wired”, and you think you may not have a use for this program. But what you really need to think about here, is that when windows boots, almost EVERY program you have on your computer is not only using up your CPU starting up, but it is also phoning home to validate, looking for updates, your antivirus and anti spyware is looking for updates, Microsoft/Windows Updates is checking to see whats going on, and dozens of other “services” you don’t even realise are running on your computer are ALL trying to get started, and get on the internet at the same time.
BOTTLENECK!
Have you ever wanted to just turn on your computer and check your email, or Google something real quick and then shut off? Maybe you want to spend 3-5 minutes on your computer to look at something, or find an answer, but your computer takes 3-5 minutes to even become useable because it is Soooo Slooow when it starts up. Maybe you want to be on your computer all day, but you would just like to be able to use it in less 10 HOURS OF TURNING IT ON!!!
Wouldn’t it be good if you could tell ALL of those other offending programs and services to wait a while before they do their business? Maybe even stagger them so instead of them all trying to start up at once, they do it one at a time in an orderly manner?…………Now your getting it!
The free version will do pretty much everything you want, but I will be buying the pro version anyway (only $20) because I believe these people deserve a little something for their efforts, it really is a great piece of software!
We use cookies on our website to give you the most relevant experience by remembering your preferences and repeat visits. By clicking “Accept”, you consent to the use of ALL the cookies.
This website uses cookies to improve your experience while you navigate through the website. Out of these, the cookies that are categorized as necessary are stored on your browser as they are essential for the working of basic functionalities of the website. We also use third-party cookies that help us analyze and understand how you use this website. These cookies will be stored in your browser only with your consent. You also have the option to opt-out of these cookies. But opting out of some of these cookies may affect your browsing experience.
Necessary cookies are absolutely essential for the website to function properly. This category only includes cookies that ensures basic functionalities and security features of the website. These cookies do not store any personal information.
Any cookies that may not be particularly necessary for the website to function and is used specifically to collect user personal data via analytics, ads, other embedded contents are termed as non-necessary cookies. It is mandatory to procure user consent prior to running these cookies on your website.

 As I am using a Mac, I downloaded the free app recommended in the article called ImageOptim (The article recommended Caesium as a free alternative for Windows users). I was impressed to read on the download page that “ImageOptim is lossless — it compresses image files without changing pixels.”
 I dropped the whole folder in using the default settings and away it went. It took about 50 minutes, and here is the summary it displayed when finished.
 And this is the specs on the folder from the finder.
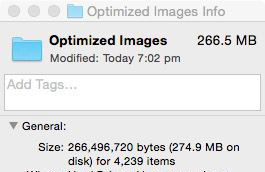 63.9 MB saving is nothing to sneeze at, but I was interested to see if I could push it any further. In the settings, I found a “Quality” slider for Jpegs. By default, it is set to 100% hence the claim to lossless, So sliding it down to 80% will obviously reduce the quality and void the lossless claim, but is the trade off for file size justifiable?
 With the Jpeg Quality Slider set to 80, I ran the program again on a copy of the original folder I made before the first optimization run. It took about 60 minutes this time, and here is the summary from the window footer
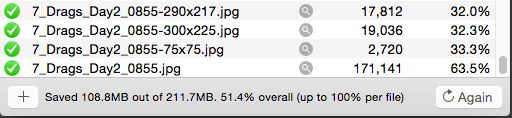 And here is how the Finder views the folder
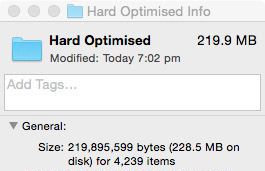 110.5 MB Saving on a 330.4 MB original file size is impressive. That’s 1/3! I went through a number of files to check the quality, and even though there is a slight difference if you look hard, for the most part the quality is good.