Best Optimal Handbrake Settings to convert 4K BLURAY to H.265 HEVC on Mac Windows Linux – JULY 2023

Convert 4K BLURAY to H.265 HEVC with HandbrakeConvert 4K BLURAY

Convert 4K BLURAY to H.265 HEVC with Handbrake without having to know or understand all of the settings. Just copy my settings and you’re done!

*Whilst your user interface may appear slightly different than shown here (depending on if you are using Windows, Mac or Linux), the settings and results will be the same across all platforms.

**NOTE** – These settings are for 4K BLURAY to H.265 HEVC Video

To convert 1080P BLURAY to H.265 – CLICK HERE!
To convert 1080P BLURAY to H.264 – CLICK HERE!
To convert DVD to H.265 – CLICK HERE!
To convert DVD to H.264 – CLICK HERE!

THE SHORT VERSION

1 Open source file in Handbrake and make sure you are on the “Summary” tab
2 Set file format to “MKV”
3 Click “Dimensions” tab and set Resolution Limit to “2160P 4K Ultra HD” and leave Anamorphic as Automatic, leave cropping “Automatic” and borders “None”
4 Click the “Filters” tab
5 Leave Interlace Detection set to Default, De-interlace set to Decomb, and Preset at “Default”. If your system CANNOT play HDR video set colourspace to BT.709 (If you are not sure create a small test video as shown HERE).
6 Click the “Video” tab
7 Select “H.265 10-Bit (x265)” from the Video Codec drop down
8 Select “Same As Source” in “Framerate”
9 Check the “Constant Framerate” button
10 Set “Encoder Preset” slider to “Slow”
11 Set “Encoder Tune” to “None”
12 Set “Encoder Profile” to “Main 10”
13 Set “Encoder Level” to “5.1”
14 Set the “Constant Quality” slider to “24”
15 In the “Additional Options” box add strong-intra-smoothing=0:rect=0:aq-mode=1:rd=4:psy-rd=0.75:psy-rdoq=4.0:rdoq-level=1:rskip=2
16 Click the “Audio” tab
17 Select the preferred 7.1 or 5.1 channel soundtrack. Select “Passthru” to keep, or go to next step to compress
18 Set “Codec” to “AC3” and the Bitrate to 448kb
19 Set Mixdown to “5.1 Channels” and Samplerate to “48”
20 Click the “Subtitles” tab
21 To remove all subtitles on MAC set the dropdown to “None”, and on Windows click the greyed out “X” on the right hand side. To keep subtitles, select the desired subtitles track from the dropdown, and unselect “Forced Only” and “Burn In” to allow you to turn them off and on as desired. To keep a second subtitle track click “Track” and then “Add New Track”. Repeat the process for the second track. To burn a track into the picture so the subtitle are always there check “Burn In”.
22 Click the “Chapters” tab
23 Uncheck the “Create Chapter Markers” option if you don’t want them or leave it checked if you do
24 Give your output file a unique name and save it somewhere easy to find
25 Make a preset to save the settings and Press the Green “Start Encode” button

THE LONG VERSION

Continue reading “Best Optimal Handbrake Settings to convert 4K BLURAY to H.265 HEVC on Mac Windows Linux – JULY 2023”

Bluray Subtitles Demystified – What settings to use in Handbrake on Windows

Bluray Subtitles Demystified –  What settings to use in Handbrake

bluray subtitles

Bluray Subtitles behave differently to what we are used to in DVD’s. DVD subtitles are basically a text file with timings noted, and the specific text is displayed at the correct time. Bluray’s however use graphics that are pretty similar to PNG files. Each line of text is actually a little picture overlayed on top of the movie. Therefore, including subtitles in your Bluray encodes with Handbrake seems a bit tricky! However, in reality it’s actually easier than you think, let me show you how!

Once you have “Make” a MKV file from your source disk, there are two ways to go. We can either use the PGS subtitles from the disk in Handbrake directly, or we can convert the PGS subtitles to SRT text based subtitles. You are probably thinking “But won’t Handbrake burn the PGS subtitles in” and “I want to be able to turn them on and off”. And there is a very simple solution:

Continue reading “Bluray Subtitles Demystified – What settings to use in Handbrake on Windows”

Best Optimal Handbrake Settings to convert 1080 BluRay to H.265 HEVC on Mac Windows Linux MARCH 2023

Convert BLURAY to H.265 HEVC with Handbrake

Convert BLURAY to H.265 HEVC with Handbrake without having to know or understand all of the settings. Just copy my settings and you’re done!

H.264 Vs H.265 – Which one should I use?
If you have a 1080 HD TV and an older media player you will want to use H.264 – See THIS ARTICLE for instructions.
If you have a 4K Television and a newer media player H.265 is best, so use these instructions below.

*Whilst your user interface may appear slightly different than shown here (depending on if you are using Windows, Mac or Linux), the settings and results will be the same across all platforms.

**NOTE** – These settings are for 1080P BLURAY to H.265 HEVC Video
Use these settings if you have a recent 4K UHD Television and newer media player like the Apple TV 
4K.
To convert 1080P BLURAY to H.264 – CLICK HERE!
To convert DVD to H.265 – CLICK HERE!
To convert DVD to H.264 – CLICK HERE!
To convert 4K BLURAY to H.265 – CLICK HERE!

THE SHORT VERSION

1 Open source file in Handbrake and make sure you are on the “Summary” tab
2 Set file format to “MKV’ and deselect “Passthru Common Metadata”
3 Click “Dimensions” tab and set Resolution Limit to 1080p and leave Anamorphic as Automatic, leave cropping “Automatic” and borders “None”
4 Click the “Filters” tab
5 Leave Interlace Detection set to Default, De-interlace set to Decomb, and Preset at “Default”
6 Click the “Video” tab
7 Select “H.265 10-Bit (x265)” from the Video Codec drop down
8 Select “Same As Source” in “Framerate”
9 Check the “Constant Framerate” button
10 Set “Encoder Preset” slider to “Slow”
11 Set “Encoder Tune” to “None”
12 Set “Encoder Profile” to “Main 10”
13 Set “Encoder Level” to “5.1” – If this wont play on your system drop it back to “4.1”
14 Set the “Constant Quality” slider to “24”
15 In the “Additional Options” box add strong-intra-smoothing=0:rect=0:aq-mode=1:rd=4:psy-rd=0.75:psy-rdoq=4.0:rdoq-level=1:rskip=2
16 Click the “Audio” tab
17 Select the preferred 7.1 or 5.1 channel soundtrack
18 Set “Codec” to “AC3” and the Bitrate to 448kb
19 Set Mixdown to “5.1 Channels” and Samplerate to “48”
20 Click the “Subtitles” tab
21 Click the “X” in the circle at the right side to remove the subtitles track on Windows, or select “None” from dropdown on Mac
22 Click the “Chapters” tab
23 Uncheck the “Create Chapter Markers” option if you don’t want them or leave it checked if you do
24 Give your output file a unique name and save it somewhere easy to fid
25 Make a preset to save the settings and Press the Green “Start Encode” button

THE LONG VERSION

Continue reading “Best Optimal Handbrake Settings to convert 1080 BluRay to H.265 HEVC on Mac Windows Linux MARCH 2023”

How To Bring Back Epic Browser PROXY VPN and AD Blocker Button Icons to Toolbar

Want To Bring Back Epic Browser PROXY VPN and AD Blocker Button Icons to Toolbar?

Epic Browser Logo

Epic Browser is a great alternative to the browsers that come with your computer like Edge and Safari. It is considerably more secure. But recently, the Proxy VPN service that was activated by default has been made an extension, and to get it back there are a few things you need to do. To get started, you can either watch the video below, or continue reading.

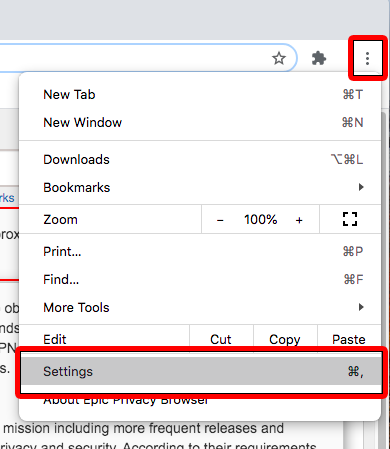
Firstly, click on the three dots in the top right hand corner, the select “Settings”

epic-browser-vpn-ad-block-settings-02

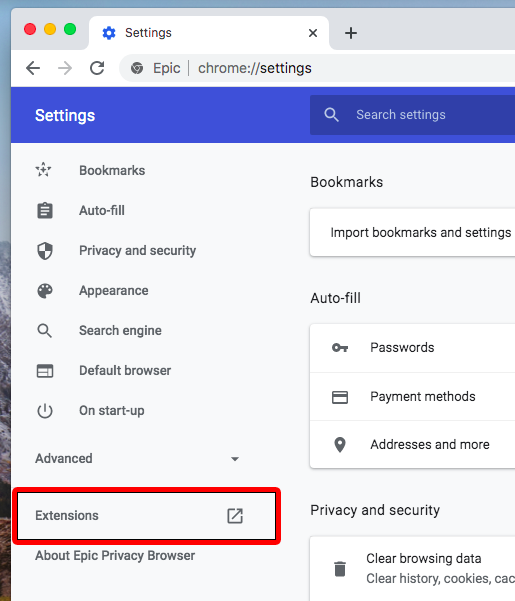
From the menu that appears, select “Extensions”

epic-browser-vpn-ad-block-settings-02a

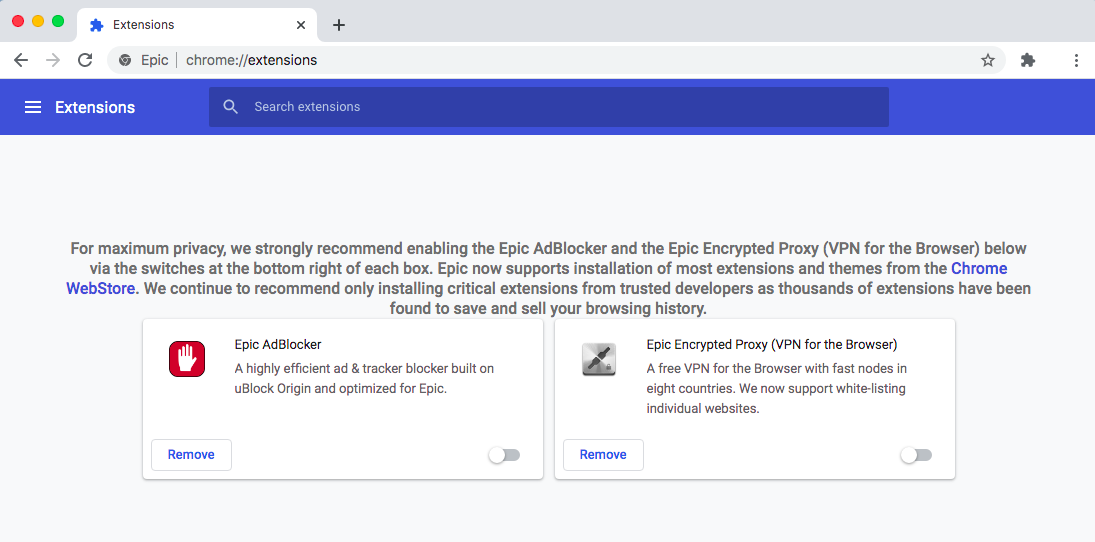
You will now find yourself seeing the extensions that come with Epic Browser

epic-browser-vpn-ad-block-settings-03

In the bottom right corner of each item you will see a toggle switch, toggle both to the “On” position

epic-browser-vpn-ad-block-settings-04

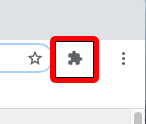
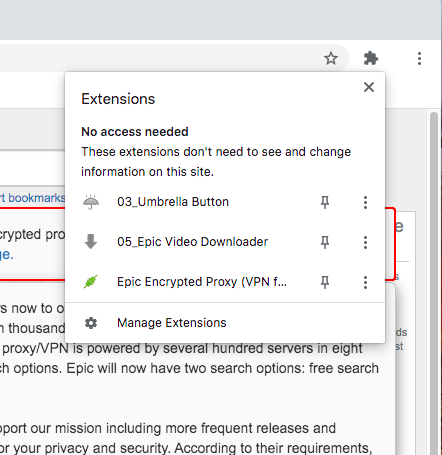
Windows users will now see the icons restored to the toolbar. For Mac users there is a few more steps to go. Close out of the extensions page and click the “Extensions Icon” in the toolbar – it’s the one that looks like a jigsaw puzzle piece

epic-browser-vpn-ad-block-settings-05

You will see the Ad Blocker and Proxy VPN listed

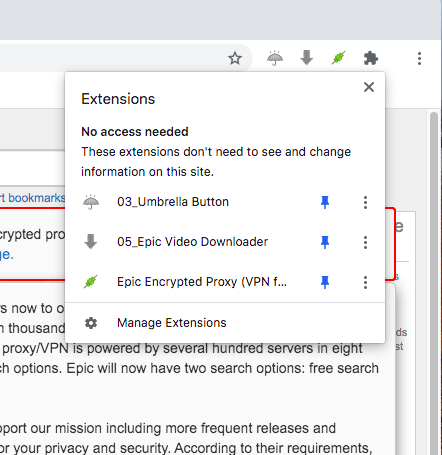
Now click the little pin next to each item you want to see in the toolbar, I clicked all three

epic-browser-vpn-ad-block-settings-07

And now you will see the icons have been restored to your toolbar, and you can go back to enjoying this fantastic and free browser

epic-browser-vpn-ad-block-settings-08


Easiest Best Optimal settings for Handbrake DVD to H264 Video Conversion on Mac, Windows and Linux 2022

Want to convert your DVD to H264 with Handbrake?DVD to H264

This is a simple easy guide on how to make the best encodes with the smallest file size in Handbrake using H.264 without having to know or understand all of the settings. Just copy my settings and you’re done!

This article is current as of FEB 2022 and uses Handbrake version 1.5.1

*Whilst your user interface may appear slightly different than shown here (depending on if you are using Windows, Mac or Linux), the settings and results will be the same across all platforms.*

**NOTE** These settings are for DVD to H.264 ONLY

To convert 1080P BLURAY to H.265 – CLICK HERE!
To convert 1080P BLURAY to H.264 – CLICK HERE!
To convert DVD to H.265 – CLICK HERE!
To convert 4K BLURAY to H.265 – CLICK HERE!

THE SHORT VERSION

1 Open file in Handbrake and make sure you are on the “Summary” tab
2 Select your preferred output file format “MKV’ or “MP4” (MKV was used for this tutorial)
3 Click “Dimensions” tab
4 Set Resolution Limit to None and leave Anamorphic as Automatic
5 Leave Final Dimensions set to Automatic
6 Click the “Filters” tab
7 Make sure “Interlace Detection” is set to “Default”
8 Set “Deinterlace” to “Decomb”
9 Set “Preset” to “Default”
10 Make sure everything else is set to “Off”
11 Click the “Video” tab
12 Select “H.264 (x.264)” from the Video Codec drop down menu
13 Select “Same As Source” in “Framerate”
14 Check the “Constant Framerate” button
15 Set “Encoder Preset” slider to “Very Slow”
16 Set “Encoder Tune” to “Film”
17 Set “Encoder Profile” to “High”
18 Set “Encoder Level” to “3.1”
19 Set the “Constant Quality” slider to “20” if you want great picture quality – If you don’t mind a slightly softer picture and would prefer a smaller file size set it to “24”
20 In the “Additional Options” box copy and paste the following:ref=5:bframes=5
21 Click the “Audio” tab
22 Select the English 6 Channel (5.1) Dolby Digital soundtrack
23 Set “Codec” to “AC3 Passthru”
24 Click the “Subtitles” tab
25 Click the “X” in the circle at the right side to remove the subtitles track if you don’t want them. If you’re using a Mac click where it says “Foreign Audio Scan” and select “None”
26 Click the “Chapters” tab
27 Uncheck the “Create Chapter Markers” option if you don’t want them or leave it checked if you do
28 Press the Green “Start Encode” button

THE LONG VERSION

THE GOAL – To produce the highest quality video with the smallest possible file size, whilst retaining the entire original 5.1 Dolby Digital sound track.

Continue reading “Easiest Best Optimal settings for Handbrake DVD to H264 Video Conversion on Mac, Windows and Linux 2022”

How To Find Frame Number In Video Movie File for FREE on Windows Mac and Linux

How To Find A Video Frame Number

From time to time you may find you need to know the frame numbers of individual frames in your videos and movies. This is especially useful if you are compressing and encoding video and want to be able to refer back to your source video and compare it to your encoded video. By picking a specific frame and knowing its number, you can view it from both versions side by side to see how it looks.

I recently stumbled upon DJV, a really useful and FREE program from Darby Johnston that amongst many other things, will allow you to see the frame numbers in videos. It has Windows, Mac and Linux versions, and can be downloaded free from the Darby Johnston Github Page HERE.

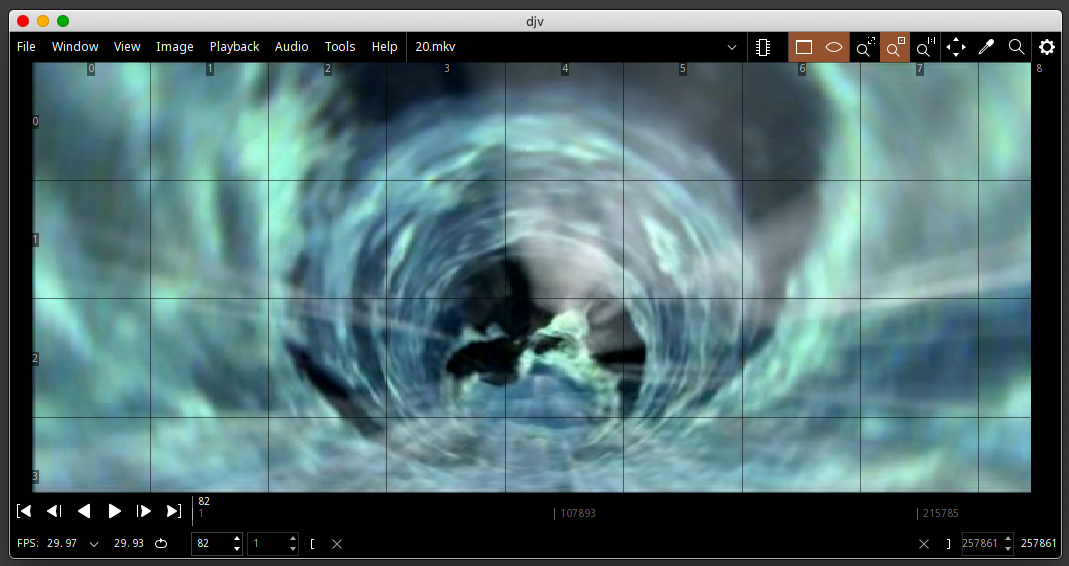
Once you have downloaded and installed DJV open it up, and you will see the main interface. Drag and Drop your video file onto DJV to load it.

DJV Main Interface Window

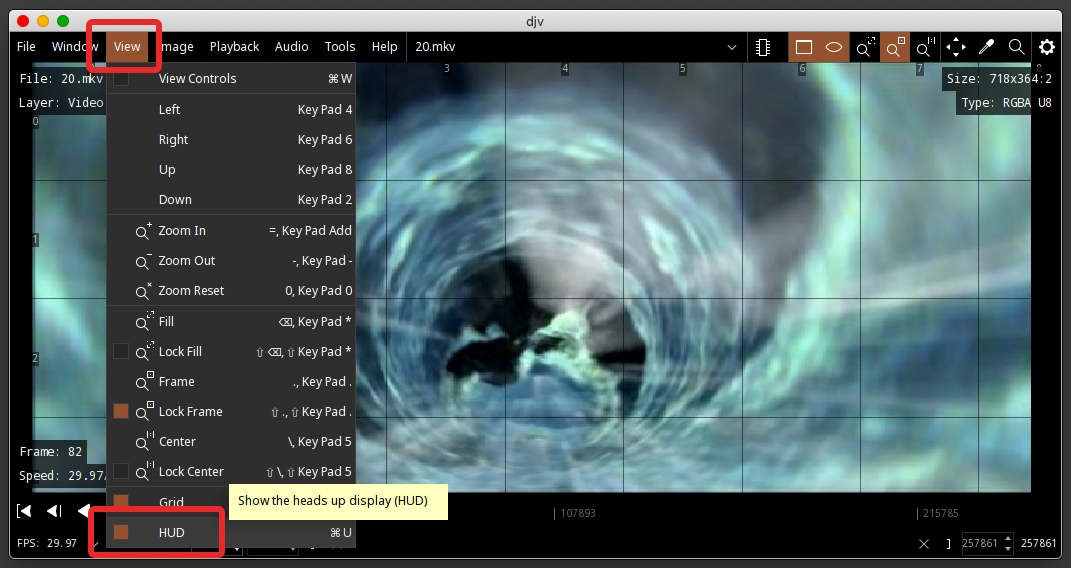
To show the frame numbers we need to click the “View Menu” and select “HUD”, which is short for Heads Up Display.

DJV Show Heads Up Display

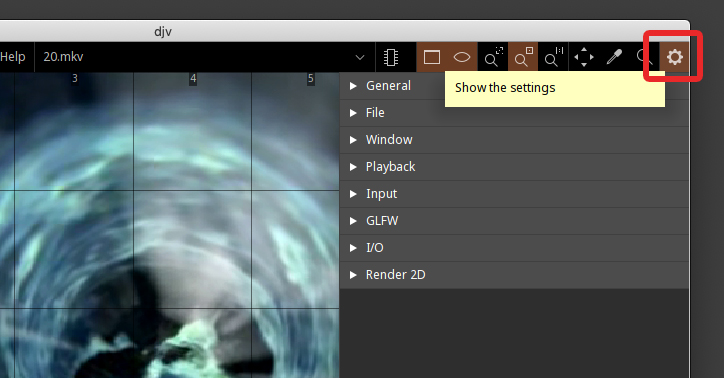
Next, open the settings/preferences from the top right corner.

DJV Settings Selection

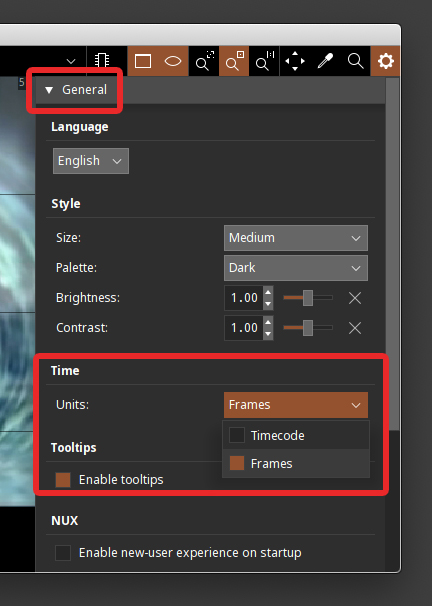
Then click and expand the “General” section, and in the “Time” option set the units to “Frames”

DJV Timecode to Frames

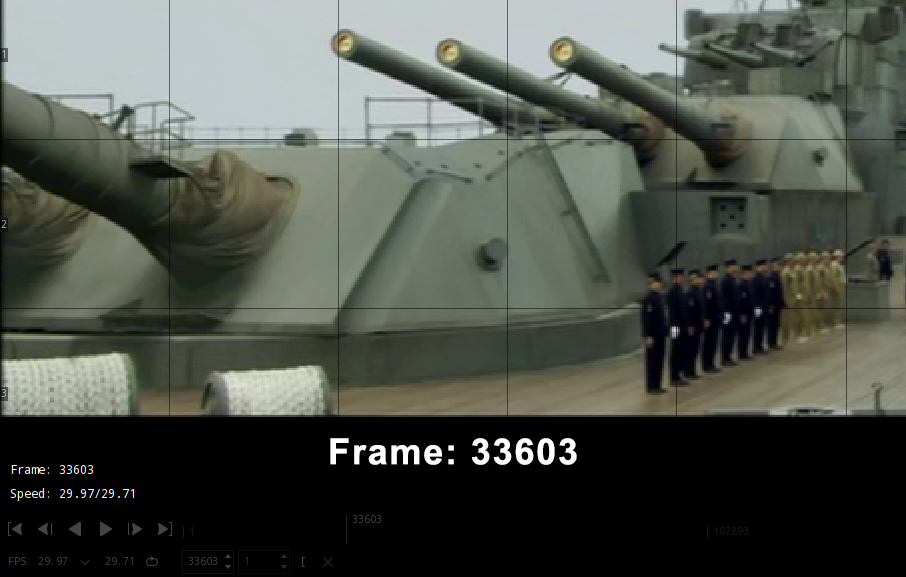
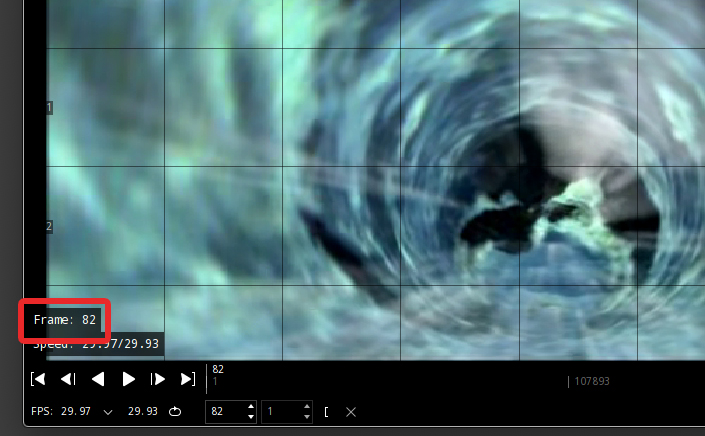
In the bottom left corner you will now see the frame numbers displayed.

DJV Frame Numbers