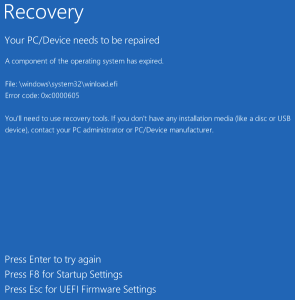
Long story short, as I am a beta tester for Micro$oft I previously installed a preview version of Windows 10. My life circumstances have changed since, so I haven’t been keeping up with its development, nor have I been updating the brand new HP PC I bought for it.
So today (Some time after the trial version has expired) I turned on the machine……BRICK…….nothing.
Couldn’t boot from disk, couldn’t boot from a USB drive, NOTHING but:
“a component of the operating system has expired”
The bottom line, if you want to reclaim your files and reinstall or upgrade, just boot into BIOS and set the date to JUNE 2015.
Split large audio files into individual tracks with Audacity This tutorial shows you how easy it is to split large audio files into single individual tracks using the free program called Audacity on Mac, Windows and Linux
You can download Audacity FREE for Mac, Windows and Linux/Unix HERE.
The quickest and easiest way I have found to keep my video library under control is by using an automatic file naming tool called Filebot. You can view the website HERE.
From the creators website:
FileBot makes organizing your movies and TV shows a breeze! We’ll automatically match your files with information from various online databases. How you want your media files to be named and organized is completely up to you. Our groovy format engine supports pretty much anything!
What I like best about it is being able to customize the output in anyway you please. I arrange my files in folders, so I have no need for the show title to be in the filename, I just like the season and episode number, as well as the episode title. But you can make your filenames include pretty much anything you want by adjusting the output formula.
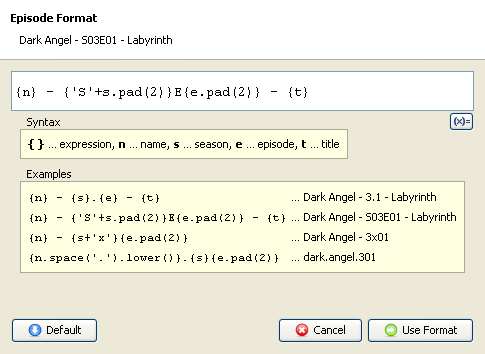
Heres My Filebot Formula {s00e00} - {t.replacePart(' Part $1').replaceAll("&", replacement = "And").replaceAll("'", replacement = "").replaceAll("!", replacement = "").replaceAll(",", replacement = "")}
Also from the Filebot website, here are some sample naming options:
{n} [{y}] {vf}{af}The Man from Earth [2007] 720p 6ch
Filebot is free to download and use from their website HERE. MAC USERS – If you try to download Filebot through the app store it is not free – It costs $4.99US, but you can get the latest version for free from Filebots Sourceforge file repository HERE. Just open the folder for the latest version and download the app.tar.gz version of the file.
There’s nothing I hate more than dropping new music into my iTunes library only to learn once it has finished importing that it doesn’t have meta-tags (No Song Name, Artist, Album Title etc etc). So now, before I add new music, I run it through MusicBrainz Picard. Here’s the programs description from their site:
“MusicBrainz Picard is a cross-platform (Linux/Mac OS X/Windows) application written in Python and is the official MusicBrainz tagger.
Picard supports the majority of audio file formats, is capable of using audio fingerprints (PUIDs, AcoustIDs), performing CD lookups and disc ID submissions, and it has excellent Unicode support. Additionally, there are several plugins available that extend Picard’s features.
When tagging files, Picard uses an album-oriented approach. This approach allows it to utilize the MusicBrainz data as effectively as possible and correctly tag your music. For more information, see the illustrated quick start guide to tagging.
Picard is named after Captain Jean-Luc Picard from the TV series Star Trek: The Next Generation.”
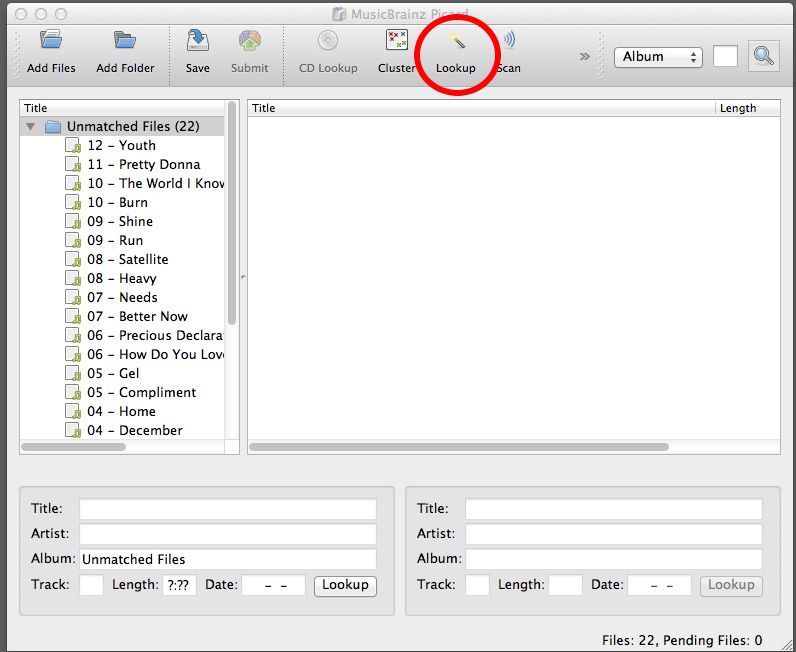
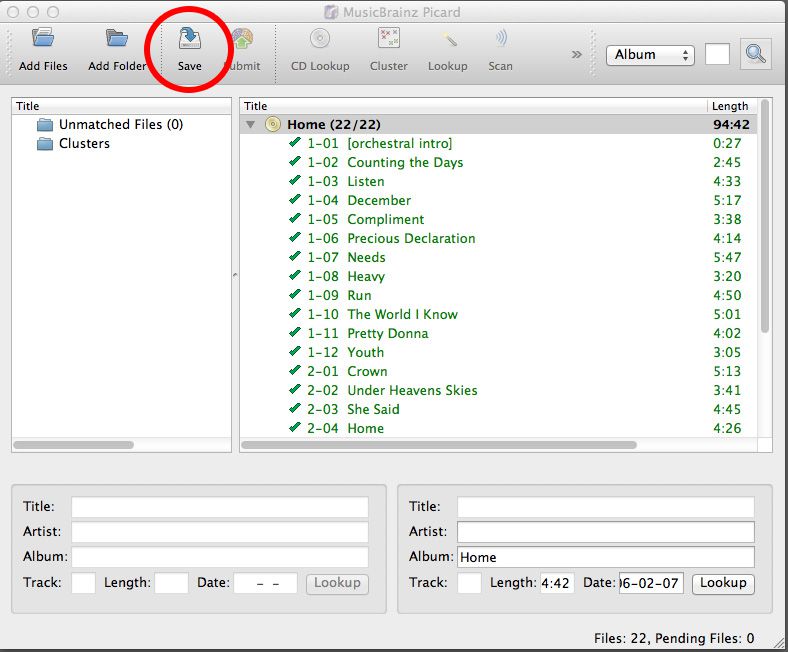
To get started, download and install MusicBrainz Picard HERE. Once you are up and running, drop the music files you want to tag anywhere in the window. They will then populate the list on the left called unmatched files.
When you have finished adding files, click the line of text with the folder icon next to it that says “Unmatched Files” to make it active. When it is active it will become highlighted. Now, go ahead and press the “Lookup” button, and MusicBrainz Picard will start scanning your music and comparing it to their database for identification.
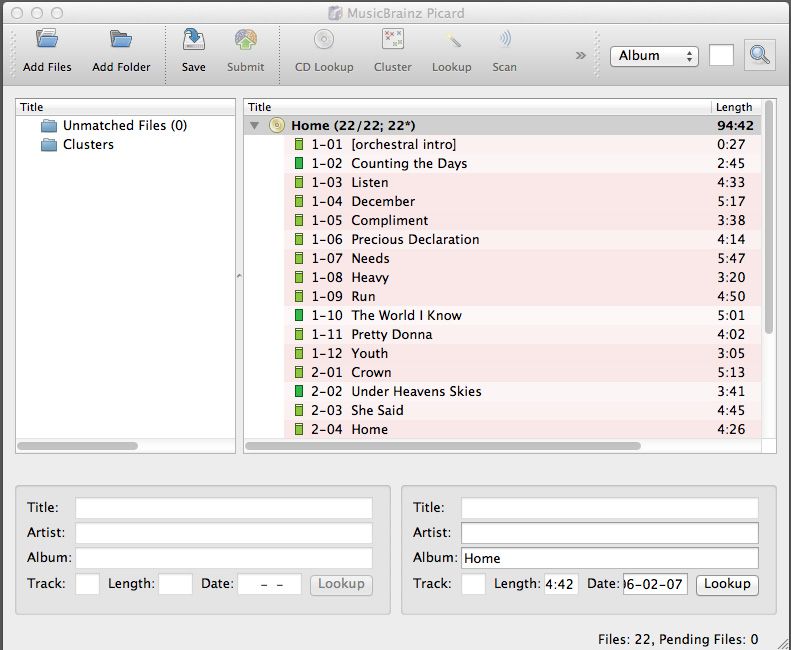
Once MusicBrainz Picard has identified the album and added all of the songs to it, the CD icon next to the album name will turn gold in color. If you don’t have all of the songs from the album, it doesn’t matter, you can still proceed, but the CD icon stays silver. The next step is to click Album Name next to the CD icon to make it active, and highlighted. You can now click “Save”.
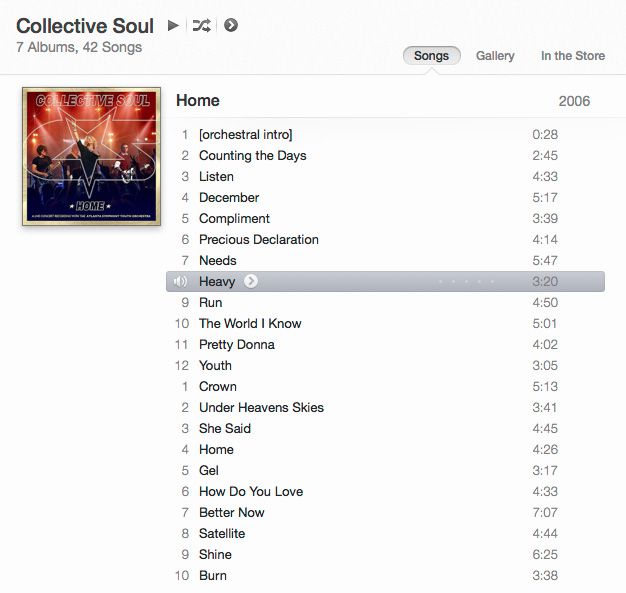
MusicBrainz Picard will now write the Meta Tag Data directly into your music files. Once it has completed, you can close out of the program, and then drop your music files into iTunes, and everything will be correctly categorised and ready to play.
Earlier today I tried to copy a large file I had made in Photoshop and I was told that the operation couldn’t complete because there wasn’t enough room on my hard drive for it. So, I needed a way to get a lot of space back, but I wasn’t sure what was taking up all of the room. I set about looking for ways to see what was going on on my drive and I happened upon some really great tools to help you visualize all your files. The process is called “Treemaps”.
I managed to find free Treemap programs for Windows, Mac and Linux platforms. For Windows users, you need to get a copy of WinDirStat (Windows Directory Statistics) HERE. Once installed, you can start it up and tell it to either analyze your whole drive, or specific folders. Here’s how it looks.
There is two options for Mac users. Grand Perspective (Gets up and going really quickly, easy to use) and Disk Inventory X (Longer to scan but a more thorough and detailed interface). Here’s how Grand Perspective looks.
And this is how Disk Inventory X Looks.
For Linux users, you can get KDirStat HERE. I havent tried it yet, but it looks very similar to WinDirStat. This screen capture is from their site.They are all fairly easy to use. Just roll your cursor over the big ones and the filename appears in the bottom left corner of the window. You can then decide which files you want to delete, and start enjoying some free space on your hard drive again.
Lately I have been backing up a lot of files to DVD for archiving. I was looking for a quick easy way to print out a list of all of the files on each disk that I could slip into the jewel case as well, so I know what is on it at a glance.
The simplest solution I could find was to open the folder in the finder, select all with command A, then command C to copy. Now that all of the files are in memory, open TextEdit and create a new text file. To paste in a “Listing” of the file names only, press command-option-shift and then V. You can now save and/or print if required.
This method works well so long as all of the files are in the same folder. If you want to print out a listing from a folder that has sub-folders, you will only get the sub-folders names, it will not display the names of the files in the sub-folders.
Do you know of a better method? Is there a program you know of that will do this better?
We use cookies on our website to give you the most relevant experience by remembering your preferences and repeat visits. By clicking “Accept”, you consent to the use of ALL the cookies.
This website uses cookies to improve your experience while you navigate through the website. Out of these, the cookies that are categorized as necessary are stored on your browser as they are essential for the working of basic functionalities of the website. We also use third-party cookies that help us analyze and understand how you use this website. These cookies will be stored in your browser only with your consent. You also have the option to opt-out of these cookies. But opting out of some of these cookies may affect your browsing experience.
Necessary cookies are absolutely essential for the website to function properly. This category only includes cookies that ensures basic functionalities and security features of the website. These cookies do not store any personal information.
Any cookies that may not be particularly necessary for the website to function and is used specifically to collect user personal data via analytics, ads, other embedded contents are termed as non-necessary cookies. It is mandatory to procure user consent prior to running these cookies on your website.