
Convert 4K BLURAY to H.265 HEVC with Handbrake
Convert 4K BLURAY to H.265 HEVC with Handbrake without having to know or understand all of the settings. Just copy my settings and you’re done!
*Whilst your user interface may appear slightly different than shown here (depending on if you are using Windows, Mac or Linux), the settings and results will be the same across all platforms.
**NOTE** – These settings are for 4K BLURAY to H.265 HEVC Video
To convert 1080P BLURAY to H.265 – CLICK HERE!
To convert 1080P BLURAY to H.264 – CLICK HERE!
To convert DVD to H.265 – CLICK HERE!
To convert DVD to H.264 – CLICK HERE!
THE SHORT VERSION
1 Open source file in Handbrake and make sure you are on the “Summary” tab
2 Set file format to “MKV”
3 Click “Dimensions” tab and set Resolution Limit to “2160P 4K Ultra HD” and leave Anamorphic as Automatic, leave cropping “Automatic” and borders “None”
4 Click the “Filters” tab
5 Leave Interlace Detection set to Default, De-interlace set to Decomb, and Preset at “Default”. If your system CANNOT play HDR video set colourspace to BT.709 (If you are not sure create a small test video as shown HERE).
6 Click the “Video” tab
7 Select “H.265 10-Bit (x265)” from the Video Codec drop down
8 Select “Same As Source” in “Framerate”
9 Check the “Constant Framerate” button
10 Set “Encoder Preset” slider to “Slow”
11 Set “Encoder Tune” to “None”
12 Set “Encoder Profile” to “Main 10”
13 Set “Encoder Level” to “5.1”
14 Set the “Constant Quality” slider to “24”
15 In the “Additional Options” box add strong-intra-smoothing=0:rect=0:aq-mode=1:rd=4:psy-rd=0.75:psy-rdoq=4.0:rdoq-level=1:rskip=2
16 Click the “Audio” tab
17 Select the preferred 7.1 or 5.1 channel soundtrack. Select “Passthru” to keep, or go to next step to compress
18 Set “Codec” to “AC3” and the Bitrate to 448kb
19 Set Mixdown to “5.1 Channels” and Samplerate to “48”
20 Click the “Subtitles” tab
21 To remove all subtitles on MAC set the dropdown to “None”, and on Windows click the greyed out “X” on the right hand side. To keep subtitles, select the desired subtitles track from the dropdown, and unselect “Forced Only” and “Burn In” to allow you to turn them off and on as desired. To keep a second subtitle track click “Track” and then “Add New Track”. Repeat the process for the second track. To burn a track into the picture so the subtitle are always there check “Burn In”.
22 Click the “Chapters” tab
23 Uncheck the “Create Chapter Markers” option if you don’t want them or leave it checked if you do
24 Give your output file a unique name and save it somewhere easy to find
25 Make a preset to save the settings and Press the Green “Start Encode” button
THE LONG VERSION
THE GOAL – To produce the highest quality video with the smallest possible file size, whilst creating a 5.1 Digital Sound Track that is compatible with most players and TV’s
DISCLAIMER – This method will produce very nice quality videos, but may take SEVERAL hours to process each hour of video! Unfortunately, good quality video with small file size cant be done quickly, it just doesn’t work that way.
THE TECHNICAL STUFF – My TV is a 65″ Samsung 4K UHD. I viewing position is about 10-12 feet back. I play the media from a Apple TV 4K, and use the Infuse Pro player app. This video was encoded on a 8 year old HP desktop with I7 processor. The version of Handbrake used in this tutorial is v1.6.1 which is the current stable release for March 2023.
MY SOURCE FILE – My source file straight off the 4K BluRay weighs in at a hefty 52 GB and contains many audio tracks. We will be able to reduce the size of this significantly! (Info provided by Mediainfo – free download HERE)

LETS ENCODE!
Once you have dropped your source file into Handbrake, you should find yourself on the Summary Tab.
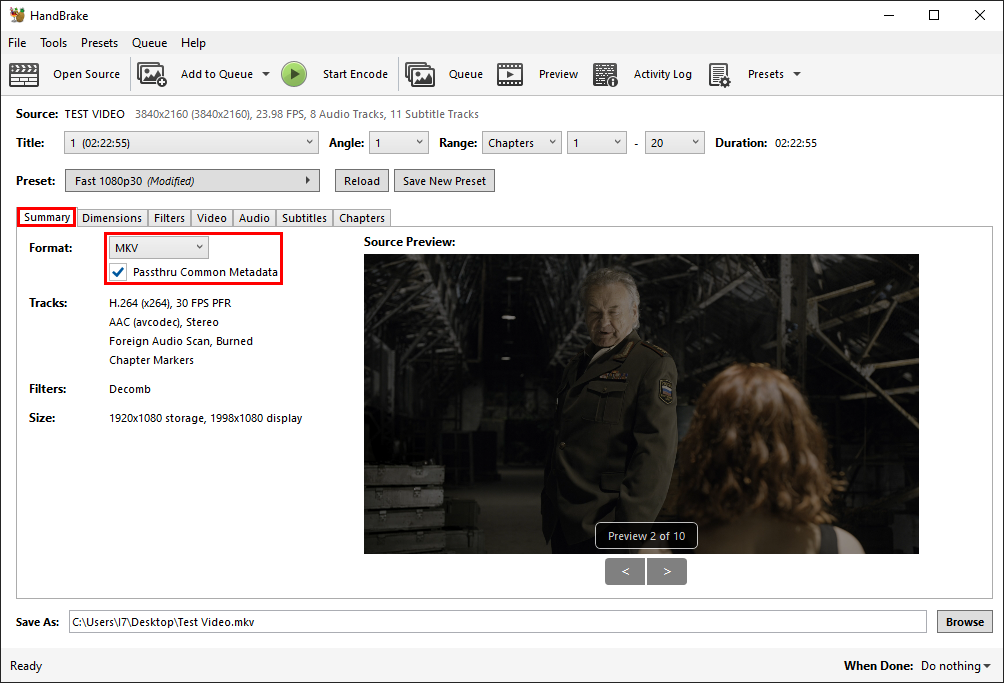
As we will be including PGS subtitles in this encode, select MKV as your output format, you can leave “Leave Passthru Common Metadata” checked if you want to retain this info, uncheck it if you don’t. Next is the Dimensions Tab.

Make sure Cropping is set to “Automatic”, set the Resolution Limit to “2160p 4K Ultra HD”, leave Anamorphic at “Automatic” and Border Fill to “None”. These settings will remove the black bars from the video, reducing the file size even further. Now it’s on to the Filters tab.
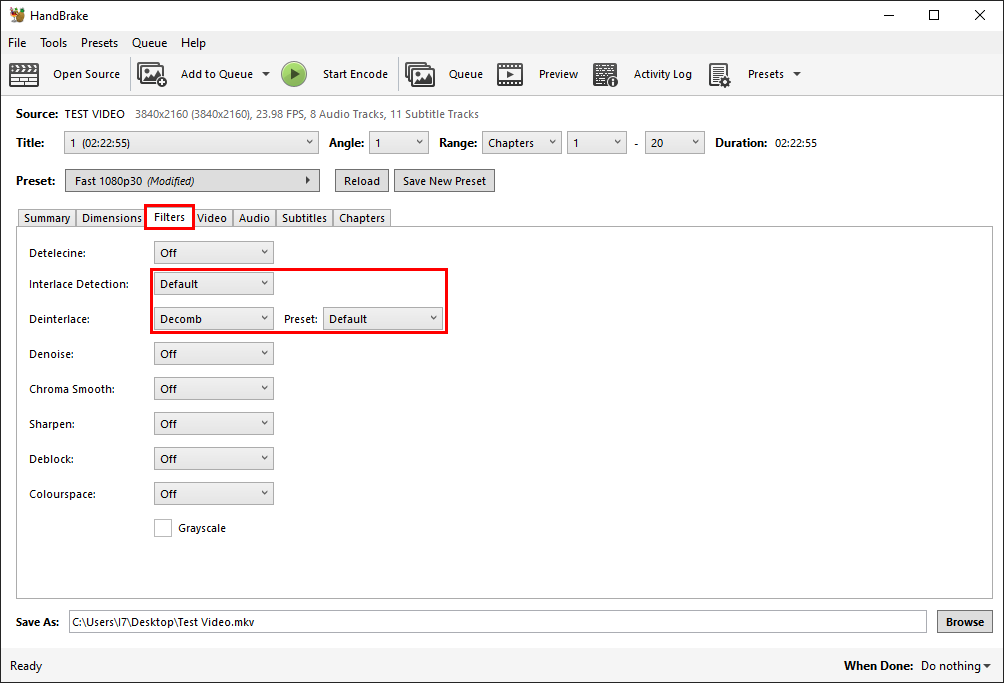
The default settings here are good. Regardless of your source file these settings result in a nice decombed progressively drawn video. This is exactly what we want. **IMPORTANT NOTE** – Not all TV’s and Media Players can handle HDR (High Dynamic Range). If your system can handle HDR leave Colourspace set to “Off”. If your system is not HDR compatible change Colourspace to “BT.709”
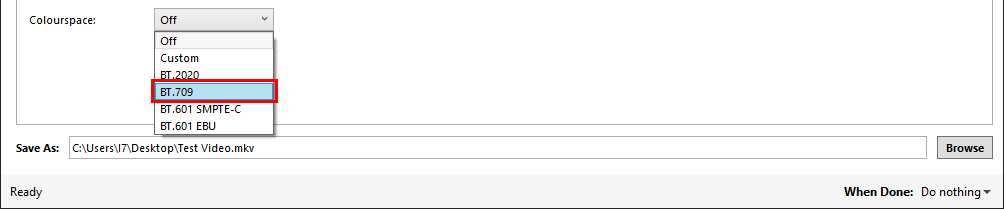
If you are not sure, copy out a small slice of your source file and make a test file, so you don’t have to wait for the whole movie to encode. See my article HERE on how to do it for free. Now we can move on to the Video tab.
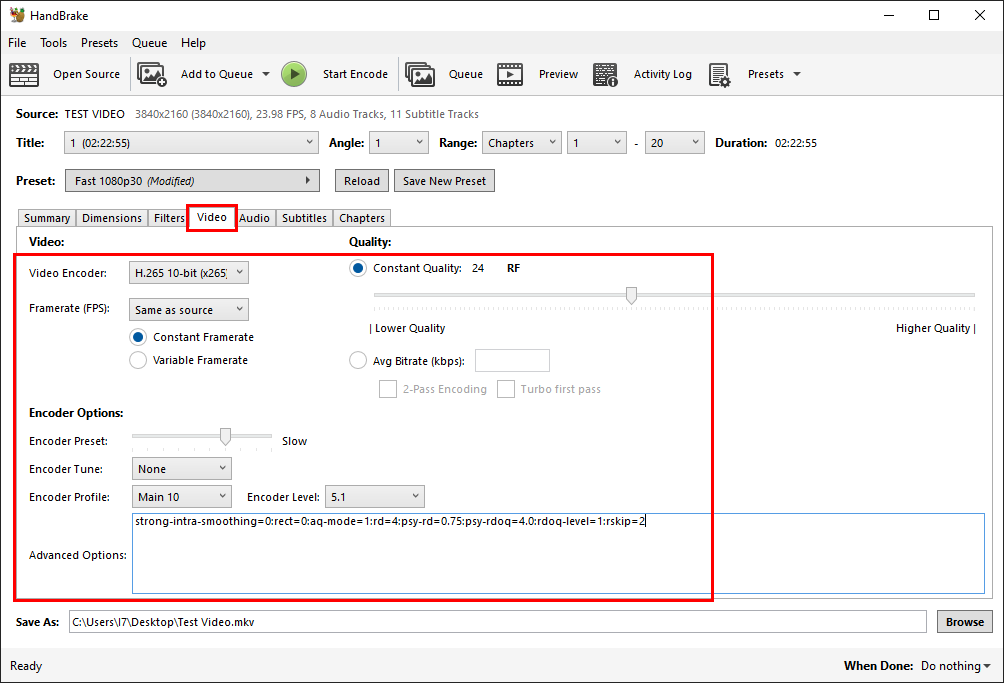
Select the H.265 10-Bit encoder. 10-Bit allows for a much wider range of available colours, and gives a cleaner encode with less artefacts. For Framerate, select “Same As Source”, and check “Constant Framerate”. Set the preset to “Slow”, leave tune at “None”, select “Main10” for the profile and set the level to 5.1. Drag the constant Quality slider to 24 and paste the following code into the Additional Options box:
strong-intra-smoothing=0:rect=0:aq-mode=1:rd=4:psy-rd=0.75:psy-rdoq=4.0:rdoq-level=1:rskip=2
| **TIME SAVING TIP** – If you want to quickly see what effects your settings have on the video your best bet is to copy off a 1-2 minute chunk of your source video file. Then you can quickly run it through Handbrake and see how your settings look before encoding the whole movie – See how it’s done in my article HERE. |
Next click the Audio Tab.
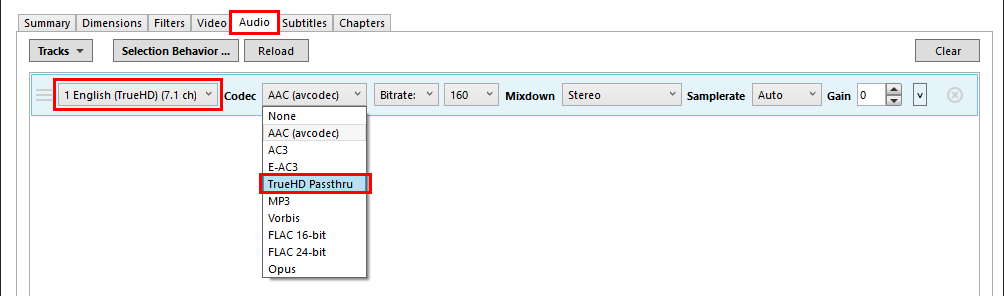
Your 4K source will have a super high definition Audio track like the one shown above. If you are a real audiophile you can pass this through untouched by selecting the appropriate “Passthru” option. But be warned, this will increase the size of the encode dramatically. For maximum compatibility and minimum file size we are going to make an AC-3 5.1 channel sound track.
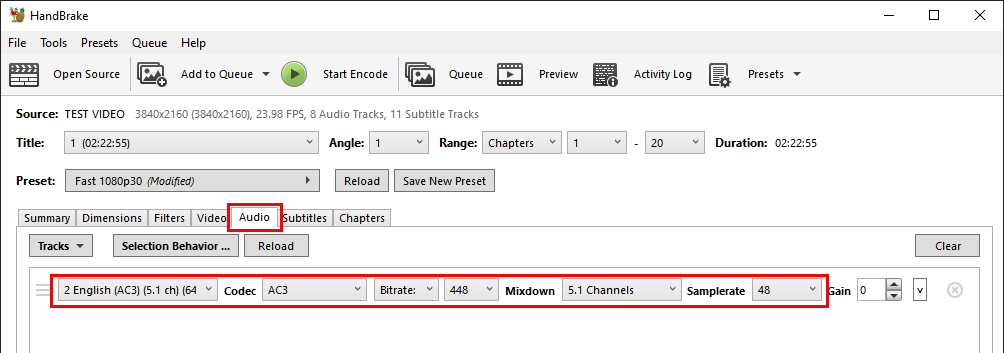
If your source file has a Dolby Digital 5.1 track in your desired language select that. If not use the super high definition audio track. Change the codec to “AC-3”, Bitrate to “448”, change Mixdown to “5.1 Channels” and the Samplerate to “48”. Next it’s on to the Subtitles Tab.

To remove all subtitles on Mac set the dropdown to “None”, and on Windows click the greyed out “X” on the right hand side. To keep subtitles, select the track you want from the dropdown, and unselect “Forced Only” and “Burn In”. This will allow you to turn the subtitles on and off as required.If you want to burn this track into your video so it is always shown and can’t be turned off, check “Burn In”. If your source has two tracks you want to keep (for example one track with all subtitles, and a second track with subtitles for just the non-english parts only) click “Tracks” and then “Add New Track”.

Now in the second drop down select the second track you want to keep. Make sure “Forced Only” and “Burn In” are unchecked here as well.
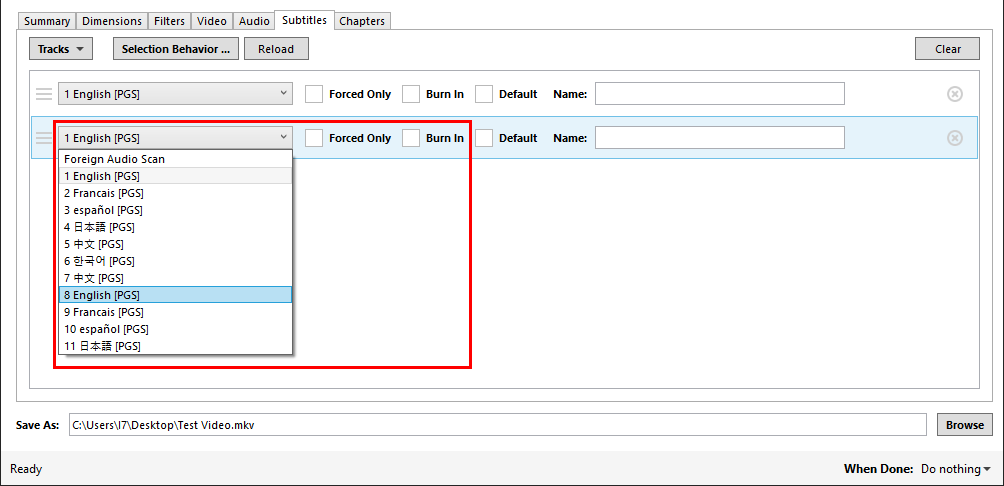
Your settings should look something like below. This will allow you to have multiple subtitle tracks that you can choose from, and turn each on and off as you require.

And finally the Chapters Tab.

If you want to retain the chapters leave the “Create Chapter Markers” checkbox ticked, they don’t use much space and can be quite handy. If you don’t want them, uncheck the box. Now, let’s go back to the “Summary” tab.
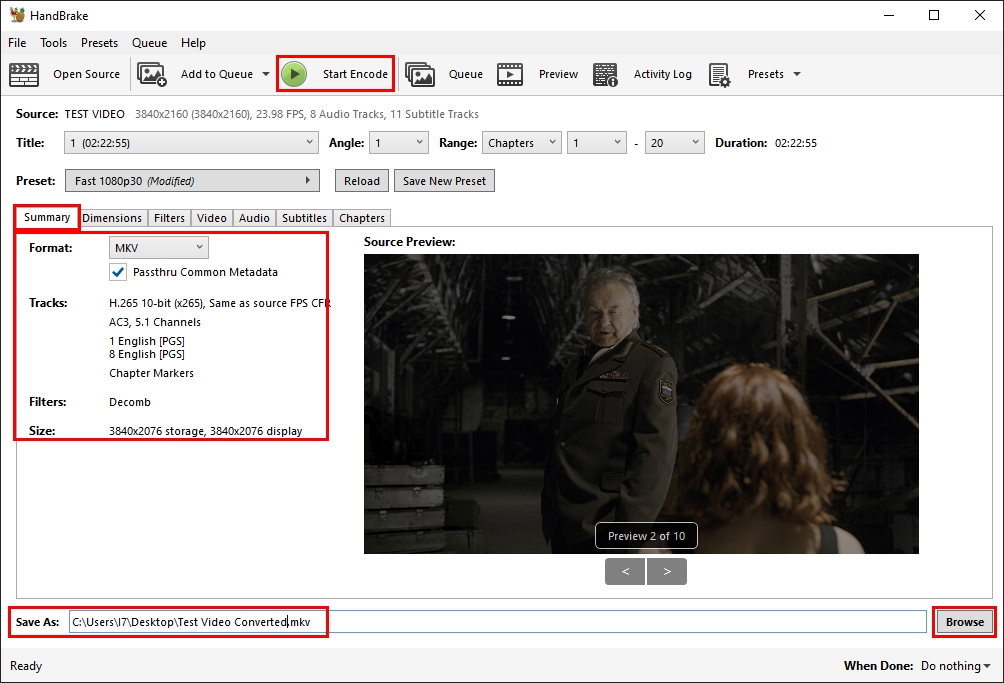
We have a quick review of our settings here to make sure we are happy with everything. You can also create a preset now to save these settings for your next encode (Unless you specify your Audio and Subtitle settings won’t save as part of the preset as every source file will be different).
Make sure to give your encode a unique filename, and save it somewhere easy to find, like the desktop. To change the output location, click “Browse”
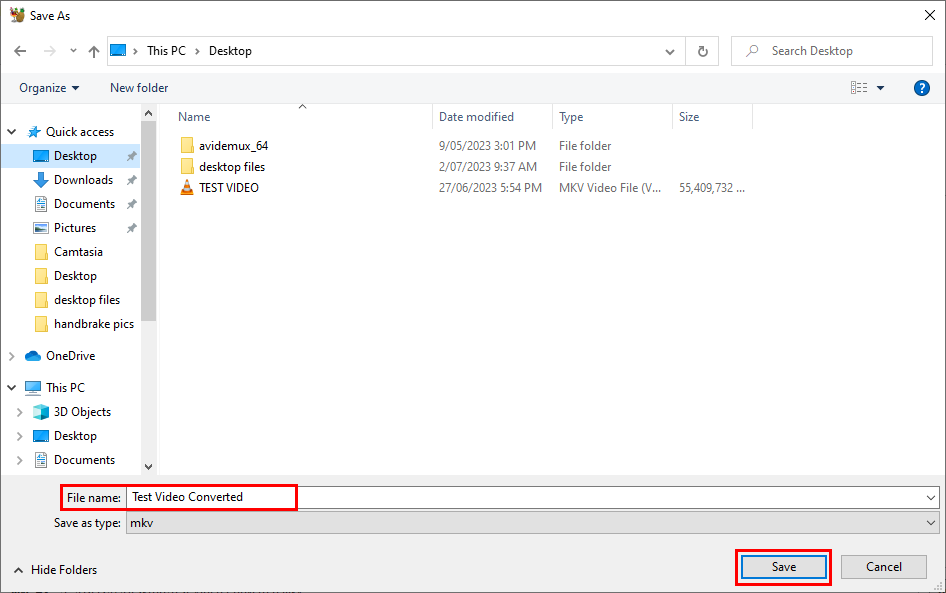
Change the output location as required, and you also have another chance to change the output filename here. Click “Save” once you are done. QUICK TIP – To change the default save location, go to Tools->Preferences->Output Files and chand the default pathway to your liking.
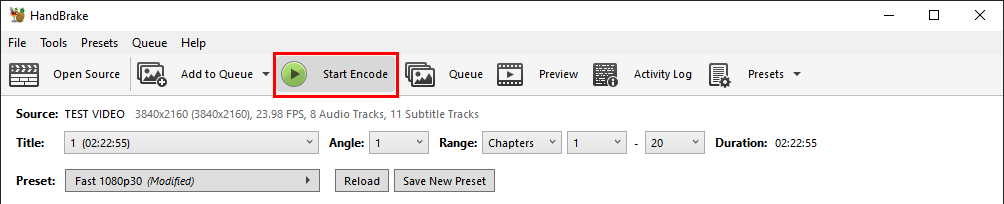
Now, it’s time to encode. Press the “Start Encode” button and Handbrake will begin doing it’s thing.
Once your encode has completed (Mine took about 18 hrs) you should see a great reduction in file size.
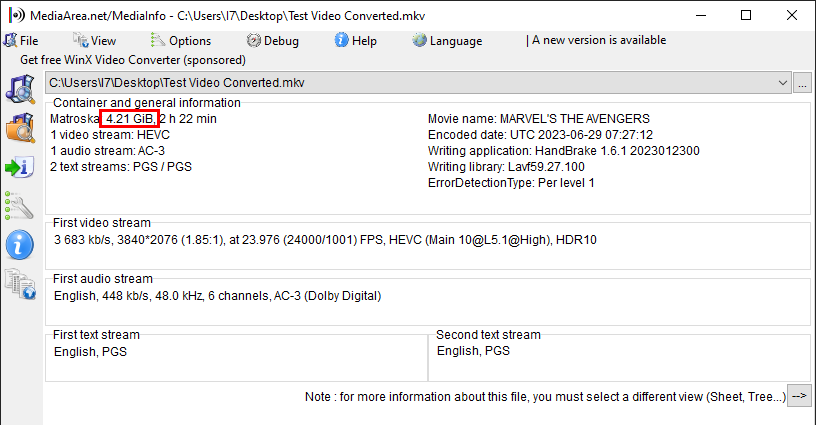
I was able to reduce the file size from 52GB down to 4.2GB, a reduction of over 90% – with minimal picture and sound quality impacts. Pretty cool huh!
Thank you so much for this! Been using your 1080p h.264 settings for years and they have never let me down. Excited to start slowly upgrading my library to 4K
Hi Steven, Thanks for your continued support, and I am glad you find the articles useful!
Greg, very grateful for the tutorial.
Is it advantageous to convert 4K BluRay to H.264..?? Is there a big difference in the size of 4K BluRay files for H.264 and H.265..??
Thanks..!!
Hi, The big advantage to H.264 is that it will convert a lot quicker, and if you use 10 Bit the quality will be excellent. File size will be bigger but not a huge amount.
Dear Webernets, everytime i want to encode “something” my first move is to visit your website. thanks for the continued support of handbrake, which is really easy to use for myself. One quetion have you ever considered AV1 encoding codec? And would you have any tips?
Hi, Im glad you find the site useful! I haven’t really looked into AV1 in any great detail. I have heard it is quite processor intensive (some suggest more than H.265) so I have not pursued it. Sorry I can’t be of more help.
Thanks for your answer, I understand your point.
How do you feel about using quicksync for the encoding with the quality preset?
I don’t have any supported hardware and have not tested, sorry I can’t be of more help.
Thank you so much for this and all your guides, extremely helpful! I wondered if there was a way of converting your 4K blu-ray files but keeping Dolby Vision?
Sure – Leave colourspace set to off and the HDR will not be adjusted
I always use your settings!! Would you ever look into NVENC settings?
Hi Lewis, Im glad you find these articles useful. I get asked A LOT for advice on Nvidia and Intel QSV, but unfortunately at this stage I don’t have any supported hardware to test on. Perhaps someday in the future.Thanks for your comment.
Thank you for this, haven’t encoded something for ~10 years now….
I’m just trying your settings…
…to super sample my 4k videos to 1080p+HDR.
…to reduce Bandwith while streaming from Plex if I’m not at home.
50 mbit upstream isn’t enough for a 60-70 mbit video stream 😉
I have looked into the hardware encoding settings (NVENC/Quicksync) and everywhere I have looked stated that using hardware encoding gives MUCH LOWER QUALITY than software encoding. The hardware encoding works best if you need/want to encode your video games for posting to relevant video game sites. So, not worth the time trying hardware encoding. Hope this helps everyone. PS – While you will see significant savings in using H.265 (MKV) over H.264 (MP4) that is a tremendous amount of time and spinning hard drive sizes (like SSD) keep going down (now around $13-15/TB) it doesn’t seem worth the time redoing your whole library to save space. I am up to 14 TB hard drives for less than $200 and everything streams fine from my QNAP NAS. For PCs (not MACs – don’t have or know MAC anything – sorry) HPC-MC works really well
I have been following your guide for decades and it has been working out quite well. Thanks for that. My devices do not support H.X265 codec. Can you suggest what changes do I need to make to the guide above to make it in H.X264 codec?
Not sure why my comments disappeared. Sorry if it’s a duplicate post. I’ve been following your settings for a while and it works flawlessly. Can you please suggest the settings for H.X264 instead of H.X265? My devices don’t support the latter.
I use all the same settings except the encoder. I use H.265 10-bit (NVEnc) w/Constant Quality at 22 and Encoder Preset to SLOWEST, to offset the minimal difference in software vs. hardware encoding. I have to say I’m very impressed and have yet to find any other settings that come close to the quality and size of these encoder settings. Thank you for your hard work and thorough explanations. (RTX 3090 encodes 4k UHD rips in about 30 min on my settings. I love that GPU.)
Hi Mark, thanks for your comment, Im glad you found the article useful!
Why would you want to use encoder level 5.1 here when max supported res is 1080p? You would want to be using 6.0-6.2.
Was curious if could do a tutorial for Windows 10 vs Windows 11 using the H.264 NVEnc or different settings so the process takes the most advantage of your graphics card instead of the processor for converting Blu ray mkvs to H.264 1080P?
Thanks for your great guide! What do these parameters do?
strong-intra-smoothing=0:rect=0:aq-mode=1:rd=4:psy-rd=0.75:psy-rdoq=4.0:rdoq-level=1:rskip=2