Want To Bring Back Epic Browser PROXY VPN and AD Blocker Button Icons to Toolbar?
Epic Browser is a great alternative to the browsers that come with your computer like Edge and Safari. It is considerably more secure. But recently, the Proxy VPN service that was activated by default has been made an extension, and to get it back there are a few things you need to do. To get started, you can either watch the video below, or continue reading.
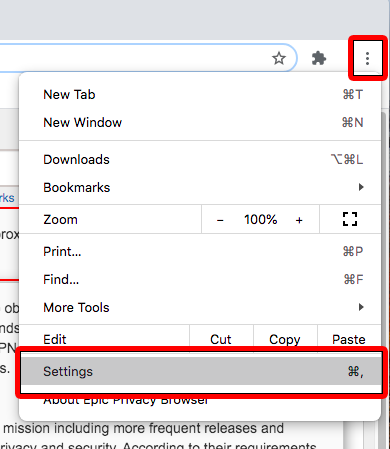
Firstly, click on the three dots in the top right hand corner, the select “Settings”
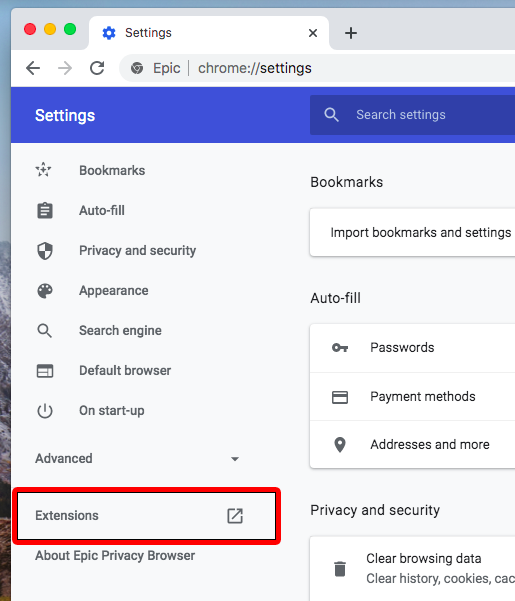
From the menu that appears, select “Extensions”
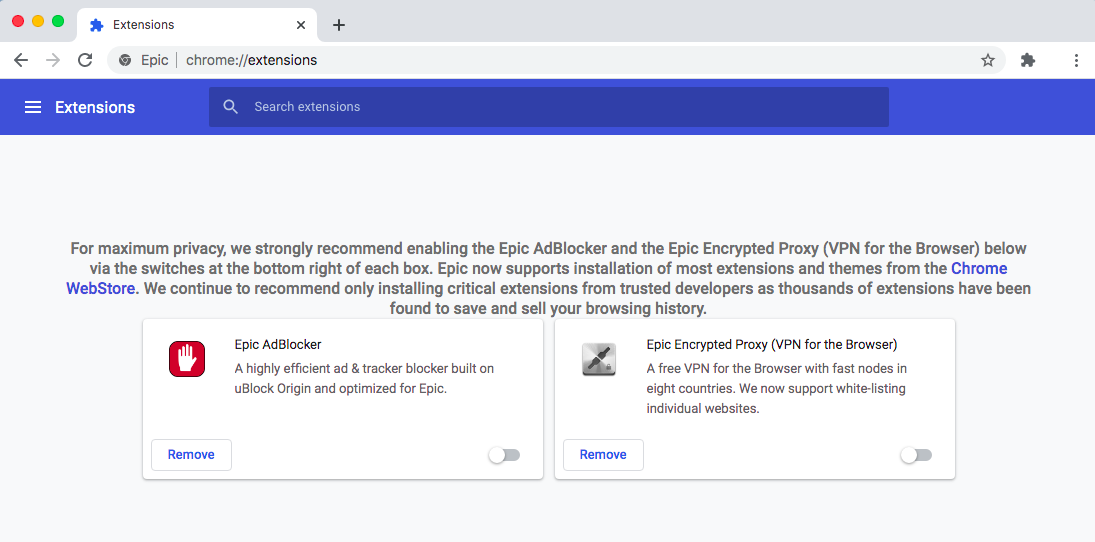
You will now find yourself seeing the extensions that come with Epic Browser
In the bottom right corner of each item you will see a toggle switch, toggle both to the “On” position
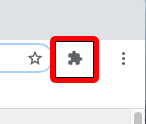
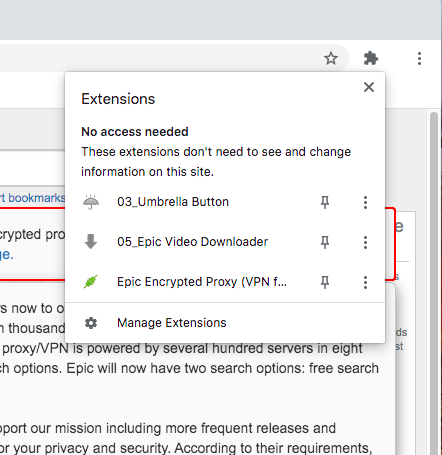
Windows users will now see the icons restored to the toolbar. For Mac users there is a few more steps to go. Close out of the extensions page and click the “Extensions Icon” in the toolbar – it’s the one that looks like a jigsaw puzzle piece
You will see the Ad Blocker and Proxy VPN listed
Now click the little pin next to each item you want to see in the toolbar, I clicked all three
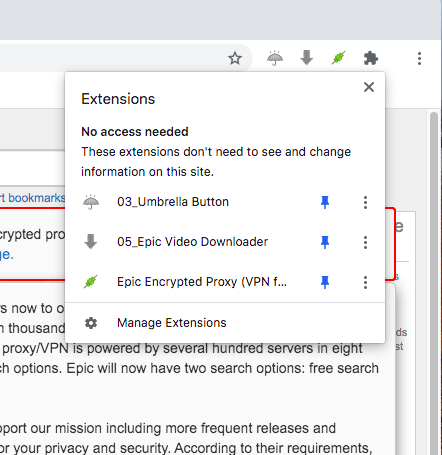
And now you will see the icons have been restored to your toolbar, and you can go back to enjoying this fantastic and free browser
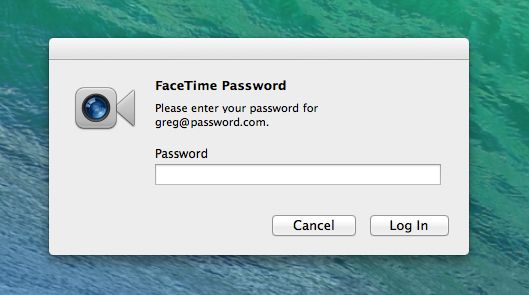
All of a sudden, when I turn on/log in on my Macs that are running OS X Mavericks, I am getting a window that asks me to input the password for FaceTime. This really started driving me crazy, as I don’t use FaceTime, and I don’t even have a camera connected to my Mac Pro.
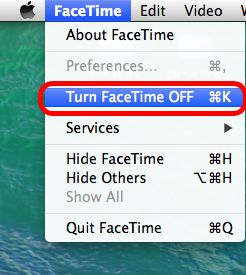
To stop this from happening, I just turned FaceTime off. To do this, open a new finder window, and then open your Applications folder. Now click/open FaceTime. Click and drag down the “FaceTime” menu option and simply select “Turn FaceTime Off”.
From time to time most of us see something on Youtube that we would like to download and save.
In my case this week, I found a Youtube channel that has the video broadcast from every NHRA drag racing event of the 2012 season. As my wife and I flew from Australia to attend the Sonoma round of racing, it makes a really great souvenir for us to have the video broadcast. The problem is though, Each days racing is split into about 9 or 10 pieces, and it was a three day event. Thankfully though, KMan2100 has arranged the videos into playlists, so they can be viewed in order.
Now, you could download the videos one at a time using the method described in my post about Video Download Helper HERE, but that will take a LOT of time. If you want to download all of the videos in a playlist quickly and easily, you need to make a download list, then download them all!
To do this, you need to be using the Firefox web browser. Its free, it runs on Windows, Mac and Linux, and if you are not already using it, you should be. You can get it free HERE.
With Firefox open and running, select “Add-ons” from the “Tools” menu in your menu bar. The first Add-on you need is the one that takes all of the videos in the playlist and turns them into a series of links. It is called BYTubeD, Bulk Youtube Downloader. To get it, type “BYTubeD” into the search bar in the top right corner.
Click the “Install” button to the right of it when you see it in your “results” list. This will download and install it. When this is finished, go back to the search bar and type “Download Them All”. As before, click the “Install” button to the right to install it.
To make your new add-ons active you need to restart Firefox. To do this, simply click the text that says “Restart now”
Once you have clicked restart, you can close the Add-ons window, and any other windows that may have popped up.
And now the fun starts!
To get downloading, go to Youtube and find your channel, and click the playlist you want to download.
As you can see, there are 28 videos on this playlist. To download them all, open your “Tools” tab on your menu bar and select “BYTubeD”. It should be at the bottom. This will open a new window.
**BEWARE** – Not only does this window contain info for all the videos you want, it also contains the info for other playlists and videos that are on this page that you may not want as well! As highlighted below, you can see the Sonoma videos I want, but I am not interested in Phoenix or Gainsville etc etc…..
For the next step, you need to tell BYTubed which videos you DO want to keep. To do this, simply highlight them. To select multiple videos (Which is kinda the point of this article) hold down your control key, then click each one if your using Windows, or your command key and click if you’ve got a Mac. Once you have highlighted the videos you want to download, click the start button.
BYTubed will now chew through the playlist and open up a new web page with links to all your videos.
Now’s where the magic happens. To download them all, open “Download Them All” from your “Tools” menu in your menu bar.
All that is left to do now is to check mark (click the circles to the left of the names) the videos you want to keep, choose your download location (I usually download to my desktop) then click “Start” to watch those babies start loading down!
From time to time we all come across videos on Youtube that we really want to download and keep on our computers so we can watch at anytime, or to re-encode so we can watch and keep them on our phones or ipods and ipads to. A simple way to download videos is with Video Download Helper.
In order to use Video Download Helper you need to be using Firefox browser, so if you are not, you probably should be, and you can download it free HERE.
Now you have Firefox open and running, you need to get the free Video Download Helper Add On. To do this, select this “Add-ons” from the “Tools” menu in your menu bar. Once the Add-ons window opens type “Video Download Helper” in the search box in the top right corner.
Video Download Helper should be the first result, so when you see it in the list, click the “Install” button to right of it. Once it has finished downloading and installing, you will need to restart Firefox to make it active. To do this, simply click the “Restart now” text.
Once Firefox restarts, you can close out of the Add-ons window and any other windows that have popped up, and you should now see a new icon in the top left.
This means you are all set to go! Now when you wake up at 2am and worry that Gangnam Style is going to be taken down and you will never see it again, you can open it up in Youtube, click the little black upside down triangle next to the colored logo (when its gray out it means there is nothing to download on the page – when its colored, there is a file it can retrieve for you) and select the quality of the file you want to download.
Once you have selected your preferred resolution and format, its just a matter of confirming with the “Save File” dialogue box, and your good to go!
Video Download Helper has a swag of other cool features as well, but we’ll cover those another time as I know you just CANT WAIT to go and run your new Gangnam Style video up on your home theater system!
Not sure what a pretty lady who can afford and appreciate a good cup of coffee has to do with horse riding though? Ahhh Who Cares……..Opp-Opp-Oppan Gangnam Style Baby!
Something else that has been bugging me lately about OSX Lion is that “One Finger Tap Dragging” has changed to “Click and Drag”. By default, you can’t just move the cursor to the windows top bar, tap once and drag it around the screen. It’s really difficult to break the habit if you have been a Mac user for several years. Thankfully, it is still available in Lion, but it is REALLY hidden away.
I spent ages going through every aspect of the “Trackpad” preferences pane, and watching all the little videos on gestures, but it turns out that this feature isn’t even in there. To turn One Tap Dragging back on, you need to go into “Universal Access”! How do you like those APPLES! Thanks APPLE!
Once you have opened Preferences and clicked Universal Access, click the “Mouse & Trackpad” tab, and then “Trackpad Options” towards the bottom.
Now, by checking one simple checkbox, all of that anguish and suffering will go away! Simply check the box next to “Dragging” and One Tap Dragging is restored. And if you were used to the “Drag Lock” feature in previous versions (where you have to tap again to release”, you can also restore that feature in the drop down to the right of “Dragging” as well.
Below is a screen capture of an option I would REALLY like to see Apple implement in coming versions of their operating system.
If you have a Windows based computer, and someone sends you a Quicktime video, or if you have a Mac, and you want to watch an AVI or a WMV video, your computer just isn’t going to play it for you without some additional software. Over the years I have experimented with a lot of different programs, but there really is only one program users of all platforms require – Videolans VLC Media Player. It will play just about everything (including DVD’s and Audio Cd’s), regardless of your operating system and installed codecs, it supports playlists for audio and video, supports sending and receiving streams, and has tons of tweaks to allow you to adjust everything from brightness and contrast, to Digital Audio pass-thru for those of us using Dolby Digital/DTS enabled audio cards with Digital Coax or Fibre Optical SPDIF audio outputs. Below are the supported video playback formats:
And the supported audio playback formats:
These are the supported Audio/Video outputs:
There are also some filters that you can apply to the playback.
The main one I find useful is the de-interlace filter, which stops you getting the “stripped” effect when watch fast moving scenes in a interlaced video (like shown below)
VLC Media Player also supports many formats of subtitles:
But the best part about VLC Media Player, it is ABSOLUTELY FREE!
We use cookies on our website to give you the most relevant experience by remembering your preferences and repeat visits. By clicking “Accept”, you consent to the use of ALL the cookies.
This website uses cookies to improve your experience while you navigate through the website. Out of these, the cookies that are categorized as necessary are stored on your browser as they are essential for the working of basic functionalities of the website. We also use third-party cookies that help us analyze and understand how you use this website. These cookies will be stored in your browser only with your consent. You also have the option to opt-out of these cookies. But opting out of some of these cookies may affect your browsing experience.
Necessary cookies are absolutely essential for the website to function properly. This category only includes cookies that ensures basic functionalities and security features of the website. These cookies do not store any personal information.
Any cookies that may not be particularly necessary for the website to function and is used specifically to collect user personal data via analytics, ads, other embedded contents are termed as non-necessary cookies. It is mandatory to procure user consent prior to running these cookies on your website.