Quick and Easy Convert DTS 5.1 or AAC 5.1 to Dolby Digital AC3 on Mac with MKV Tools

MKV Tools can convert AAC and DTS to Dolby Digital!
MKV Tools Logo

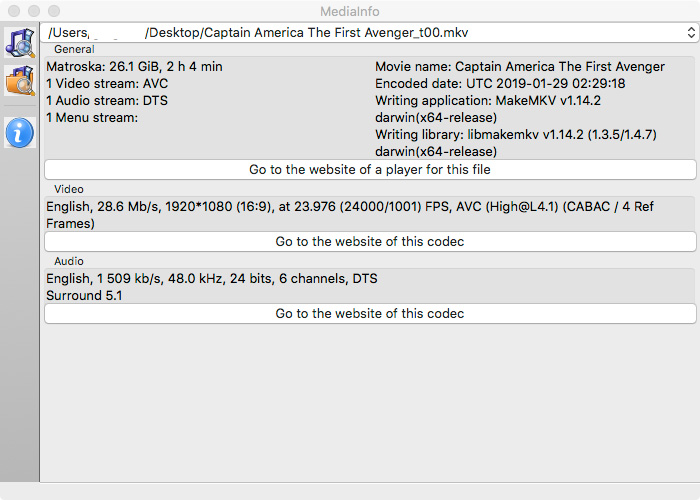
A lot of new TV’s these days do not support the DTS Soundtrack found in BluRay and DVD discs. I learned this the hard way when I got my new 65 Inch Samsung 4K TV. A lot of older audio equipment can not play AAC 5.1 either. I have ripped a lot of my Blu Rays to a network drive and it seems a large number of them have DTS. Usually, us Mac users are left out, but in this case we have an awesome tool available to us to fix this easily called MKV Tools. It works very quickly as it allows the video to “Pass Through” without having to be re-encoded. Only the audio is touched. As you can see in the below screen capture of my source file in Media Info below, the video file I am starting with has a DTS sound track.

DTS Video File

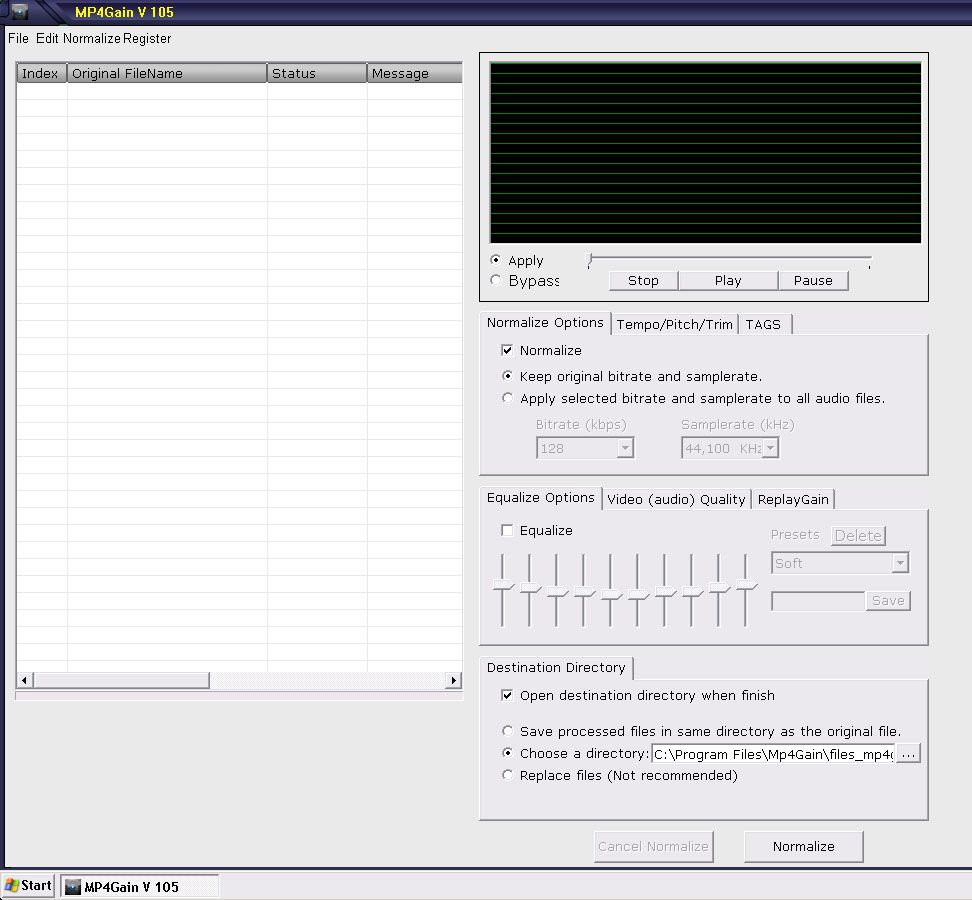
To convert it to a more compatible AC3 format download and install MKV Tools HERE. Once you have opened MKV Tools you will need to choose “Open” to import your video file, as drag’n’drop is not supported in the unregistered version. At this point you will receive another “Nag” window. Just wait a few seconds and you will be able to select “Register Later”, then you can choose your video file. Once the file is imported you will see the main window.


MKV-Tools-Window-1

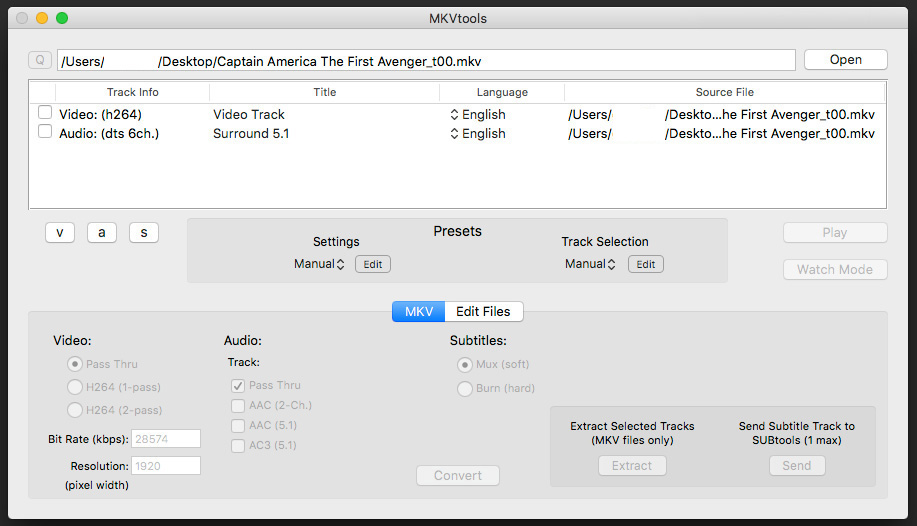
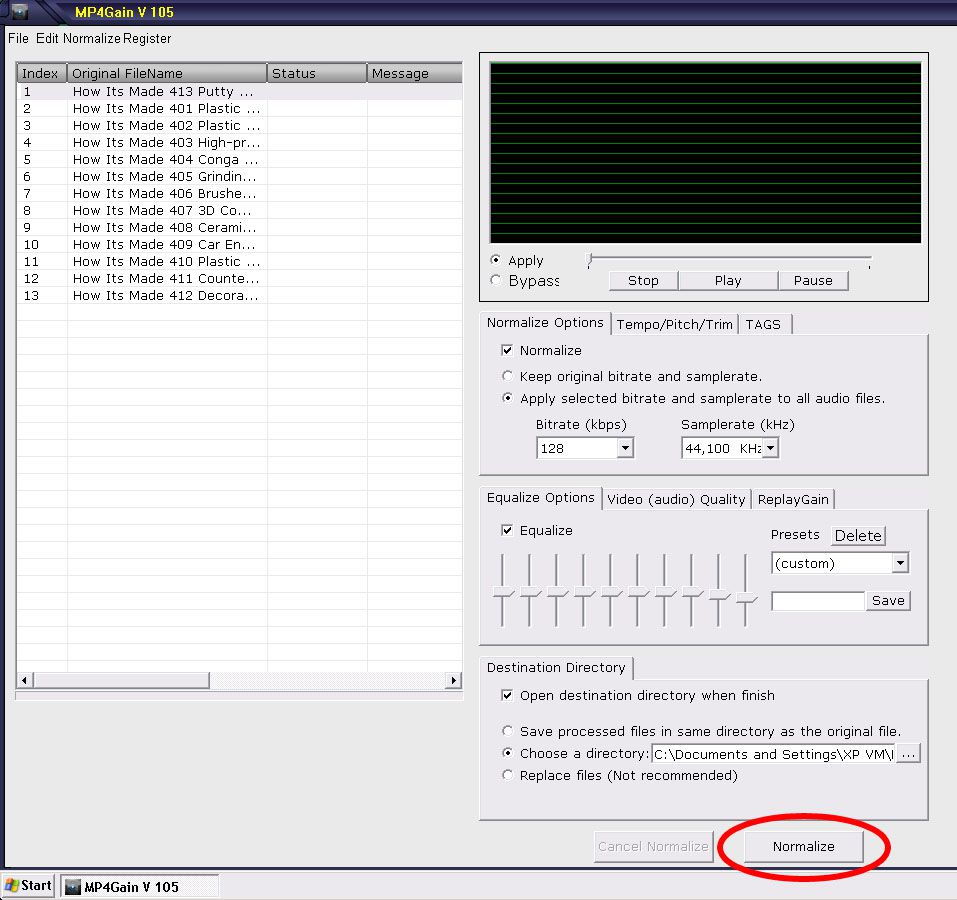
At this point you need to select the video and audio streams you need to work on, then you can start making adjustments.

MKV-Tools-Window-2

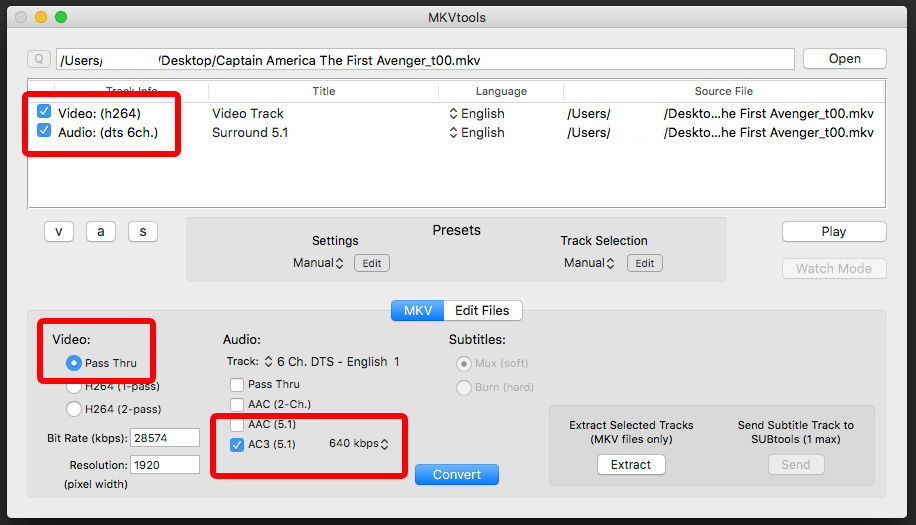
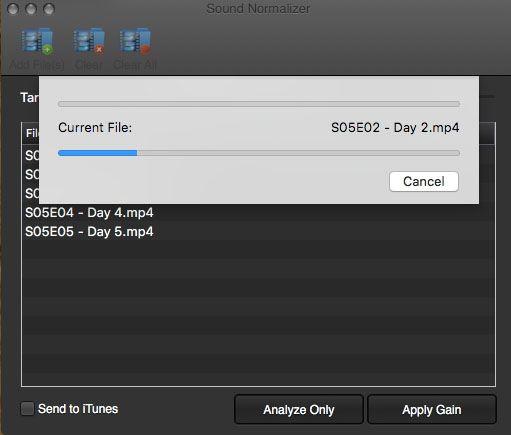
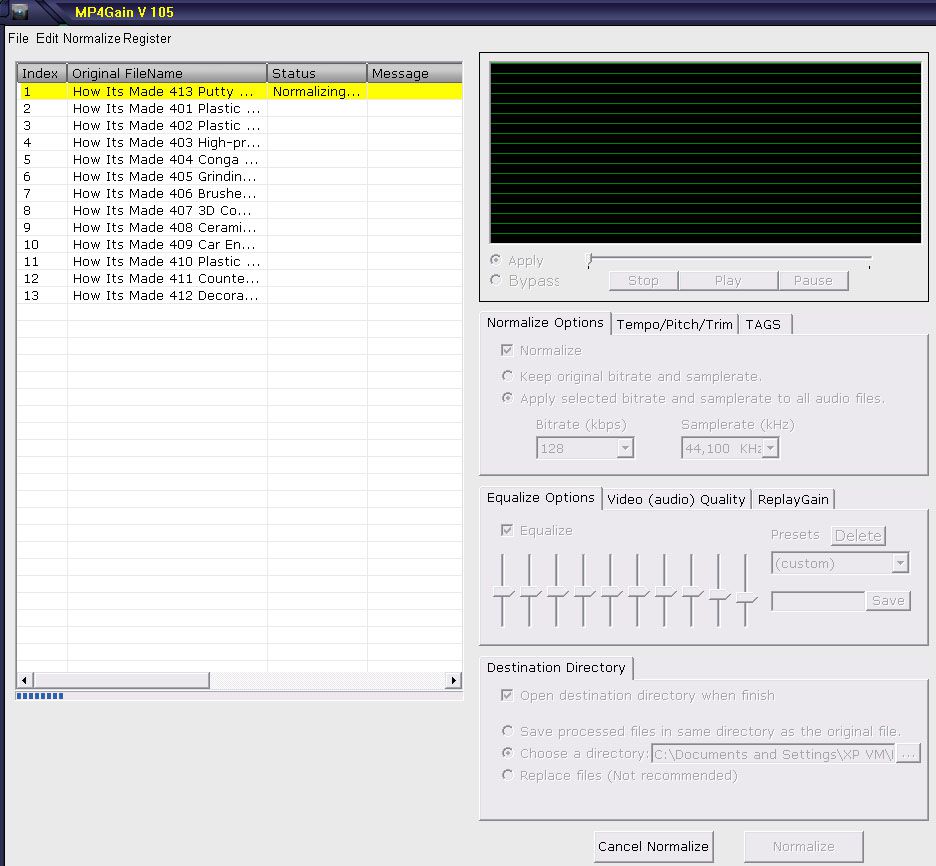
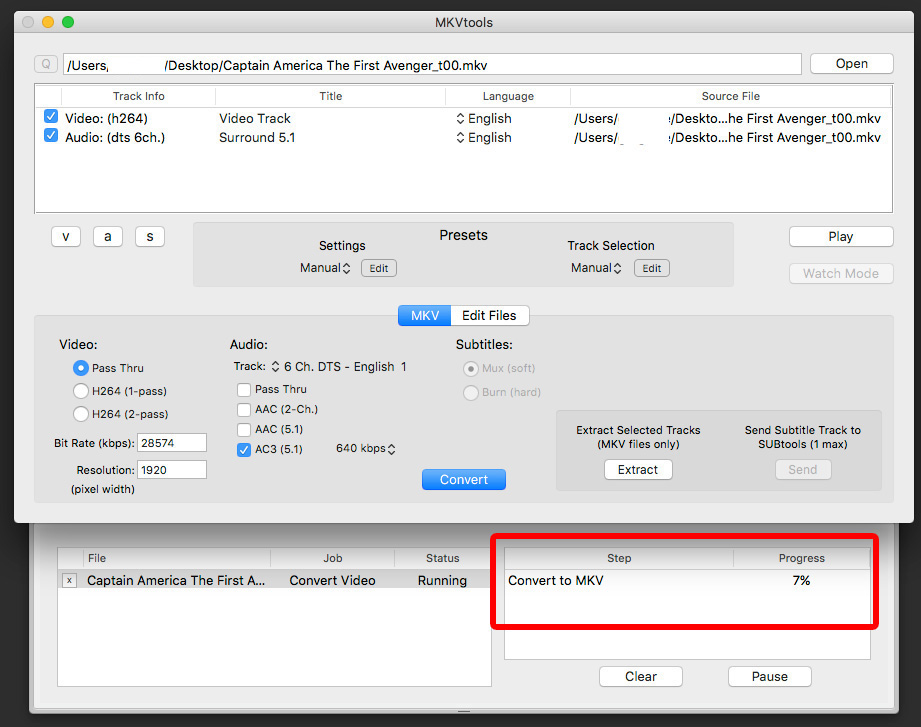
Once you have selected the Audio and Video channels, make sure video is set to “Pass Thru”. In the audio options, select AC3 (5.1) and deselect “Pass Thru”. Then set your desired bit rate. I prefer 640kb, but you can go down to 384kb comfortably without any real noticeable quality loss. Then, press the “Convert” but and MKV Tools will start converting your audio stream. A new tab will fold out underneath the main window where you can view the progress.

MKV-Tools-Window-3


Whilst MKV Tools is not technically free, it is a bargain at $5.99. You can use it without paying to re-encode as many videos as you like, but given how powerful and convenient it is, and how little it costs, its well worth buying/registering in my opinion. I did!

Normalize Audio Volume Levels in Video on Mac with Sound Normalizer

Sound Normalizer IconDifferent volume levels in videos can be a real pain. I have a folder with dozens of music videos that I like to watch from time to time, and often one song will be very quiet and I need to raise the volume to hear it, then the next song will blow the speakers apart because it is so loud.

Sound Normailzer fixes all of that by adjusting the volume of each video to be the same – so you can set your volume once then sit back and enjoy your videos.

Sound Normalizer Default ScreenThe program seems to be built on, or at the very least modeled after MP3Gain Express For Mac, so for those of us who have normalized our music collection, the interface and simple usability will be very familiar.

Just drag and drop your video files into Sound Normalizer, and it will start analyzing the volume levels.

Sound Normalizer Analyzing Video FilesOnce analysis has finished, you will see the results listed. It shows you the current dB rating of the track, and the amount of gain it needs to apply or subtract to achieve the desired dB level. The desired level is set by default 89dB which is pretty much the standard most people will want. You can adjust this if you want to, but I advise leaving it alone.

Sound Normalizer Results

If you are happy to proceed and make the changes to your videos, press “Apply Gain” in the bottom right hand corner, and Sound Normalizer will start fixing up your videos.

The good thing is that it doesn’t actually adjust your original video, it adjusts a copy, and saves it to a new location which can be selected in the preferences. The new copy’s file name is appended with the normalization target dB, which in most cases will be 89dB.

Sound Normalizer OutputSound Normalizer works with all of the most popular Video AND Audio file types.
Video formats such as MP4, MKV, FLV, AVI, RMVB, WebM, 3GP, TS, M2TS, MTS, MOV, WMV, MPG, DivX, etc.
Audio formats such as MP3, WMA, AAC, AC3, AU, M4A, MMF, OGG, FLAC, WAV, MP2, etc.

File Types

Sound Normalizer is not free however, but it is well worth the $7.99 price tag. Grab your copy today in the app store, or find out more on Sound Normalizers Preview Page HERE.

How To Make Your Own Internet TV Show – Part 4 – Mixing Audio, Mics, and Avoiding Looping in Software

Mixing DeskPart 4 – Mixing Audio, Mics, and Avoiding Looping in Software

Mixing Audio into your Vidcast can be as easy as you want it to be, or as difficult as you want it to be. You will find the more you want to incorporate into your set up, that audio is always going to be the pebble in your shoe, especially if you are using multiple audio sources.

As a result, I will divide this tutorial into two parts, a Basic Beginners section for those just getting started, and an Advanced section for those using external mixers and audio sources.

Note to Pros – These articles are aimed at beginners, who wish to spend little or no money until they have a grasp on the topic, and are hoping to learn how to get started quickly and easily, using equipment they most likely already have.

Beginners Tutorial

httpvh://youtu.be/cEfJWcLq7xI

Voicemeeter can be downloaded FREE HERE at vb-audio.com. Don’t forget to make a donation – the programmer deserves a little something for a program this good!

vb_audio_logo_blue_175

Advanced Tutorials

In this tutorial I show you how you can use a USB Mic and an external mixer together in Vidblaster. See the full article HERE.

httpvh://youtu.be/rtWqR_AWV4M

This tutorial shows you how you can run your USB mic through your external mixing desk. View the full article HERE.

httpvh://youtu.be/K9vqNj0_CuU

MORE AUDIO TUTORIALS COMING SOON!

You can download a free unrestricted trial copy of Vidblaster from vidblaster.com

vidblasterbuynow234x60
Part 1 – Selecting Video Switcher Production Software – The Heart of Vidcasting – VIEW HERE
Part 2 – Installing Vidblaster, Connecting Your Webcam, Switching and Interface Basics – VIEW HERE Part 3 – Adding Additional Cameras – VIEW HERE
Part 4 – Mixing Audio, Mics, and Avoiding Looping in Software – VIEW HERE
Part 5 – Desktop and Browser Capture – VIEW HERE
Part 6 – Connecting Guests Via Skype – VIEW HERE
Part 7 – How To Make A Lower Third Overlay – VIEW HERE
Part 8 – Adding flair with Effects, Soundboards and Chat Streams – COMING SOON!
Part 9 – Green Screen/Chroma Keying and Virtual Sets with iClone – COMING SOON!
Part 10 – Recording and Streaming – COMING SOON!

Normalize Audio Volume Levels in your MP4 Videos with MP4Gain

MP4Gain – Normalize Audio Volume Levels in your MP4 Videos

MP4Gain-Logo

Mac users please see my Mac specific article HERE.

I have been saving episodes of the Discovery Channel show “How It’s Made” for years. Recently I compiled and organized them into an archive on my WDTV Live Hub, and I found that as I have used several different devices to record the episodes over the years, the audio volume levels range from barely audible to deafening. I needed a way to make the audio volume level of all of my mp4 video files the same. This process is called “Normalizing”.

A Google search returned only one batch MP4 volume normalizer of note, MP4Gain. The author offers a trial version, which I downloaded and installed. This is what the main window looks like.

mp4gain video normalizer main windowThe program is VERY easy to use. For straight out “Normalizing” all you need to do is simply add your video files and press “Normalize”. In my case, I wanted to adjust the bit rates of the audio and do a little re-equalizing.

Equalizer

The program includes a level meter with fall-offs, so you can play your file and have a visual representation of the sound levels. The functionality is bit raw at the moment, but I’m sure in future versions this will be refined, and hopefully you will be able to adjust the fall-off times to make them stay at the peaks a little longer, as they seem to drop off a little to quickly.

MP4Gain Video Normalizer

Once I set my EQ levels and bit rates, I pressed “Normalize” and away it went!

MP4Gain ProgressMP4Gain processes the files very quickly, and once it is complete, all your video files are the same volume! Its VERY cool!

You can download the trial version of MP4Gain HERE. The trial is fully functional and allows you to process about 15-20 files before asking you to buy a license.

In summary, this program is great, and I’m hoping that future versions polish up a few minor issues, like a missing vertical scroll bar (program is difficult to use on a small screen as the Normalize button is right down the bottom, and off the screen), and the jerky level meter. The major killer of this program is the price. At $40, it is pretty expensive (In My Humble Opinion). If it was somewhere in the $15 – $20 range it would definitely be hard to pass up.

It is able to normalize volume levels in the following video file types:

  • mp4, flv, avi
  • mpeg, mpg
  • 3gp, wmv

MP4Gain can also normalize your audio music files. It can also normalize MP3, MP2, AAC, AC3, FLAC, OGG, WAV and M4A files to!