Stop Folders Opening Automatically when Hovering Cursor Over Them
I really hate how folders open automatically when you hover your mouse cursor over them on Mac. Sometimes I need to place a number of files into different folders, and having them open automatically when I just want to drop something in there is a real pain. It slows me down, and is just plain annoying. Thankfully, it is easy to stop this behavior. Open Preferences, and look for the accessibility option.
Once you have the accessibility tab open, look for mouse & trackpad options in the left pane, and then click it to open.
Now you will be able to see the source of the problem. Spring loaded folders.
To slow down the time it takes for folders to pop open when you are hovering over them, slide the slider towards “long” delay. To stop folders from springing open automatically completely, uncheck the “spring-loading delay” option.
At least three times a week my phone will ring between 11pm and 4am, repeatedly. When I answer it, there is someone there, who (with a very strong Asian accent) asks for what sounds to me like “Allan”. I have responded pleasantly saying “wrong number’, “not Allan’s phone”, “sorry, you have the wrong number” etc etc etc, to no avail. I hang up and 5 minutes later, the phone rings again…..”Allan…Allan…”……
Your probably saying “Just Turn The Ringer Off”, which is what I do when my wife is at home, but her job requires her to spend on average 1 or 2 weeks a month away from home. When she is away, I really like to leave the phone on so if there is a problem, and she needs me, she can reach me. Not unreasonable.
I set about finding a “Blocking App” in the Apple App Store, and I must say, I was really disappointed not only at the amount of fake apps that are available for purchase, but the fact that Apple has allowed them to be made available for purchase in their store.
After further investigation it seems that Apple doesn’t allow access to the particular part of the iPhones software that would need to be accessed in order to intercept and block an unwanted call…
If you choose to Jailbreak your phone, you have options, but for the 95% of people who use their iPhone as it came, anything you purchase from the App store to block an unwanted number is going to disappoint you!
In short, at this point in time, I can only offer a “Workaround” – A way to deal with the situation. And as my mystery caller shows me no respect, I will now return the favor and publish their number on this site – please call them at 3am!
My mystery caller phones me from two different numbers. They will try two or three times from one number, and then switch lines and try a few more times from another number. To begin handling this problem I created a contact for my unwanted caller with both of the numbers, and called it “Spammer”,
Now that I have created a contact for my phone spammer, I needed a way to silence them! The best I could come up with was a “Non Ring Tone”. A ring tone that doesn’t make any sound. After a bit of searching (and finding fake files, popups, porn links etc) I did find a silent ring tone. To make your life easier, here it is:
Once you have downloaded the zip file, extract it so you have the “SilentRing.m4r” in front of you, then open iTunes and connect your phone. On the top left side of the iTunes window, select “Tones”. Once you have Tones open, drag and drop the SilentRing.m4r file into the open field window.
Once the silent ring tone has copied into iTunes, you can now drag it from the iTunes window to your connected iPhone. When you drag the “SilentRing” file over your iPhone in the device menu, I have noticed that all categories seem to highlight/illuminate (in my case a blue color). It doesn’t seem to matter where you drop the ring tone file, it is automatically copied to the right place on your phone.
After dropping the ring tone file, you will need to click the “Sync” button in the bottom right corner of the window to make your changes stick. You may also have to click “Apply” if a pop up window appears.
Once you have successfully copied your new ringtone to your iPhone you can then choose to apply it to your unwanted caller only, that way when they ring at 2am, you don’t hear it, but if your loved one calls with an emergency, your phone will ring normally. To do this, select your unwanted caller/spammer from your contacts, open their information window, and in the top left corner select edit.
A new window will open with more details. As you will see, the ringtone will be set to your phone’s default ringtone.
This is where you can assign different ringtones to different callers. Now that you have a “Silent” ring tone on your phone, it is just a matter of changing this from “Default” to “SilentRing”.
Once you have made your changes (I changed the text message tone to silent as well), click “Done” in the top right hand corner, and your all set. Next time they call, you wont hear a thing! Your phone may still vibrate though, so it might pay you to disable that feature as well if your a light sleeper.
We use cookies on our website to give you the most relevant experience by remembering your preferences and repeat visits. By clicking “Accept”, you consent to the use of ALL the cookies.
This website uses cookies to improve your experience while you navigate through the website. Out of these, the cookies that are categorized as necessary are stored on your browser as they are essential for the working of basic functionalities of the website. We also use third-party cookies that help us analyze and understand how you use this website. These cookies will be stored in your browser only with your consent. You also have the option to opt-out of these cookies. But opting out of some of these cookies may affect your browsing experience.
Necessary cookies are absolutely essential for the website to function properly. This category only includes cookies that ensures basic functionalities and security features of the website. These cookies do not store any personal information.
Any cookies that may not be particularly necessary for the website to function and is used specifically to collect user personal data via analytics, ads, other embedded contents are termed as non-necessary cookies. It is mandatory to procure user consent prior to running these cookies on your website.

 I really hate how folders open automatically when you hover your mouse cursor over them on Mac. Sometimes I need to place a number of files into different folders, and having them open automatically when I just want to drop something in there is a real pain. It slows me down, and is just plain annoying. Thankfully, it is easy to stop this behavior. Open Preferences, and look for the accessibility option.
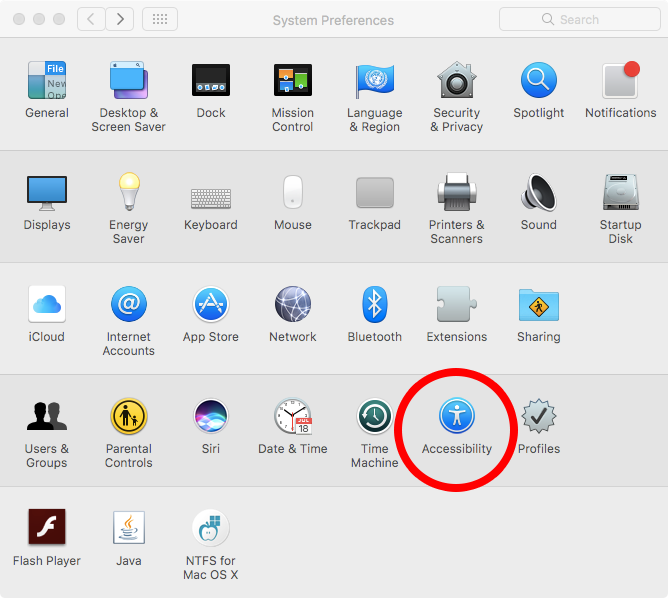 Once you have the accessibility tab open, look for mouse & trackpad options in the left pane, and then click it to open.
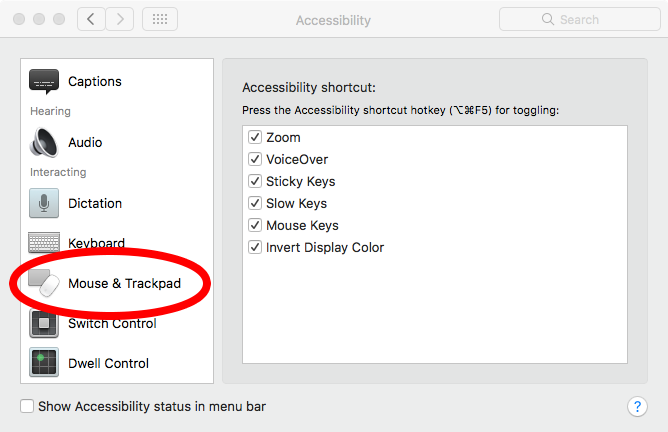 Now you will be able to see the source of the problem. Spring loaded folders.
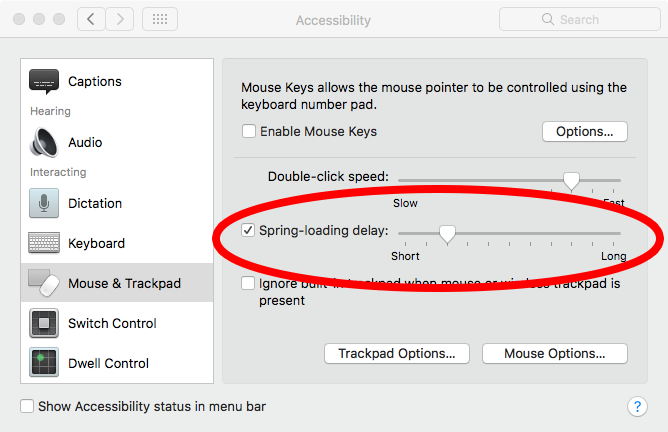
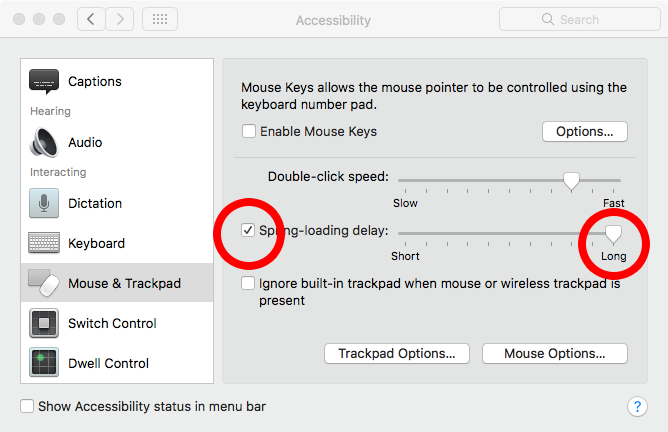 Problem Solved!


