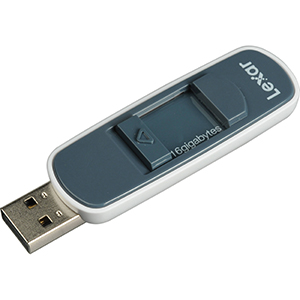
Have you ever had a large USB drive that only shows 200mb when you plug it into your Windows computer? Frustrating isn’t it!
And what makes it worse is that nothing you try in the “Format” utility will change it – it always says 200mb in the capacity drop down.
The reason this happens is that in some stage in the USB Drive’s life it has been plugged into a Mac, and it has done “Mac Things” to the drive. Thankfully, there is an easy way to fix it.
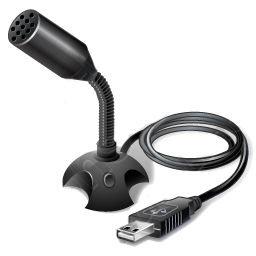
I have been reading on forums lately how some people would like to be able to run their USB Mic through their external hardware mixing desks, and it is relatively easy to do.
httpvh://youtu.be/K9vqNj0_CuU
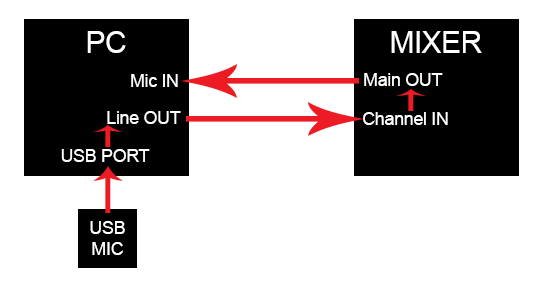
Below is a diagram on how to run your wiring between the devices.
Plug your USB Mic into a USB Slot, run an appropriate lead from the Line Out/Headphone Out of your computer into a stereo input channel on your mixer. If your mixer has only mono channels, use channel one for your left, and channel 2 for your right. Next, run wires from the Main Output of the mixer to your Line in/Mic In on your computer, and the physical part is done.
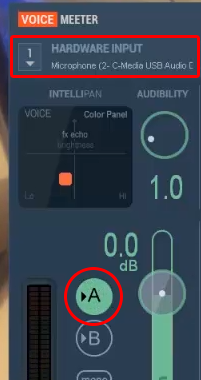
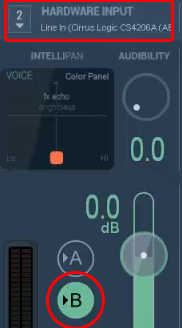
Next, open up Voicemeeter (If you don’t have Voicemeeter you can download it free at VB-Audio.com) and select your USB Mic as the device for channel 1. Make sure “A” is selected/highlighted and “B” is not selected.
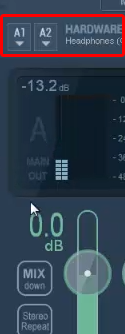
Then, select your Line Out/Headphone Out jack as the device for Voicemeeters Main Output, “A1”.
Now it is time to select your Line In/Mic in as the device for Channel 2. Make sure that “A” is not selected, and “B” is selected.
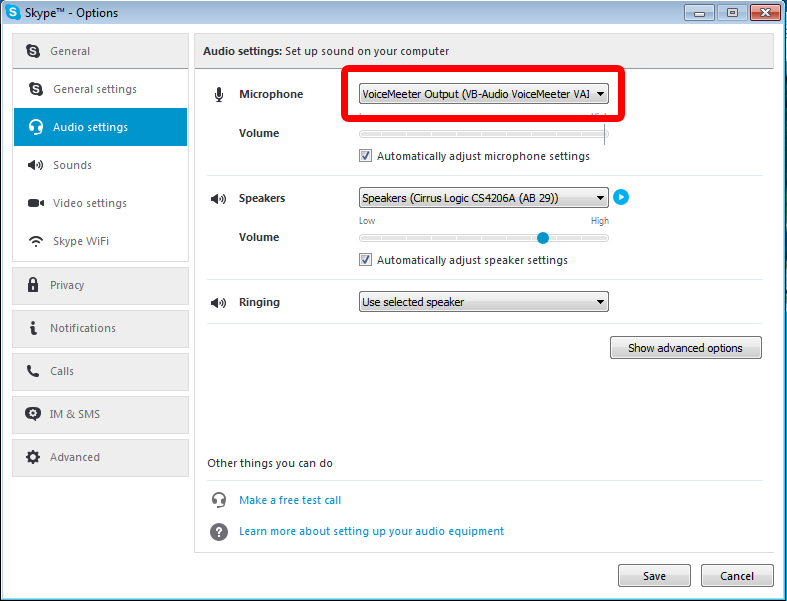
All that is left is to open up the app you want to use (eg – Skype, Vidblaster, or some other Web Cam program) and select Voicemeeter’s Virtual Device (Output “B” in Voicemeeter) as the input source audio device.
Voicemeeter can be downloaded FREE HERE at vb-audio.com. Don’t forget to make a donation – the programmer deserves a little something for a program this good!
How to use a USB Mic AND Mixer together in Skype or Vidblaster
Web cam software like Skype and Vidblaster only allow for one audio source, so if your mixer is coming into the computer via the line input, and your mic is coming in through USB, you are generally out of luck….until now.
httpvh://youtu.be/rtWqR_AWV4M
I recently stumbled upon a free piece of software called Voicemeeter which makes it incredibly easy to solve this problem. It is basically a software mixer that will allow you to take various inputs as well as your system sound and mix them with a great deal of control into one “Virtual” sound device, which you can then select as your audio input device in your web cam program.
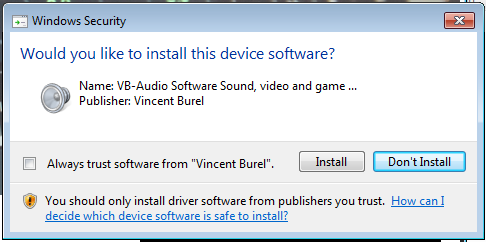
To get started, Download your free copy of Voicemeeter HERE.During installation, you will get some dialogue boxes telling you it wants to install some drivers, this is completely normal.
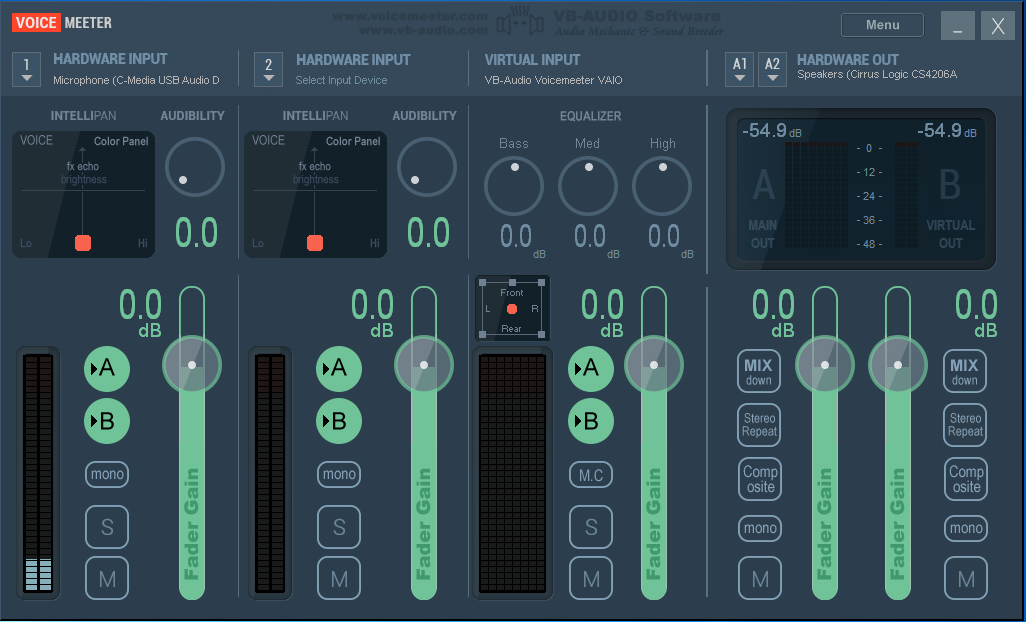
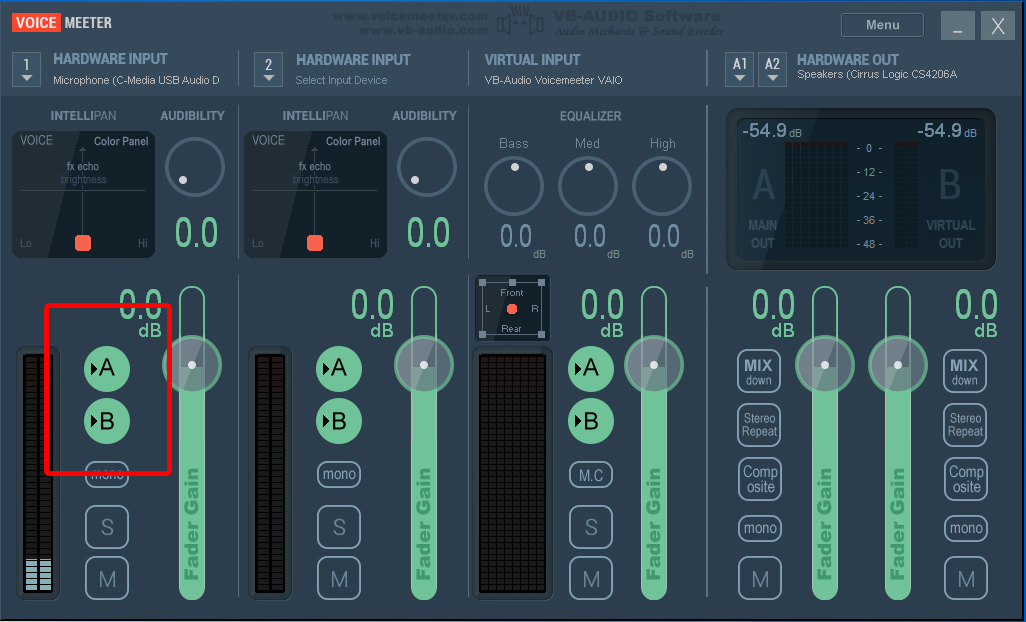
Once you have installed it, you will need to restart your computer so the virtual drivers can register in your system. Once you have rebooted, open up Voicemeeter and you will see the mixing console.
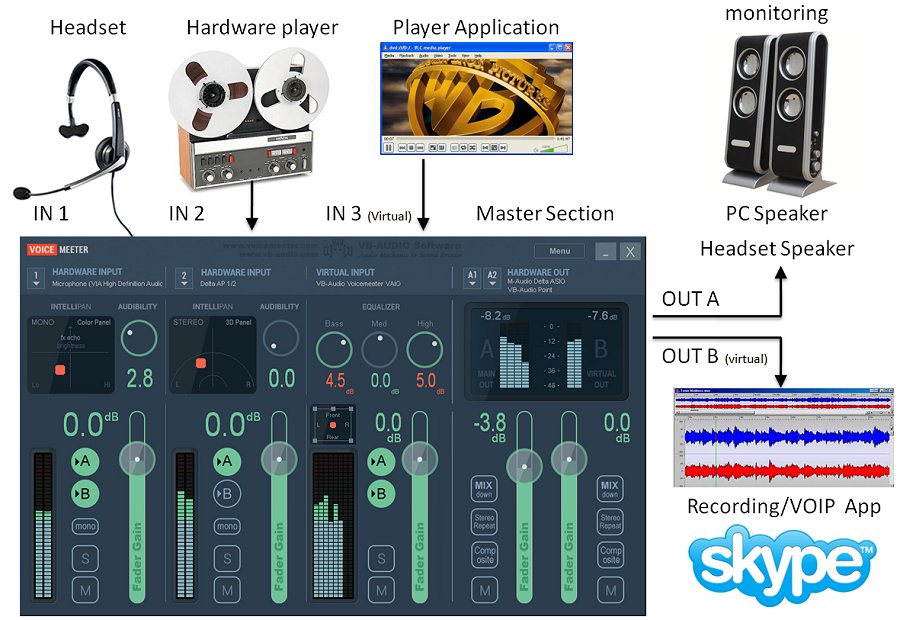
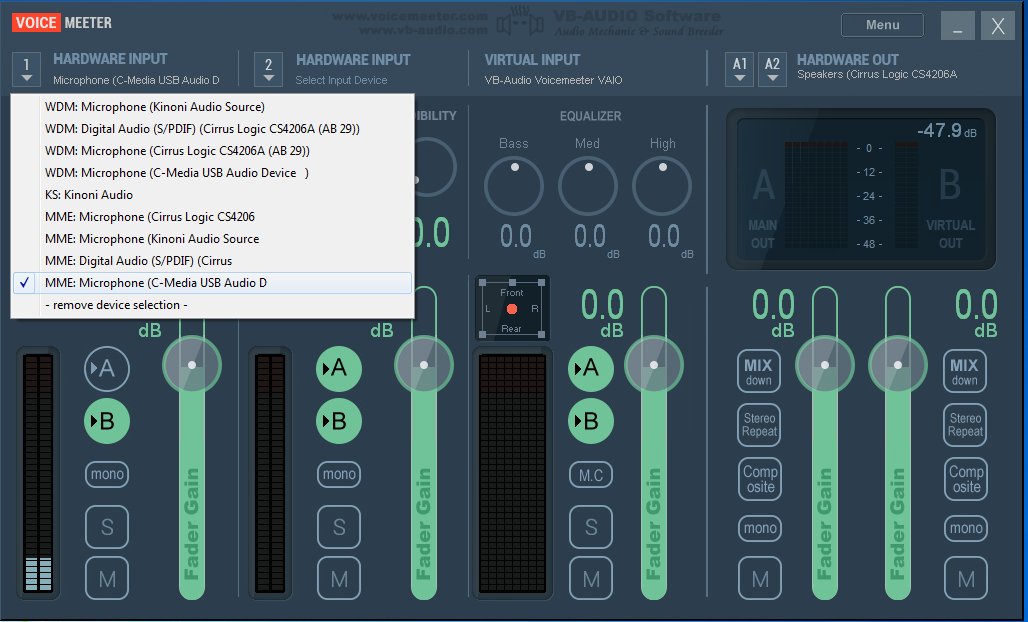
Looks cool doesn’t it! In short, you have two hardware inputs and one virtual input. The virtual input seems to be your system sound, so anything that tries to output through your computers speakers, like Winamp or Windows Media Player, can be fed into your mix here if you want it, if not, just mute this track by pressing the “M” button at the bottom next to its slider. To mix your Mic and Line In (Mixer) click where it says “1 Hardware Input” and select your USB Mic from the drop down list.
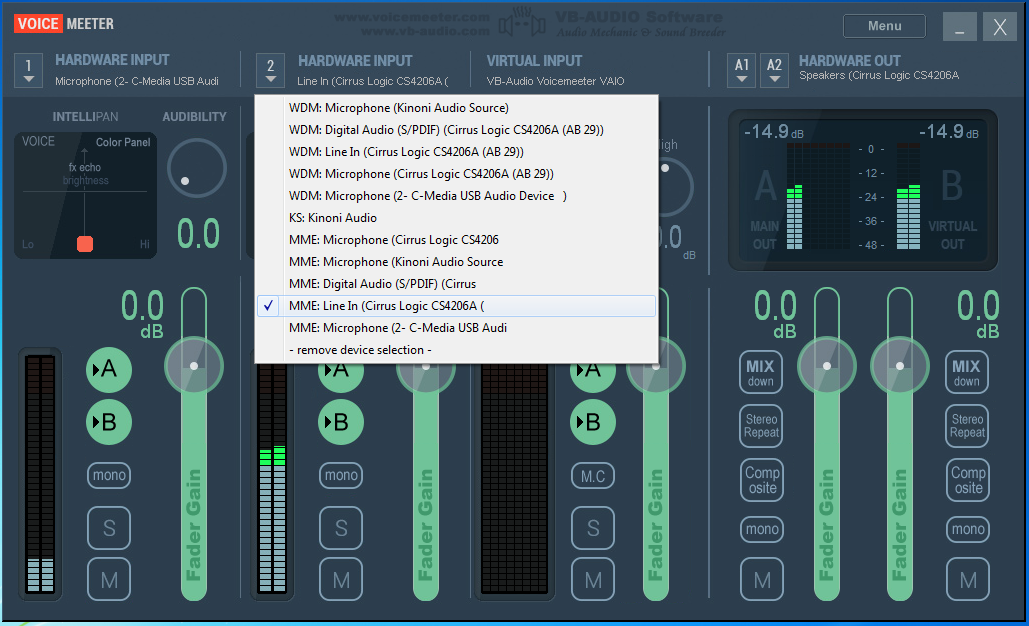
The next step is to select your line in/mixer device in “2 Hardware Input”
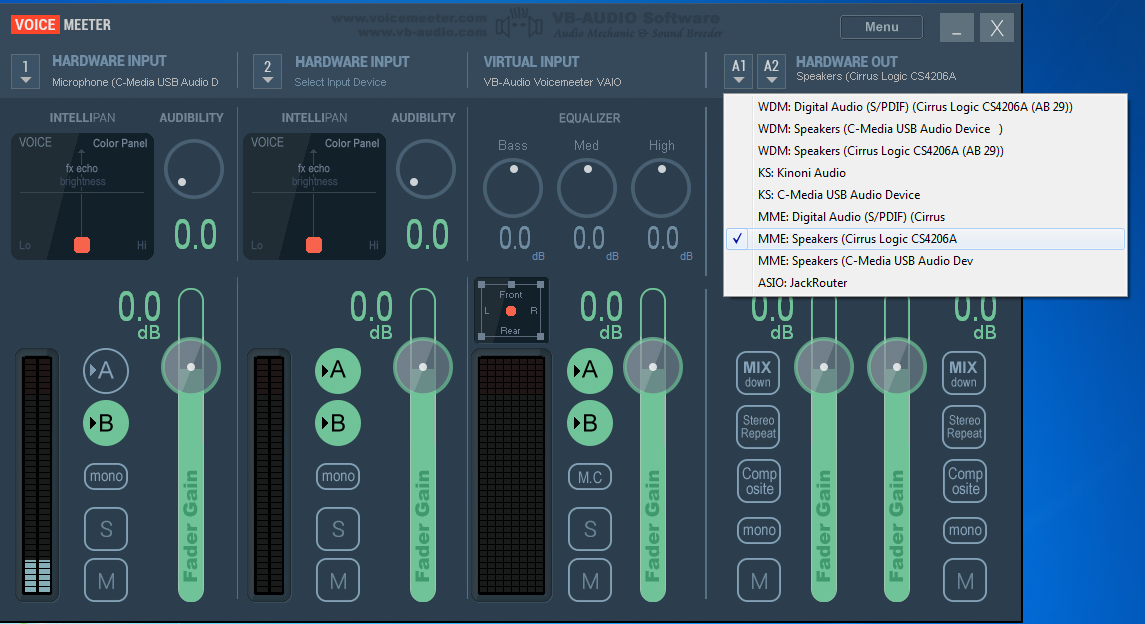
Now its time to tell Voicemeeter where your speakers are. Select them from the drop down menu that says “Hardware OUT”
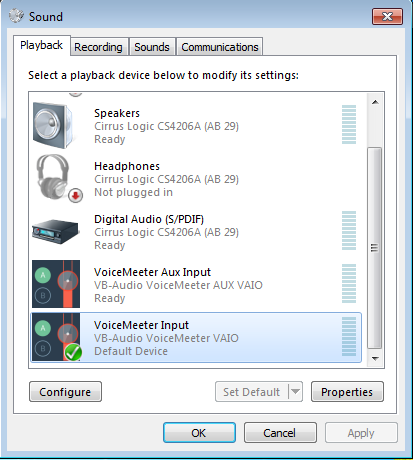
The last step to making this all work is to open your Windows menu and select control panel. When this opens select the sound icon to open your computers sound preferences window. In the “Playback” section select “Voicemeeter Input” and then set it as the default device.
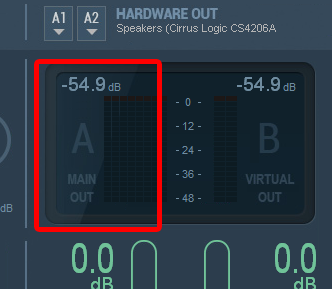
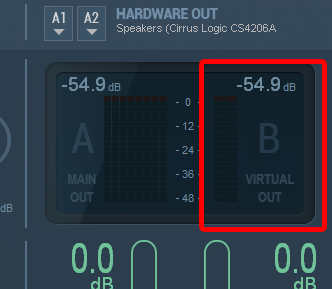
Now you are all configured, you just need to do a small adjustment in Voicemeeter to stop feedback loops. The output of Voicemeeter has two channels, “Main Out” which will go to your speakers, and “Virtual Out” which is what will go into web cam software (Skype, Vidblaster etc….)
In the “1 Hardware Input” channel, it is wise to de-select “A” as this will stop your mic from being played out aloud through your speakers. This will prevent feedback, but still allows your USB Mic to feed into your web cam program through the Virtual Out.
Now, all that’s left is to open your web cam program, Skype or Vidblaster etc, and select Voicemeeters output as your input device, and you can now use your USB Mic AND your external hardware mixer.
Voicemeeter can be downloaded FREE HERE at vb-audio.com. Don’t forget to make a donation – the programmer deserves a little something for a program this good!
UPDATE – **I HAVE TESTED THIS METHOD WITH OS X MAVERICKS AND IT WORKS GREAT!**
This tutorial was written using Mountain Lion as an example, but it works for Mavericks as well – just follow the same process
Just like OS X Lion, it is really important to save your OS X Mountain Lion and Mavericks “Install File” BEFORE you install it. Without it, you can not make an install disk, and it is deleted automatically once you install your new operating system.
Once you have purchased Mountain Lion or Mavericks, your purchase/price button will turn into a “downloading” button.
A short time after, your launchpad may spring open and show you the downloads progress.
You can leave it open and watch the progress if you want. Close it up when your finished watching, or when the file has completely downloaded.
**CRITICAL** – When the file has finished downloading, a window will pop up and ask you if you want to go ahead and install the new software. QUIT THE INSTALLER IMMEDIATELY! This can be done by clicking the file menu and selecting the “Quit” option.
Don’t worry, you are not going to loose the program you just bought, you are just telling your computer that you want to install later. Once you have closed out of the installer, open a new finder window, then open your “Applications” folder. Inside this folder you will see your OS X Mountain Lion or Mavericks Install File.
Right click and “Copy” the installer file, then “Paste” it onto your desktop.
Once the file finishes copying to the desktop, you can go back into your applications folder and double click and run the installer, if you are ready to install your update.
If you want to make a bootable install DVD disk or a USB Key, the easiest way to do this is with Disk Maker X (Formerly called Lion Disk Maker).
Go to the Disk Maker X web site HERE and download the latest version of the program. Once downloaded, unzip and run the program.
TO MAKE A DVD DISK:
With Disk Maker X open, select Mountain Lion to make a Mountain Lion DVD, Or Mavericks to make a Mavericks Install DVD.
Once you select your Operating System, the program will try to locate the install program automatically. It doesn’t matter if it uses the one in your Applications folder, or the one on your desktop. In my case, it found the one on my desktop.
The next step is to tell Disk Maker X if you want to make a DVD or a USB key. Keep in mind, if you want to make a DVD you will need a 8.5gb Dual Layer DVD, and a Dual Layer DVD Burner, as the installer will not fit on a single layer 4.7gb DVD.
Click “Burn A DVD”. Disk Maker X will ask you to select your Burner.
You will now be prompted to insert a disk, and begin the burning process.
TO MAKE A USB KEY:
With Disk Maker X open, select Mountain Lion to make a Mountain Lion USB or Mavericks to make a Mavericks install USB key.
Once you select your operating system, the program will try to locate the install program automatically. It doesn’t matter if it uses the one in your Applications folder, or the one on your desktop. In my case, it found the one on my desktop.
The next step is to tell Disk Maker X if you want to make a DVD or a USB key. Keep in mind, if you want to make a USB Key you will need a 8gb thumb drive, due to the size of the installer. Click “Create a Boot Disk”.
Next, Disk Maker X will ask you about your Thumb Drive. In keeping with the recommendations of the makers of the program, we will select “8gb USB Thumb Drive”.
(My understanding is, that this option will completely erase the entire USB drive, and ALL existing data will be over-written. If you have a larger drive, which is divided up into partitions, and you do not want to erase the whole drive, use the “Another kind of disk” option. IF this is incorrect, or there is also another reason, please reply in comments.)
You will now be asked to confirm your drive selection, and its location.
One last warning! Your thumb drive will now be erased COMPLETELY!
Disk Maker X will now begin crunching files to make your USB Installer.
During this process, particularly towards the end of the process, a lot of new windows and “Get Info” dialogues will pop up, and disappear. This is normal. This is just your computer acknowledging the creation and mounting of new drives and volumes.
Once it is all completed, you will hear Homer yelling “WooHoo!” and see your new USB drive ready to go!
We use cookies on our website to give you the most relevant experience by remembering your preferences and repeat visits. By clicking “Accept”, you consent to the use of ALL the cookies.
This website uses cookies to improve your experience while you navigate through the website. Out of these, the cookies that are categorized as necessary are stored on your browser as they are essential for the working of basic functionalities of the website. We also use third-party cookies that help us analyze and understand how you use this website. These cookies will be stored in your browser only with your consent. You also have the option to opt-out of these cookies. But opting out of some of these cookies may affect your browsing experience.
Necessary cookies are absolutely essential for the website to function properly. This category only includes cookies that ensures basic functionalities and security features of the website. These cookies do not store any personal information.
Any cookies that may not be particularly necessary for the website to function and is used specifically to collect user personal data via analytics, ads, other embedded contents are termed as non-necessary cookies. It is mandatory to procure user consent prior to running these cookies on your website.

 Have you ever had a large USB drive that only shows 200mb when you plug it into your Windows computer? Frustrating isn’t it!
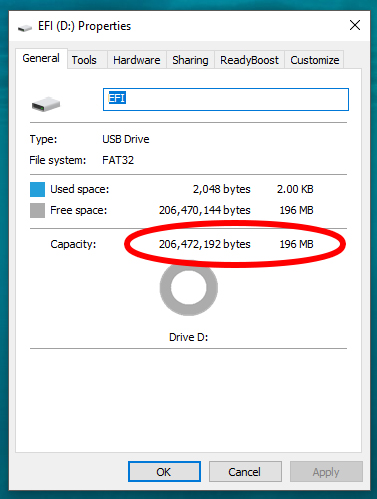 And what makes it worse is that nothing you try in the “Format” utility will change it – it always says 200mb in the capacity drop down.
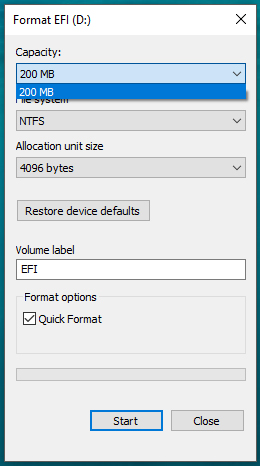 The reason this happens is that in some stage in the USB Drive’s life it has been plugged into a Mac, and it has done “Mac Things” to the drive. Thankfully, there is an easy way to fix it.