To celebrate the New Year I have created some FREE social media templates you can download and customise for the BIG 4 popular platforms, Youtube, Instagram, Facebook and Twitter. These templates are correct as of January 2021.

Quick Easy Tech Tips, Tricks and Reviews, with a little bit of Dog Stuff!
Wordpress Templates, Wallpapers, and other fun Freebies
To celebrate the New Year I have created some FREE social media templates you can download and customise for the BIG 4 popular platforms, Youtube, Instagram, Facebook and Twitter. These templates are correct as of January 2021.
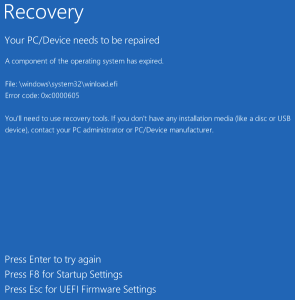
I hate Windows……I really really do…….
Long story short, as I am a beta tester for Micro$oft I previously installed a preview version of Windows 10. My life circumstances have changed since, so I haven’t been keeping up with its development, nor have I been updating the brand new HP PC I bought for it.
So today (Some time after the trial version has expired) I turned on the machine……BRICK…….nothing.
Couldn’t boot from disk, couldn’t boot from a USB drive, NOTHING but:
“a component of the operating system has expired”
The bottom line, if you want to reclaim your files and reinstall or upgrade, just boot into BIOS and set the date to JUNE 2015.
USB Mic through an External Audio Mixer – How To
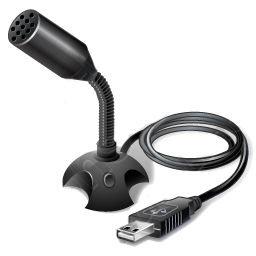 I have been reading on forums lately how some people would like to be able to run their USB Mic through their external hardware mixing desks, and it is relatively easy to do.
httpvh://youtu.be/K9vqNj0_CuU
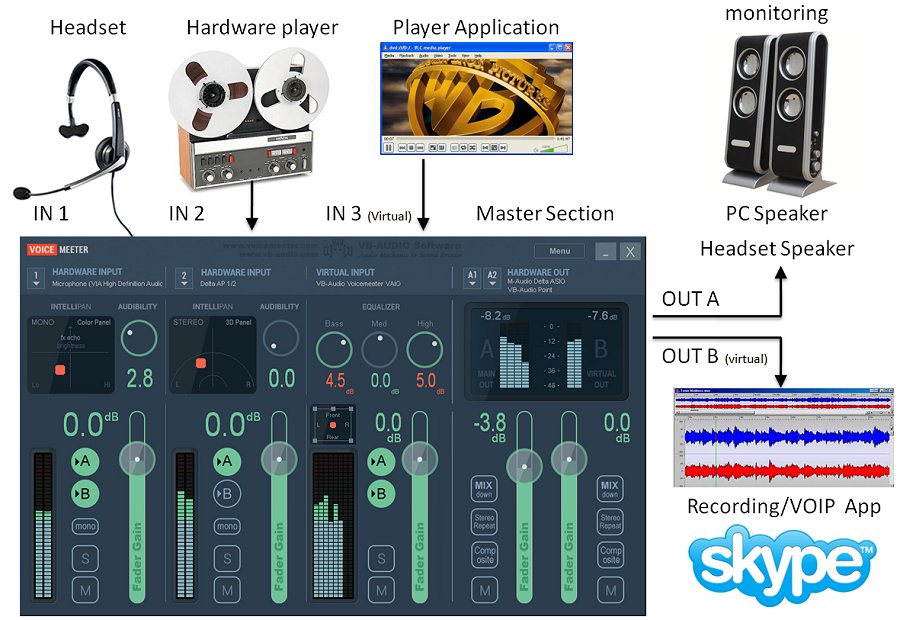
Below is a diagram on how to run your wiring between the devices.
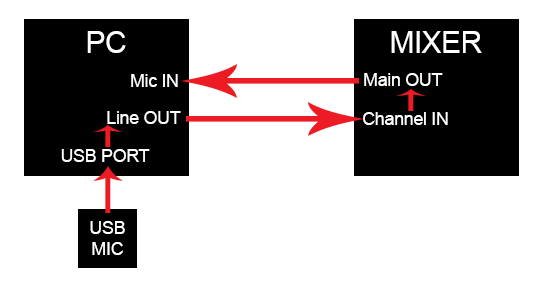
Plug your USB Mic into a USB Slot, run an appropriate lead from the Line Out/Headphone Out of your computer into a stereo input channel on your mixer. If your mixer has only mono channels, use channel one for your left, and channel 2 for your right. Next, run wires from the Main Output of the mixer to your Line in/Mic In on your computer, and the physical part is done.
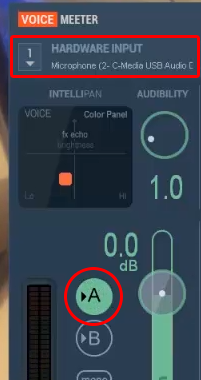
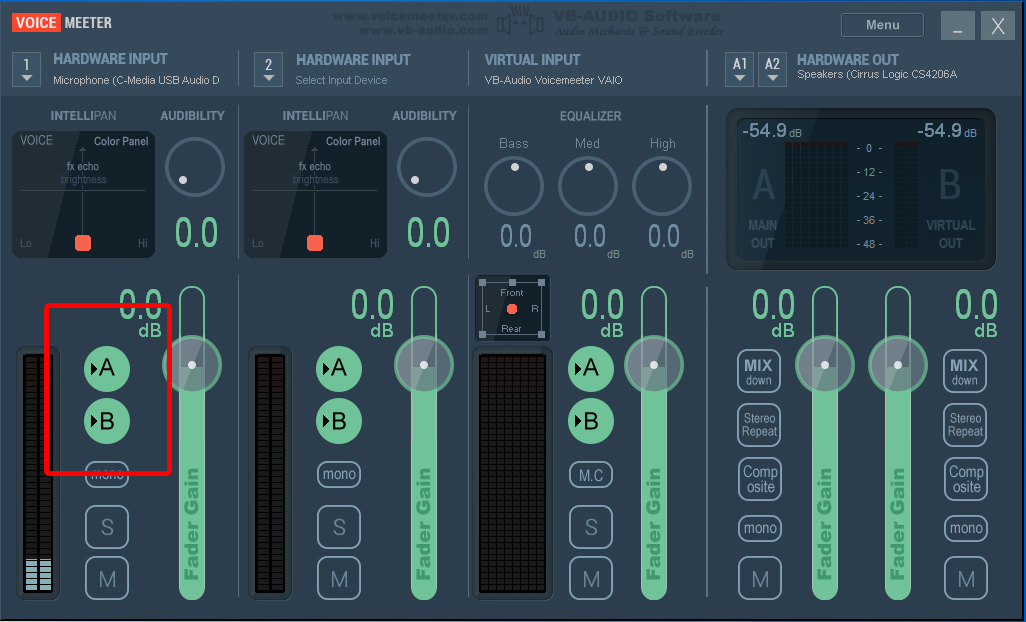
Next, open up Voicemeeter (If you don’t have Voicemeeter you can download it free at VB-Audio.com) and select your USB Mic as the device for channel 1. Make sure “A” is selected/highlighted and “B” is not selected.
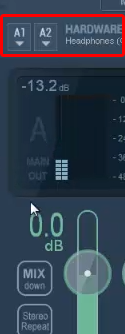
 Then, select your Line Out/Headphone Out jack as the device for Voicemeeters Main Output, “A1”.
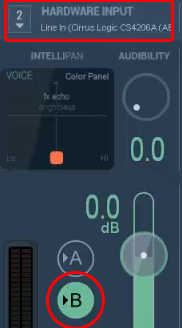
 Now it is time to select your Line In/Mic in as the device for Channel 2. Make sure that “A” is not selected, and “B” is selected.
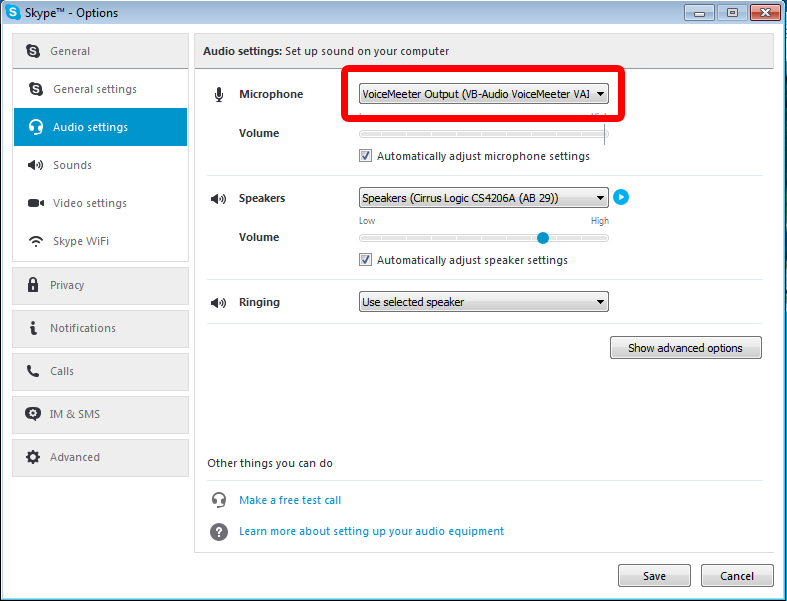
 All that is left is to open up the app you want to use (eg – Skype, Vidblaster, or some other Web Cam program) and select Voicemeeter’s Virtual Device (Output “B” in Voicemeeter) as the input source audio device.
 Voicemeeter can be downloaded FREE HERE at vb-audio.com. Don’t forget to make a donation – the programmer deserves a little something for a program this good!
![]()
How to use a USB Mic AND Mixer together in Skype or Vidblaster
Web cam software like Skype and Vidblaster only allow for one audio source, so if your mixer is coming into the computer via the line input, and your mic is coming in through USB, you are generally out of luck….until now.
httpvh://youtu.be/rtWqR_AWV4M
I recently stumbled upon a free piece of software called Voicemeeter which makes it incredibly easy to solve this problem. It is basically a software mixer that will allow you to take various inputs as well as your system sound and mix them with a great deal of control into one “Virtual” sound device, which you can then select as your audio input device in your web cam program.
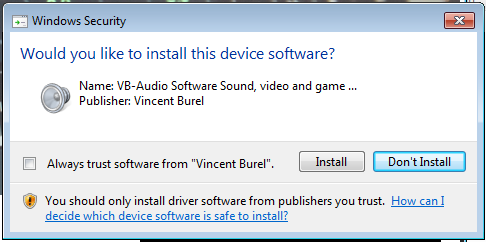
 To get started, Download your free copy of Voicemeeter HERE.During installation, you will get some dialogue boxes telling you it wants to install some drivers, this is completely normal.
 Once you have installed it, you will need to restart your computer so the virtual drivers can register in your system. Once you have rebooted, open up Voicemeeter and you will see the mixing console.
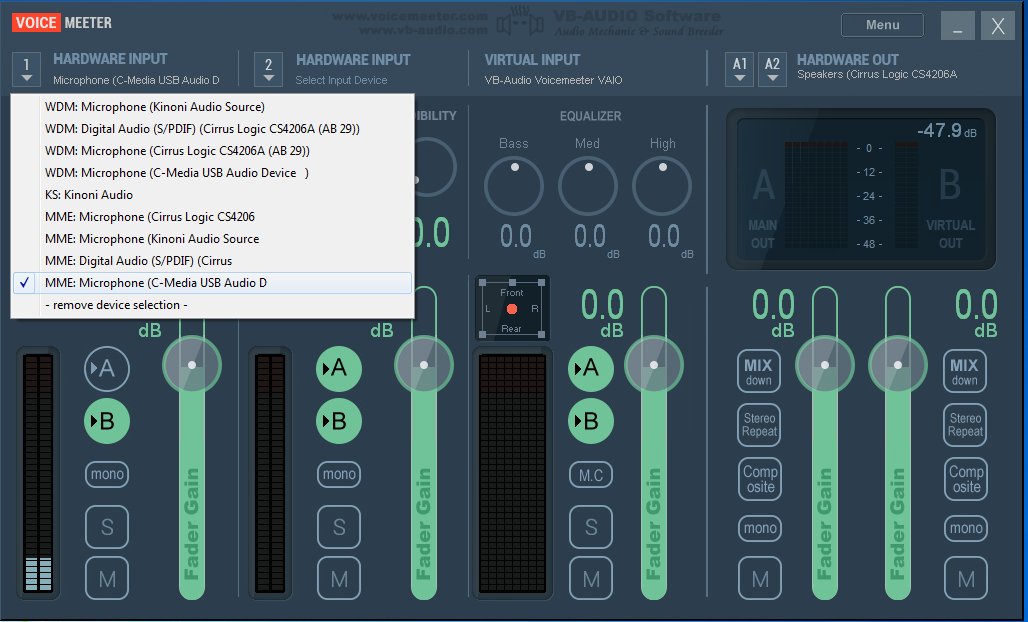
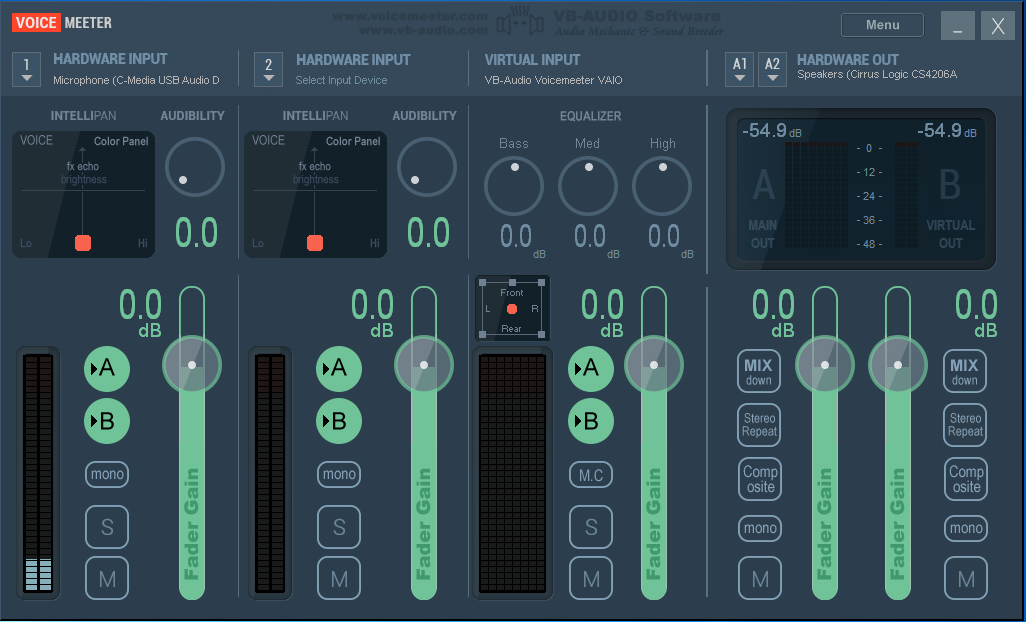 Looks cool doesn’t it! In short, you have two hardware inputs and one virtual input. The virtual input seems to be your system sound, so anything that tries to output through your computers speakers, like Winamp or Windows Media Player, can be fed into your mix here if you want it, if not, just mute this track by pressing the “M” button at the bottom next to its slider. To mix your Mic and Line In (Mixer) click where it says “1 Hardware Input” and select your USB Mic from the drop down list.
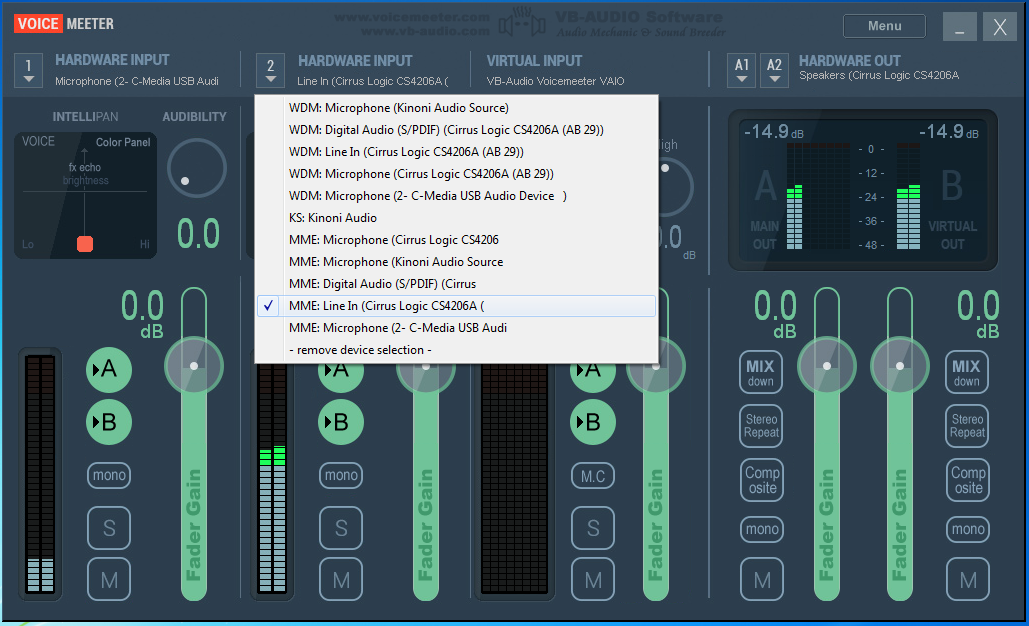
 The next step is to select your line in/mixer device in “2 Hardware Input”
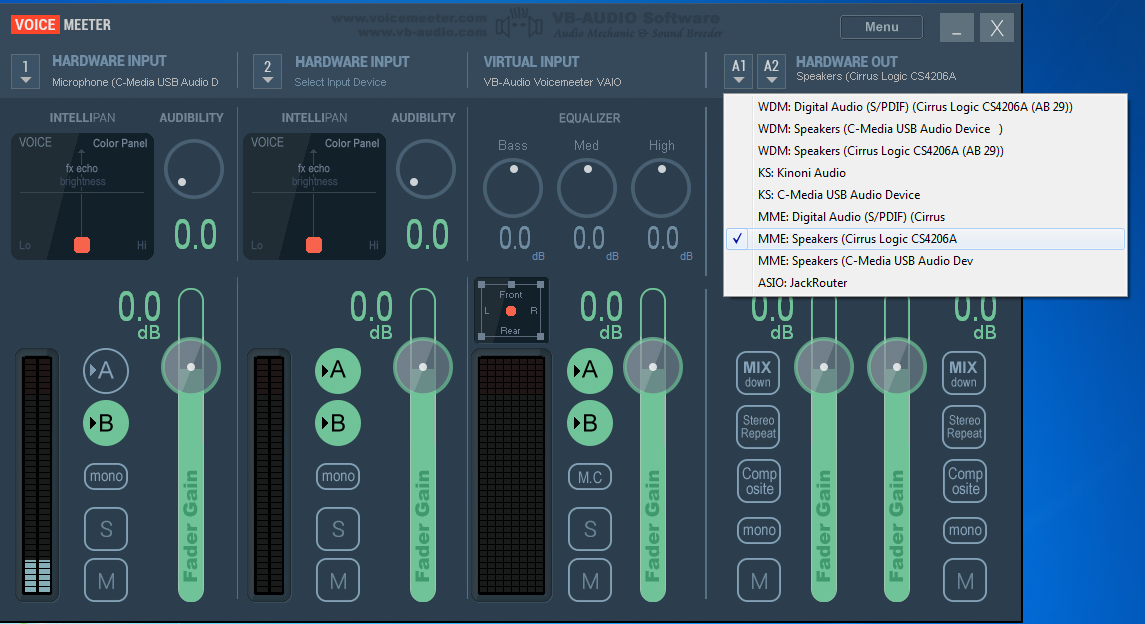
 Now its time to tell Voicemeeter where your speakers are. Select them from the drop down menu that says “Hardware OUT”
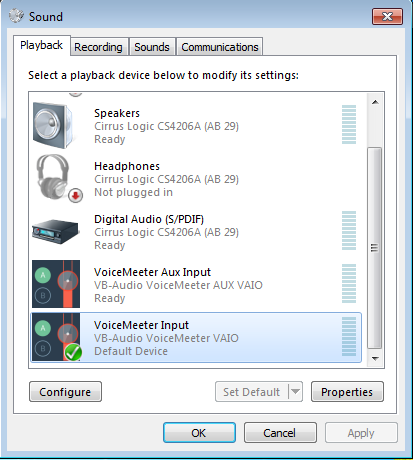
 The last step to making this all work is to open your Windows menu and select control panel. When this opens select the sound icon to open your computers sound preferences window. In the “Playback” section select “Voicemeeter Input” and then set it as the default device.
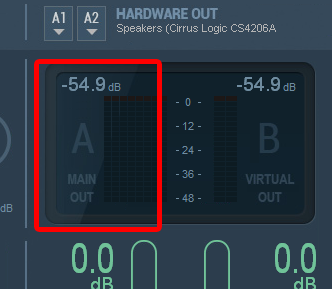
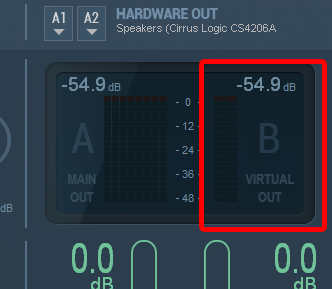
 Now you are all configured, you just need to do a small adjustment in Voicemeeter to stop feedback loops. The output of Voicemeeter has two channels, “Main Out” which will go to your speakers, and “Virtual Out” which is what will go into web cam software (Skype, Vidblaster etc….)
 Now, all that’s left is to open your web cam program, Skype or Vidblaster etc, and select Voicemeeters output as your input device, and you can now use your USB Mic AND your external hardware mixer.
Voicemeeter can be downloaded FREE HERE at vb-audio.com. Don’t forget to make a donation – the programmer deserves a little something for a program this good!
![]()
Split large audio files into individual tracks with Audacity
 This tutorial shows you how easy it is to split large audio files into single individual tracks using the free program called Audacity on Mac, Windows and Linux
You can download Audacity FREE for Mac, Windows and Linux/Unix HERE.
httpvh://youtu.be/72ewbraagj8