Quick and Easy Convert DTS 5.1 or AAC 5.1 to Dolby Digital AC3 on Mac with MKV Tools

MKV Tools can convert AAC and DTS to Dolby Digital!
MKV Tools Logo

A lot of new TV’s these days do not support the DTS Soundtrack found in BluRay and DVD discs. I learned this the hard way when I got my new 65 Inch Samsung 4K TV. A lot of older audio equipment can not play AAC 5.1 either. I have ripped a lot of my Blu Rays to a network drive and it seems a large number of them have DTS. Usually, us Mac users are left out, but in this case we have an awesome tool available to us to fix this easily called MKV Tools. It works very quickly as it allows the video to “Pass Through” without having to be re-encoded. Only the audio is touched. As you can see in the below screen capture of my source file in Media Info below, the video file I am starting with has a DTS sound track.

DTS Video File

To convert it to a more compatible AC3 format download and install MKV Tools HERE. Once you have opened MKV Tools you will need to choose “Open” to import your video file, as drag’n’drop is not supported in the unregistered version. At this point you will receive another “Nag” window. Just wait a few seconds and you will be able to select “Register Later”, then you can choose your video file. Once the file is imported you will see the main window.


MKV-Tools-Window-1

At this point you need to select the video and audio streams you need to work on, then you can start making adjustments.

MKV-Tools-Window-2

Once you have selected the Audio and Video channels, make sure video is set to “Pass Thru”. In the audio options, select AC3 (5.1) and deselect “Pass Thru”. Then set your desired bit rate. I prefer 640kb, but you can go down to 384kb comfortably without any real noticeable quality loss. Then, press the “Convert” but and MKV Tools will start converting your audio stream. A new tab will fold out underneath the main window where you can view the progress.

MKV-Tools-Window-3


Whilst MKV Tools is not technically free, it is a bargain at $5.99. You can use it without paying to re-encode as many videos as you like, but given how powerful and convenient it is, and how little it costs, its well worth buying/registering in my opinion. I did!

2011 Apple Macbook Pro Graphics GPU GFX Card Crash Failure

Apple Macbook Pro 2011 Graphics Card Failure Pic
If you are reading this, there is a good chance it is because your 2011 Macbook Pro bit the dust big time, just like mine did. I paid over $3000 for it, and whilst it is 6 years old now I have grown incredibly fond of it, and I really wanted to revive it.

The problem stems from the Graphics Card. There are actually two graphics processors in these machines, the Discrete Card which is an ATI Radeon (This is the one that fails) and an Integrated one, which is an Intel Chip integrated into the motherboard. The reason Apple included two graphics processors is that the ATI Radeon is super fast, which is great for the gaming experience and video, and when you are working on spreadsheets or sending emails, the integrated Intel processor uses way less power and considerably increases battery life. The truth of the matter is, if you aren’t a gamer, the Integrated Intel Graphics Processor is just fine, and thankfully this chip is what allows you to get your machine up and running again.

**THIS HAS WORKED FOR ME – I HOPE IT WORKS FOR YOU, BUT I CANT GUARANTEE IT**

This is not a guaranteed permanent fix – But it has been working for me, and hopefully you experience similar results.

My machine kept crashing not long after it would boot, which made it impossible to work on, until I found out that if you don’t have it plugged in to the power, it should boot using the integrated graphics. When its plugged in the power hungry faulty card is used, so disconnect from power.

Disconnect The Power

Once you get it booted go into system preferences and look for “Energy Options”

Energy-Saver

Open Energy Saver

Continue reading “2011 Apple Macbook Pro Graphics GPU GFX Card Crash Failure”

Normalize Audio Volume Levels in Video on Mac with Sound Normalizer

Sound Normalizer IconDifferent volume levels in videos can be a real pain. I have a folder with dozens of music videos that I like to watch from time to time, and often one song will be very quiet and I need to raise the volume to hear it, then the next song will blow the speakers apart because it is so loud.

Sound Normailzer fixes all of that by adjusting the volume of each video to be the same – so you can set your volume once then sit back and enjoy your videos.

Sound Normalizer Default ScreenThe program seems to be built on, or at the very least modeled after MP3Gain Express For Mac, so for those of us who have normalized our music collection, the interface and simple usability will be very familiar.

Just drag and drop your video files into Sound Normalizer, and it will start analyzing the volume levels.

Sound Normalizer Analyzing Video FilesOnce analysis has finished, you will see the results listed. It shows you the current dB rating of the track, and the amount of gain it needs to apply or subtract to achieve the desired dB level. The desired level is set by default 89dB which is pretty much the standard most people will want. You can adjust this if you want to, but I advise leaving it alone.

Sound Normalizer Results

If you are happy to proceed and make the changes to your videos, press “Apply Gain” in the bottom right hand corner, and Sound Normalizer will start fixing up your videos.

The good thing is that it doesn’t actually adjust your original video, it adjusts a copy, and saves it to a new location which can be selected in the preferences. The new copy’s file name is appended with the normalization target dB, which in most cases will be 89dB.

Sound Normalizer OutputSound Normalizer works with all of the most popular Video AND Audio file types.
Video formats such as MP4, MKV, FLV, AVI, RMVB, WebM, 3GP, TS, M2TS, MTS, MOV, WMV, MPG, DivX, etc.
Audio formats such as MP3, WMA, AAC, AC3, AU, M4A, MMF, OGG, FLAC, WAV, MP2, etc.

File Types

Sound Normalizer is not free however, but it is well worth the $7.99 price tag. Grab your copy today in the app store, or find out more on Sound Normalizers Preview Page HERE.

Adobe Creative Cloud Photography Plan – Good Value or Dishonest and Unfair?

CCI have been a Photoshop user for many years, and have been very happy with it. Recently, I purchased CS6 and have been blown away with it’s “Content Aware” powers. I have gone back and forward on Lightroom many times though. I have trialed it more than once, and was never 100% convinced I had to have it.

A few weeks ago a friend recommended I download and trial Abobe’s Creative Cloud Photography plan, which features new versions of Photoshop and Lightroom. It installed easily and was up and running quickly on my Mac Pro/Yosemite machine. My first impression was that it slowed my system and internet connection considerably (Spinning Beachball syndrome). It always seems to be phoning home for something, like telling me I need to update Acrobat DC, when I don’t have Acrobat on my system, but that is a whole other discussion. As usual, I found Photoshop to be amazing, and to my surprise I was also impressed with how Lightroom had grown since I last trialed it. The inbuilt lens profiles and new features like Dehaze seemed to bring it to life for me. Add to this the packages price tag of only $9.99 AUD per month, it was seeming to good to be true, and I started to feel like I would sign up.

adobe-screen-grab
Whilst looking for something else on the internet I stumbled upon This Article on Geek.com entitled “Adobe will try anything to stop a Creative Cloud cancellation”. This is the line in the post that really caught my attention:

“in order to protect that revenue they are using strong-arm tactics when someone attempts to cancel their subscription”

Strong-Arm Tactics? That sounded like a pretty bold statement, and initially I wondered if it was Adobe or the Geek.com author who came off looking bad here. I chose not to base my decision on this article, gave Adobe the benefit of the doubt on this one, and continued to research the plan. To my dismay I was able to find other similar stories on the internet about the way Adobe does business. After removing the flames and venom I was able to summarize those articles into a few points that are relevant to the decision I have to make. It appears that Adobe’s Creative Cloud Photography plan is $9.99 for the first year, and then it jumps up to $19.99 for the second year and beyond. It also appears to be very difficult to cancel if you change your mind at some point, and it seems that if you are able to initiate a cancellation you will be expected to pay out the contract.

Don’t get me wrong, I think the Photography Plan is still good value at $19.99 per month. However, my concern lies in the fact that there appears to be some important information that consumers are entitled to know about being hidden away. Adobe don’t appear to be being honest and transparent about how the plan works. I have searched fairly extensively on Adobe’s web site looking for the fine print, and there doesn’t seem to be any. Perhaps it may be revealed once I click the “BUY” button and start the purchase process. Right now, I don’t feel everything is being disclosed, and I am worried that I will be locked into an arrangement with hidden conditions and fee’s that whilst they may be visible if you know where to look, are obscured and buried away in a heavily texted poorly titled page guarded by a very stern Robots.txt file to block it from showing in searches.

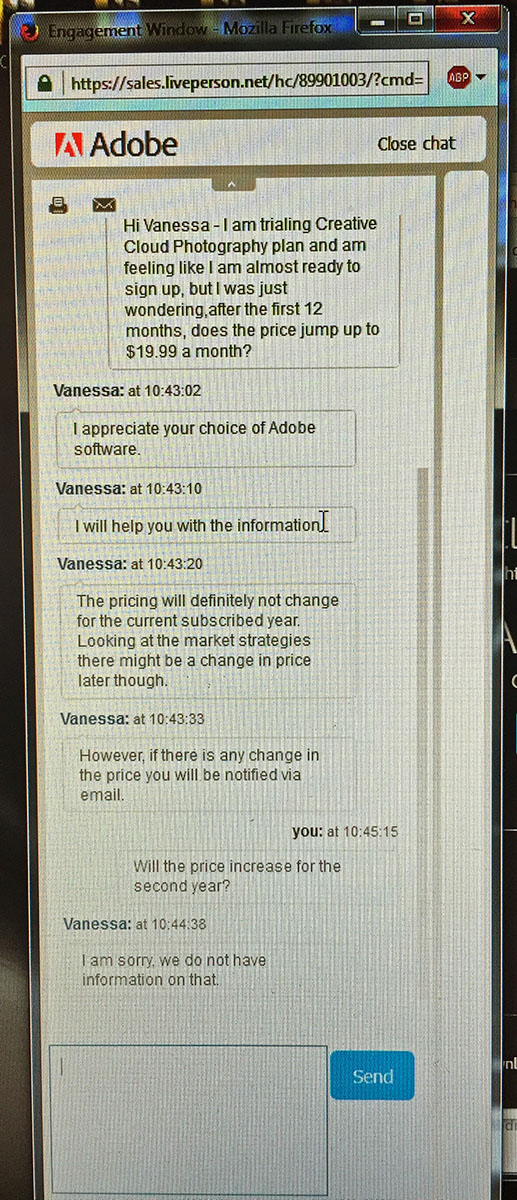
Concerned, I went directly to Adobe and asked them straight out – “After the first 12 months, does the price jump up to $19.99 a month?” Please see transcript of the chat below:

Adobe-Transcript

I assume Vanessa is not this customer service agents real name, and this simple and direct question may not be on her answers flow chart (Not her fault). But after reading some other transcripts, the question still remains in the forefront of my mind – are Adobe playing games? Has Vanessa not been trained properly, and genuinely doesn’t know the answer to this very simple question? Or is Adobe hiding the possibility that the prices on their web site are introductory, will increase 100% after 12 months, and they will make it very difficult for you to cancel your account when you find out in the hopes that they can defeat your will and retain you as a customer, as many articles, stories and comments suggest?

As I am still undecided, I am very interested to hear your thoughts on Adobe’s Creative Cloud Photography Plan and Adobe’s business practices in general. Do you think Adobe are a fair company, and the Creative Cloud Photography Plan is a good deal, or do you think Adobe are dishonest and sneaky, and the Creative Cloud Photography Plan is the cheese on the mousetrap?

If you have a moment, please answer the poll questions below (login not required), and leave a comment if you have one (email address required).

How do you feel about Adobe?

View Results

Loading ... Loading ...


Should I sign up for Creative Cloud Photography?

View Results

Loading ... Loading ...

How to easily create a group and send a SMS Text Message to everyone in it on iPhone

connect-contact-managerMy boss at work asked me if there was an easy way to create a group of contacts, and send a message to everyone in the group on her iPhone, and with a little digging I turned up this free GEM app called Connect Contact Manager for iPhone. An example of its use would be if you were a coach of a team, and you need to let all the players know practice is cancelled, you just select the group, type “Practice is cancelled” as a text message, and when you press send, the same message is sent to the entire team automatically (Assuming you have all of their mobile/cell numbers on your phone).

Go to the app store and download the free app. Find it by searching for Connect Contact Manager, or go HERE.

Connect Contact Manager Download

Once downloaded, open it up.Contact Screen

Create A New Group

You can scroll through the groups you have already made by swipping left and right on the group names, and if you want to create a new group click the plus icon in the top right corner. If you have already created the group you want to message, skip down to the “Send A Message To The Group” section

Add Group

Give your new group a name

New GroupSelect the contacts that you want to be in your group

Confirm Create

When you have selected all of the contacts you want in your group, confirm your selections by clicking create in the top right cornerconfirm-createSend A Message To The Group

Now, select the group you want to message by scrolling left and right, and hold down/press the groups name for a few seconds

Select GroupThen select “Message”

Select Message

Now you can type your message

Send Message

When you are done typing, simply press “Send”, and everyone in the group will get your message

How to run a USB Mic through an External Audio Mixer

USB Mic through an External Audio Mixer – How To

USB Mic through an External Audio MixerI have been reading on forums lately how some people would like to be able to run their USB Mic through their external hardware mixing desks, and it is relatively easy to do.

httpvh://youtu.be/K9vqNj0_CuU

Below is a diagram on how to run your wiring between the devices.

sound-flow-direction-diagram

Plug your USB Mic into a USB Slot, run an appropriate lead from the Line Out/Headphone Out of your computer into a stereo input channel on your mixer. If your mixer has only mono channels, use channel one for your left, and channel 2 for your right. Next, run wires from the Main Output of the mixer to your Line in/Mic In on your computer, and the physical part is done.

Next, open up Voicemeeter (If you don’t have Voicemeeter you can download it free at VB-Audio.com) and select your USB Mic as the device for channel 1. Make sure “A” is selected/highlighted and “B” is not selected.

step 1Then, select your Line Out/Headphone Out jack as the device for Voicemeeters Main Output, “A1”.

Step 2Now it is time to select your Line In/Mic in as the device for Channel 2. Make sure that “A” is not selected, and “B” is selected.

Step 3All that is left is to open up the app you want to use (eg – Skype, Vidblaster, or some other Web Cam program) and select Voicemeeter’s Virtual Device (Output “B” in Voicemeeter) as the input source audio device.

Skype InVoicemeeter can be downloaded FREE HERE at vb-audio.com. Don’t forget to make a donation – the programmer deserves a little something for a program this good!
vb_audio_logo_blue_175