Easily Watch or Fix Aspect Ratio Problems in MPEG Video with MPEG Streamclip on Windows and Mac

Earlier this week one of my favorite movies “The Scorpion King” was on TV, and as I recently bought a new digital set top box with USB recording capabilities, I thought I would give it a try. I remember when I saw The Scorpion King at the movies it was in a very widescreen aspect ratio, and it looked great! But, as soon as it started on Sunday night, I could tell something was not right. Rock Johnson looked more like a character from Avatar than the WWF! He seemed over 10 feet tall and as skinny as a broom handle, which as we all know, isn’t the case!

My suspicion is that someone at the TV station got lazy, or maybe a setting in my set top box was wrong, but the bottom line is I have a 2+ gigabit video file of one of my favorite movies, and it is virtually unwatchable because the aspect ratio is way off.

Thankfully, there is a nice easy way to straighten things out. Now, If I intended to watch the video file on my computer, I would use VideoLAN’s VLC Player, because it’s free, it plays practically everything, and it has nice built in feature’s that amongst dozens of other tricks, will adjust your movies aspect ratio on the fly, so no re-encoding is required.
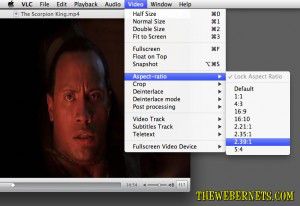
VLC Player falls into my “I can’t Believe it’s free” category. No matter what OS your running, they have a player for you that will knock your socks off. But if you want to watch that distorted video file on something like a WDTV, or plug a USB key into your flat screen TV, your gonna have to re-encode it and repair the problems.

Luckily, my set top box records in MP4 format, so my tall and skinny video file will drop straight into a really cool, and again FREE program, called MPEG Streamclip, which is what I am going to use to fix my aspect ratio problem in my video file.

Thankfully, MPEG Stream not only fixes tall and skinny video’s, but short fat ones too 🙂

To get started, if you don’t have it already, get your free copy of MPEG Stream clip right HERE! You can do a bunch of cool stuff with it, it’s free, so there is no reason not to have it in your video tool kit! Once your installed, FIRE IT UP!
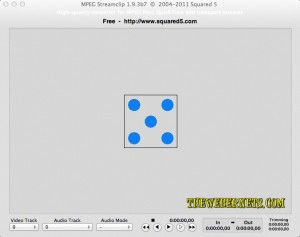
MPEG Streamclip Screen CaptureOnce the main window is open, drag your wonky video clip into it, and you will see a preview window.
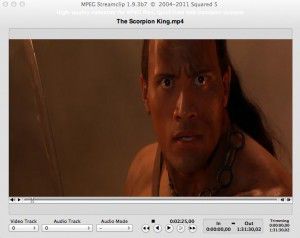
MPEG Streamclip Screen CaptureTo begin reshaping, open the file menu and select “Export to MPEG-4”, or if you want to cross encode to another format, you can choose it here instead.
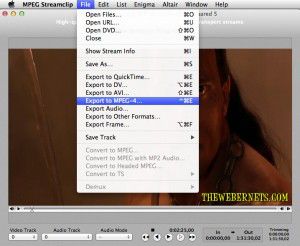
MPEG Streamclip Screen CaptureOnce you have selected your preferred export format, a new window will pop up where you can adjust your settings, and de-distort your movie.
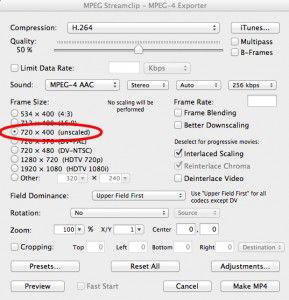
MPEG Streamclip Screen CaptureAs you can see from the above capture, my video was recorded in 720px wide by 400px high, so I am now thinking I really do need to go and take a look at the default settings on my set top box. To start repairing the problem, I clicked “Other”, left the width at 720px, and started to play with the vertical height. After I changed the setting, I clicked “Preview” to see if my changes made the aspect ratio better.
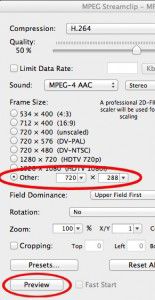
MPEG Streamclip Screen CaptureA new window popped up and the movie started to preview, and I noticed a secondary window which looked like it had already begun encoding, but this doesn’t appear to be the case. It seems to me that it is just encoding your preview while you are watching it, but its not the final pass.
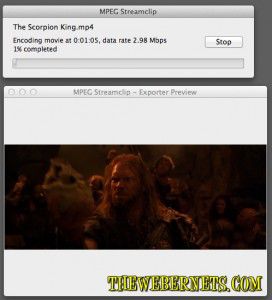
MPEG Streamclip Screen CaptureIf the preview looks good, or even if it doesn’t, click the stop button after you have assessed your changes. If you want to re-adjust your settings, you can go back and do so, or if you are happy with your changes, go ahead and click “Make MP4” in the bottom right hand corner, and give your FIXED video a new unique name.
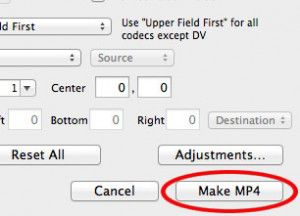
MPEG Streamclip Screen CaptureLike most video encoding, it will take some time to process the file and apply your changes. But when it’s done, everything will look like it should again.

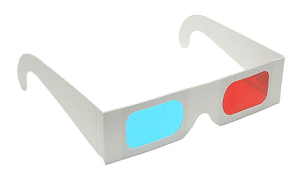
3D Video for Beginners Part 1 – Filming in 3D with Web Cams

3D For Beginners

3D video is becoming popular again, and with the tools already available to most of us, its pretty easy to get started making your own 3D movies. There are a lot of programs available that will take your current 2D video and convert it to 3D with varying levels of success, but if you are interested in actually filming in 3D using a stereoscopic camera set up, this is the article for you.

Getting started making 3D can be a bit confusing for beginners. But if you have a PC and a couple of web cams, you are two thirds of the way there. It is really helpful if your webcams are the same to, and a lot of webcams are available in twin packs now as well (one for you, one for your friend), so these are a good place to start.

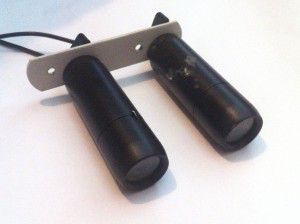
I had a security camera set up at the last place I lived, and two of the cameras are identical. For 3D filming it is critically important that both cameras are aligned, and looking at exactly the same view. I joined the two together by screwing them to a flat piece of steel at their mounting point, and they lined up quiet well.

Stereo Bullet CamerasIn order to achieve the 3D effect your cameras will need to be spaced about 65mm apart. You can technically use any two cameras, but it just makes it a lot easier if they are the same. Once your cameras are mounted together its time to connect them to your computer. If they are USB cams just plug them in, but in my case I had to use a Pinnacle Dazzle for the left camera, and a Easy Cap USB interface I got from Ebay for the right camera, in order to be able to use them. My cameras have a coaxial cable output, and the Dazzle/Easy Cap act like adapters that allow me to plug the cams into them, then they plug into the computers USB port. Once you are all plugged in, the next step is to download a program that will let you view your cams, align them, and eventually record your video. I looked at a lot of programs, and there is only one that gets my thumbs up, and that is Stereoscopic Multiplexer. The only down side is that it doesn’t record audio, so you will need to use a stand alone audio recorder to capture the sound, and then ad it back in processing later. You can download the program and try it out with no restrictions other than a watermark in the image. If you really get the hang of things and want to buy it, you can, and the watermark will be removed. But if you just want to try this out and experiment, you can download it and test it at no cost.

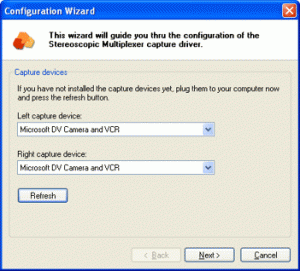
Once Stereoscopic Multiplexer is installed, open it up, and the configuration wizard starts. This is where you can tell it which camera is going to be the left camera, and which is going to be the right camera.

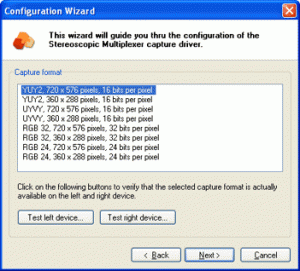
Capture DevicesThe next step is to select a capture format.

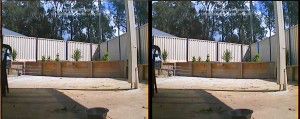
Capture FormatsThis is basically telling the program the format and quality your webcams can deliver. In my case, my cameras are PAL, and the image size they deliver is 720 pixels wide by 576 pixels high, so I use YUY2 720×576 pixels. The next few windows are OK to leave at the default settings, so keep clicking OK until you get to the preview window. If everything has configured correctly, you will now see a preview window of what your cameras see.

Multiplexer PreviewAs you can see from my preview, I spent a lot of time making sure the image from the left camera is identical to the right. The pole on the right of the view is the same distance from the edge of the frame in both, as is the positioning of the back of the chair on the left, and the doggy bowl at the bottom.

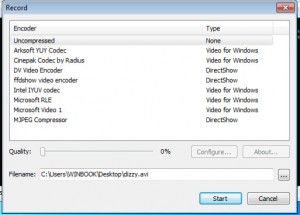
Now that everything is lined up, its time to start recording. When you click the red record button another window will appear asking you how you want the video compressed.

Record-Window
If you have a fast processor the Cinepak Codec by Radius seems to be pretty good, but in my case I have to record uncompressed. Its a lot faster, but the file sizes are huge. I use Ojosoft Total Converter to compress the videos once I have finished shooting, so the file sizes are more manageable. Make sure you have your preferred compression method highlighted, and you have given your file a name and a “save to” location before you try to click start, otherwise it wont work. Below is a sample of the raw video footage I captured.

httpv://youtu.be/xn0DCKzFw7Q
Stereoscopic Multiplexer is great because your left and right cam footage is in sync, and saved side by side into one file (Hence the frame size of 1440 x 576 when recording from two 720 x 576 cameras). If you were to use two regular video tape cameras, you have to try and match the videos so they both play at exactly the same time, which is not impossible, but is difficult and ads more steps to the process.

Now it’s time to process the raw video – Stay tuned for Part Two!

R2 Studios Startup Delayer for Windows

Startup DelayerIsn’t it nice when something just works! I have recently moved house, and in my previous home I had a very elaborate security system which included infra red video cameras with motion detection (so I know when the Feds/Aliens are trying to sneak up on me to steal my brain waves). In actual fact, the cams were simply so my wife and I could check in on our doggies whilst we were out, night or day. I set up a web server for my cam feeds, and we can see the dogs on our iPhones (pretty cool, and VERY easy to do – will post article soon). The problems is though, I haven’t had a chance to recreate this monster system in our new house, but we still want to be able to see the pups.

I managed to find the XP based computer (the heart of the security system) in amongst all of the moving madness, and plugged in a few cams to get something going. A real bonus in our old house was that the walls were just filled with Ethernet cable going in every direction, it was quiet a work of art actually. Sadly, Not so much in the new place. So to get connected quickly I plugged in a Netcomm NP900n wireless dongle I have, and the machine was connected quickly and easily. I reconfigured my web server with the my new I.P  and other info regarding my new internet connection, and with an average amount of fuss (to be expected when dealing with all matters tech) we were able to spy on our doggies from anywhere in the world again. Feeling very pleased with myself, and my superior knowledge of port forwarding and other gunk most people don’t even know exists, I ran disk clean up, defragged, and went through my regular “Window Cleaning” routine. Now, I have the computer set to “Auto Reboot on Power Failure” in bios, and my video cam server program shortcut is in “Start Up Items”, so if there is a power failure, the machine restarts and my servers run up the moment the power is restored. After my maintenance routine completed, I chose to “restart” the computer, as you do. Here is where the fun starts.

When this machine was using a wired connection, the Gigabit network connection was up immediately on start up, the internet connection was available to the web server when it was launched, so it began serving up the CCTV feed with no problems. I have learned this week, that it takes a lot longer for a wireless connection to handshake and initialise.  When programs start with windows, they are often ready to go before the wireless internet connection. If the connection isn’t present when they are ready to go, they assume there isn’t a connection, will never be a connection, and don’t go looking for one at regular intervals. That is the shortened version of what really happened, with all of the profanity removed:)

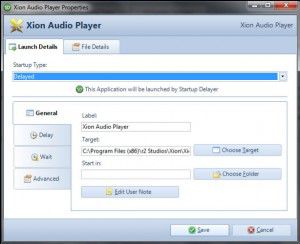
Armed with this new knowledge I turned to Google and searched for “start up delay”. The first result was R2 Studios Startup Delayer. I downloaded it, installed it, told it that I wanted it to start my web server 5 minutes after the machine starts…………AND IT DID! No questions asked! I just love it when this stuff happens, as it just doesn’t usually happen at all these days.

This program has a free and a paid version, both of which do far more than I require in this instance, but I will delve in deeper and do a more concise review in a later post. It was a very easy install. It requires Dot Net 2 (free from Microsoft, and installed automatically if you don’t already have it), and once installed, it is just a matter of telling it what programs and processes you want it to start, and when you want it to start them. It is so easy to use!

Startup Delayer Screen Capture

Now, you might be thinking “I don’t have webcams” or “My internet connection is wired”, and you think you may not have a use for this program. But what you really need to think about here, is that when windows boots, almost EVERY program you have on your computer is not only using up your CPU starting up, but it is also phoning home to validate, looking for updates, your antivirus and anti spyware is looking for updates, Microsoft/Windows Updates is checking to see whats going on, and dozens of other “services” you don’t even realise are running on your computer are ALL trying to get started, and get on the internet at the same time.

BOTTLENECK!

Have you ever wanted to just turn on your computer and check your email, or Google something real quick and then shut off? Maybe you want to spend 3-5 minutes on your computer to look at something, or find an answer, but your computer takes 3-5 minutes to even become useable because it is Soooo Slooow when it starts up. Maybe you want to be on your computer all day, but you would just like to be able to use it in less 10 HOURS OF TURNING IT ON!!!

Wouldn’t it be good if you could tell ALL of those other offending programs and services to wait a while before they do their business? Maybe even stagger them so instead of them all trying to start up at once, they do it one at a time in an orderly manner?…………Now your getting it!

Go check this program out – You NEED this! R2 Studios Startup Delayer.

The free version will do pretty much everything you want, but I will be buying the pro version anyway (only $20) because I believe these people deserve a little something for their efforts, it really is a great piece of software!

Identify unknown Video Codecs

Video Spec Logo
Have you ever been sent a video, or downloaded a video from the internet that just wont play? Isn’t it frustrating! Most times it is because the video has been encoded with  a codec (compressor/decompressor) that is not on your computer, therefore your system doesn’t know how to play the file.

There are a lot of tools out there to help you with this problem, and with only a few of them, you will be able to play 99% of everything you come across easily.

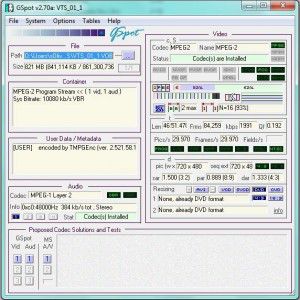
If you have a windows computer, you will need to download “G-Spot” codec identifier.

And for Mac users, “Video Spec” codec identifier is an equivalent.

Once you have downloaded and installed your codec identifier, just drag and drop your pesky video file onto it, and the identifier will analyse it and tell you everything you wanted to know about it, as well as a bunch of stuff you didn’t! Once you have identified the codecs used in creating the file, you can set about searching for it, installing it, and enjoying your video.

G-Spot Video Codec Identifier

As mentioned in my “How to play almost any video with VLC Media Player” post HERE, you can play pretty much anything with VLC Media Player 😉 – But if you don’t want to download a new player, and you are happy using Windows Media Player, or Quicktime, there are some FREE “plugins” which add extended capabilities to your favorite media player. Windows users will definitely want to get your hands on the K-Lite codec pack. There are small, medium, and large packs, but again, 99% of everything you will want to watch will work if you install the “Standard” pack. For Mac owners, Perian is definitely the first plugin you will want. It will allow you to play AVI, XVID, DIVX, FLV and MKV straight away, and for those who want to watch Windows WMV files, Flip For Mac is the solution. If you go to their site, they will push you hard towards their paid version, but there is a free version if you go via Microsoft HERE which will do everything you want it to do.

How to play almost any media file on Windows, Mac or Linux/Unix

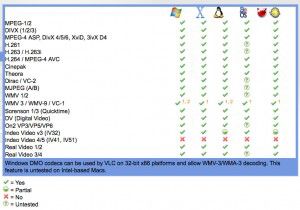
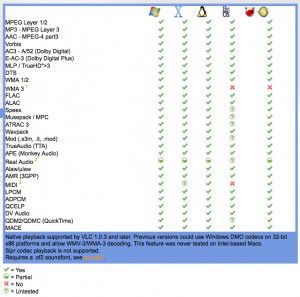
Video Lan Client Player IconIf you have a Windows based computer, and someone sends you a Quicktime video, or if you have a Mac, and you want to watch an AVI or a WMV video, your computer just isn’t going to play it for you without some additional software. Over the years I have experimented with a lot of different programs, but there really is only one program users of all platforms require – Videolans VLC Media Player. It will play just about everything (including DVD’s and Audio Cd’s), regardless of your operating system and installed codecs, it supports playlists for audio and video, supports sending and receiving streams, and has tons of tweaks to allow you to adjust everything from brightness and contrast, to Digital Audio pass-thru for those of us using Dolby Digital/DTS enabled audio cards with Digital Coax or Fibre Optical SPDIF audio outputs. Below are the supported video playback formats:

And the supported audio playback formats:

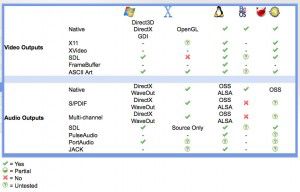
These are the supported Audio/Video outputs:

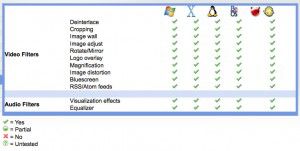
There are also some filters that you can apply to the playback.

The main one I find useful is the de-interlace filter, which stops you getting the “stripped” effect when watch fast moving scenes in a interlaced video (like shown below)

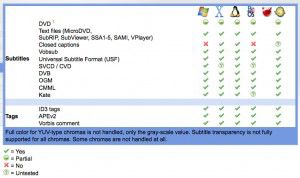
VLC Media Player also supports many formats of subtitles:

But the best part about VLC Media Player, it is ABSOLUTELY FREE!

So go and download it now at VideoLAN.org!

Why does Intenet Explorer see web sites so differently?

During construction of this site, I have viewed it on Firefox on both Mac and Windows, and Safari on the Mac, and it looks great! For some reason, I just fired up Windows to check it out on Internet Explorer…….

The last thing I expected was to see this:

Webernets screen grab in internet explorerWhy is it that the dominant web browser interprets web site code differently to every other browser? Who’s right and who’s wrong?

If you are viewing this site with IE, I apologise, and will try to sort this out soon.