How to use a USB Mic AND Mixer together in Skype or Vidblaster

How to use a USB Mic AND Mixer together in Skype or Vidblaster

USB Mic AND Mixer
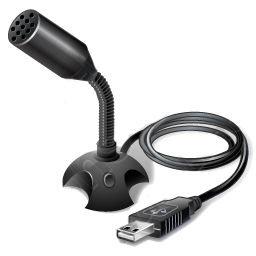
Web cam software like Skype and Vidblaster only allow for one audio source, so if your mixer is coming into the computer via the line input, and your mic is coming in through USB, you are generally out of luck….until now.

httpvh://youtu.be/rtWqR_AWV4M

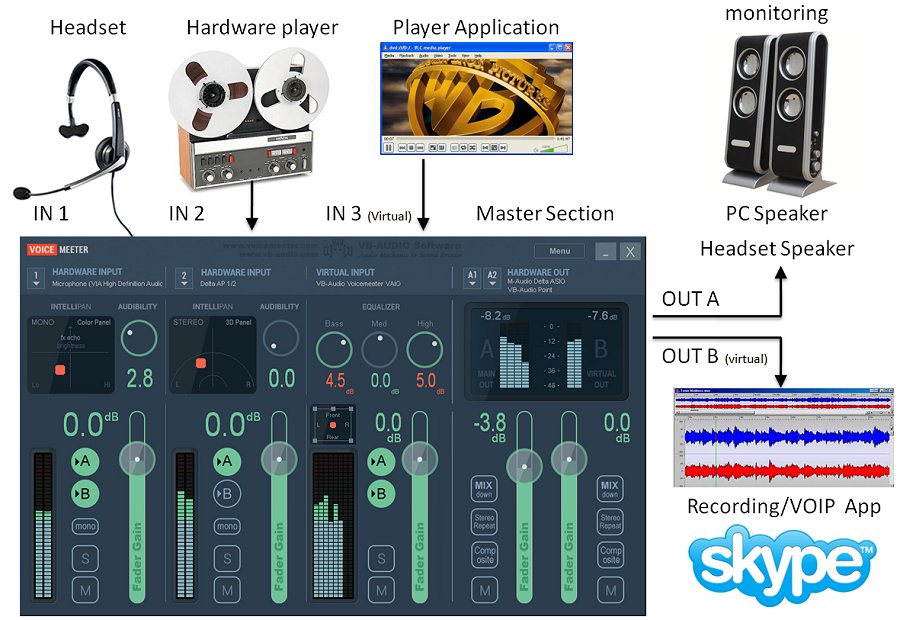
I recently stumbled upon a free piece of software called Voicemeeter which makes it incredibly easy to solve this problem. It is basically a software mixer that will allow you to take various inputs as well as your system sound and mix them with a great deal of control into one “Virtual” sound device, which you can then select as your audio input device in your web cam program.

Voicemeeter Connection Diagram
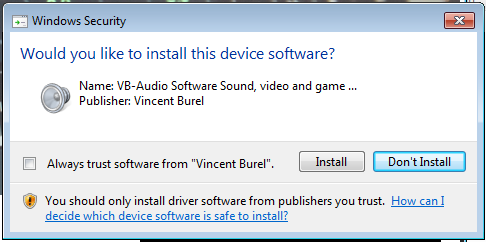
To get started, Download your free copy of Voicemeeter HERE.During installation, you will get some dialogue boxes telling you it wants to install some drivers, this is completely normal.

voicemeeter-driver-installOnce you have installed it, you will need to restart your computer so the virtual drivers can register in your system. Once you have rebooted, open up Voicemeeter and you will see the mixing console.

voicemeeter Mixing Console
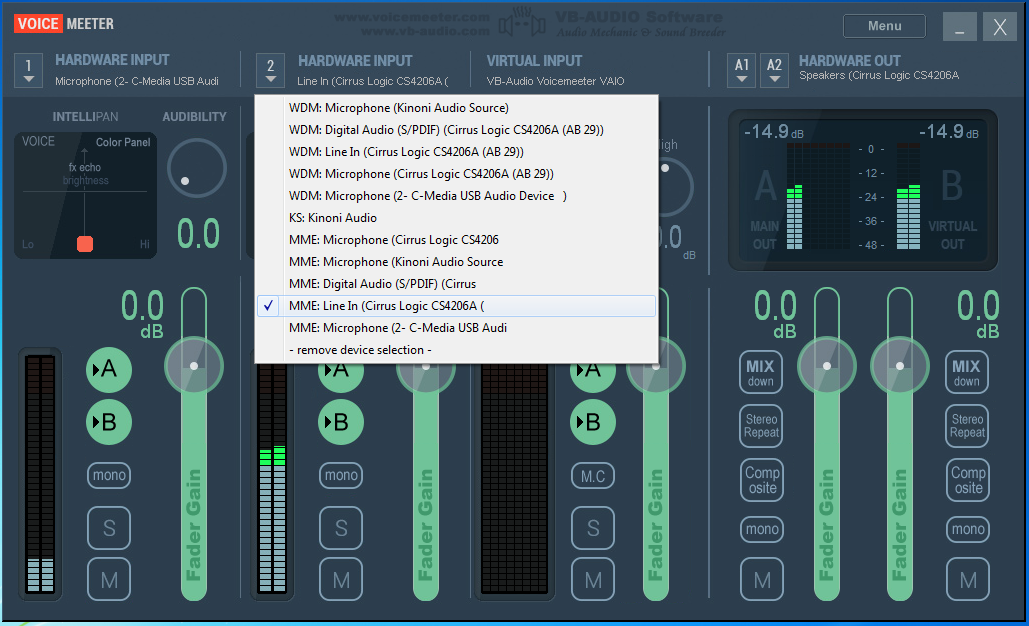
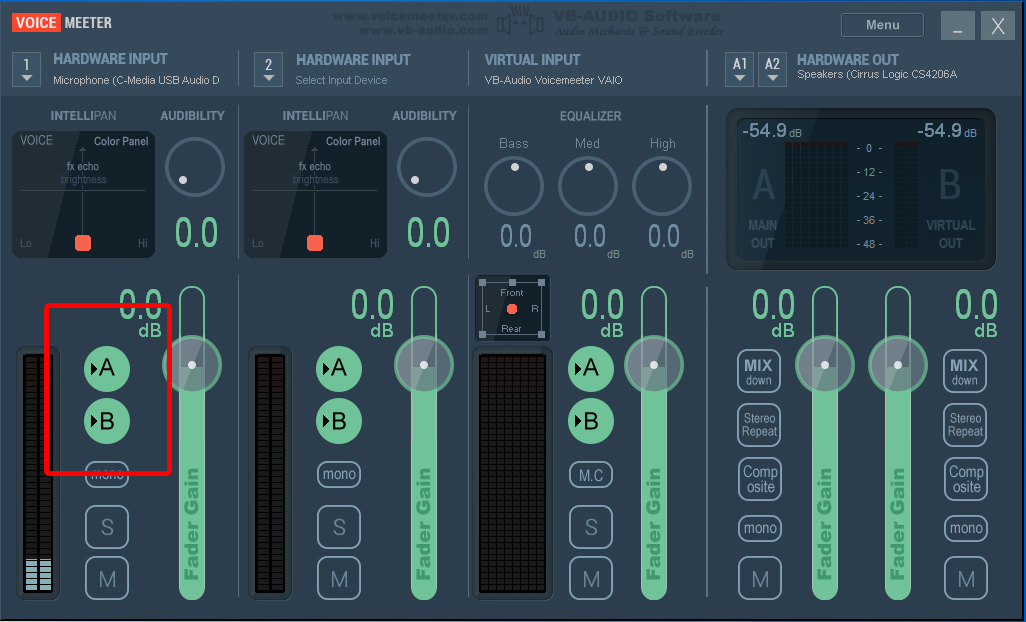
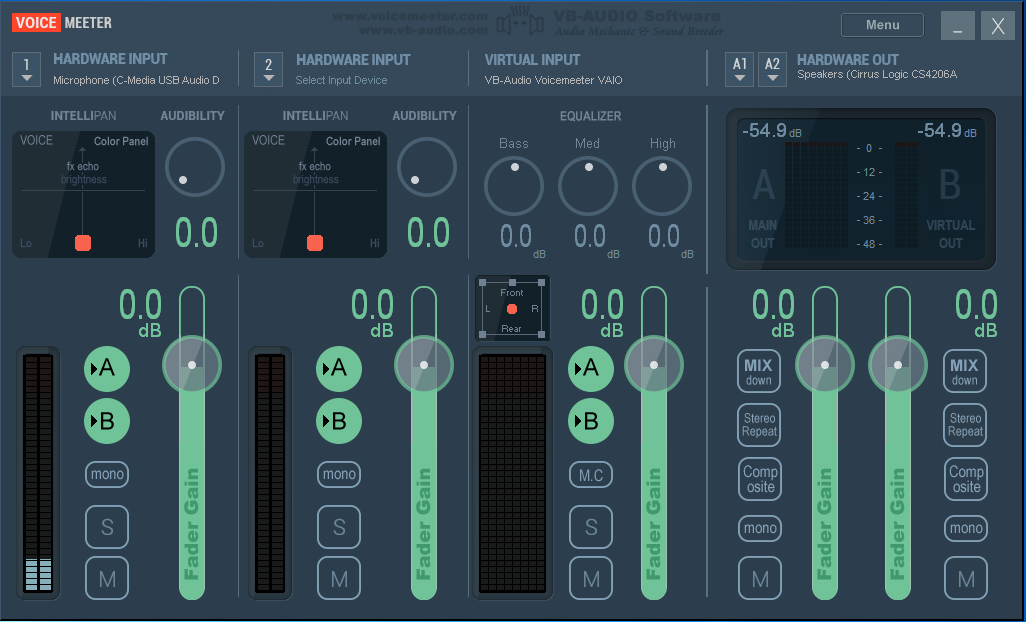
Looks cool doesn’t it! In short, you have two hardware inputs and one virtual input. The virtual input seems to be your system sound, so anything that tries to output through your computers speakers, like Winamp or Windows Media Player, can be fed into your mix here if you want it, if not, just mute this track by pressing the “M” button at the bottom next to its slider. To mix your Mic and Line In (Mixer) click where it says “1 Hardware Input” and select your USB Mic from the drop down list.

Select USB Mic
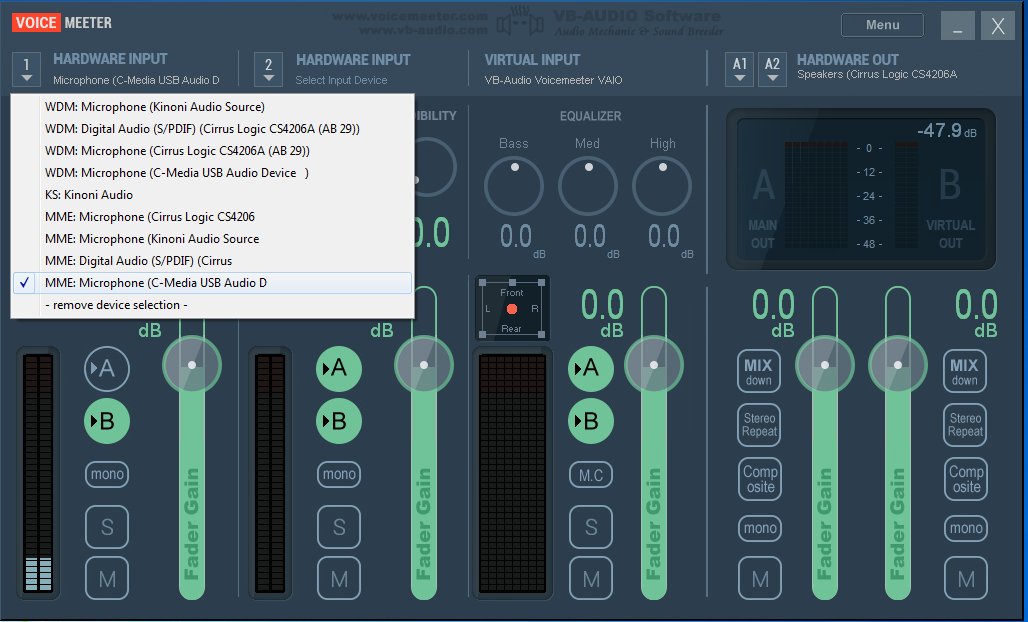
The next step is to select your line in/mixer device in “2 Hardware Input”

Select Line In
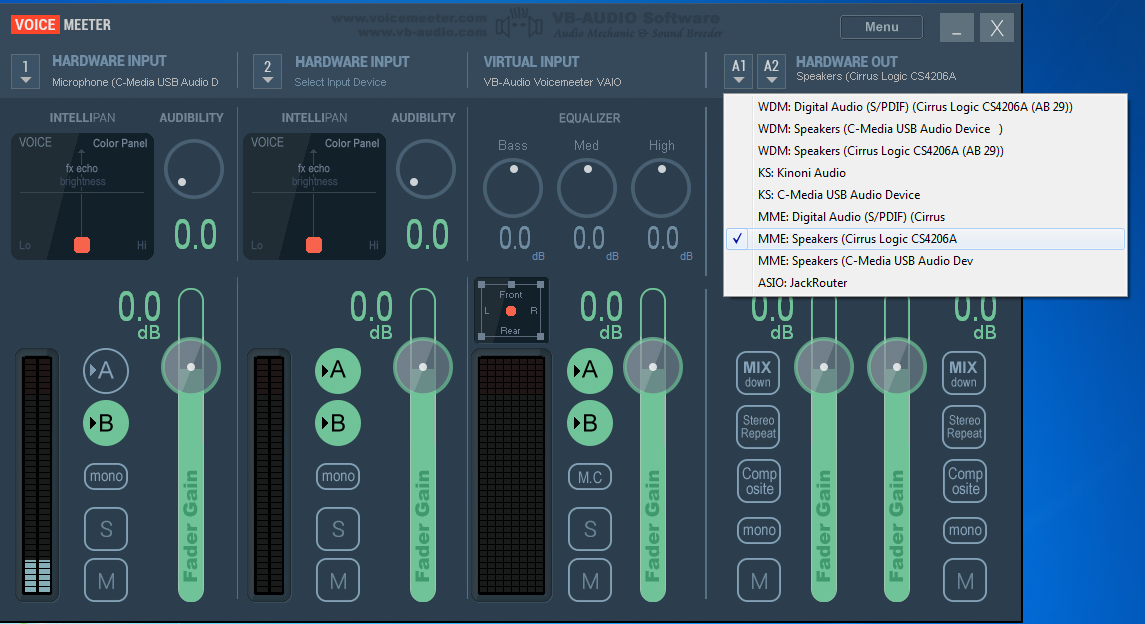
Now its time to tell Voicemeeter where your speakers are. Select them from the drop down menu that says “Hardware OUT”

select-speakers
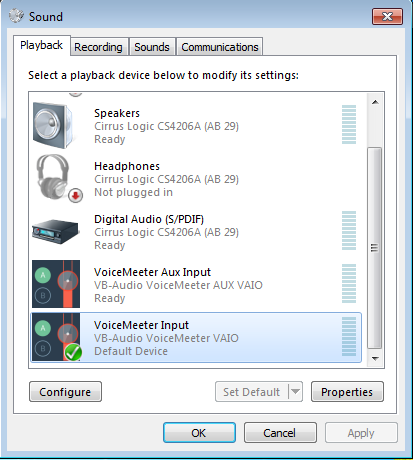
The last step to making this all work is to open your Windows menu and select control panel. When this opens select the sound icon to open your computers sound preferences window. In the “Playback” section select “Voicemeeter Input” and then set it as the default device.

select-voicemeeter-in-sound
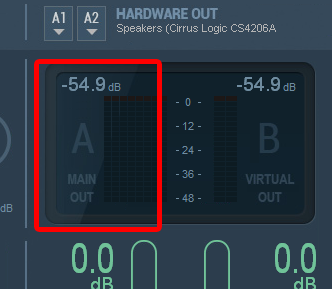
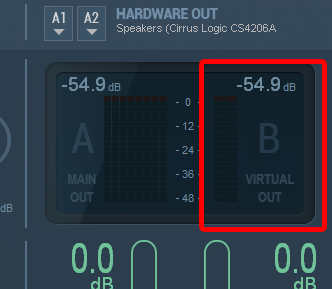
Now you are all configured, you just need to do a small adjustment in Voicemeeter to stop feedback loops. The output of Voicemeeter has two channels, “Main Out” which will go to your speakers, and “Virtual Out” which is what will go into web cam software (Skype, Vidblaster etc….)

main out  virtual out
 In the “1 Hardware Input” channel, it is wise to de-select “A” as this will stop your mic from being played out aloud through your speakers. This will prevent feedback, but still allows your USB Mic to feed into your web cam program through the Virtual Out.

Channel Select
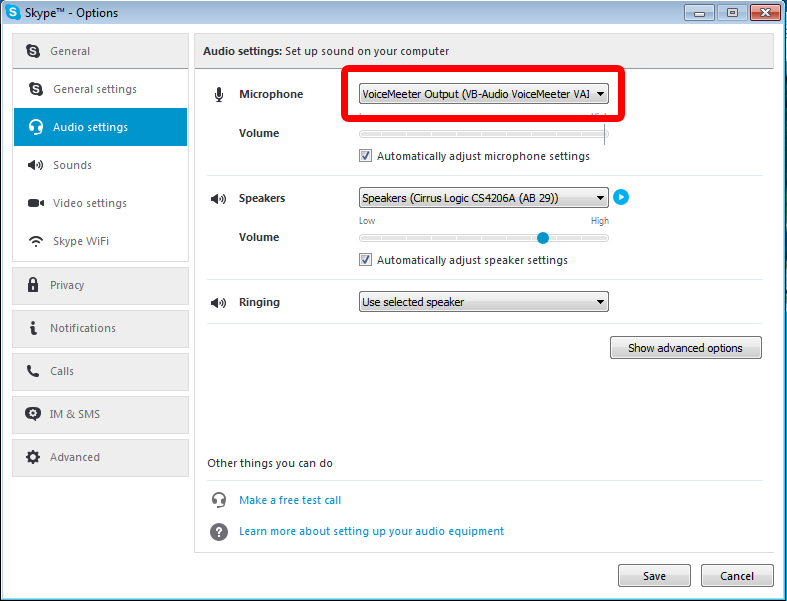
Now, all that’s left is to open your web cam program, Skype or Vidblaster etc, and select Voicemeeters output as your input device, and you can now use your USB Mic AND your external hardware mixer.

Skype In
Voicemeeter can be downloaded FREE HERE at vb-audio.com. Don’t forget to make a donation – the programmer deserves a little something for a program this good!

vb_audio_logo_blue_175

How To Use iPhone Android or Nokia Smart Phones as cameras in Vidblaster

Epoccam Icon

httpvh://youtu.be/Z5E-vEalubM

This video will show you step by step how to download and install software that will allow you to use your iPhone, Android Phone, or Nokia Smart Phone as a camera in Vidblaster.

**NOTE** – Your phone and computer need to be connected to the same wifi network

To get started, download the free Epoccam App from your devices app store and install it. Then, on your computer, browse to kinoni.com to download the free virtual device drivers. The software relies on Apple’s Bonjour networking technology, and if it isn’t already on your system, the installer will download and install it automatically for you. Don’t worry, it’s harmless!

Once everything is installed, open the app on your phone, then open Vidblaster, and add a new camera module and select “Kinoni Video Source” and you should be up and running.

How to fix old bad decals and make them slide off the backing sheet paper

Fix old bad decals and make them slide off the backing sheet paper

IMG_6367In this tutorial I show you how to Fix old bad decals – I show you how I reclaimed some Tamiya decals that even after more than half an hour in water, still refused to slide off the backing sheet. Reclaim decals that are no longer good for use. They have been subject to moisture or humidity previously, and now even after more than half an hour in water, they refuse to slide off the backing sheet.

httpvh://youtu.be/0kqbpiaorw8

How to paint Realistic Wood Scale Ship Model Decks by Loren Perry

**NOTE** – This article was written by Loren Perry many years ago, for another web site which unfortunately is no longer available. I was very glad to have found the article on an old floppy disc recently, and post it here now for the benefit of all.

Please visit Loren Perry and buy the best Ship Model Photo Etch parts at – Gold Medal Models


arizonaWooden deck on the fantail of Loren Perry’s 1934 Arizona, built from the Revell 1/429 kit

One of the three colors is a paint, the other two are from Floquil’s range of model “stains”. They are: 1. “Mud” (a model railroad weathering paint), 2. “Driftwood” (a light gray stain), and 3. “Walnut” (a brown stain.) The entire process can be boiled down to four simple steps:* 1. Airbrush the deck with Mud.
* 2. Streak the deck with Driftwood.
* 3. Streak the deck with Walnut.
* 4. Repeat steps 2 and 3 as necessary.

This method is, fortunately, very simple and very forgiving. First one must airbrush the deck with Mud and allow it to dry at least 24 hours. In fact, this will be the very first color painted on the entire model – the grays, blacks, and other colors come after the deck has been prepared first. Once the Mud paint has dried, select your smallest tipped brush and open the bottle of Driftwood. You then dip the brush into the stain and then wipe the tip of the brush lightly over a paper towel until only a small amount of wet stain remains in the bristles. Now use the brush to streak the stain in narrow strips lengthwise along the deck (or parallel to the planking). Use random strokes until the deck is evenly streaked over is entire surface. When finished (the stain dries very quickly), open the Walnut stain and repeat this step. If the deck appears too dark, repeat the streaking process with the Driftwood until the deck starts to lighten up. If you want the deck to return more to the shade of the Mud paint, streak the deck with Mud in the same manner as the stain. By alternating back and forth between these three colors, you’ll find you have great control over the final appearance of the model’s wooden decks. And so long as you keep the stains and paint nicely thinned, there will be no visible buildup of pigment to obscure detail. And remember to keep the brush strokes about the width of a plank, or no more than two planks.

Some advantages of this technique: A. no great artisitic skill is necessary, only the ability to apply random paint streaks in parallel lines; B. a damaged area can easily be blended into the rest of the deck by applying more strokes in alternating colors as above; C. the process goes quickly – one Arizona model had its deck fully painted and streaked in about an hour (after the original Mud application had dried, of course.) A tip: purchase an inexpensive kit to use as your “guinea pig”. Use this kit’s parts to test your technique and refine it before you move onto your main project. You’ll find, as I did, that the final appearance of your model’s planked deck looks exceptionally convincing, both in photographs and to the viewer seeing it on display.

arizona_003arizona_002

How to make Quick Easy Blast Bags for Scale Ship Models

The revised 1/700 Tamiya Yamato has many corrections on the original release (Which I am building). One is that they have added blast bags to the 18″ guns. But for those of us with old stock, or building some other model without blast bags, there is a solution. It requires some Blu-Tack, skill, and believe me, much better results can be achieved than what I will show here (Instead of skill, I got Fat Fingers:-)

Here’ the two pieces that combined will form the gun.

t2Assembled, you can see the gapping holes around the barrels

t1Roll some Blu-Tack between your fingers and flatten it out into a tube-shape so its about 1 1/2 inches long, and wrap it around the base of the barrels.

t3Then pull the barrels through the turret. The Blu-Tack will hold the barrels in place, and a small amount will protrude through the turret. This can then be shaped with a toothpick to make a convincing enough looking blast bag. Blu-Tack can also be painted.

t4Blu-Tack is very forgiving, if you botch it, just pull it out and start over.

t5And here is the finished blast bag painted.

Quick and Easy Barrel Upgrade for 1/350 Scale Ship Models

In this article I will show you how I upgrade the big gun barrels on 1/350 scale ship models. More often than not, the barrels that come with the kit are not very realistic looking, and in some cases they can be hideously bad. This is obviously very disappointing, as the rest of the kit is quiet good quality. I have developed a very simple and quick way to make those barrels look a little bit better.

barrel_upgradecoverIn the “Scratch Building Supplies” section of your local hobby store, you will be able to find some brass tubing, which is perfect for replacing those solid chunks of plastic. Try to find some that is as close to the diameter of the molded plastic guns as possible. In this article I am replacing barrels on Tamiya’s 1/350 Prince Of Wales, and a length of 3/32 rod looks right for the job here.

barrel_upgrade4To get started I will use a set of vernier calipers, or some other device for measuring accurately to find out the length of the section I will be replacing.

barrel_upgrade01To cut the brass tubing, I used a “Jewelers Saw” that I purchased from my local hobby store. It has an extremely fine blade and is great for precision cutting.

sawI secured the brass tube into a soft jawed wooden hobby vise (so as not to crush it) and used the measurement I took from the plastic barrels to mark out the lengths of brass I needed to cut.

barrel_upgrade05Then it was time to get down to business and do some cutting.

barrel_upgrade06Once you have your new barrels cut, make sure you check their length and shape so they are all identical.

barrel_upgrade08To clean up the outside of the new barrels, simply twist/rotate them between your fingers while the tip is in contact with some fine grade sandpaper.

barrel_upgrade09The inside of the barrel can also be easily cleaned by using an X-acto knife or scalpel.

barrel_upgrade10Once your new brass barrels are cleaned up and ready to go, you can start to remove the old barrels. **IMPORTANT NOTE** – DO NOT remove the entire section, leave roughly 5mm of the old barrel in place as illustrated below. This is how we will mount the new barrels to the old frame.

barrel_upgrade02

barrel_upgrade03Take your X-acto knife/scalpel and start “Whittling” away at the 5mm section we left behind, so it fits snuggly inside the 3/32 replacement barrels.

barrel_upgrade04The trick here is to be slow, and patient. remove a little, then test fit, remove a little more, then test again. This is the best way to ensure a snug fit, and that the barrels sit perfectly parallel on the frame.

barrel_upgrade11Once you are happy with the fit, and that everything lines up correctly, take your preferred glue and apply it to the 5mm section you have just “whittled”.

barrel_upgrade12Once all barrels have been glued onto the frame, line everything parallel, and leave it to dry. Once it’s dry, you can spray your primer on the brass in preparation for the final color.

barrel_upgrade13