
 If you have got an idea for a Vidcast (Video Podcast) or a Internet TV Show, but don’t know where to start, You are in the right place! All you need is a Computer with a Web-Cam connected (And a good internet connection if you plan to stream live) and you are ready to get started.
Note to Pros – These articles are aimed at beginners, who wish to spend little or no money until they have a grasp on the topic, and are hoping to learn how to get started quickly and easily, using equipment they most likely already have.
Over the next 10 Tutorials/Articles I will show you everything you need to know to make your idea a reality!
Part 1 – Selecting Video Switcher Production Software – The Heart of Vidcasting – VIEW HERE
Part 2 – Installing Vidblaster, Connecting Your Webcam, Switching and Interface Basics – VIEW HERE Part 3 – Adding Additional Cameras – VIEW HERE
Part 4 – Mixing Audio, Mics, and Avoiding Looping in Software – VIEW HERE
Part 5 – Desktop and Browser Capture – VIEW HERE
Part 6 – Connecting Guests Via Skype – VIEW HERE
Part 7 – How To Make A Lower Third Overlay – VIEW HERE
Part 8 – Adding flair with Effects, Soundboards and Chat Streams – COMING SOON!
Part 9 – Green Screen/Chroma Keying and Virtual Sets with iClone – COMING SOON!
Part 10 – Recording and Streaming – COMING SOON!
It is worth noting that what you are about to undertake, will eventually cost you a few dollars if you are really serious about it, and during reading these articles you will probably feel like throwing your hands up in the air and saying “It’s too hard”. But keep in mind, just 15-20 years ago, this sort of thing was only achievable if you owned a TV station with a staff of engineers and production folks, and a multi-million dollar budget. If you get overwhelmed, stop, take a deep breathe, and please stick with it. I know there is a lot to learn, but the rewards are well worth it!
PART 1 – Selecting Video Production Software
There are several video production programs available. The average price is around $500, but there are some Free options available as well. Most of the programs have free fully functioning trial versions, so you can get started TODAY for zero outlay, and grow your rig as your budget permits. In my opinion, the software you use to create your production will be the heart of your show, so once you are done with the trials, this is probably the first investment you need.
At the time of writing, the following are the main players I dug up. I am sure there will be a few others, so don’t be afraid to leave a comment if you know of one I have missed. Lets take a look at the options!
BOINX TV – MAC ONLY
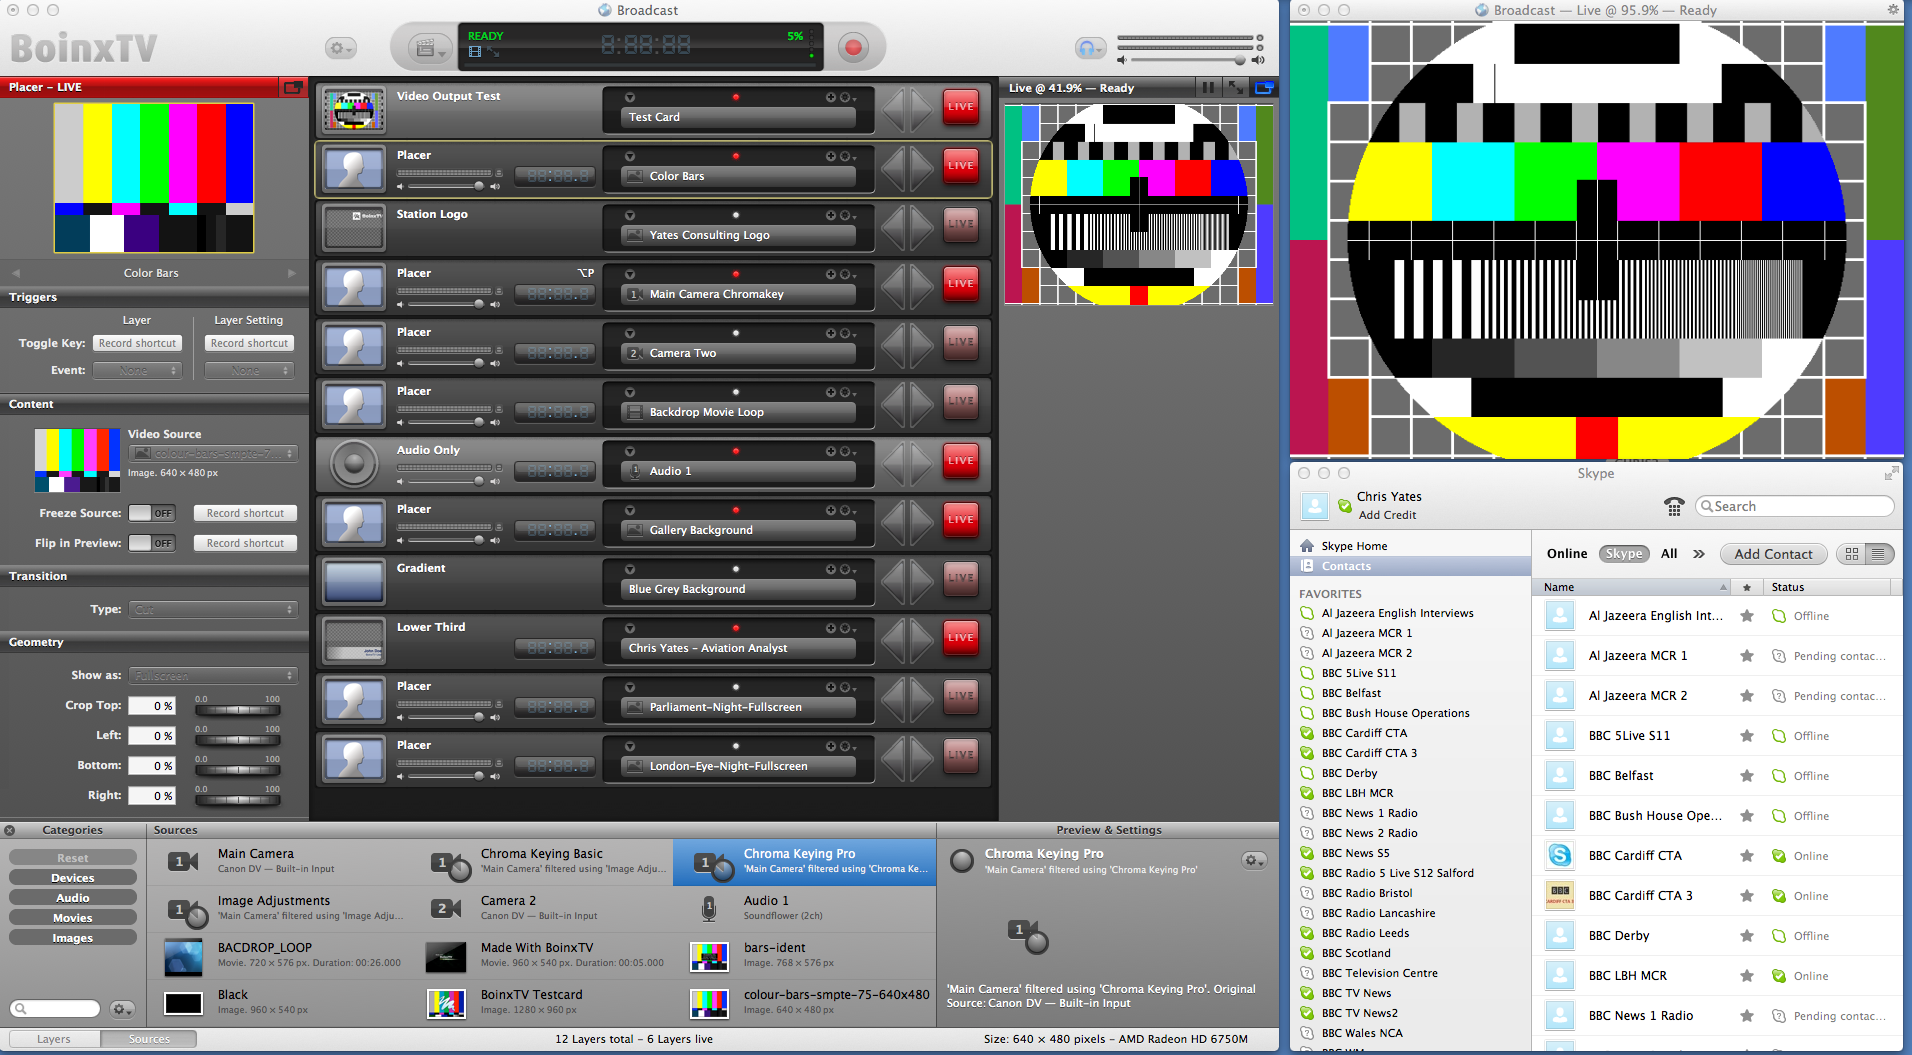 Boinx TV from Boinx Software is a really stable application. As it is a MAC only program it makes use of QuickTime for capture and record, which works really well. Boinx TV seems to be based around layering the content from the bottom up. For example, at the very bottom would be your Web Cam video feed which remains constant, and your is your default view, then any thing you want to play over the top like a subtitle or a graphic goes on a higher level. If you want to run a video clip for example, you put it above your Web-Cam feed which is always on, and when you start the clip it fades in OVER your Web-Cam and plays, then fades out revealing your Web-Cam when it is done.
Boinx TV has some really nice features, as well as some nice built in themes you can use to give your show a flavor and feel, like a newsroom theme with newsy animations and subtitles,
 and a cool Sports Show theme as well.

As cool as Boinx TV is to play with, It can be a little frustrating too. There’s a bit of a learning curve, and it is not really intuitive (Instantly Useable). If you have planned your show/broadcast in its entirety, and have everything set to go, it is great, but if you fly by the seat of your pants, and want to make it up as you go along (Which most of us do), it is very hard to “produce” your show while you are appearing on camera, managing titles, and queuing up clips. Very difficult to use “On The Fly”. And for $499, Boinx TV does not get my thumbs up. However, if your using a Mac, give it a go! You’ve got nothing to loose, and it might just suit you! Download the trial version HERE.
WIRECAST – MAC & WIN
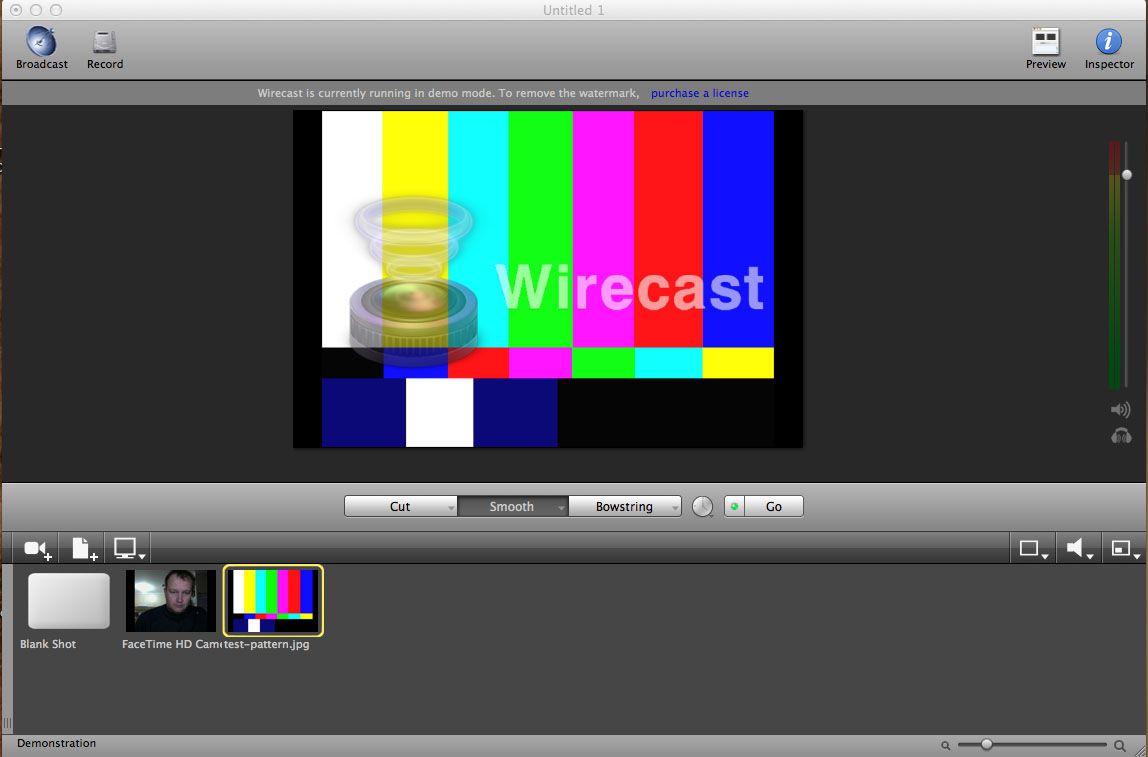 Wirecast from Telestream is probably the most popular video production program out there. It is available for both Mac and Windows. This one (Much like Boinx TV) needs you to jump through a series of hoops in order to make things happen. Ive tried several times to “Give Wirecast A Go” because it seems like it should be awesome, but for me, it just isn’t. Like Boinx TV, Wirecast is not intuitive, and has quiet a learning curve to it. Pictures, Videos, and even Music files are called “Shots”. You have to “Set up a Shot”, and after you have painstakingly set up all of your “Shots” for your episode, you then have to go through the whole layers thing again………..I just don’t get it…..
However, The features I really do like in Wirecast is firstly, the Desktop Presenter. This is AWESOME! The biggest problem I have found in putting Web Shows together is that it is often too much for one computer to handle, but the Desktop Presenter takes care of this by giving you a way to integrate other computers into your show. You download the Desktop Presenter software and install it on other computers in your network (lets say you have a second machine that will be solely for connecting with your guests through Skype) and it sends your screen from the second computer back to the first, so you can incorporate its video feed in your production/show. Another feature I like is the presets for broadcasting/sending your video stream to streaming services like UStream and Justin.tv.
Like Boinx TV, I am unable to give Wirecast the thumbs up. It’s $495 for the basic package, and if you want stuff like themes or a scoreboard (useful if you are streaming a sport or game) you have to pay $995 for the pro version. I find it confusing and impossible to use efficiently on the fly, but feel free to give the trial a go, because it might just work for you! You need to create an account to download the trial, and you can get that done and Download it HERE. The trial has the most annoying watermarks through your feed though (see above screen capture), and plays an equally annoying “Wirecast” audio message every 30 seconds or so. I am sure there are people out there who love this program, but respectfully, it is at the bottom of the heap in my opinion.
VIDBLASTER – WIN ONLY (Works great in Virtual Machines and Bootcamp on MAC)
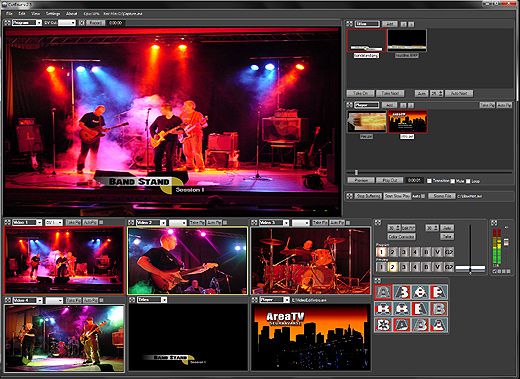
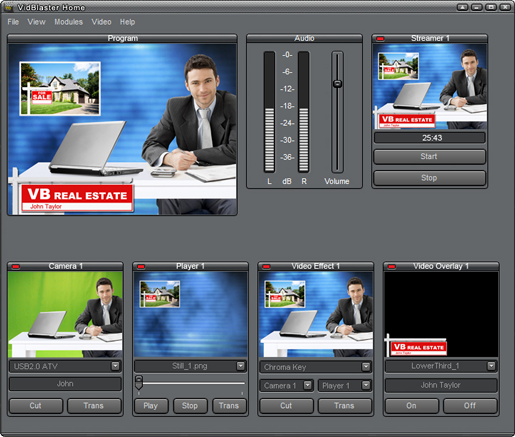 Vidblaster in my opinion is the best, by far! In less than a minute of running it for the first time, within the first few mouse clicks, you will see things happen that make sense, and start to get a feel for how it works. It is effortless to switch between cameras and media on the fly, and feels focused solely on freeing up your mind of all things techy so you can go star in your show. It works on modules. Each camera, title, video clip or webpage etc you wish to use in your show is assigned to its own module, and when it comes time to run that particular piece of media, you just click its preview window to launch it. If you only have a limited number of modules, it is very easy to add new media to an existing module on the fly.
This program is one of the best pieces of software I have seen….ever!
It is a Windows only program, but in my experience it works flawlessly in Windows on a Mac, in either virtualization (like in VMWare Fusion) or in a dedicated Windows partition via Bootcamp.
There are 4 different levels of Vidblaster, Home, Pro, Studio and Broadcast. The Home edition allows you to run up to 7 Modules, but I expect that once you get a taste for the power of Vidblaster, 7 wont be enough. The Pro version lets you run 15 modules. This is probably the version most of you will want. The Studio version gives you 25 modules, and if you are going to get really serious about your show and are happy to make an investment, you will get all you need here. The Broadcast version is way more than most of us will ever need. It’s aimed at those who are running a full on studio with an audience environment, who wish to broadcast HD video to several different services. It has up to 50 modules, and supports streams up to 30Mbps. Most of us will use either the Pro or Studio versions.
What is REALLY cool about Vidblaster is the free trial. It is a fully functional unrestricted studio version (25 Modules) of the program, that never times out! You can use it free for as long as you want. The only thing is that there is a “Vidblaster” logo that runs over your production in the top right corner. Buying a license removes it. It is a much more sensible and generous way to trial a program than Wirecast.
There is a very rich forum with lots of help, but to avoid humiliation I would strongly suggest that if you need help, thoroughly search the forums before posting to it, or sending a email.
Download the latest version in the Vidblaster Forum HERE.
**NOTE** – As Vidblaster’s free trial is fully functional, generous in features, the easiest to use and generally awesome, the rest of the tutorials in this series will be based on it.

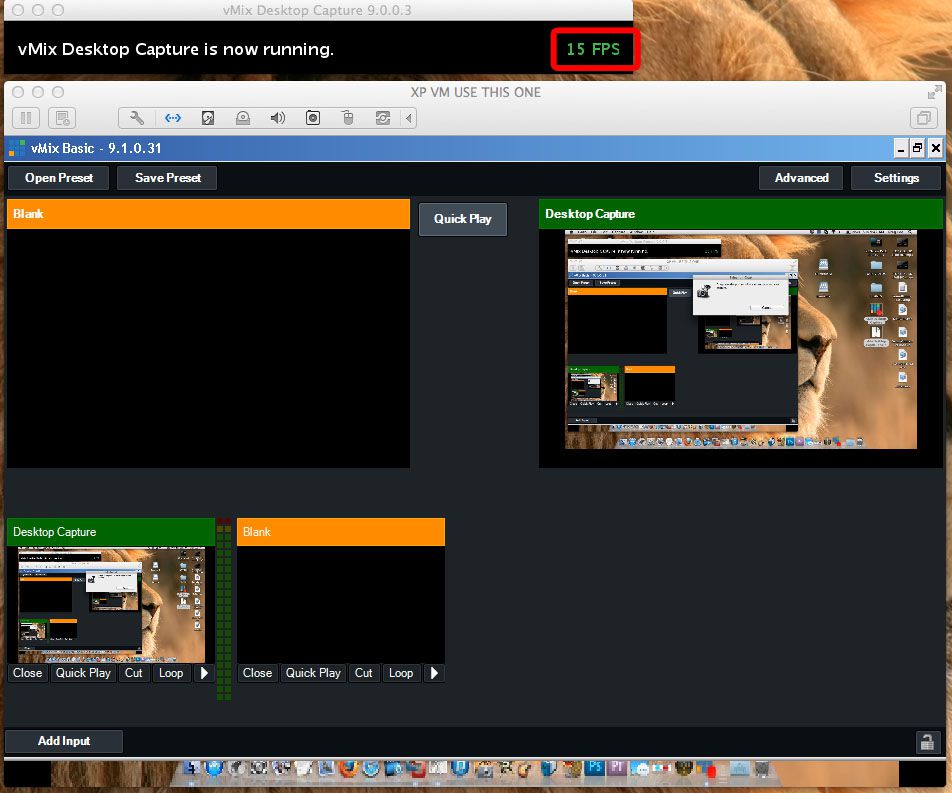
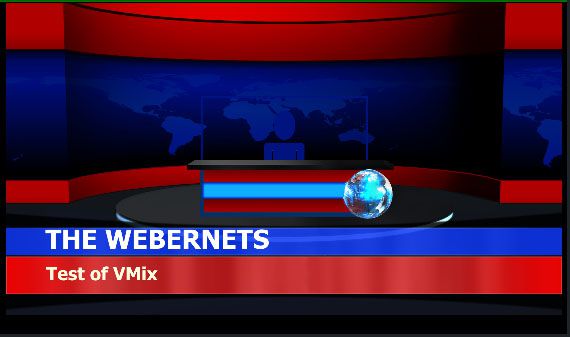
VMIX – WIN ONLY – FREE VERSION AVAILABLE (Works in Virtual Machines and Bootcamp, but not all hardware is supported).
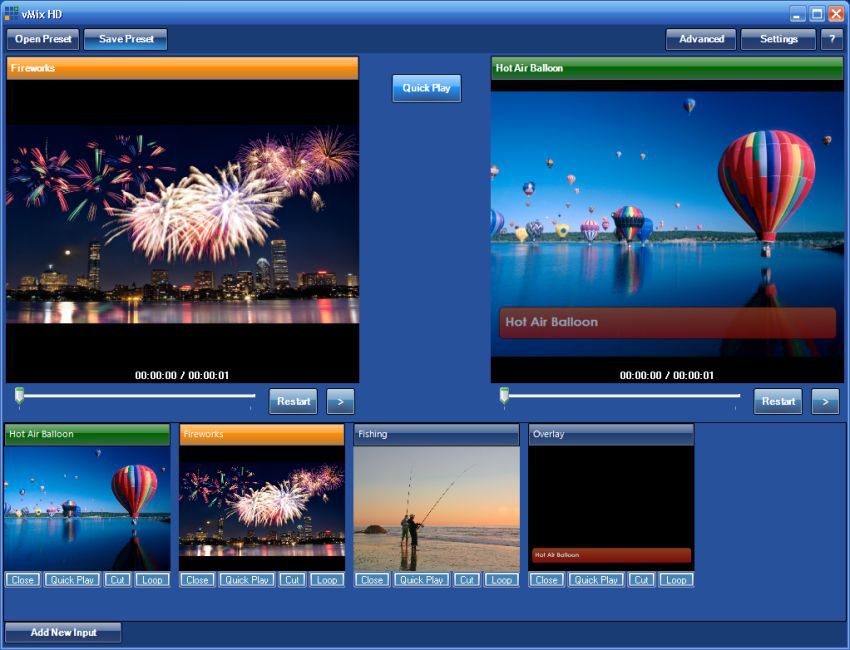
VMix has only come to my attention recently whilst researching this article. My first impression was not good. It didn’t support my computers built in web-cam, and wouldn’t play the mp4 videos I tried to test. It seemed everything I tried to do resulted in a error box. But I did persevere with it, and I have to say that the little I could do with it really impressed me.
It is much more sensibly priced than the above mentioned programs, and there is a free version which is somewhat restricted, but still very useable for the task at hand.
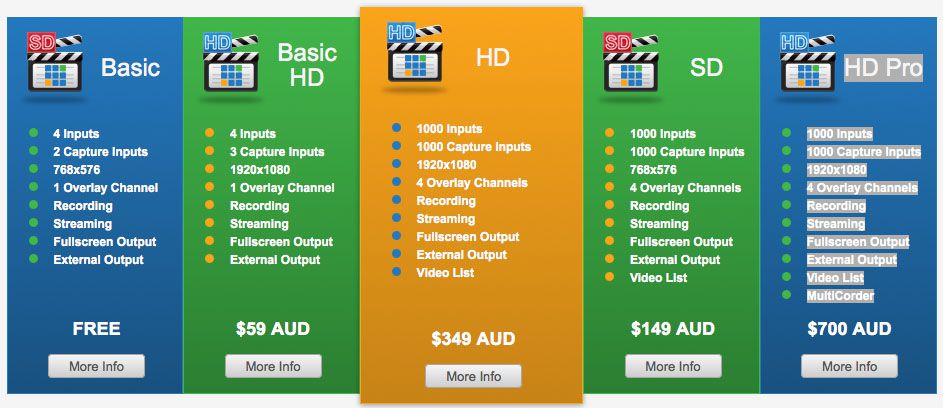
Like Wirecast, there is a desktop capture program you can run on a second computer, so you can import it’s screen on the first, to help with processing. I was REALLY impressed with how well this feature worked!
Included are some pretty nice virtual sets and lower thirds.
You can download the VMix Trial HERE.
I am looking forward to playing with VMix more, and getting a feel for it.
VIDSTUDIO – WIN ONLY – FREE (Works great in Virtual Machines and Bootcamp on MAC)
 Vidstudio is pretty similar in appearance and functionality to Vidblaster. Its obviously a much younger program that still has a lot of stuff to be added, which I am sure we will see soon in future version. In its current state, it is very useable, very good, and FAST! My guess is of all of these programs, it is the lightest on system resources. Initially, I did have some trouble getting sound to play in videos, but the author was super quick to respond to my email, and very helpful. It turns out that you have to have the “SOUND” option checked in the bottom right corner of the module/preview window BEFORE you select the file you want to play.
I REALLY like this program! It’s free (For the moment, I expect once it is more polished the author will want to get paid), and very quick and easy to get up and running.
The are very limited support options at the moment. There is no forum and a very basic FAQ. But the price is right! Download your FREE copy HERE.
CUTFOUR – WIN ONLY (can work in Bootcamp, probably not suitable for a Virtual Machine)
In the interest of fair reporting, I also tried Avtake’s Cutfour SD/HD and DV versions. I tried it on 3 different machines, and was only able to get it to run on one. I even custom built a machine for it based on Avtake’s recommended specs, and it just continuously crashed on launch. After comparing the system it worked on to the ones it didn’t using the very cool and very free Belarc Advisor, I learned that this program needs Microsoft DotNet to run. Thanks for NOT mentioning this Avtake! It’s NOT even mentioned in the “Minimum System Requirements”……
I was not able to get any of my cameras to work on it, not even my Sony HD Broadcast camera over Firewire. I don’t believe this program supports WDM Cameras (The USB webcams that the majority of us use) either. Accepting defeat in the camera department, I tried to run a few videos, and again found failure. The program seems to support only AVI video’s of a specific flavor.
The layout looks really nice, and of all of the programs I tested, this one is the closest to a real Video Tricaster. Given how specific the requirements are regarding input types, and media formats, I don’t think this program is suitable for most of us. It definitely has potential, but needs to be a bit more flexible to be of use in my set up.
Cost is $599.
You can download a free trial HERE.


