Adminimize – WordPress Super Plugin

Adminimize WordPress PluginI have written about some bad WordPress plugins, so I thought it was time I wrote about a good one, and oh boy, is this a good one. This is one of those plugins that is “Bigger than Ben Hur”. If you are building a WordPress site for someone who is a bit of a newb, or in my case an editor of a major print magazine and celebrity national television sports commentator, who has no interest in the back end, and just wants a word processor to update their site,  you NEED this plugin.

The point of Adminimize is to minimize the admin, or back end of a WordPress site. This is great for multi user sites. As an admin, you can decide what site users get to see, and more importantly, what they don’t get to see in their dashboard. In my case, my  client comes from a purely editorial background. He wants to write his articles, and moderate his readers, and that’s it. So with Adminimize, I have been able to remove all of the other WordPress features such as the Plugins panel, Pages panel, Appearance panel, Tools, Settings, and the menu/settings entries for the twenty something other plugins I have had to install to make the site work to his requirements. He can create new posts, reply to comments, and ad links to his blogroll, because that’s all he wants to do. What I really like about this plugin, is that when you install other plugins, it knows about them upon a refresh, and you can decide how much of their admin capabilities is available to your different user levels as well.

You can remove that pesky admin bar, screen options, or admin colour schemes, and many other of WordPress’s “features” (depending on whether you love them or hate them) not only globally, but on a user level as well. So you can have the admin bar for yourself as an admin, remove it for your editors, and enable it for authors, if that’s what you want to do.

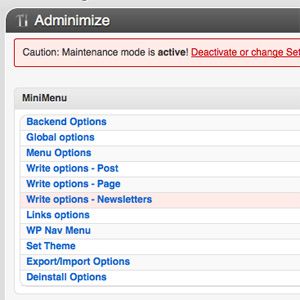
Adminimize Screen ShotThis plugin is one of those ones that I just can’t believe is free. There is a “Donate” option on the settings page, and I believe this one is well worth leaving a few bucks for the authors – It’s a killer plug in! Just one word of warning though, on installation and activation, you will be confronted with literally hundreds of check boxes. Even though it will appear overwhelming, it’s not. Keep in mind there is 5 check boxes, one for each user lever, per option. Just remember the options are down the left hand side in column one, and the rows are for user levels that you want to allow/disallow the privileged. Give it a go, and look at it one option at a time, and before long not only will you understand its simple layout (which appears complicated because there are hundreds of choices), but you will see why I hereby officially give Adminimize “5 Paws Up”!

5 Paws Up AwardAdminimize is available for download at the WordPress repository HERE.

WordPress Robots Txt

Robots TxtAll web sites need a good robots.txt in my opinion. For those reading (Ha….what a joke!) who don’t know what that is, a robots.txt file is simply a text file that tells search engines what they are allowed to tell the world about, and what you dont want them to promote. Now, you might be thinking “I want them to index every page on my site”, and that’s a fair call, but what they can also do, is promote the folders and files that exist behind the scenes of your site, that you would prefer to keep private for reasons such as privacy and security.

If you are new to the web/site design, and this is all news to you, and you have realised there are some folders on your server that contain files you don’t want the world to find through a search engine, you can easily generate a robots.txt file using the free robots.txt file generator at McAnerin HERE. Once you have told the generator the directories on your server you want to keep private, copy the code it generates, and then create a new text document on your computer, and paste it in. Call the file “robots.txt” (without the exclamation marks of course) and then upload it into the “public_html” folder of your website.

Now, for those of us who use WordPress, there are quiet a few directories that I think should be blocked. There are also others who have the opinion that your WordPress site ranks higher if you don’t use one. There’s still a lot of unanswered questions about the internet, and this is one of them. Until it is resolved, I personally will continue to use robots.txt.

So for now, below is my robots.txt file I use – If you think I have missed something, or if you think the whole robots.txt idea is junk, please comment! I’d love to hear your thought’s for and against.


User-agent: *
Disallow: /wp-content/
Disallow: /wp-icludes/
Disallow: /trackback/
Disallow: /wp-admin/
Disallow: /archives/
Disallow: /category/
Disallow: /tag/*
Disallow: /tag/
Disallow: /wp-*
Disallow: /login/
Disallow: /*.js$
Disallow: /*.inc$
Disallow: /*.css$
Disallow: /*.php$

User-agent: All
Allow: /

User-agent: Googlebot-Image
Disallow: /

User-agent: ia_archiver
Disallow: /

User-agent: duggmirror
Disallow: /

Chameleon CSS

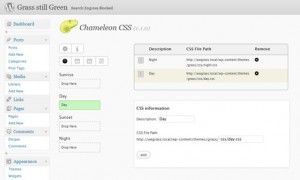
Chameleon CSS LogoUpon building a site for a client who wanted different backgrounds and headers on his site for different occasions, I came across the Chameleon CSS plugin. Put, very simply, it allows you to automatically schedule the use of different CSS Style sheets at different times (Time, Date, Day and Month). Its compatible with WP Super Cache, and is really easy to use.

Chameleon CSS Screen ShotCheck it out now in the Plugin Directory – Chameleon CSS.

WordPress Plug In SPAM alert – Post Page Associator 1.3.21

This is so disappointing. Dennis Hoppe has written a really really good plugin. Post Page Associator allows you to create a “page” in WordPress, and place content from one, or multiple categories on it, and by modifying the associated CSS file (or creating your own template) you can make it look just the way you want. It truly is a great plug in. There is a paid version, and a free version. The free version is where my issue with this plugin begins. Now, WordPress is created and made available for free, not to be sold. Even though some plugins on third party sites are commercial, plugins that appear in the Official WordPress Plugin Repository are also meant to be free. This plugin appears in the repository HERE. On the authors own site, he bills the program as free from the repository:

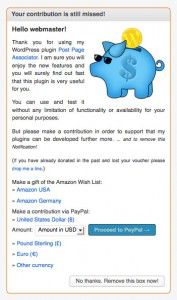
Dennis Hoppe Site GrabSo imagine my surprise when I activated the plugin and saw this in my Dashboard:

Dashboard Spam Screen Capture from WordPress DashboardNot only did it appear in the Admin dashboard, it also appeared under the “Editor” permissions group as well. Thankfully, I don’t have “subscribers” activated on this particular site, as I expect (but can not confirm) it would appear in the subscriber dashboard panel as well. If this isn’t bad enough, should you choose not to donate to the author, and click the button in the bottom right labelled “No thanks, Remove this box now!”, as expected the box goes away……..and so does the plug in!  It de-activates itself!

RANSOM and ULTIMATUM! Pay up, don’t use it, or live with a very large obtrusive and ugly nag screen in everybody’s dashboard,  that’s your choices.

I believe this is a violation of the spirit and terms of WordPress, and I call this “Dashboard SPAM”. I have no problems with plugin authors including a “Donate” button on their plugins “settings” page, or an advertisement for their plugins paid version, and its benefits over the free version, but I feel what the author has done in this case oversteps the mark. At no point during my selection and installation of this plugin was I asked to accept this term/condition.

I have just been looking to see if the author has made a note anywhere about how to remove the spam part, and I stumbled upon THIS thread. The first thing that caught my attention is that the author does indeed provide a way for you to remove the spam when asked – his answer:

How To Remove Spam GraphicAnother suggestion in the thread states that removal of the “donate.php” file is all that is required to make it go away. This may have been true of previous versions, but in the current 1.3.21 version, no such file exists. In the current version, the author has renamed this file to “contribute.php”, and now, simply deleting this file will crash your entire WordPress install. The author has written it in such a way that there is code in this file that code elsewhere in other files looks for, and if it doesn’t find it, it WordPress crashes.

Post Page Associator is not, and will not be used on this site.


Modifying WordPress’s Tag Cloud Widget

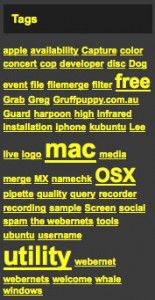
Wordpress Tag Cloud WidgetWordPress ships with a Tag Cloud widget built in. Unfortunately, this widget is not customizable from the admin panel. You need to modify one of the systems .php files.

To modify the widget, you need to get into your WordPress installs files using your favorite FTP program , and in the “wp-includes” folder you will see a file called “category-template.php”. This is the file we will be working on, so please make a backup copy of it and store it in a safe place before you start. That way if something goes wrong you can recover quickly and easily by re-uploading the known good file. Once you have a backup tucked away, open up the file in your preferred editor ( I usually just use the Text Editor on Mac, or Notepad on Windows) and look for (or search for) “Display tag cloud”. This is the beginning of the part of the file we need to edit, and you will see by reading the commented out text, that there are a few parameters you can adjust. For this article we will look at the font sizes, and the number of tags that  appear in the cloud.

The default settings are:

'smallest' => 8, 'largest' => 22, 'unit' => 'pt', 'number' => 45,

As you can see, the smallest tag size is set to 8 points, the largest is 22 points, and the number of tags in the cloud are the top 45. Feel free to enlarge or shrink your font sizes, and ad or subtract the total number of tags displayed. The font sizes are ok for me, but I did increase the number of tags displayed to 150 for this web site.

Once you have made your changes, replace the category-template.php file on your server with the file you just modified, and when you refresh your browser you will see your changes in place.