ProMovie is a fantastic app for your iPhone that takes recording video to a new level. It has a host of professional features that allow you to fine tune many aspects of video recording, and goes way beyond the capabilities go the built in Camera App. You can check it out on the ProMovie Recorder web site. Note, this is not a free app, but it is worth every penny!
After not using it for a short while, I went in today only to discover that I no longer had the ability to zoom or movie between the wide angle, telephoto and normal lenses on my iPhone 13 Pro. I guess some things may have changed in a recent update. I found this quite frustrating. I was not able to find the answer online either. But after a great deal of messing around I figured it out.
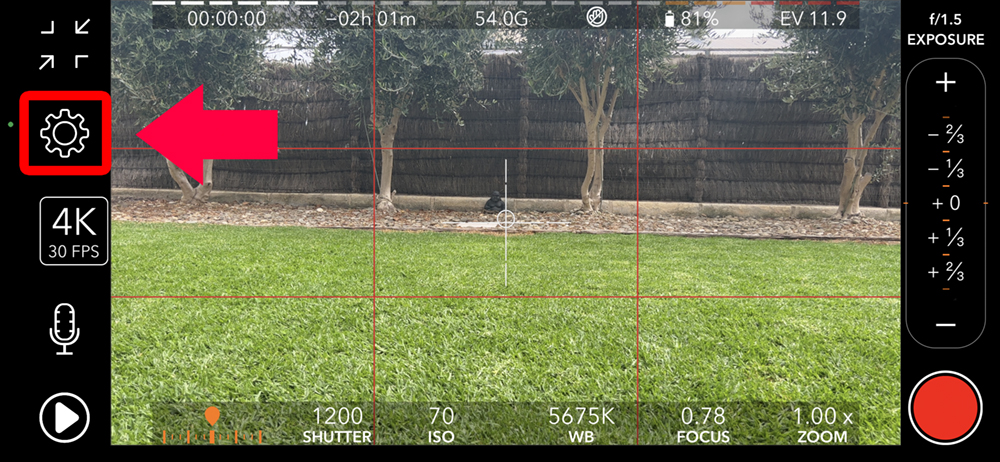
To get the zoom and wide angle working again, click the settings icon, it looks like a little gear.
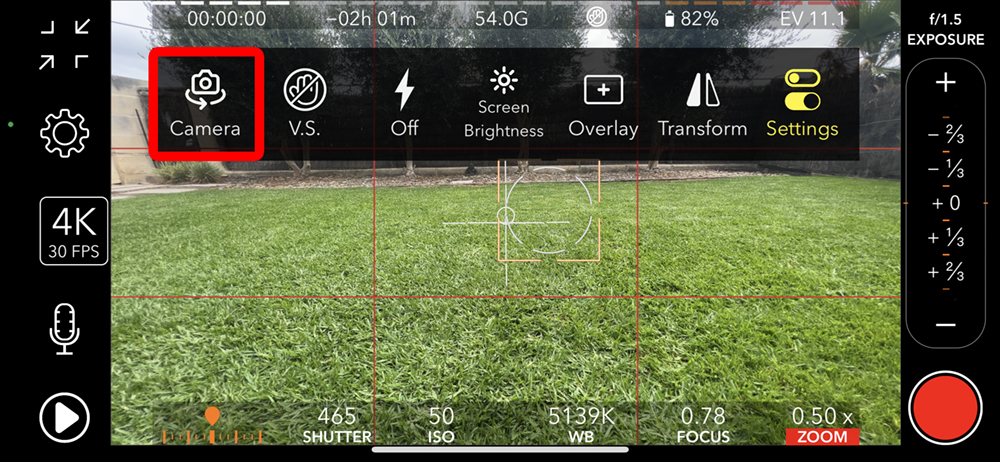
This will open a menu on the screen – select “Camera”
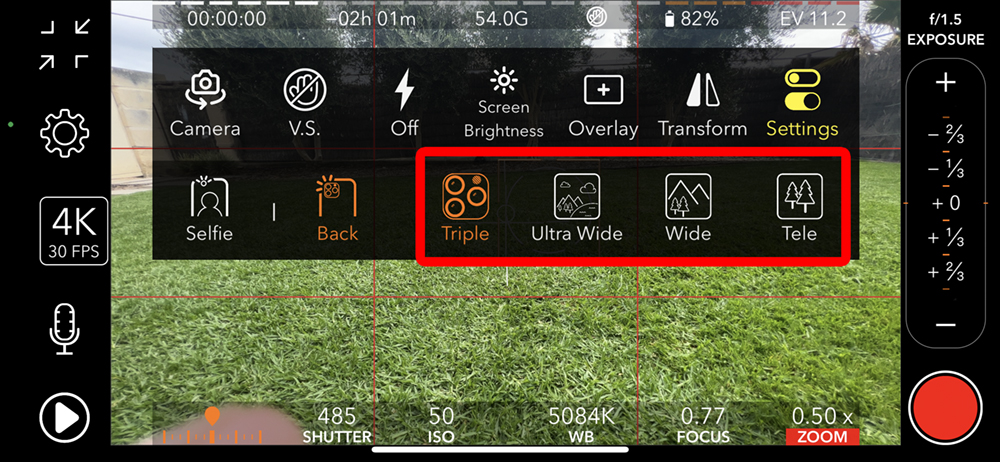
Another menu will appear, and it is in here that you can select which lens to use.
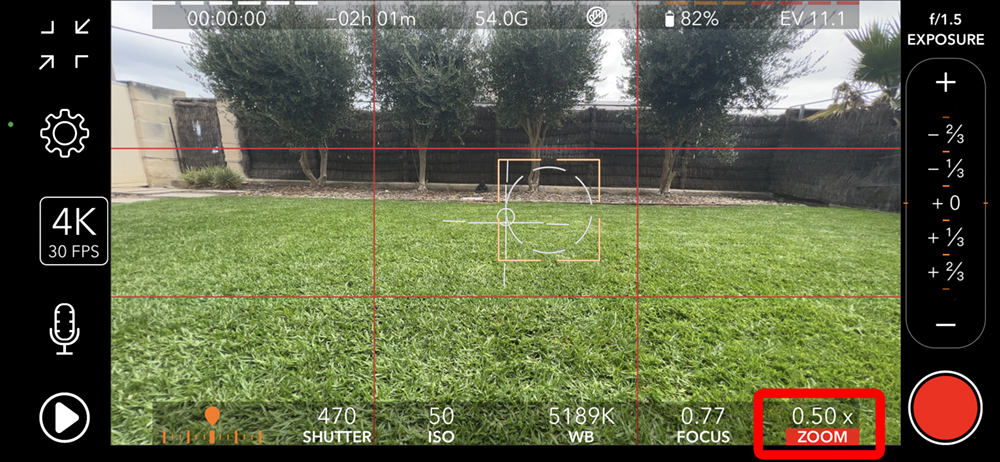
I selected “Triple”, which gave me back the ability to use all three lenses again, and choose from ultra wide angle and zoom al the way through telephoto. You can also lock in on a specific lens if you choose.
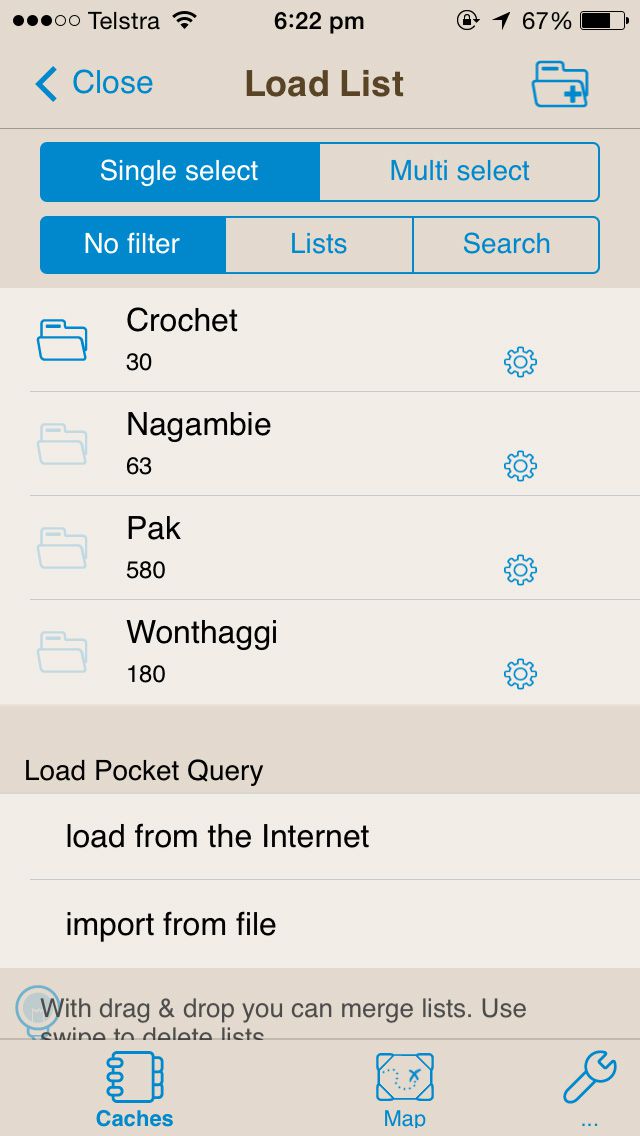
Recently I was made aware of a great Geocaching App for iPhone called Looking 4 Cache. It has quickly become my favorite Geocaching App, and not by a little. I think it is easily the “Ultimate” application for Geocaching on the iPhone at the moment! There is one thing this App can do, that the others can’t, that places it head and shoulders above the rest – 100 Percent Complete Total OFFLINE Geocaching!
Now that I have satisfied the “SEO Gods” with my first paragraph, let’s get down to business. To begin with, I downloaded the free version, Looking 4 Cache lite. My first impression of Looking 4 Cache Lite was not good. I didn’t find it intuitive. As I had previously been using iGeoknife, I thought Looking 4 Cache’s interface was ugly by comparison, and I actually deleted it from my phone. It was only after discussing offline caching on a Facebook group that I learned the Full version/Pro version offered offline maps. I then paid my $10, bought the Pro version, and gave it another go. This was a big enough feature to force me to revisit and re-assess my opinions on this application.
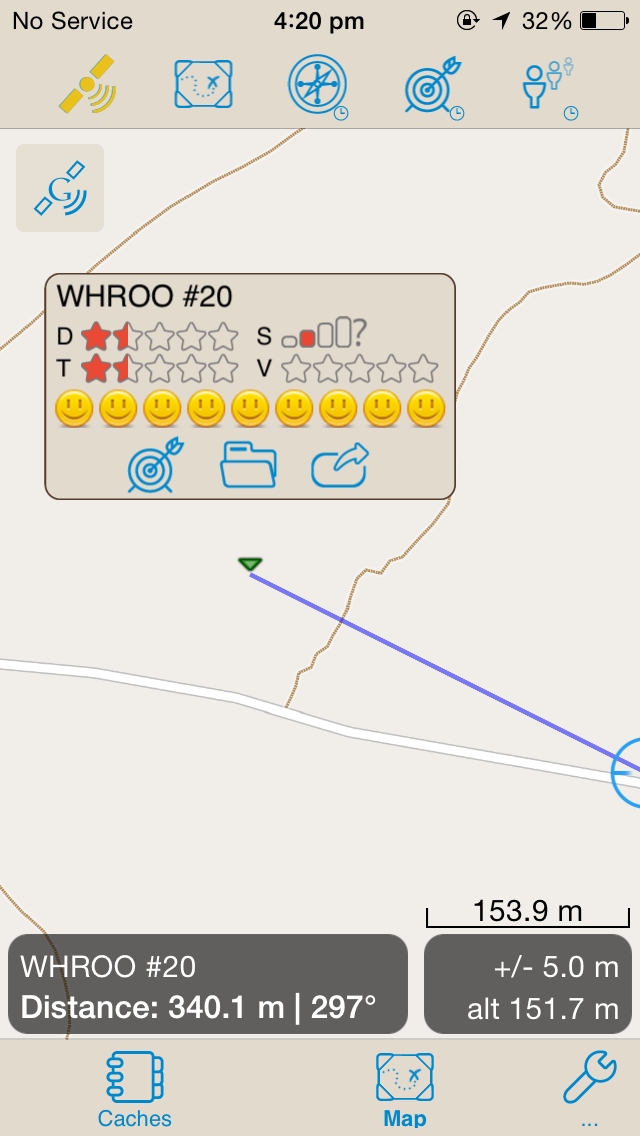
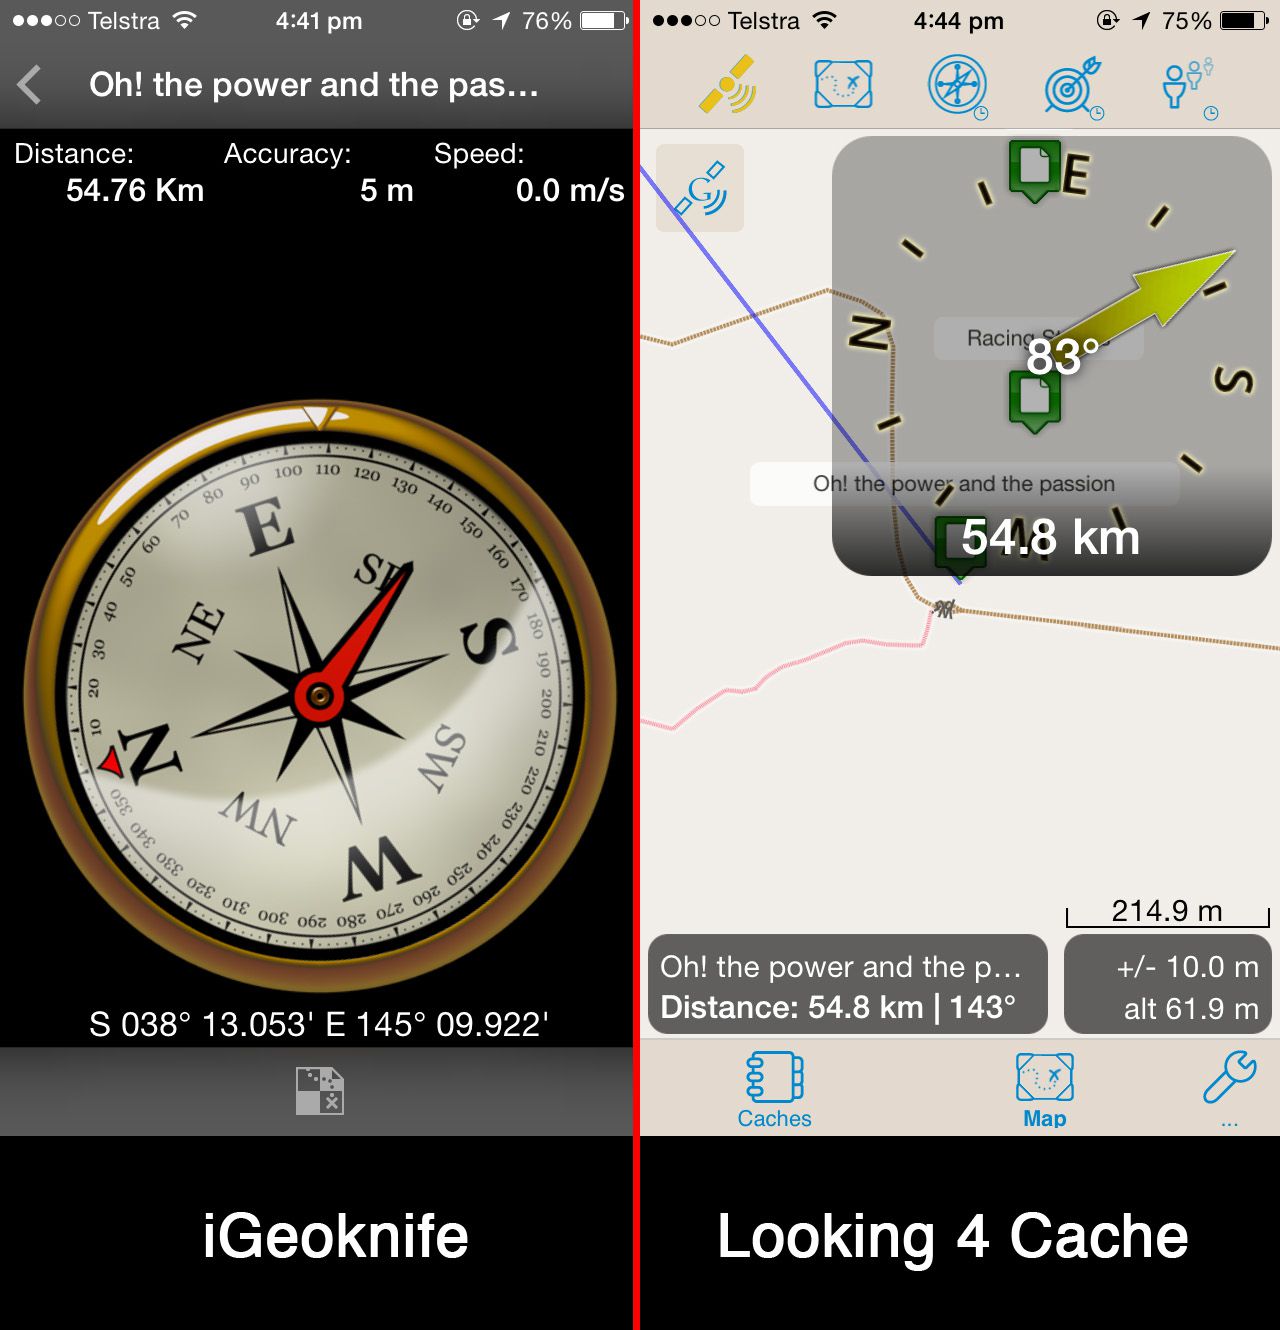
Not only do I find the App’s Icon to be somewhat disturbing, Initially, and still today, the interface looks somewhat like a “Pirate Map” to me… Perhaps that is what the developer was going for, and I can see why – Geocaching is somewhat of a “Treasure Hunt”. Having just played with iGeoknife (A far more polished, but considerably less capable app) prior to Looking 4 Cache (from hereon referred to as L4C), it’s cleaner and sharper (especially on iPad) appearance was still at the forefront of my mind. The first thing I did with each App, was to go and look for a cache. I am sure you will agree, the appearance of the compass in iGeoknife slaughters L4C’s offering.
In my opinion, opening L4C for the first time is confusing, un-intuitive, and messy.
BUT……………….
If you can get past that, and give it a few minutes, and try and dig down into it, once the penny drops and you get the gist of how it is laid out, you will quickly forget the initial awkwardness forever, and like me, will also forget every other Geocaching App (Including the Official Geocaching App) you have ever tried.
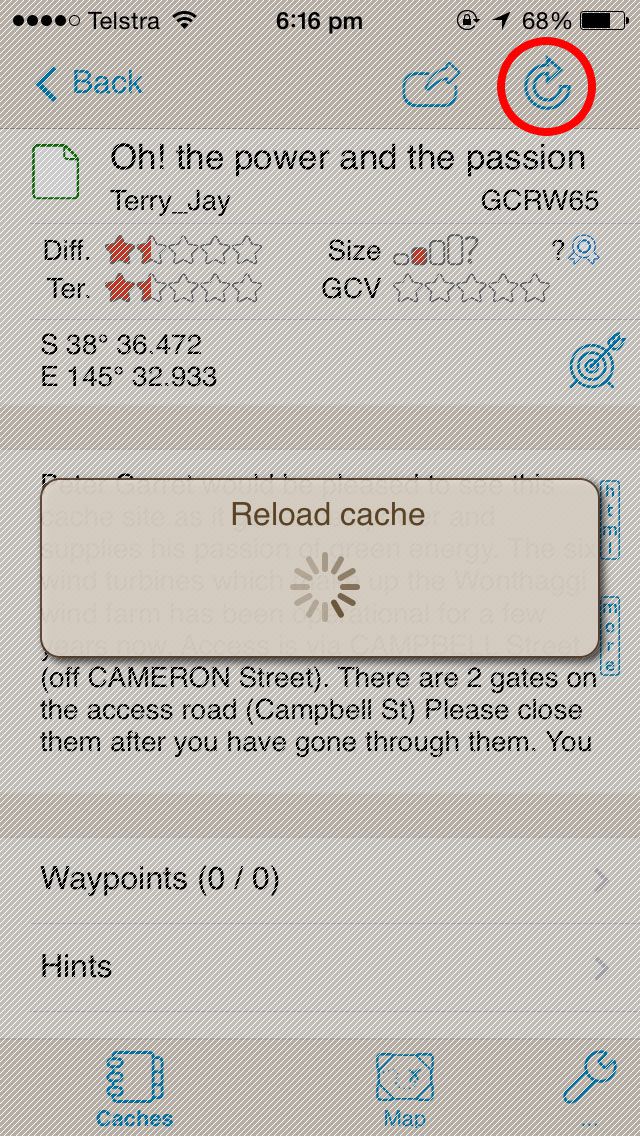
Unlike the Official Geocaching App (Which is the biggest data allowance gulping app on my iPhone), L4C seems to be built on the concept of low/no data usage. If you are caching online, it saves your “Live” searches, so if you leave your current location, and come back another day, those results are still available to you (assuming you haven’t cleared them). You might be thinking “but I wont be seeing the latest logs”. L4C gives you the option to update or reload the cache you are chasing, to get the latest information (obviously you need connectivity for this). Just hit the “Reload” icon in the top right corner.
If you are using “Live” maps, it also seems to “Cache”…(pardon the pun) the map tiles as well, so once they are downloaded, it doesn’t appear to have to re-download them again whilst you are still active in that area.
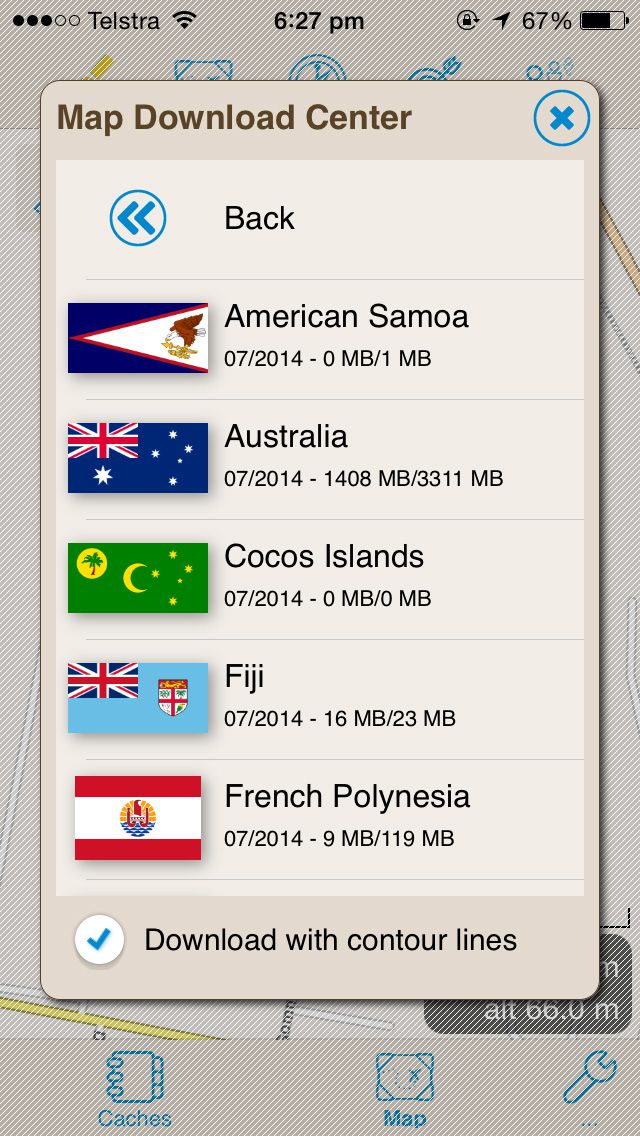
Where L4C cements itself as the number one Geocaching App, is it’s ability to download very detailed maps, and save them for offline use. The Map Download Centre gives you the ability to download detailed offline maps from pretty much everywhere in the world. But, be warned, as you would expect, detailed maps equals big impact on free space! If you want to cache offline, it is going to take up some room to do so! The offline Australia map is 3.3Gb! You cant have one without the other!
Combine this with its ability to digest/ingest pocket queries from the Geocaching web site, as well as GPX files and databases that you might create using GSAK (Geocaching Swiss Army Knife), and you have got a 100 Percent Totally Offline solution.
You can now go Geocaching literally in the middle of nowhere, completely cut off from the internet, provided you have your maps and pocket queries in order before you leave. Once you have found your caches you can create “Found It” logs as you go, and once you have data coverage again L4C will send them off to geocaching.com automatically. Cool Huh!
I really love the “Cheezburger” app on my iPhone. The photo streams of “I Has A Hotdog” and “Failblog” really help to get me through the day. But lately, for no reason, the app goes away, and the app store opens up to games like Candy Crush, Clash of Clans, Game of War and Zelda Dungeon. It is SOOOO frustrating!
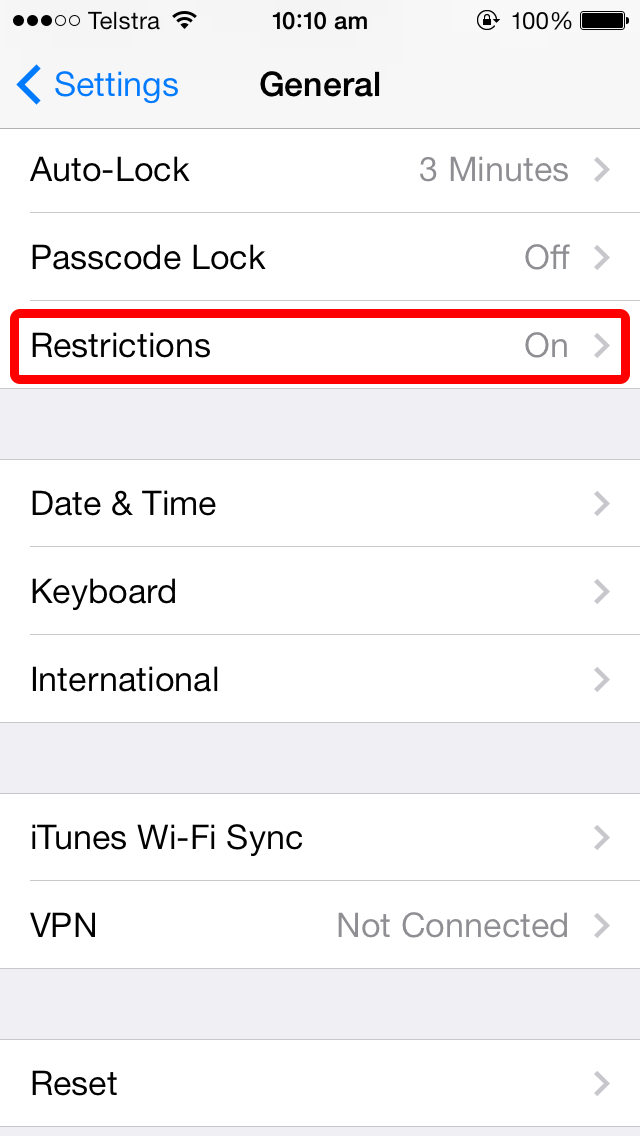
I have found a “Work Around” for this problem, and it’s pretty simple. To stop this from happening, open up “Settings”, and then select “General”, and there is an entry in there called “Restrictions”.
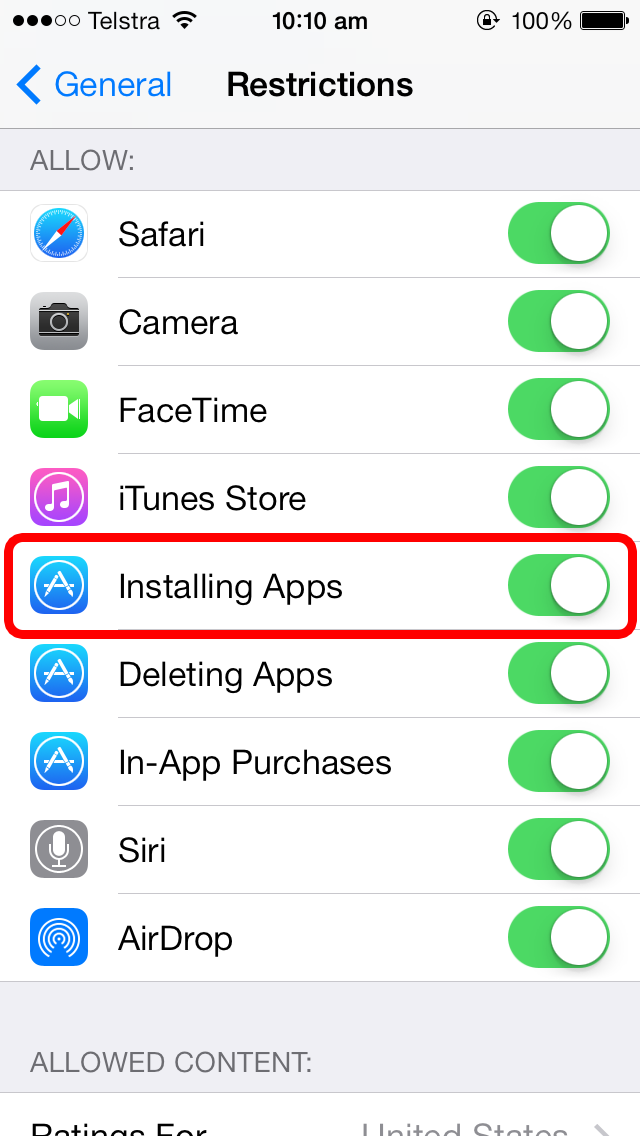
If you are using “Screen Lock” you will have to enter your password to open this section. Once you are in, simply turn “Installing Apps” off.
Once you have done that, you can close out of settings, and go back to browsing Uninterrupted. The only down side is that if you want to download a new app, you will have to go back in and turn “Installing Apps” back on.
In my opinion, the best first step to speeding up your Mac is to repair your permissions and run disk repair as outlined in my article Speed Up Your Mac Article HERE.
The next step is to clean your caches, rebuild your indexes, and run your macs daily, weekly and monthly maintenance scripts. This can all be done easily with the FREE and very powerful ONYX.
Once you have ONYX downloaded and installed, its a good idea to make sure that you have backed up ALL of your stuff. Like using any cleaning program, things can get moved or lost, so make sure you don’t get caught!
When you are satisfied your files are safe, go ahead and open ONYX. The first thing you will see is a alert box that asks if you want ONYX to check the S.M.A.R.T status of your hard drive. S.M.A.R.T stands for Self-Monitoring, Analysis and Reporting Technology. Most hard drives these days monitor their own performance and try to anticipate if a failure is imminent, and if their is something wrong with your drive, you will be notified after this test. It is well worth doing.
Once this has completed, the next alert will ask if you want to verify your drive. If you have already performed this task because you are following on from my first “Speed Up Your Mac” article this is not necessary. If you haven’t already done this, it is well worth doing as it will find any drive errors. This process can take some time, and it will require all other programs to be closed, so if you decide to run it, go get yourself a coffee and some fresh air after you begin.
When Verification has finished, ONYX will ask you to type in your password to give it permission to make changes and clean thing up.
You will now see the main menu bar for ONYX.
As you can see, this program has a lot of in depth features and can do a lot of different things, but for this tutorial, we will focus on cleaning up quickly and easily. To start cleaning, press the “Automation” button. You will now see the Automation screen.
The safest way to proceed is to accept the defaults and press “Execute”. If you are following on from my first “Speed Up Your Mac” article you might want to un-check “Repair Permissions” as you will have already done this. Other wise, leave it checked. If you are like me and like living on the edge, you can go ahead and check/un-check the items you feel necessary.
*BE WARNED* – As with every clean up program, there can be unwanted side effects, so proceed with caution!
For me personally, I do change it up as I like to clean my system deeply, and I am happy to put things back how I like them after the cleaning (such as re-arranging my icons how I like them on my desk top again). I also like to execute my Macs built in daily, weekly, and monthly maintenance scripts. Below is how I use ONYX.
*NOTE* – I take no responsibility if you copy my settings and loose something.
When you are happy with your cleaning options, its time to press execute.
ONYX will tell you it is going to close any other programs that are open, so again, make sure you have saved your work.
ONYX will now start performing maintenance. In most cases this will take some time, so if you didn’t stretch your legs, get a coffee and some fresh air before, now is the time. When ONYX has finished, a dialogue box will appear. Click OK.
If you have a camera capable of taking 3D photographs, and a Apple Computer, I have just found the simplest, quickest, easiest way to view your photos, It’s called ShowMe3D. Ever since I got my 3D camera I have been longing for a way to just unload my pics, and view them in 3D straight away, without having to jump through a million hoops, and this is it!
Open up App Store on your Mac and search for ShowMe3D, or click this link to Download ShowMe3D from the Mac App Store. It’s not free, but at just $4.99, it really is a bargain.
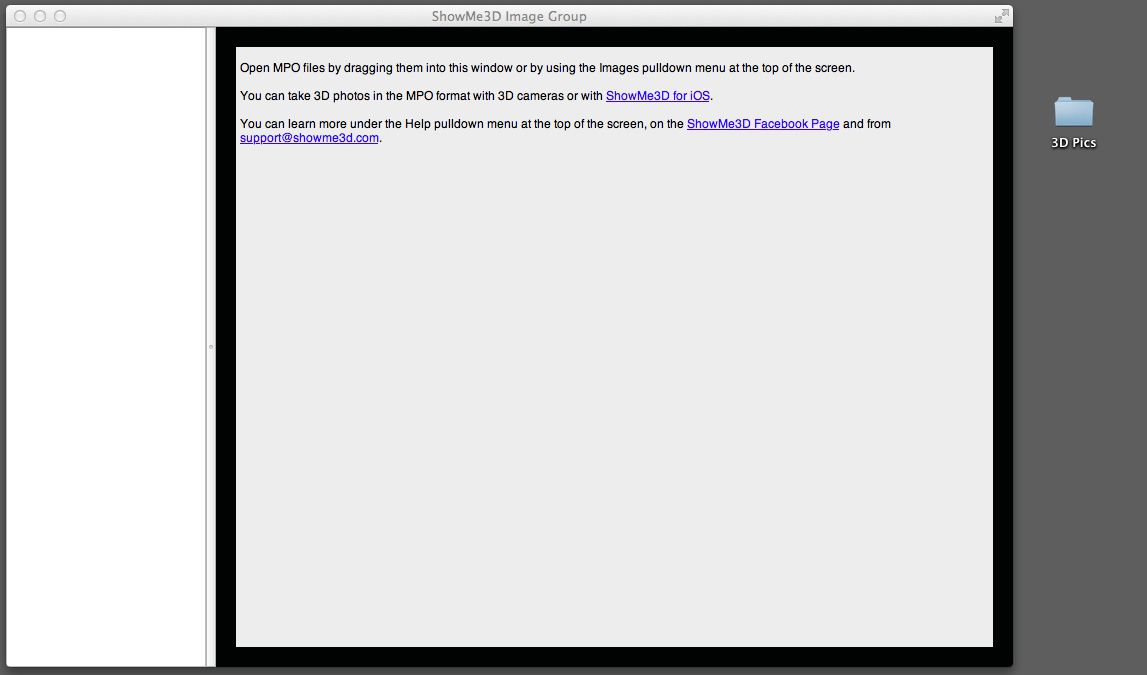
Once you have downloaded and installed ShowMe3D, open it up and you will see the main screen.
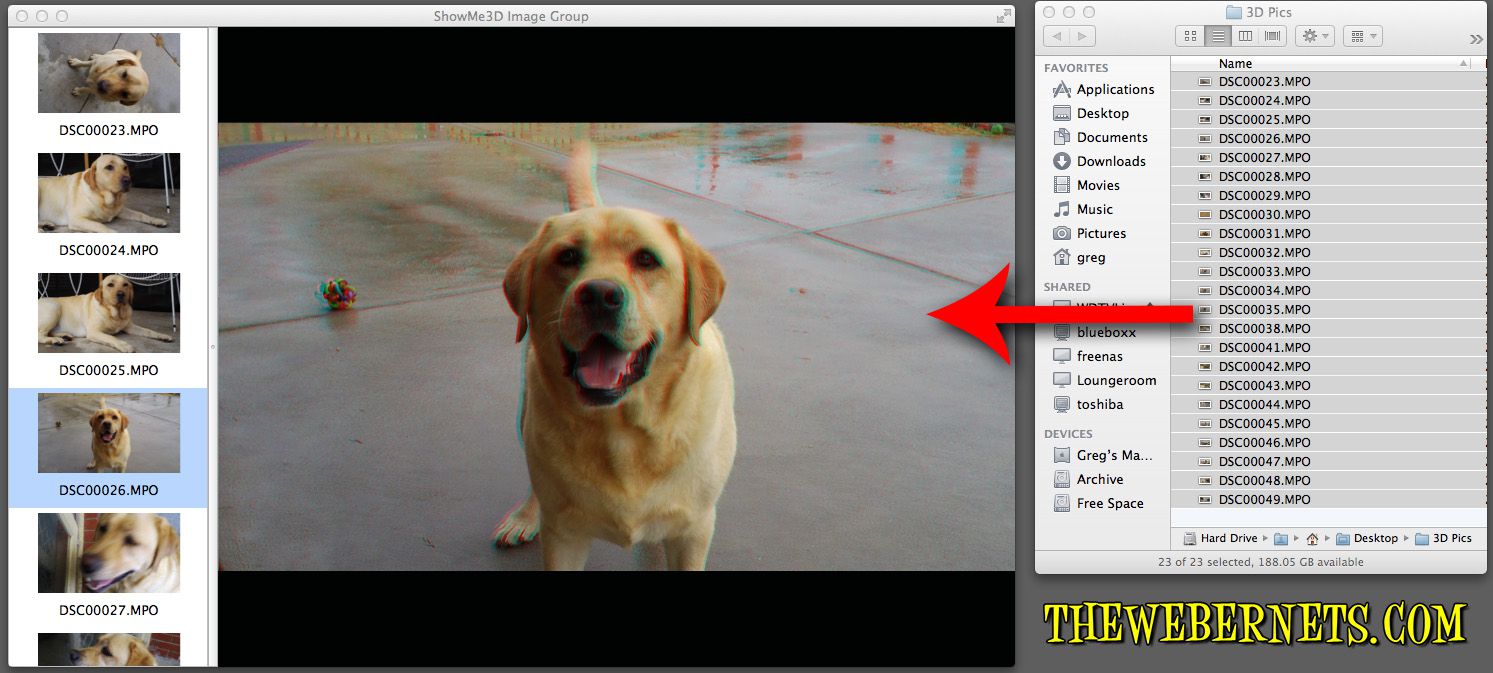
Now, open the folder that contains the .mpo files (Multiple Picture Object) from your camera, and drag the pics you want to view onto the open window and put on your 3D glasses.
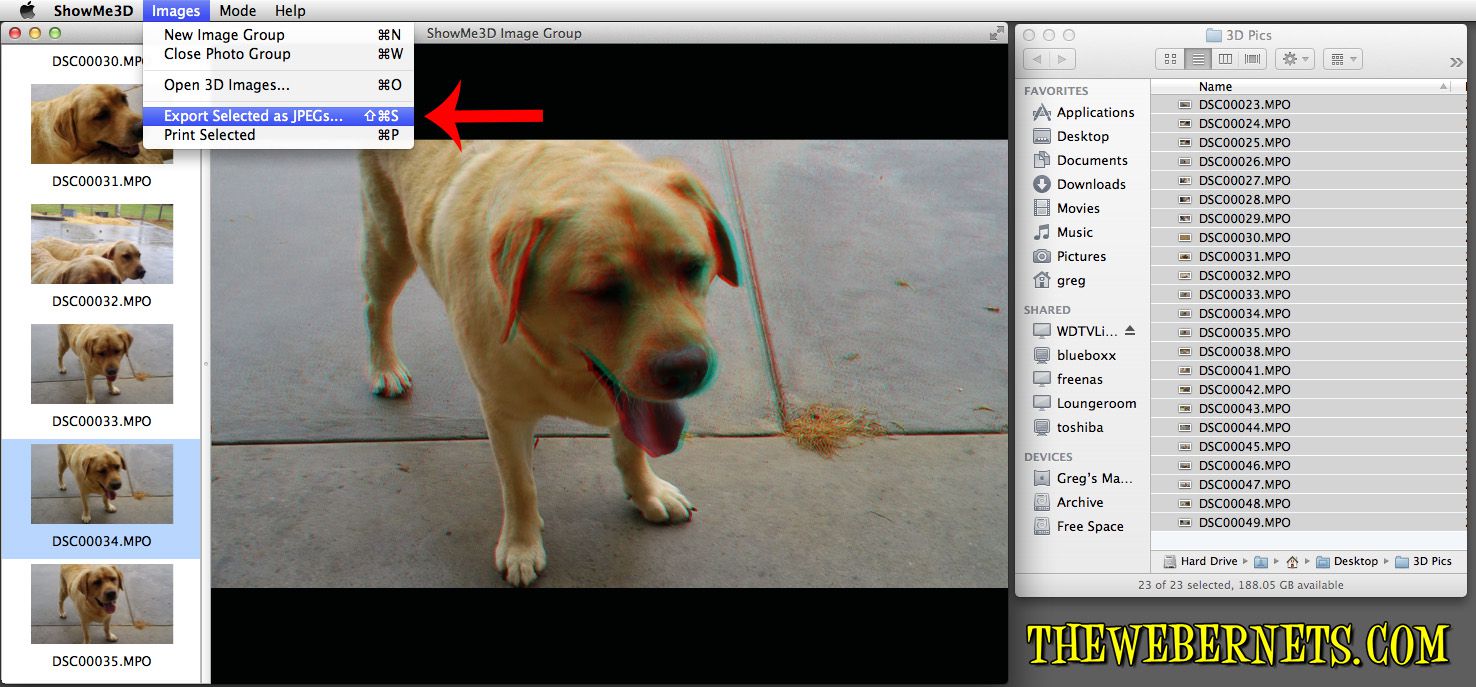
Instantly, you can view your 3D photos in 3D, and scroll through them in the same way you would using the “Preview” app. A feature of this program that I really like, is it also allows you to Export your .mpo files as Anaglyph Jpegs, so you can quickly and easily convert your .mpo’s to regular jpegs – cool huh!
Here’s a Anaglyph 3D Jpeg I converted from an .mpo file using ShowMe3D – It’s my dog Benson.
From time to time an app on your IOS device may crash and become un-responsive. Just like on your computer, sometimes apps need to be closed and shut down, then completely restarted to become active again.
To do this on your iPhone, iPod Touch or iPad, quickly double click the home button.
This will push whatever you are looking at on your device upwards, and the multi tasking menu will appear. This is also how you can open another app and use it without closing the one you already have open. The ones you have used most recently will be in the first group of four icons that appear, and you can scroll/drag left and right through them to find the one you want to close if it isn’t on the first screen. Once you have found the icon for the app you want to close, put your finger on it, and leave your finger on it, and all of the apps will start wiggling and dancing (Like they do when you want to re-arrange them. The difference here is that they will now have a red circle with a white minus sign, as opposed to the black circle with the “X”. The red minus means close, the black X means delete).
Now all you have to do is press the red circle with the minus sign in it to close the app completely. Once it is closed, press the home button once to stop the apps dancing, and you can now restart the app by opening it like you normally would.
Closing out of apps completely that you are not using can also aid in preserving battery life, and help speed things as well, as apps are no longer in an open state using up resources while they lay in waiting!
We use cookies on our website to give you the most relevant experience by remembering your preferences and repeat visits. By clicking “Accept”, you consent to the use of ALL the cookies.
This website uses cookies to improve your experience while you navigate through the website. Out of these, the cookies that are categorized as necessary are stored on your browser as they are essential for the working of basic functionalities of the website. We also use third-party cookies that help us analyze and understand how you use this website. These cookies will be stored in your browser only with your consent. You also have the option to opt-out of these cookies. But opting out of some of these cookies may affect your browsing experience.
Necessary cookies are absolutely essential for the website to function properly. This category only includes cookies that ensures basic functionalities and security features of the website. These cookies do not store any personal information.
Any cookies that may not be particularly necessary for the website to function and is used specifically to collect user personal data via analytics, ads, other embedded contents are termed as non-necessary cookies. It is mandatory to procure user consent prior to running these cookies on your website.