Want to Move Search Bar Back To The Top In Safari On iPhone?
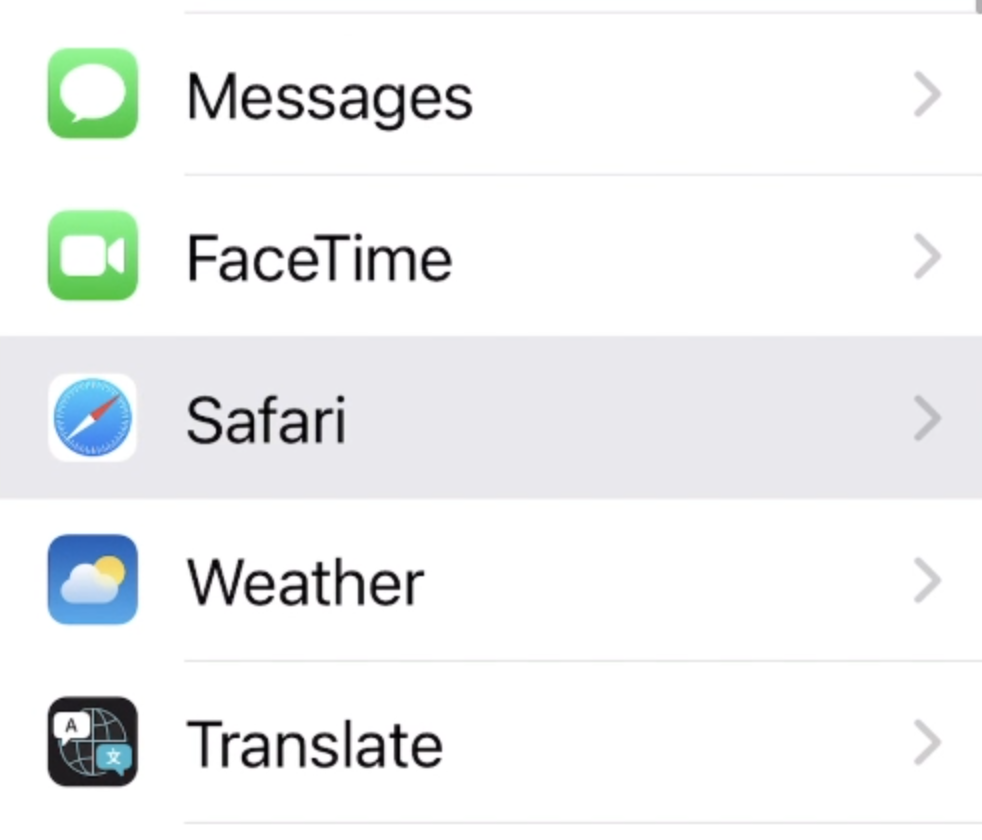
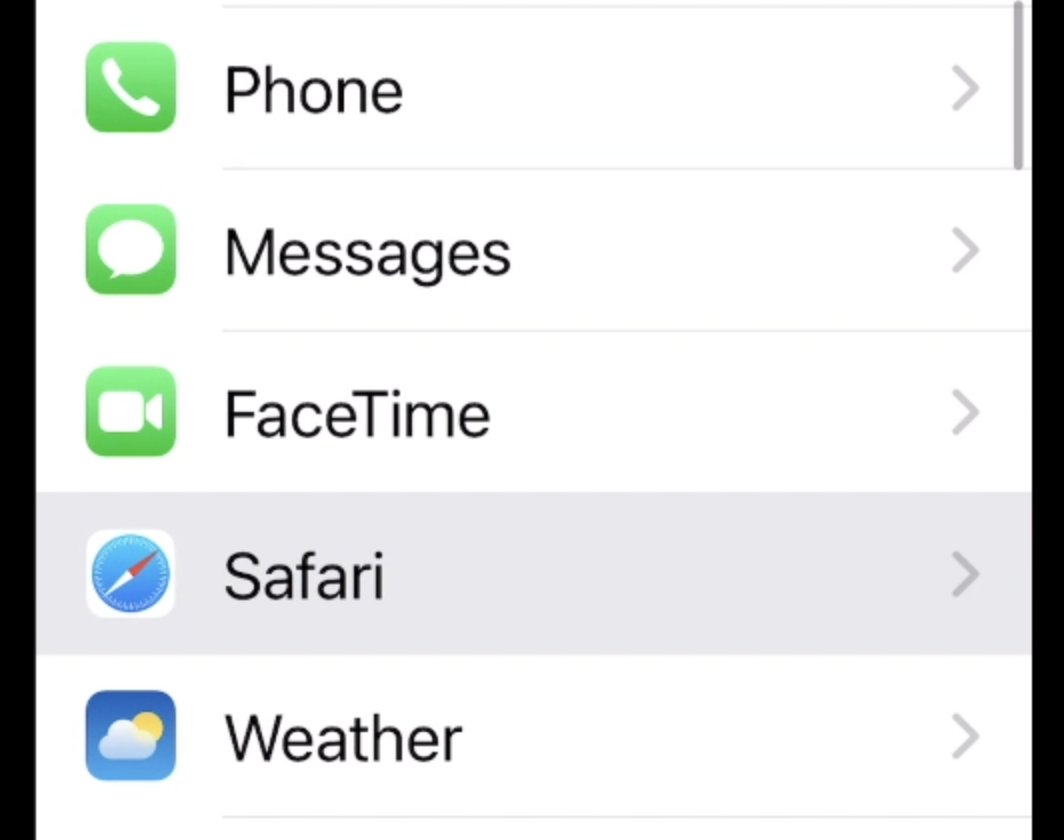
For some reason in iOS 15 Apple decided to turn our world upside down, and put the Search Bar at the bottom of the window in the Safari web browser. To put it back to the top where it has always been open settings
Scroll down to Safari and open it up
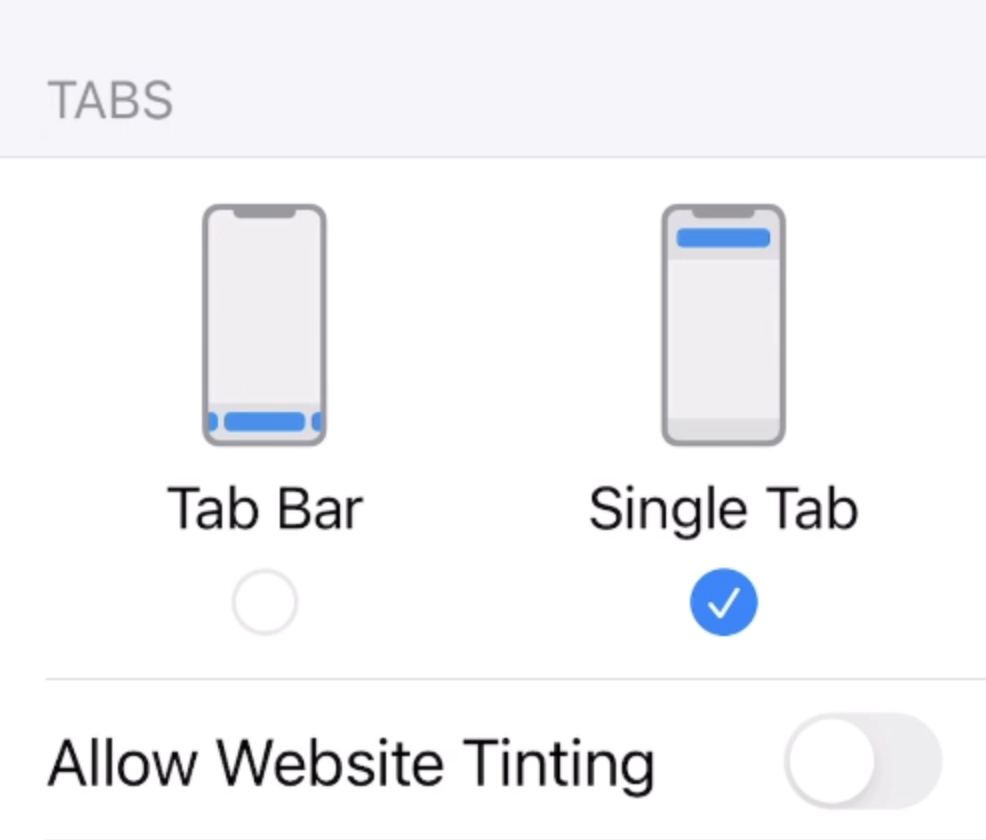
Scroll down about halfway so you can see the “Tab Bar/Single Tab” option – Change this to “Single Tab” as shown below
Now close out of settings and go back into Safari, and your Search Bar is back where it belongs
I haven’t had a High Horse opinion on this site since 2011, but this change has really made me furious. I wish Apple would focus their attention on making what we have now work reliably, as opposed to changing things needlessly so they can announce it as a new feature at the next World Wide Developers Conference (WWDC).
Want To Bring Back Epic Browser PROXY VPN and AD Blocker Button Icons to Toolbar?
Epic Browser is a great alternative to the browsers that come with your computer like Edge and Safari. It is considerably more secure. But recently, the Proxy VPN service that was activated by default has been made an extension, and to get it back there are a few things you need to do. To get started, you can either watch the video below, or continue reading.
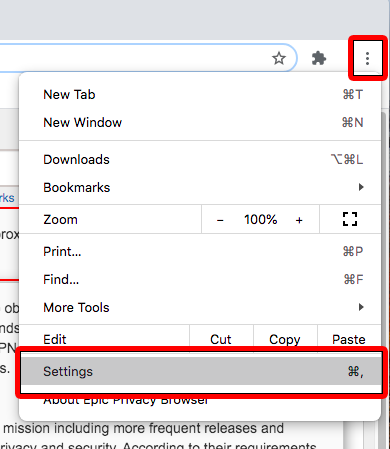
Firstly, click on the three dots in the top right hand corner, the select “Settings”
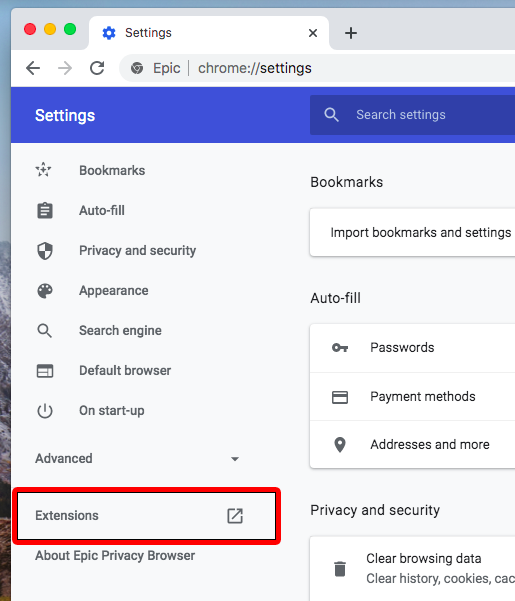
From the menu that appears, select “Extensions”
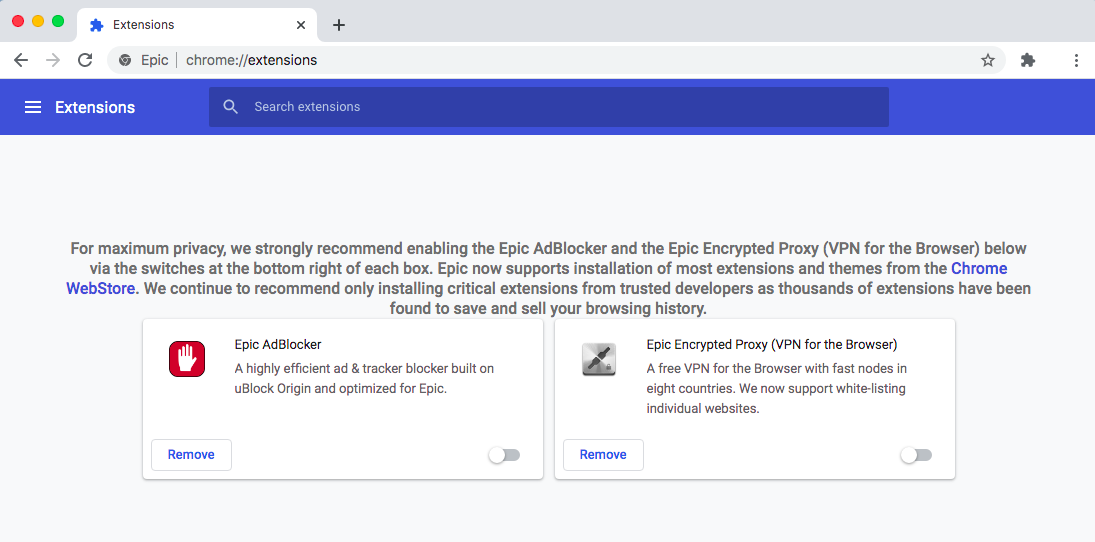
You will now find yourself seeing the extensions that come with Epic Browser
In the bottom right corner of each item you will see a toggle switch, toggle both to the “On” position
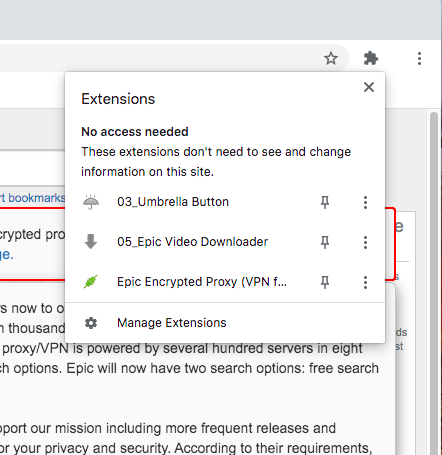
Windows users will now see the icons restored to the toolbar. For Mac users there is a few more steps to go. Close out of the extensions page and click the “Extensions Icon” in the toolbar – it’s the one that looks like a jigsaw puzzle piece
You will see the Ad Blocker and Proxy VPN listed
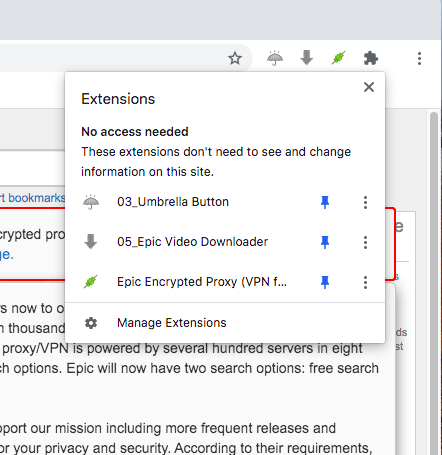
Now click the little pin next to each item you want to see in the toolbar, I clicked all three
And now you will see the icons have been restored to your toolbar, and you can go back to enjoying this fantastic and free browser
Like millions of other Apple/iPhone users around the world, I turned on Apple Music. Immediately, my whole music collection turned on its head. I had duplicate playlists, song files went missing and couldn’t be located, songs were renamed incorrectly, and music I had on my phone that is not in the Apple music library disappeared. Like most other musicians, I had a lot of music from my own bands there, and lots of music from fav’s who shunned the streaming service, like Prince. This music was ALL gone, and no matter what I tried to do, I just couldn’t get it back onto my iPhone. I tried to click the upload button next to affected tracks in iTunes to supposedly load them to iCloud, and it never worked. I could never get those tracks back onto my phone.
As time went on I grew to like the broad range of tunes available in Apple Music, and I came to accept that I just wasn’t going to have that old music on my phone anymore.
Over the weekend, I did a back up on my wife’s phone, and she asked for a specific playlist we have to be added. As she did not want to use Apple Music when it launched, I was able to click the playlist in iTunes, and sync her phone, and she had the music quickly and easily. It made me so angry that I decided enough was enough. I wanted control of my music back.
After lots of fruitless Googling, I was finally able to figure out what the issue is, and it is not Apple Music at all. It is “iCloud Music Library” that causes all of the problems. All Apple Music does is give you access to over a million songs, but iCloud Music Library tries match all of your music with songs in Apple’s collection, and then give you access to those tracks on your devices. In theory it sounds like a great idea, that should save drive space and give you high quality tunes. In the real world though, it is a poorly developed, rushed out, cacophony of errors that ruined my music collection. If you listen to mostly main stream music your issues might not be so bad, but if you have lots of live music, rare music, old vinyl you have converted yourself, or in the case of musicians your own original music, iCloud Music Library will mismatch, grey out, and in the some cases, remove music entirely from your device. And, no matter what you do, you will not be able to put it back.
**DISCLAIMER** – I TAKE NO RESPONSIBILITY FOR YOUR MUSIC COLLECTION IF YOU DECIDED TO FOLLOW IN MY FOOTSTEPS! PROCEED AT YOUR OWN RISK! THIS ARTICLE EXPLAINS HOW I GOT MY COLLECTION BACK TO WHERE I AM HAPPY WITH IT – THESE RESULTS MAY NOT BE SUITABLE FOR YOU.
In the end, it really only took one simple step to end this misery, regain control of what music is on my phone, and still have access to songs not in my collection via Apple Music.
I Turned off “iCloud Music Library” on my phone.
I went to settings and selected music:
Then I turned “iCloud Music Library” off, and got control of my Music Collection back!
Now, doing this is not without its perils, it turns your iPhone music collection on it’s head again, just like it did when Apple Music turned it on. A large majority of my music disappeared immediately, as it was matched (poorly) with music in Apple’s cloud. Thankfully, all of my original playlists before Apple Music were still on my Mac Pro, so when I did my first sync after flipping the switch, and I was able to select which music I wanted myself again, ALL of my music pre Apple Music was back! My 80’s Hairbands playlist went from 230 songs back up to its original 400. And lo and behold, the Gold Album was there as well.
The Down Side to switching off iCloud Music Library – All of the tunes I added to my iPhone collection from Apple Music had disappeared. Playlists containing Apple music disappeared. The ability to click the plus “+” button and save a song to my phone is no longer available. I can still search for and play any song on Apple Music, but I can’t add those songs to my device or use them in playlists, because Apple is a big whiny greedy baby!
Waaaaa – You cant save this song to your phone cos we want you to use
iCloud Music Library – Waaaaa-Ha-Haaaaa!!!! NEWSFLASH APPLE – Not everybody wants to sync their computer playlists to their iPhones and vice versa!
The bottom line is I now have control again, I have all of my favorite music back on my device, and I can control what is on there and what is not. I have lost a lot of functionality with Apple Music, and it is a small price to pay in my opinion, because I can still listen to those songs, and I finally have The Con!
Lionel Ritchie – Now a member of Warrant – Thanks Apple Music!
Recently, a Webernets reader (Yes, there is at least one person looking at this site) crashed their XP Pro virtual machine, and it made me think about a really quick and easy way to back up and restore a VMWare Virtual Machine in the unfortunate event of a terminal failure.
As VMWare Virtual Machines can grow in size pretty quickly, especially if they are not regularly “cleaned up“, in most cases you will need to use an external hard drive or a very large USB key to store your back up. Whilst it is convenient to keep your back up on the same computer, its also no help to you at all if that computer is the one that fails, so keeping a back up some where else is a pretty good idea. I actually would recommend doing BOTH. You can never have too many back ups in multiple locations – ask any one who has ever had a catastrophic failure!
To get started, you need to locate your Virtual Machines, and this is REALLY easy! Open a finder window, click “Documents”, and you will see a folder called “Virtual Machines”
To back up your virtual machine, simply drag the virtual machine file to your back up destination. As you can see below, I have a virtual machine called “XP with Apps”, which is my main Windows computer, and I would be pretty lost if anything happened to it. I also have a FREENAS server, which is just basically a big hard drive that is attached to my home computer network, and shows up as a “Share”, so to back up my XP Machine, I just drag the virtual machine file onto the Freenas entry in the side bar menu, and let it do its work. As my Virtual Machine is quiet large, it does take some time for it to copy over.
Now that we have our Virtual Machine backed up, you are probably wondering how easy it is to restore it? Its just as easy! Check this out!
To restore a saved virtual machine, just locate it on your back up source (In my case, it is on my Freenas server), and drag it into your virtual machines folder. For this demonstration, I am going to restore my most FAVORITE Linux distro, PUPPY LINUX! I started by dragging the Puppy Linux Virtual Machine from my Freenas server to the desktop on my Mac.
Once the file had copied over, I moved it into the “Virtual Machines” folder in my “Documents” folder with my other virtual machines. Then to begin the restore, just double click the virtual machine file.
When you double click it, a window will pop up asking if you have copied or moved the virtual machine. In this case, we have performed both actions, we have moved, as well as copied the machine. Given the wording in the dialogue box, and the confusion that arises after being presented with a multiple choice question where both answers are applicable, I went with “If you don’t know, answer “I Copied It””, and I clicked “I Copied It”.
Almost instantly, my Puppy Linux virtual machine sprang into life, and before you can say “How the heck did I do that?” my Puppy Linux Virtual Machine was up and running!
Thanks to the folks at VMWare for making this so easy!
Something else that has been bugging me lately about OSX Lion is that “One Finger Tap Dragging” has changed to “Click and Drag”. By default, you can’t just move the cursor to the windows top bar, tap once and drag it around the screen. It’s really difficult to break the habit if you have been a Mac user for several years. Thankfully, it is still available in Lion, but it is REALLY hidden away.
I spent ages going through every aspect of the “Trackpad” preferences pane, and watching all the little videos on gestures, but it turns out that this feature isn’t even in there. To turn One Tap Dragging back on, you need to go into “Universal Access”! How do you like those APPLES! Thanks APPLE!
Once you have opened Preferences and clicked Universal Access, click the “Mouse & Trackpad” tab, and then “Trackpad Options” towards the bottom.
Now, by checking one simple checkbox, all of that anguish and suffering will go away! Simply check the box next to “Dragging” and One Tap Dragging is restored. And if you were used to the “Drag Lock” feature in previous versions (where you have to tap again to release”, you can also restore that feature in the drop down to the right of “Dragging” as well.
Below is a screen capture of an option I would REALLY like to see Apple implement in coming versions of their operating system.
My iPhone/iTunes has been bugging me for a while now about how my phone is running out of memory, and it won’t let me load more music, or take new photographs or video. My first instinct was that I should clean house, and move some photos or songs off it, and whilst it was plugged in to my Mac I noticed something interesting in the storage capacity stats window:
1.03 GB of Other? I would much rather have an extra GB of music and photos than a GB of “Other”! So, I did a little bit of research and it looks to me that “other” is stuff like contacts, calendars and emails etc, so no joy to be had there, but it is also log files, history, cache, and other gunk that is meaningless to most users. There were also reports in the Apple forums that you can reclaim “some” of that space with a full system restore. So I thought I would give it a try!
I started by making a full backup of my phone. Once my iPhone was plugged in to my computer, and it showed up in iTunes, I right clicked on it and selected “Backup” from the menu. It took a few minutes to copy everything over.
Once that was all done, I went to the “Summary” window and clicked the “Restore” button.
After clicking the usual procession of Ok’s, Yes Please’s, and I Understand’s, it set about completely wiping my iPhone.
Once it had erased the memory, it began uploading the 4.3.5 software installation, powered on and off a few times, and then I got asked if I wanted to restore my phone from the back up I created, or if I wanted to start my phone from fresh again. I clicked “Restore from Back Up” so it would reinstall my apps, contacts, music etc etc and off it went again It did take some time to completely erase, and re-install the software and my files and info (about 15-20 minutes), but it was well worth it!
My iPhone went from 1.03GB of “Other” down to 0.24GB of “Other”! That’s nearly 800KB of “Other” that can now be used for photos and music!
We use cookies on our website to give you the most relevant experience by remembering your preferences and repeat visits. By clicking “Accept”, you consent to the use of ALL the cookies.
This website uses cookies to improve your experience while you navigate through the website. Out of these, the cookies that are categorized as necessary are stored on your browser as they are essential for the working of basic functionalities of the website. We also use third-party cookies that help us analyze and understand how you use this website. These cookies will be stored in your browser only with your consent. You also have the option to opt-out of these cookies. But opting out of some of these cookies may affect your browsing experience.
Necessary cookies are absolutely essential for the website to function properly. This category only includes cookies that ensures basic functionalities and security features of the website. These cookies do not store any personal information.
Any cookies that may not be particularly necessary for the website to function and is used specifically to collect user personal data via analytics, ads, other embedded contents are termed as non-necessary cookies. It is mandatory to procure user consent prior to running these cookies on your website.


 Recently, a Webernets reader (Yes, there is at least one person looking at this site) crashed their XP Pro virtual machine, and it made me think about a really quick and easy way to back up and restore a VMWare Virtual Machine in the unfortunate event of a terminal failure.


