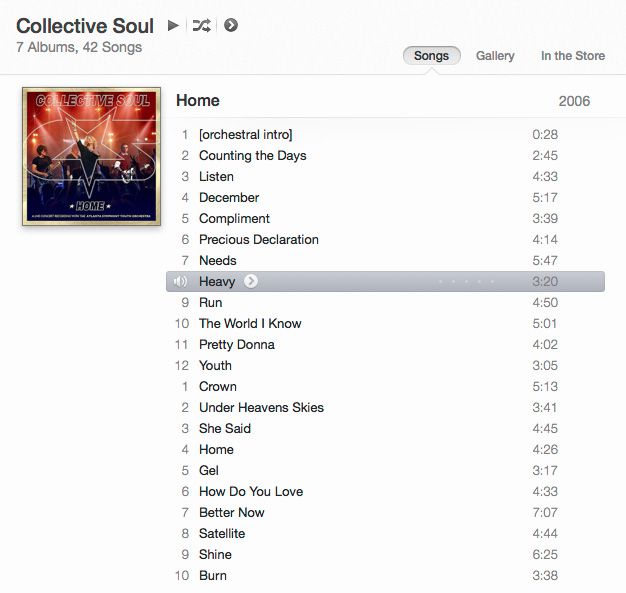
Easily add Meta Tags to your music with Musicbrainz Picard

musicbrainz-picardThere’s nothing I hate more than dropping new music into my iTunes library only to learn once it has finished importing that it doesn’t have meta-tags (No Song Name, Artist, Album Title etc etc). So now, before I add new music, I run it through MusicBrainz Picard. Here’s the programs description from their site:

“MusicBrainz Picard is a cross-platform (Linux/Mac OS X/Windows) application written in Python and is the official MusicBrainz tagger.

Picard supports the majority of audio file formats, is capable of using audio fingerprints (PUIDs, AcoustIDs), performing CD lookups and disc ID submissions, and it has excellent Unicode support. Additionally, there are several plugins available that extend Picard’s features.

When tagging files, Picard uses an album-oriented approach. This approach allows it to utilize the MusicBrainz data as effectively as possible and correctly tag your music. For more information, see the illustrated quick start guide to tagging.

Picard is named after Captain Jean-Luc Picard from the TV series Star Trek: The Next Generation.”

To get started, download and install MusicBrainz Picard HERE. Once you are up and running, drop the music files you want to tag anywhere in the window. They will then populate the list on the left called unmatched files.

mb1

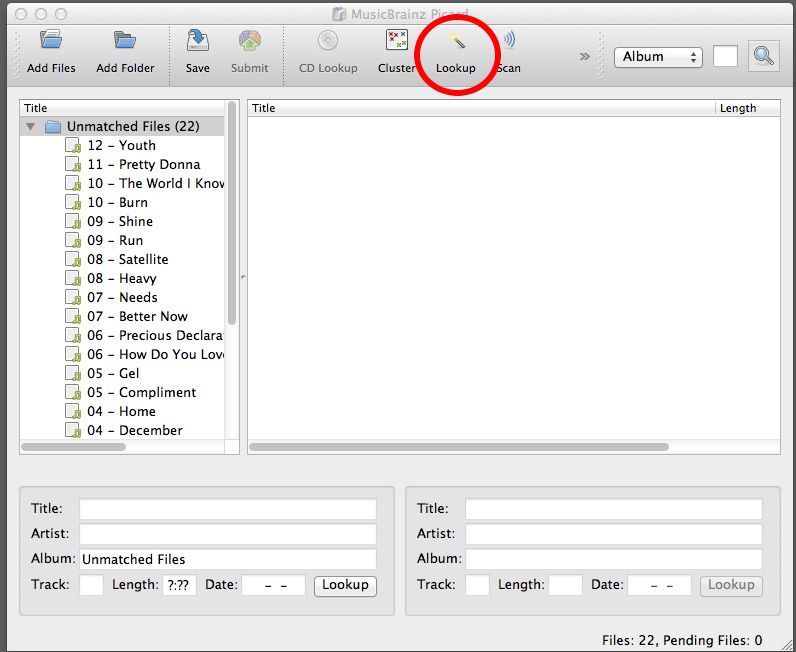
When you have finished adding files, click the line of text with the folder icon next to it that says “Unmatched Files” to make it active. When it is active it will become highlighted. Now, go ahead and press the “Lookup” button, and MusicBrainz Picard will start scanning your music and comparing it to their database for identification.

mb2

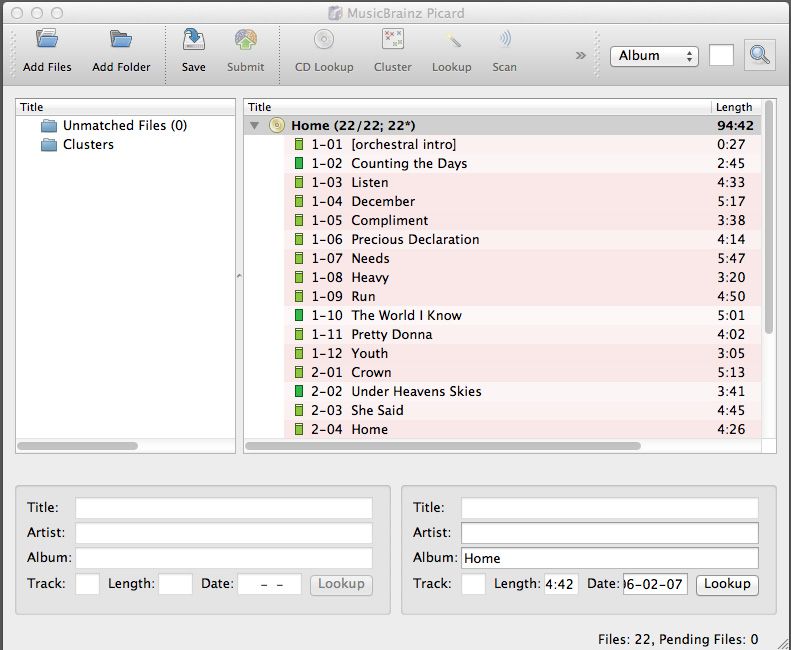
Once MusicBrainz Picard has identified the album and added all of the songs to it, the CD icon next to the album name will turn gold in color. If you don’t have all of the songs from the album, it doesn’t matter, you can still proceed, but the CD icon stays silver. The next step is to click Album Name next to the CD icon to make it active, and highlighted. You can now click “Save”.

mb3

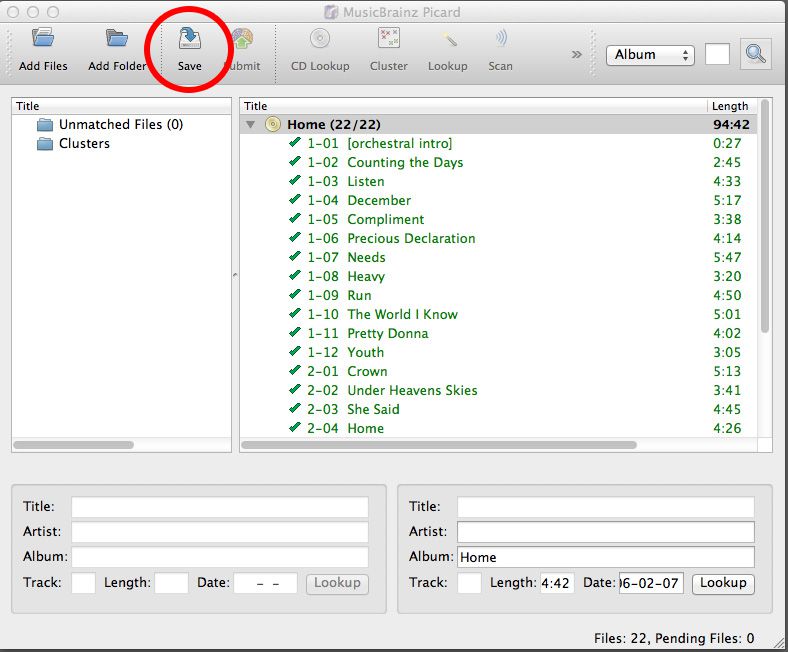
MusicBrainz Picard will now write the Meta Tag Data directly into your music files. Once it has completed, you can close out of the program, and then drop your music files into iTunes, and everything will be correctly categorised and ready to play.

mb4

Gruffys Free Domain Parking Script

Gruffy’s Domain Parking Script is a simple and FREE script I created for domain names I have purchased with the intention of selling at a later date. Rather than have the name lying dormant, you can put it to work for you by making it advertise itself, as well as by displaying Google Ads which can make you money. This script can also be easily modified to suit regular parked domains.

Gruffy’s Domain Parking Script is made available here FREE of charge, I offer no warranties, support, and accept no responsibility for consequences of its use (unless you make heaps of money and want to give some of it to me). By downloading and using Gruffy’s Domain Parking Script you are confirming that you understand these conditions and acknowledge you are using it AT YOUR OWN RISK!

Gruffy’s Domain Parking Script

Detailed usage instructions can be found HERE.

SCREENSHOT:

Parking-Capture

Easily find and delete BIG files that are taking up space on your Hard Drive

full-hard-driveEarlier today I tried to copy a large file I had made in Photoshop and I was told that the operation couldn’t complete because there wasn’t enough room on my hard drive for it. So, I needed a way to get a lot of space back, but I wasn’t sure what was taking up all of the room. I set about looking for ways to see what was going on on my drive and I happened upon some really great tools to help you visualize all your files. The process is called “Treemaps”.

I managed to find free Treemap programs for Windows, Mac and Linux platforms. For Windows users, you need to get a copy of WinDirStat (Windows Directory Statistics) HERE. Once installed, you can start it up and tell it to either analyze your whole drive, or specific folders. Here’s how it looks.

windirstat-screen-cap

There is two options for Mac users. Grand Perspective (Gets up and going really quickly, easy to use) and Disk Inventory X (Longer to scan but a more thorough and detailed interface). Here’s how Grand Perspective looks.

grand-perspective-screen-cap

And this is how Disk Inventory X Looks.

disk-inventory-x-screen-cap

For Linux users, you can get KDirStat HERE. I havent tried it yet, but it looks very similar to WinDirStat. This screen capture is from their site.They are all fairly easy to use. Just roll your cursor over the big ones and the filename appears in the bottom left corner of the window. You can then decide which files you want to delete, and start enjoying some free space on your hard drive again.

Download, Save and Keep ALL videos on a Youtube playlist!

From time to time most of us see something on Youtube that we would like to download and save.

In my case this week, I found a Youtube channel that has the video broadcast from every NHRA drag racing event of the 2012 season. As my wife and I flew from Australia to attend the Sonoma round of racing, it makes a really great souvenir for us to have the video broadcast. The problem is though, Each days racing is split into about 9 or 10 pieces, and it was a three day event. Thankfully though, KMan2100 has arranged the videos into playlists, so they can be viewed in order.

download-youtube-playlist

Now, you could download the videos one at a time using the method described in my post about Video Download Helper HERE, but that will take a LOT of time. If you want to download all of the videos in a playlist quickly and easily, you need to make a download list, then download them all!

To do this, you need to be using the Firefox web browser. Its free, it runs on Windows, Mac and Linux, and if you are not already using it, you should be. You can get it free HERE.

With Firefox open and running, select “Add-ons” from the “Tools” menu in your menu bar. The first Add-on you need is the one that takes all of the videos in the playlist and turns them into a series of links. It is called BYTubeD, Bulk Youtube Downloader. To get it, type “BYTubeD” into the search bar in the top right corner.

Click the “Install” button to the right of it when you see it in your “results” list. This will download and install it. When this is finished, go back to the search bar and type “Download Them All”. As before, click the “Install” button to the right to install it.

To make your new add-ons active you need to restart Firefox. To do this, simply click the text that says “Restart now”

Once you have clicked restart, you can close the Add-ons window, and any other windows that may have popped up.

And now the fun starts!

To get downloading, go to Youtube and find your channel, and click the playlist you want to download.

As you can see, there are 28 videos on this playlist. To download them all, open your “Tools” tab on your menu bar and select “BYTubeD”. It should be at the bottom. This will open a new window.

**BEWARE** – Not only does this window contain info for all the videos you want, it also contains the info for other playlists and videos that are on this page that you may not want as well! As highlighted below, you can see the Sonoma videos I want, but I am not interested in Phoenix or Gainsville etc etc…..

For the next step, you need to tell BYTubed which videos you DO want to keep. To do this, simply highlight them. To select multiple videos (Which is kinda the point of this article) hold down your control key, then click each one if your using Windows, or your command key and click if you’ve got a Mac. Once you have highlighted the videos you want to download, click the start button.

BYTubed will now chew through the playlist and open up a new web page with links to all your videos.

Now’s where the magic happens. To download them all, open “Download Them All” from your “Tools” menu in your menu bar.


All that is left to do now is to check mark (click the circles to the left of the names) the videos you want to keep, choose your download location (I usually download to my desktop) then click “Start” to watch those babies start loading down!


That’s all there is to it!

Download, Save and Keep videos from Youtube

download-helper-iconFrom time to time we all come across videos on Youtube that we really want to download and keep on our computers so we can watch at anytime, or to re-encode so we can watch and keep them on our phones or ipods and ipads to. A simple way to download videos is with Video Download Helper.

In order to use Video Download Helper you need to be using Firefox browser, so if you are not, you probably should be, and you can download it free HERE.

Now you have Firefox open and running, you need to get the free Video Download Helper Add On. To do this, select this “Add-ons” from the “Tools” menu in your menu bar. Once the Add-ons window opens type “Video Download Helper” in the search box in the top right corner.

video-download-helper-1

Video Download Helper should be the first result, so when you see it in the list, click the “Install” button to right of it. Once it has finished downloading and installing, you will need to restart Firefox to make it active. To do this, simply click the “Restart now” text.

Once Firefox restarts, you can close out of the Add-ons window and any other windows that have popped up, and you should now see a new icon in the top left.

This means you are all set to go! Now when you wake up at 2am and worry that Gangnam Style is going to be taken down and you will never see it again, you can open it up in Youtube, click the little black upside down triangle next to the colored logo (when its gray out it means there is nothing to download on the page – when its colored, there is a file it can retrieve for you) and select the quality of the file you want to download.

Once you have selected your preferred resolution and format, its just a matter of confirming with the “Save File” dialogue box, and your good to go!

Video Download Helper has a swag of other cool features as well, but we’ll cover those another time as I know you just CANT WAIT to go and run your new Gangnam Style video up on your home theater system!

Not sure what a pretty lady who can afford and appreciate a good cup of coffee has to do with horse riding though? Ahhh Who Cares……..Opp-Opp-Oppan Gangnam Style Baby!

3D Video for Beginners Part 2 – Watching your 3D Video on Mac, Windows or Linux with BINO

Bino LogoSo now you have created your 3D video file, its time to watch it back and see how it looks. If you try to open it using Quicktime or Windows Media Player, you will see your two camera feeds simultaneously in “Side by Side” format.

side by side videoIn order to see the 3D effect, and watch your video in 3D you will need to use a player that is capable of handling Stereoscopic Video files. There are quiet a few out there, but my Favorite is called BINO. I like it because it is really easy to use, can play your side by side video file back in lots of different flavors of 3D (like red/cyan, amber/blue, green magenta), there are versions for Windows, Mac and Linux/Unix, and the best part, its completely free!

You can download BINO from the bino3d.org web site HERE.

Once you have downloaded, extracted and installed BINO you can launch it, and from the file menu select your Side By Side video file, and the player will appear. You now need to set only two parameters, you need to tell BINO what kind of file it is you want to play, and how you want it played back.

In the “Input” drop down menu, select “Left/Right Half Width”, and in the “Output” drop down menu, select the display method that corresponds to the 3D Glasses you will be using to watch the video. I have the ones with the Red and Blue lenses, so I use Red/Cyan High Quality mode. Now, just push play and see how you did.

Bino WindowYou can make your video go full screen by double clicking the playing video. Double clicking on it again takes you back to window mode.