Bringing back the Icon Size Slider in OSX Lion

Mac Icon Size SliderBeing a web designer, graphic artist, and a photographer, well you could say I use my mac to deal with images quiet a lot. I estimate that in my “Resources” folder on my server (made up of stock photos and graphics) and my own photograph collection, I have around 100,000 images. When I need to find a texture, or a stock photo to suit a specific purpose, I may need to browse through a folder with up to a 1000 images in it. The great thing about having a 30″ monitor is that you can open the folder up, fill the screen and see a lot of the files quickly. My FAVORITE thing in Snow Leopard was the icon size slider. Just by dragging the slider located at the bottom right of every folder view left or right, you could make icons small to fit more on screen for faster browsing, and when you think you found what you need, you could drag it up to enlarge the icon for a closer look. It was GREAT!

One of the first things to piss me of in Lion was that the slider is gone. (Literally, It only took me about 3 mins to notice it missing).

Grrrr!!!In search of a solution, I found a icon slider in the “View Options”, but this meant each time I need to change icon sizes I had to open another window, and it was a real pain.

Today, I stumbled upon the solution – The slider is still there in Lion (YAY!), but it is just turned off by default (BOO!). To turn it back on, click any blank area on your desktop to select the finder, then open the View menu, slide down and select/check “Show Status Bar”
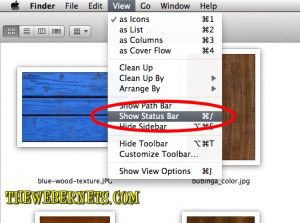
Show Status BarIt seems a bit ambiguous when you are looking for the icon size slider to have to select “Show Status Bar” to bring it back, but at least it is still there!Icon Size SliderAnother cool feature available in this view menu, is to select/check “Show Path Bar”. Once it is checked, you see a “breadcrumbs” style path to where your file is. Very Handy!

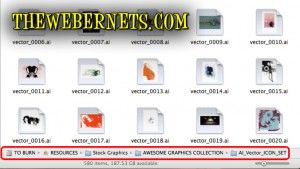
Show Path

Mac OSX Lion broke my Gigabit Network!

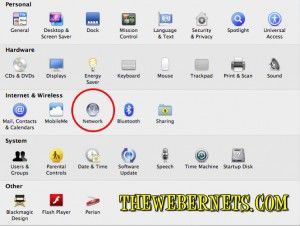
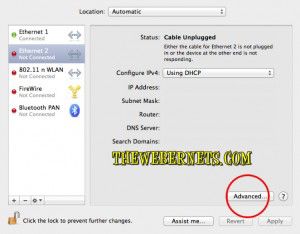
Network CablesI have just been trying to shift some large files around my home network, and found the transfer speeds to be down on what I am used to.So I set about finding out what the problem was. I started by opening the system preferences, and clicked the Network icon.Gigabit Screen Capture 1In the left side window I had to highlight the connected Ethernet port (the one with the green circle next to it), as my machine has two ports, and the one that wasn’t connected was selected when I opened the window as shown below. Once I selected the connected port, I clicked the Advanced button to open up all the good stuff.

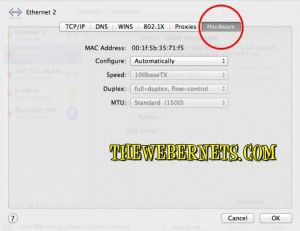
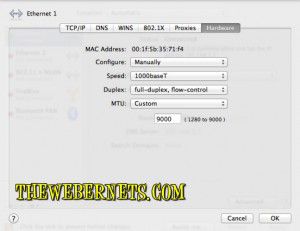
Gigabit Screen Capture 2From here, I clicked the Hardware button to see what was going on. As expected, my machine had auto-negotiated a 100MBPS connection, instead of the much faster 1000MBPS Gigabit connection I have come to love so much.Gigabit Screen Capture 3So once I changed Automatic, to Manual, and selected 1000MBPS with Full Duplex, flow control, and set my MTU to Jumbo 9000 (Where it has always been), I saved the settings, rebooted and was ready to enjoy my super-fast network!

Lion Gigabit
Wrong-GraphicHuh? What? Why? – Then the expletives came! Why wasn’t my Gigabit connection working? – I went back in and found the Green circle was gone – Replaced with a very unattractive and disheartening RED circle! A desperate flurry of disconnections, reconnection and more expletives occurred. Sitting helplessly on the floor next to my Gigabit switch, head in hands, my attention was drawn to the pretty color cables…….

Cables

CablesThis post is dedicated to that gorgeous yellow ethernet cable. Oh yellow ethernet cable, how I love you! It turns out that for some reason, Lion doesnt recognise the 33 miles of blue Cat 5(e) cable I have running around the house as Gigabit capable like Snow Leopard used to! I removed the blue cable, and plugged a black CAT 6 cable I had (Which I never really understood why it was different until today) and beautiful Green lights lit up everywhere! In my connections window, on the switch, it was SUCH a relief!

After a bit of Googling, I learned quiet a few people are having this problem, and not all cables are created equal.

The short solution to the problem is change your cables to Cat 6, and for the reason why (if you are interested in the nuts and bolts) can be found in THIS article on Answers.com.


**UPDATE**

22OCT11 – Apple appear to have rectified this issue in the latest update to OSX Lion (10.7.2) – I have been using my Macbook Pro at Gigabit speed using blue cat 5 cable for a few days now. Can anybody else confirm?

How to play almost any media file on Windows, Mac or Linux/Unix

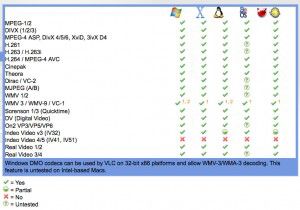
Video Lan Client Player IconIf you have a Windows based computer, and someone sends you a Quicktime video, or if you have a Mac, and you want to watch an AVI or a WMV video, your computer just isn’t going to play it for you without some additional software. Over the years I have experimented with a lot of different programs, but there really is only one program users of all platforms require – Videolans VLC Media Player. It will play just about everything (including DVD’s and Audio Cd’s), regardless of your operating system and installed codecs, it supports playlists for audio and video, supports sending and receiving streams, and has tons of tweaks to allow you to adjust everything from brightness and contrast, to Digital Audio pass-thru for those of us using Dolby Digital/DTS enabled audio cards with Digital Coax or Fibre Optical SPDIF audio outputs. Below are the supported video playback formats:

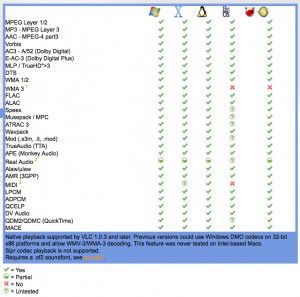
And the supported audio playback formats:

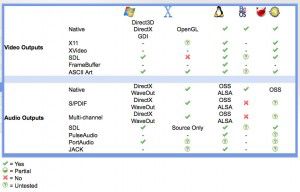
These are the supported Audio/Video outputs:

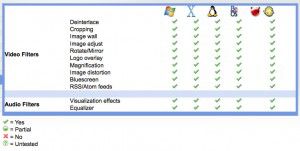
There are also some filters that you can apply to the playback.

The main one I find useful is the de-interlace filter, which stops you getting the “stripped” effect when watch fast moving scenes in a interlaced video (like shown below)

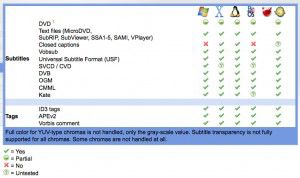
VLC Media Player also supports many formats of subtitles:

But the best part about VLC Media Player, it is ABSOLUTELY FREE!

So go and download it now at VideoLAN.org!

Awesome File Merge Utility on your OSX Disc

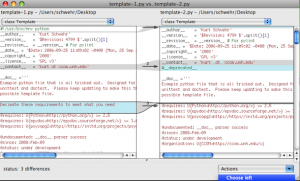
Mac File Merge UtilityI wrote yesterday about how there are some really cool things in the Mac Applications-Utility folder, but if you have ever purchased a Mac OSX operating system disc, there are also some pretty cool programs on it that aren’t actually installed by default. The first one that comes to mind is FileMerge. Its a app that allow you to take two files or folders, and compare them side by side, and it will highlight the differences between the two.

Mac File Merge UtilityI used this recently when Greg Smith of Cyberhawk Designs modded a WordPress template I created and put three widget positions in the header! I just HAD to know how he did it, so I used file merge to compare my original files with the modded files he sent back! Cool Huh!

Greg has since written a tutorial about adding the header widgets, and you can take a look at it on his cool Cyberhawk web site HERE.

Mac Grab Sceen Capture Utility

Mac Grab Screen Capture Utility Icon

The amount of goodies tucked away in Mac OSX never ceases to amaze me. There have been so many times I need a app, only to find the good folks in Cupertino have already included what I need as a standard utility. Grab is one of those apps. It is a simple and very good screen capture utility. It can capture a selection, a window, or your entire screen, and even has a ten second automatic screen capture timer if you need to set something up before your capture. The default capture format is TIFF, which is great for capture quality, but can get a little annoying if you need to capture a lot of things and convert to JPG for web. I noticed last time I was playing around in “Tinker Tool” (A free program to unlock hidden features in OSX) that it will allow you to change the format of the captured image, but when I set it to JPG, it still saved as TIFF for me.

So there you have it, a really cool and very useful utility that you probably didn’t even know you had! There’s heaps of cool stuff in that Utilities folder so open your Applications folder, then Utilities, and take a look around!

Pipette and Color Cop Colour Samplers

free hex color pickerPipette Color Sampler is a FREE mac utility the you open like any other program, and it has an eyedropper that you can move to any part of your screen, and click on it, and Pipette will tell you the exact hex color number of the pixel you clicked on. For designers,  it’s one of those utilities that you will wonder how you lived without it once you have it. Pipette is for MAC users only, and can be downloaded free HERE at Charcoal Design.

And don’t worry Windows users – I have an equivalent for you! Color Cop is also FREE, and it to will tell you the hex value of any pixel on your screen. You can download it free HERE from Colorcop.net.

Color Cop Pixel Sampler