
THERE IS AN UPDATED VERSION OF THIS ARTICLE FOR FEBRUARY 2022 USING HANDBRAKE VERSION 1.5.1 HERE
This is a simple easy guide on how to make the best encodes with the smallest file size in Handbrake without having to know or understand all of the settings. Just copy my settings and you’re done!
To get started right away please scroll down to the red text that says “START HERE”.
**NOTE** – These settings are for DVD Video ONLY – You can find a updated Blu Ray Tutorial HERE.
MY RANT – By popular demand, I have decided to update my two articles on how to quickly and easily produce great quality DVD and Blu Ray video encodes with Handbrake. The program interface has changed, the H.264 codec has been refined, and the TV’s we view our movies on have evolved dramatically since writing the original articles.
THE GOAL – To produce the highest quality video with the smallest possible file size, whilst retaining the entire original 5.1 Dolby Digital sound track. DVD’s playing on todays large 4K TV’s look terrible due to their low resolution. We will also use Handbrakes filters to clean up the picture quality.
DISCLAIMER – This method will produce very nice quality DVD videos, but may take 2 hours or more to process each hour of video, so my advice is to let run whilst you are sleeping each night. Unfortunately, good quality video with small file size cant be done quickly, it just doesn’t work that way. Also, All set-ups are different. We all have different size TV’s, different size and shape rooms, different players and a plethora of other factors that could produce varying results. This is a guideline, and a great place for a beginner to start. If you feel there is something that could be done better, or should be done differently, please feel free to let us all know by leaving a comment.
THE TECHNICAL STUFF – My TV is a 65″ Samsung 4K which I absolutely love, and sit about 10-12 feet back from. I play the media from a Apple TV 4K, and use the Infuse Pro 5 player app. The video is encoded on a 3-4 year old HP desktop computer with a Intel I5 processor. The version of Handbrake used in this tutorial is v1.2.0 which is the current stable release for February 2019.
Ready to encode? START HERE!
Once you have the current version installed and have ripped your DVD video, drop your file into Handbrake, or you can also click the “Open Source” button in the top bar to load your video file. Handbrake utilizes 7 tabs to help you navigate though setting up the desired video file output parameters.
![]()
Once your video has loaded you should find yourself on the “Summary” tab. If not, click Summary
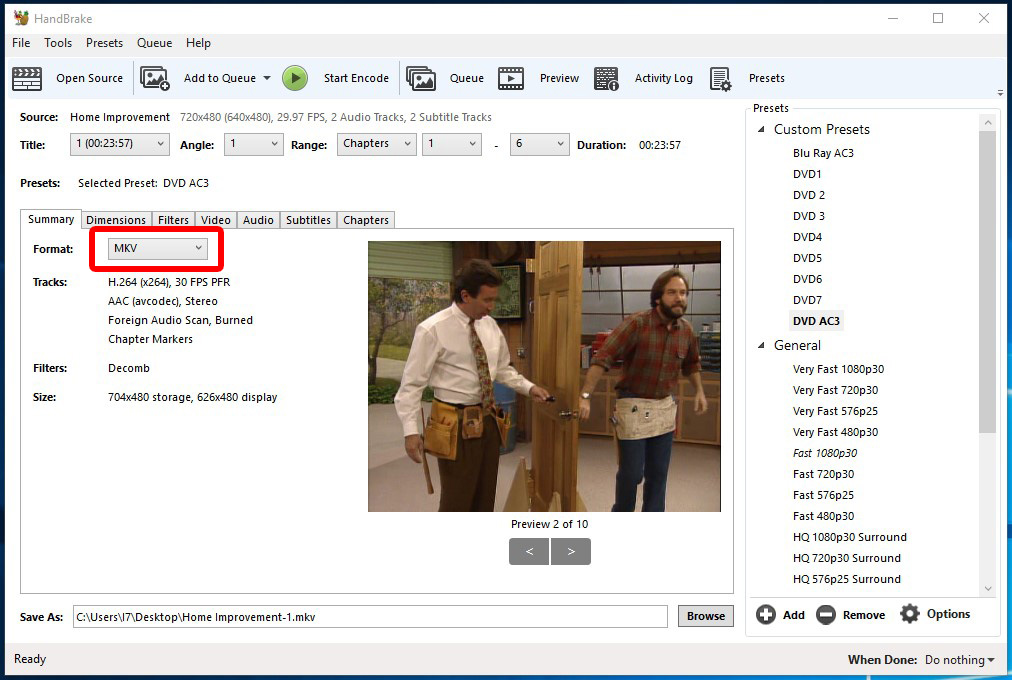
The only thing we need to be concerned with here is the MP4/MKV option. It is your choice which format you will use here. My personal preference is MKV, so I have changed this option. Next, click the Dimensions Tab.
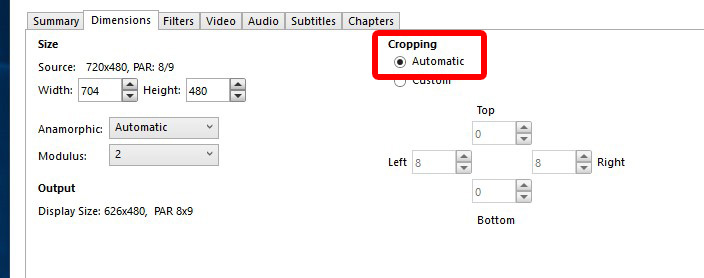
Handbrake has gotten really good at automatically picking the right video output size settings, so I recommend not touching anything in this window. Just make sure that the “Automatic” option is set. Next is the Filters Tab.
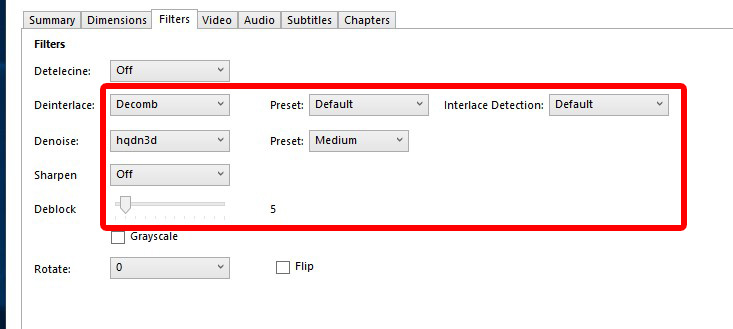
This is where we will clean up that blocky grainy low resolution video so it looks better on a large HD TV. The first thing we will tackle is Interlacing. For the most part TV shows seem to be interlaced, where as most movies are progressive scan. In my opinion everything should be progressive, interlacing is horrible. We are going to set Handbrake up so it doesn’t matter what kind your source video is, your output will always be progressive. In Deinterlace, set it to “Decomb”. Leave the preset at “Default” and detection at “Default”. Now its time to clean things up. For the Denoise option select “hqdn3d” and make the preset “Medium”. Leave the Sharpen option off, and set Deblock to 5. Leave everything else unchecked and off. Next, click the Video tab.
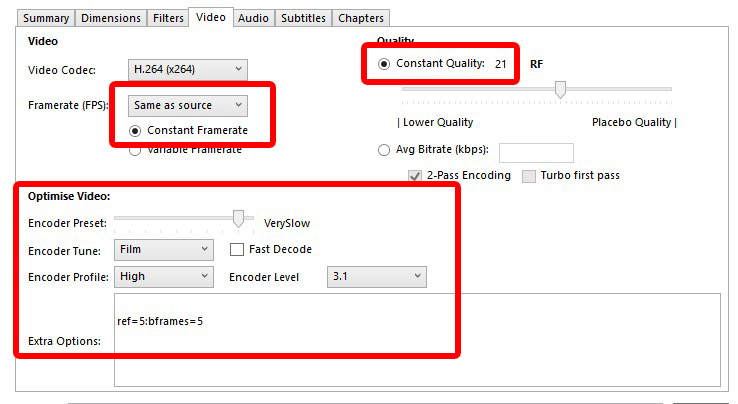
This is where the magic happens. Select Constant Quality and set the Slider to 21. Then for Framerate, change it to “Same As Source” and make sure “Constant Frame Rate” is selected. I find this really helps keep the video and audio in sync. In the “Optimize Video” section, set the encode speed to Very Slow. This is a critical step, as if you pick a faster encode rate the quality will suffer dramatically. (I know it’s frustrating, but this is just the way encoding works. As I said early, let it run while you sleep). Set Tune to “Film”, Encoder Profile to “High”, and Encoder Level to 3.1. The next critical step is to type or copy and paste the following command into the Extra Options window
ref=5:bframes=5
This is the secret sauce behind gorgeous encodes in my humble opinion. Once you have completed all of these steps, move to the Audio Tab.
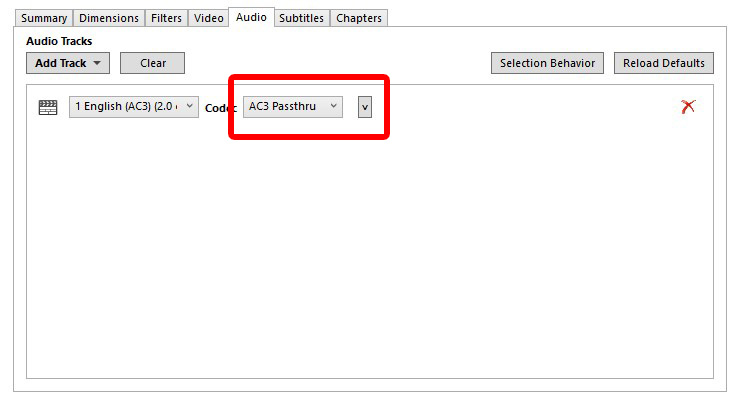
My source video has a Dolby Digital 2 Channel AC3 sound track, which I want to preserve in its entirety, so I am going to select “Pass Thru” which allows the audio track to pass through Handbrake untouched and un-modified. I am a real Audiofile, I love the Dolby Digital and DTS 5-7 channel audio tracks in movies, so I select “Auto PassThru”. But, if regular 2 channel Stereo is ok for you, you can configure that in this area if you want. I figure you are looking for best video quality, you might as well have the best sound quality as well. Just select the AC3 or DTS sound track from the drop down window, and choose “Passthru”. Something to keep in mind here is that not all TV’s play DTS these days, so if yours cant, and your source file has a DTS sound track, you are best to convert it to AC3 here. Next is the Subtitles tab.
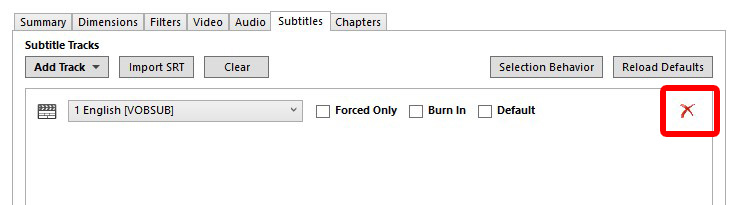
As I don’t want any subtitles, I am going to click the red X on the right side to completely remove all reference to subtitles from the encode. Finally, on to the Chapters tab.
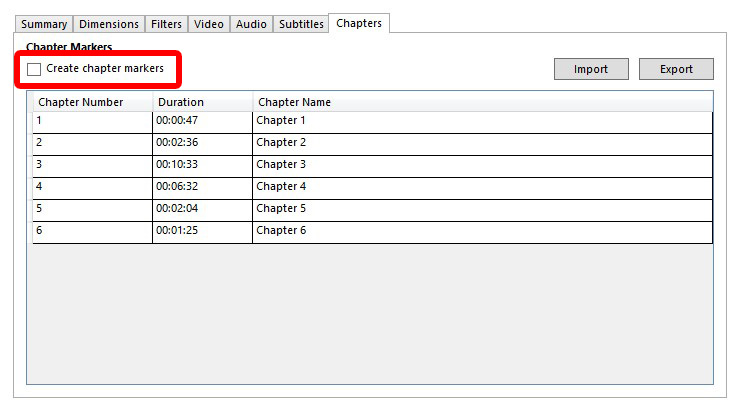
As most media players now allow you to scroll pretty quickly through movie files, I no longer place chapter markers in my encodes. I make sure “Create Chapter Markers” is unchecked.
THERE IS AN UPDATED VERSION OF THIS ARTICLE FOR FEBRUARY 2022 USING HANDBRAKE VERSION 1.5.1 HERE
NOW ITS TIME TO ENCODE!
If you are only doing one file, press “Start Encode”, and your computer will start crunching down the video. If you want to encode multiple files using these setting, click “Add to Queue”, then drag in your second title. Once it has finished importing, just press “Add to Queue” again to add it for encoding using the same settings. Once all of your subsequent files have been added to the queue, press “Start Encode” to get things moving. It might also be a good idea at this time to create a Preset for these settings, so you don’t have to enter them all manually each time you want to use them.
WHERE TO GO FROM HERE – As I said earlier, this is a guideline, and a great place for a beginner to start. I recommend starting with these settings and then tweaking here and there to get things perfect for your set up. The best way to do this is to use a free movie splitter and take out 2-3 minutes of your movie and encode that first as a test. This way you can make adjustments fast without having to wait for the whole movie to encoded. Adjust your test segment then play it on your TV, if it needs adjusting, fix it up and re-encode it again and again until it is just perfect, then do the whole movie. The only setting you will need to adjust if you find the picture contains artifacts is the “Constant Quality” slider. Slide it 20 or 19 to clean the video up, but beware, this will push the file size up.
Looks nice with tv series DVD’s. I used Virtualdub to compare the before and after and see the combing disappear.
Really needed this!
I would like to know a bit more of the ‘why’ those settings were chosen.
My source are downloaded files that sometimes are sharper and smaller than the result from these settings. Knowing what which setting do would help fine tunning.
Where could I learn more…?
Any chance you will update this with x265 encode settings?
Yes, At some point in the future when I have the time to research and test I will write some x265 related articles.
I use the settings for Matrix Reloaded and it’s moved out the faces on everyone, it took the wrinkles from around people’s eyes out and even almost smooth out all of Morpheus has Pits on his face. I don’t like that.
If you dont like the smoothing effect, simply leave it out
I need to have the best settings for youtube videos using mp4. can anybody help me here please? im a newbie in this and its taken me 4 days to get this far and still im stupidly scratching my head. i have a 1.3gig video (mp4) im wanting to compress before i post to youtube. also i want to make a preset setting with all settings sorted so that i can just load video and click on my user preset and go——
By the way i am using Handbrake – 1.0.7 – (32-bit) so when you say go to SUMMARY – for example, theres no such thing on my version. what there is, is: Picture/Filters/Video/Subtitles/Chapters
This goes back to what caincha referred to. “If you don’t like the smoothing effect, simply leave it out.” OK… for those of us who don’t understand all the varied aspects of video production, which one of the above settings is the “smoothing effect” that should be left out?
The smoothing effect is created by the Deblock filter. Set it to zero to leave it out
I followed your settings to convert a 150gb .mov file to a smaller mp4/mkv file to burn DVDs. But it it was too small at 1.23gb instead of 4.5gb. What settings do I change to make it to fit a dvd?
I did as stated in your guide, but the result was very choppy video playback.? are there any other options that i should adjust to remedy this? I can post a log if needed.
Very helpful, thanks. What I am trying to figure out is, for a given video — say from my phone — how may I reduce the file size yet maintain relative fidelity? (In short testing, h265 appears to be a better option.} Having a fuller explanation of Handbrake’s various settings (instead of a do this/do that) would prove quite useful. I have not yet been able to find such a tutorial.
But I just found and would recommend
https://www.demolandia.net/screen-test/patterns/page-1.html
for various video and sound test files.
Greg – I have a couple of questions:
1. What is the Anamorphic & Modulus setting? You didn’t mention anything about these settings and you have left it to the default (Automatic, Modulus 2).
2. Cropping – In your updated post, you have mentioned to leave the Cropping to automatic. In your previous post, you have always chosen custom and zero. If some cropping happens, will it distort the movie in the big screen? What is the significiance here?
3. Audio settings – You are right when it comes to DTS. My soundbar is not capable of playing DTS, so I always encode it to AC3 with bitrate 640. I can still find some difference in quality between AC3 passthrough and files converted from DTS to AC3. I’m using the highest bitrate possible. Is there anything to make the DTS to AC3 encoding better? Most of the blurays DD settings are coming with audios for visually impaired, so I cannot chose that soundtrack.
4. I recently converted Spiderman Far From Home DVD using your DVD settings as mentioned in the previous blog (not this updated one). I noticed that the face color (and other portions where the screen is brownish yellow) is bleached out. This doesn’t happen with the bluray settings. What controls this bleaching effect?
I really appreciate your help in this and thanks for the guidance.
In the update I have (1.3.0) deblock is not a number setting. It is a menu rated untralight to very strong. What would be the new menu’s equivalent to 5, which is what you suggestion for the deblock setting in the earlier editions? Thanks for this guide!
First of all fantastic guide, you have really helped me save a lot of stress by infinitely tweaking these on my own until I lose my sanity. So thank you so much!
On to my question… I see the interface has changed a bit since last year. For example, Deblock was previously a slider, and now presents its options as a drop-down list of Off, Custom, Ultralight, Light, Medium, Strong, Stronger, and Very Strong. There is also a new option related to this, Tune, with options Small (4×4), Medium (8×8), and Large (16×16). Could you comment on how you would update your settings within the newer UI for HandBrake?
Again, thank you very much!
Tested the settings, they looked f-ing awful. blury as hell. Not blaming you, and thankfully I was testing as it was encoding, so I stopped it and switched off the deblock (which is no longer a slider FYI). Was definitely the issue. Knowing how that works vs the slider method you covered would help, or even whether it is necessary or not. Seems not to be to me, so I’d say do away with it.
Good tips in here- especially the “ref=5:bframes=5” I never know what to type in that extra commands box to get it to look better. Running at “Slow” or “veryslow” presets will definitely increase your quality as he mentions here. When encoding in higher res like 1080p I’ve never had the patience to wait for a slow or very slow, personally but to each their own.
Keep in mind if youre looking for even better image quality on HD content you will want to step up the encoding profile to 4.0 or 4.1. I’ve been told the higher level profiles allow for higher bitrates and more features that the encoder uses to render colors and make action shots look clearer. keeping it 3.1 is only a thing if you’re trying to play the video on an old device. I have successfully played 4.0 encodes on older iphones/pads with mixed success so I usually keep it at 4.0 these days.
Another thing I would add is get the program “MediaInfo” from MediaArea.net- it allows you to pull up the encoder settings of whatever video is on your hard drive so you can peep all the settings whoever encoded your video file used when it was made- you can see how many ref frames or b-frames there are on your best looking rips.
Very helpful, made a clear movie, thank you.
I’m on a Mac, using v1.3.2. For the Deblock setting, instead of a slider I have a dropdown with options of Off, Custom, and additional choices from ultralight to very strong. If I choose custom, there is a text entry field for settings; the other choices disclose a Tune dropdown with options from small 4×4 to large 16×16.
Can you please advise on the appropriate settings, since I can’t set Deblock as shown in your tutorial?
Thanks!
Any suggestions for this scenario? I have VHS tapes of family home videos that were made by a professional company into DVDs years ago. Now I want to rip those DVDs into files I can store on my hard drive. I am looking for the best archival settings in handbrake to prioritize quality over storage space. I’m new to handbrake so any recommendations would be helpful!
Hello, love this post, however the newer version of handbrake doesnt the same Deblock options, do you have a alternative to it?
You mention this “ref=5:bframes=5” as a secret sauce, what does it actually do? Thank you for sharing these settings!
Hey man, love your content. I´ve gotta say the old one produces better quality, i prefer to stick to the old version of handbrake and the old page with the settings you gott
For audio you can select Bitrate or Quality — does anybody know whether the quality scale 1-10 goes from best to worst, or worst to best? There is no documentation on this anywhere.
Hi All – I am having a play with the new version of Handbrake now and am hoping to have some new articles up soon, including H265 encoding. I have included the deblock smoothing in the old articles as my source dvd’s were very grainy and I wanted to smooth them out. If your DVDs look good on your TV dont worry about deblock, leave it turned off. If you would like to try and smooth them so they look a little nicer try setting deblock to “ultra light”. As always, the best way to proceed is to make a 2 minute sample out of your source file (try to use dark action scenes) and run it through Handbrake so you can quickly see what your encode looks like before converting the whole file.More to come soon!
Hi. Looked around for several sites also to backup my own dvd’s. Made several test clips with different movies. It really shows how ancient they are now. Used to convert dvd all the time in the h264 days. Just to help out. Here are some pointers.
These are the settings I got the best results with:
PAL Video:
Codec: H.265 (H.265 10-bit is also suggested for banding. I have seen no proof of that.)
Encoder preset: Medium/Slow (Still double digits with my CPU.)
Encoder profile: Main
Encoder level: 5.1 (Highest my S905x player supports.)
CRF 12: Perfect quality. (Really jumps up filesize.)
CRF 16: Near Perfect quality. (Use between 12-16 for backups. I use 16.)
CRF 20: Watchable quality.
Filters:
Denoise: Light/Ultralight. Tune: Film (Light gives better compression.)
Deblock: Medium. Tune: Large 16×16. (Really needed for dvd. Stable picture. Removes fringing in pixels.)
In other guides I keep reading to just leave deblocking off. I did not understand why this was best so I tested all combinations 4×4 to 16×16 from Light to Strong. Dvd uses 16×16 macroblock and 8×8 blocks for DCT information as I know now so after encoding all test samples it seems that also 16×16 deblock gives the best result for dvd. The deblock Light setting still gave color fringing on macroblocks. After seeing Medium the fringing was gone. The Strong setting gave the same result.
Hopefully this helps.
Great tutorial! Thank you so much!
Great tutorial. Can you make one to store the dvds as back up. I find these settings to change to much the original appearence
Kinde regards