
Want to convert your DVD to H264 with Handbrake?
This is a simple easy guide on how to make the best encodes with the smallest file size in Handbrake using H.264 without having to know or understand all of the settings. Just copy my settings and you’re done!
This article is current as of FEB 2022 and uses Handbrake version 1.5.1
*Whilst your user interface may appear slightly different than shown here (depending on if you are using Windows, Mac or Linux), the settings and results will be the same across all platforms.*
**NOTE** – These settings are for DVD to H.264 ONLY
To convert 1080P BLURAY to H.265 – CLICK HERE!
To convert 1080P BLURAY to H.264 – CLICK HERE!
To convert DVD to H.265 – CLICK HERE!
To convert 4K BLURAY to H.265 – CLICK HERE!
THE SHORT VERSION
1 Open file in Handbrake and make sure you are on the “Summary” tab
2 Select your preferred output file format “MKV’ or “MP4” (MKV was used for this tutorial)
3 Click “Dimensions” tab
4 Set Resolution Limit to None and leave Anamorphic as Automatic
5 Leave Final Dimensions set to Automatic
6 Click the “Filters” tab
7 Make sure “Interlace Detection” is set to “Default”
8 Set “Deinterlace” to “Decomb”
9 Set “Preset” to “Default”
10 Make sure everything else is set to “Off”
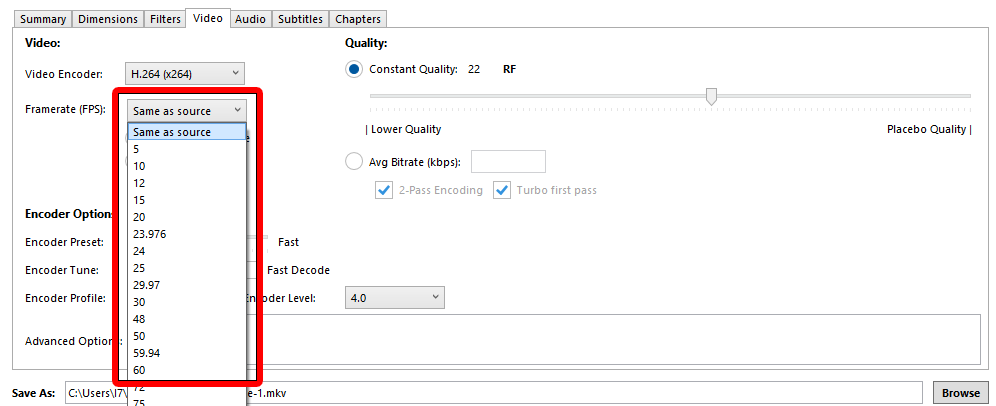
11 Click the “Video” tab
12 Select “H.264 (x.264)” from the Video Codec drop down menu
13 Select “Same As Source” in “Framerate”
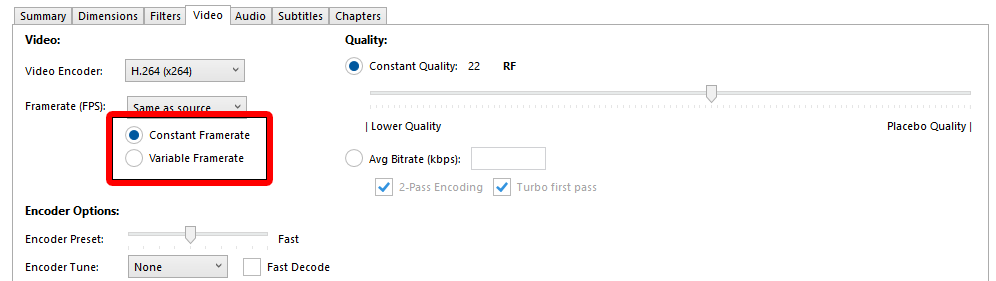
14 Check the “Constant Framerate” button
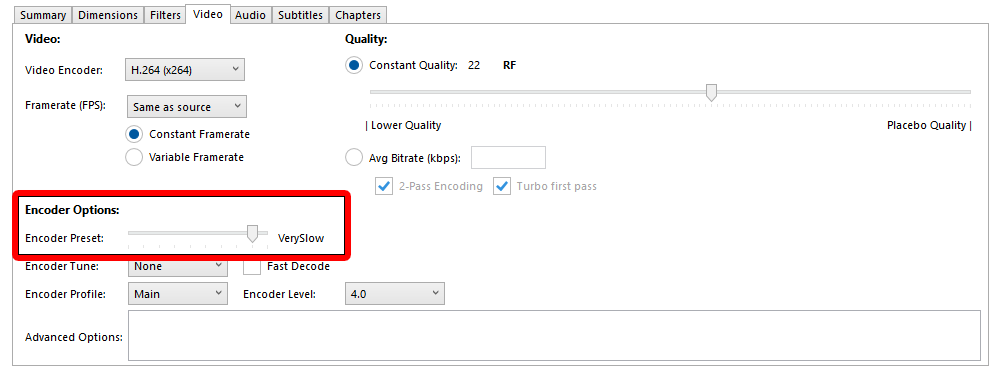
15 Set “Encoder Preset” slider to “Very Slow”
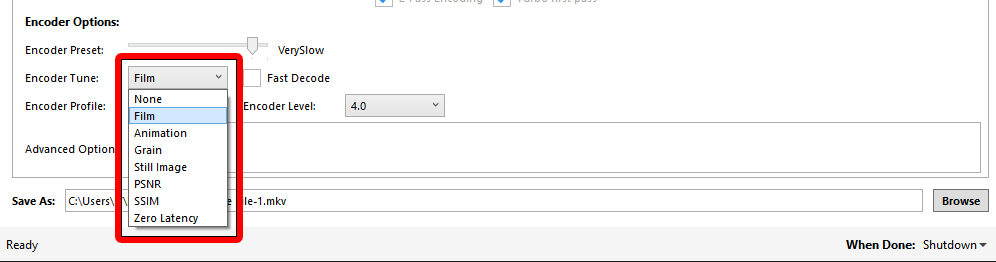
16 Set “Encoder Tune” to “Film”
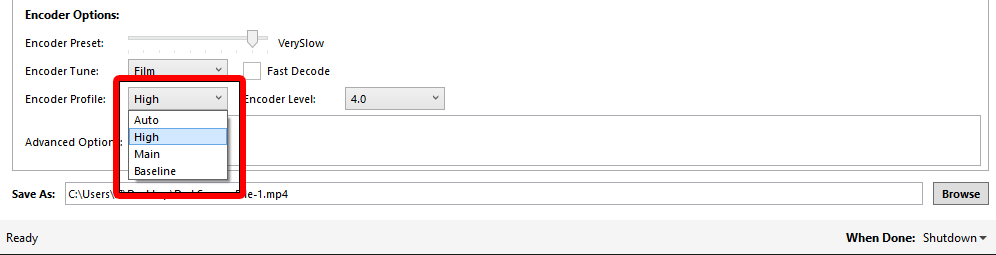
17 Set “Encoder Profile” to “High”
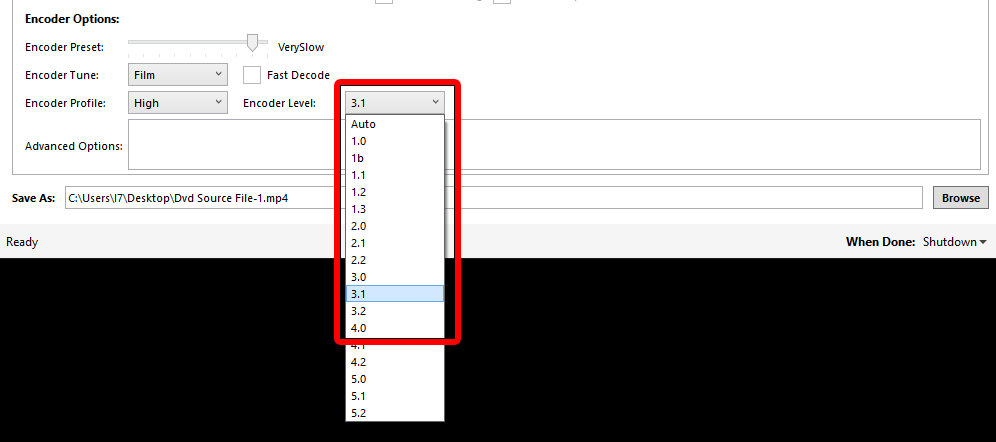
18 Set “Encoder Level” to “3.1”
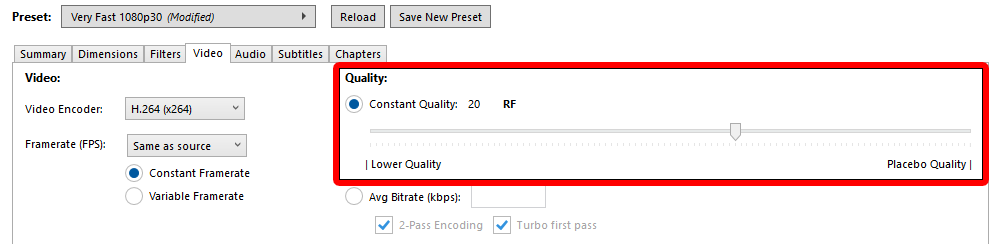
19 Set the “Constant Quality” slider to “20” if you want great picture quality – If you don’t mind a slightly softer picture and would prefer a smaller file size set it to “24”
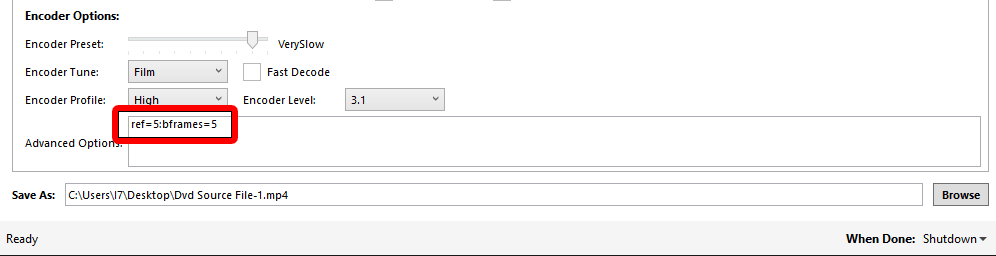
20 In the “Additional Options” box copy and paste the following:ref=5:bframes=5
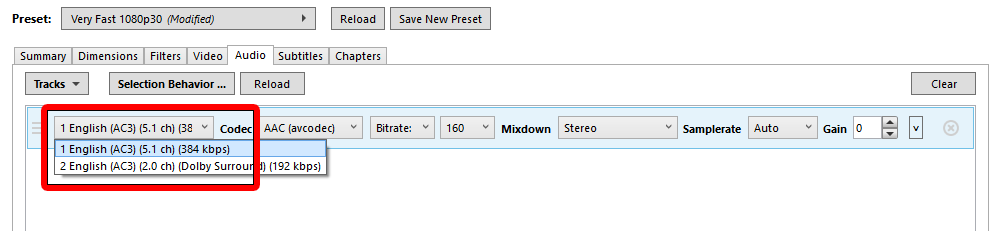
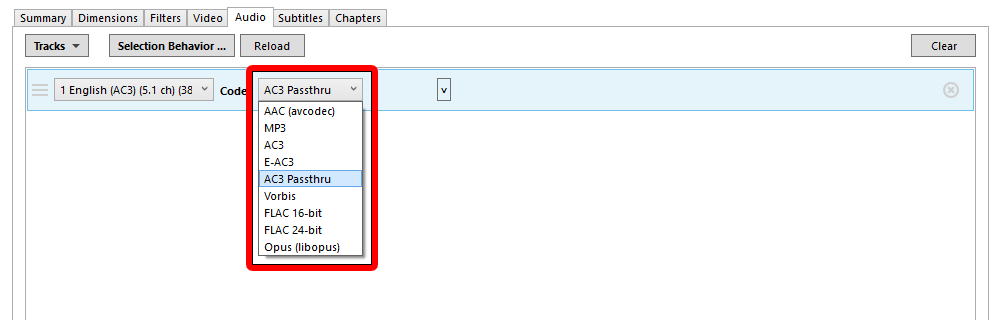
21 Click the “Audio” tab
22 Select the English 6 Channel (5.1) Dolby Digital soundtrack
23 Set “Codec” to “AC3 Passthru”
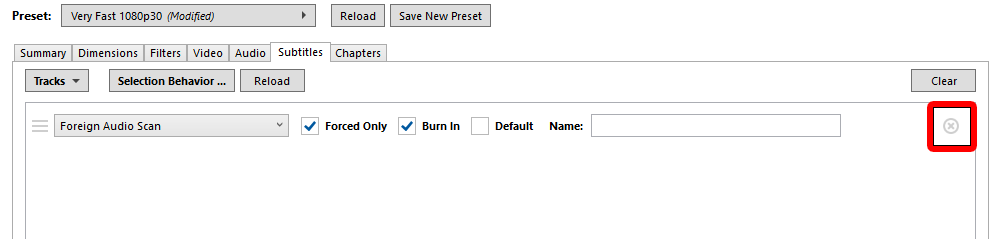
24 Click the “Subtitles” tab
25 Click the “X” in the circle at the right side to remove the subtitles track if you don’t want them. If you’re using a Mac click where it says “Foreign Audio Scan” and select “None”
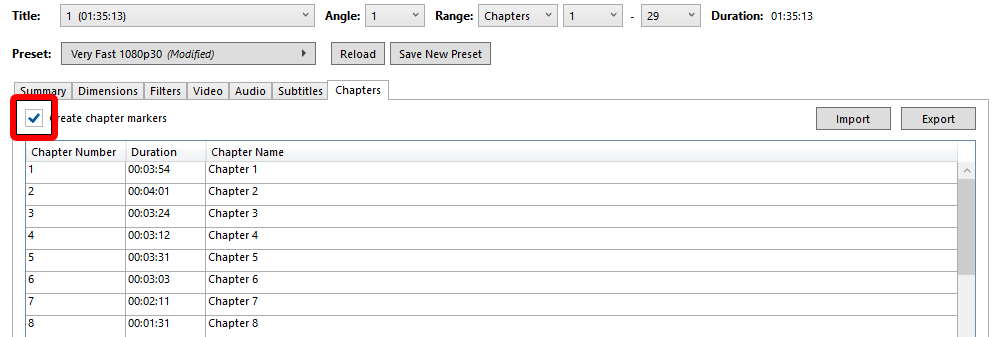
26 Click the “Chapters” tab
27 Uncheck the “Create Chapter Markers” option if you don’t want them or leave it checked if you do
28 Press the Green “Start Encode” button
THE LONG VERSION
THE GOAL – To produce the highest quality video with the smallest possible file size, whilst retaining the entire original 5.1 Dolby Digital sound track.
DISCLAIMER – This method will produce very nice quality videos, but may take SEVERAL hours process to each hour of video! Unfortunately, good quality video with small file size cant be done quickly, it just doesn’t work that way. Also, all set-ups are different. We all have different size TV’s that use differing upscale methods, different size and shape rooms, different players and a plethora of other factors that could produce varying results. This is a guideline, and a great place for a beginner to start. If you feel there is something that could be done better, or should be done differently, please feel free to let us all know by leaving a comment.
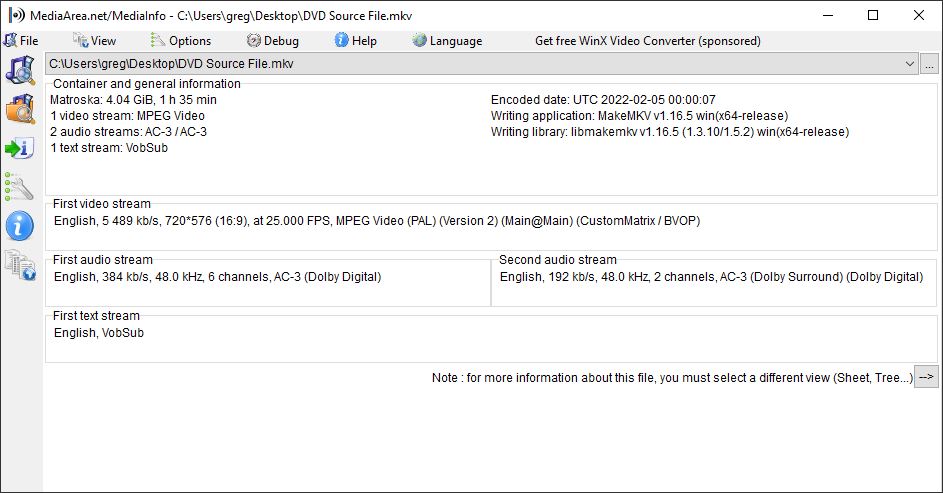
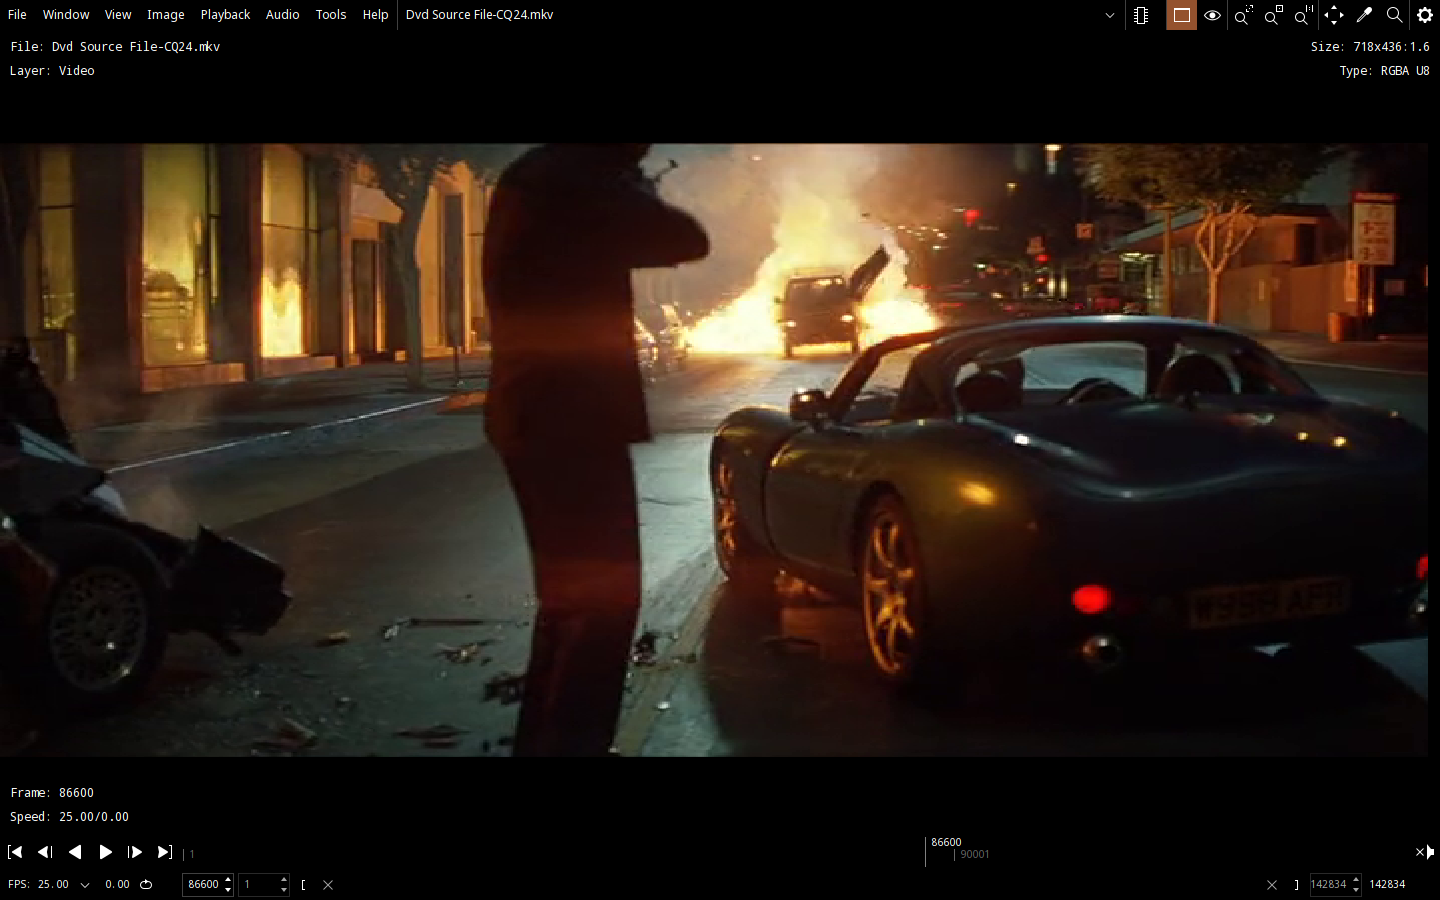
THE TECHNICAL STUFF – My TV is a 65″ Samsung 4K, and I sit about 10-12 feet back from it. I play the media from a Apple TV 4K, and use the Infuse Pro player app. The video is encoded on a 7 year old HP desktop computer with a Intel I5 processor. The version of Handbrake used in this tutorial is v1.5.1 which is the current stable release for February 2022. The details of my DVD Source are shown below in Media Info video data viewer.
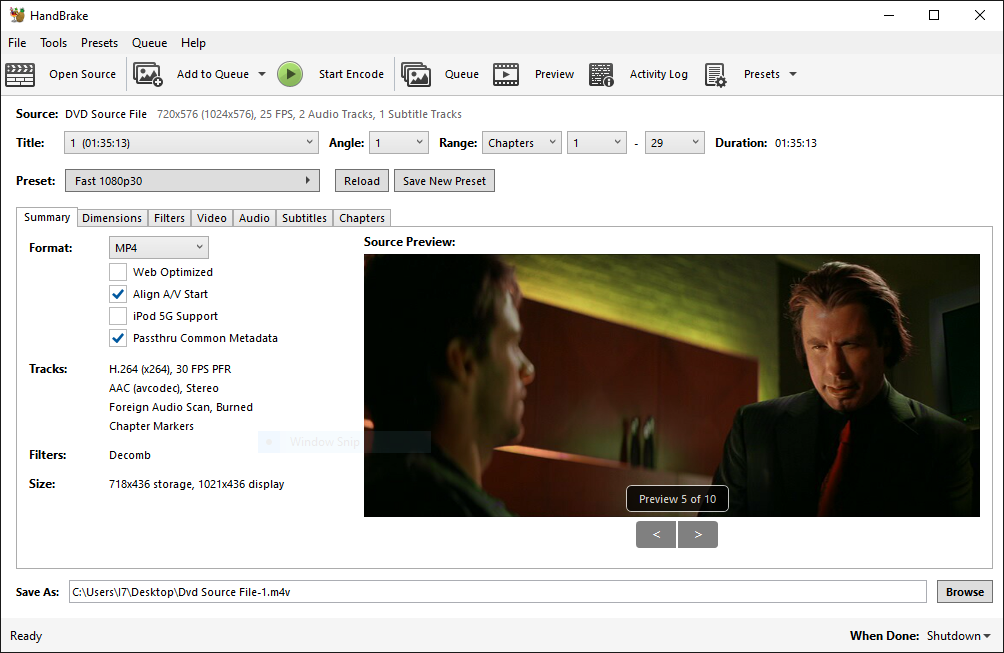
Once you have the current version of Handbrake installed and have ripped your DVD video to MKV, drop your file into Handbrake, or you can also click the “Open Source” button in the top left to load your video file. Handbrake utilizes 7 tabs to help you navigate though setting up the desired video file output parameters.
![]()
Once your video has loaded you should find yourself on the “Summary” tab. If not, click Summary
The only thing we need to be concerned with here is the output file format option.
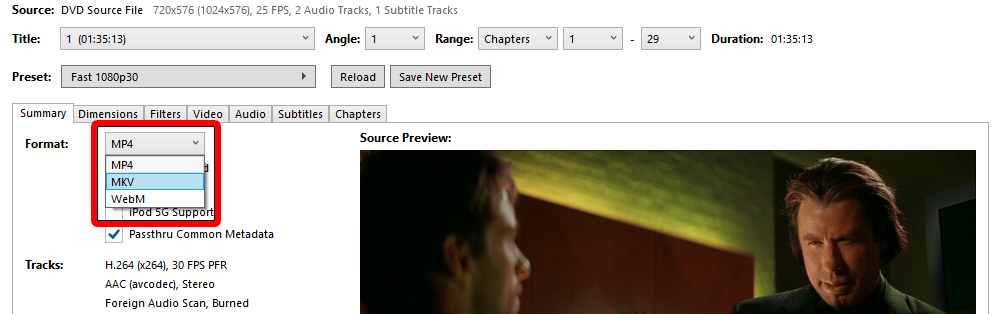
Select either “MKV” or “MP4” and then click the “Dimensions” Tab. (MKV was used for this tutorial and is my personal preference)
![]()
Handbrake has become really good at automatically picking the right video output size settings, so I recommend not touching anything in this window unless you have to. Just make sure that the “Resolution Limit” is set to “None”, and Anamorphic is set to”Automatic”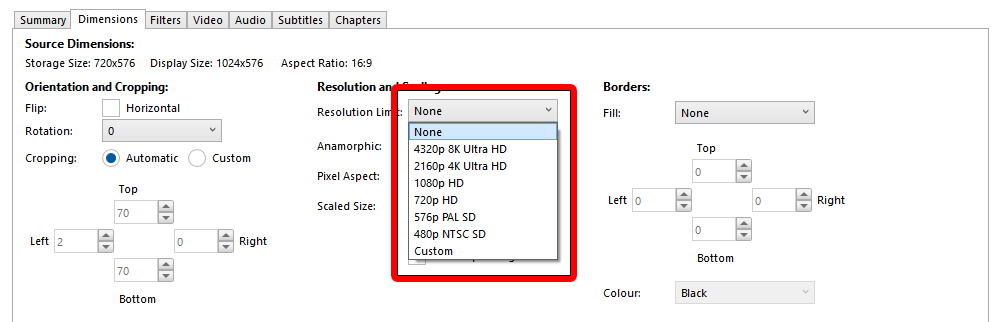
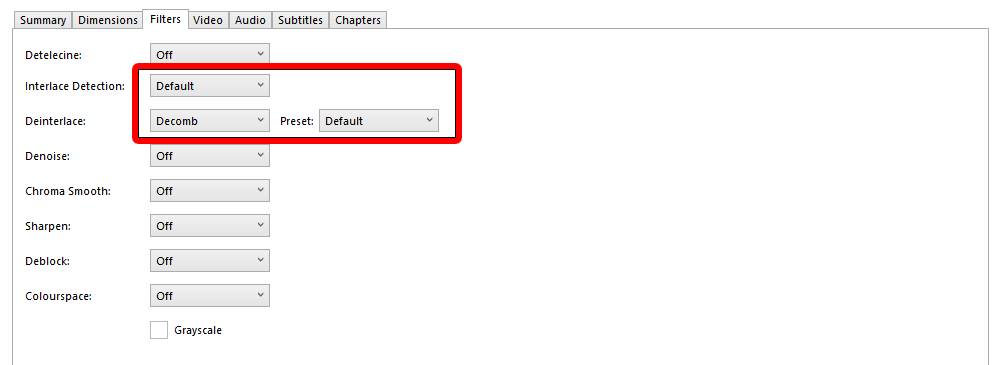
Next up, click the “Filters” Tab.
![]()
The first thing we will tackle is Interlacing. Different countries use different display methods. Where I am in Australia we use Interlaced video, which draws the screen in two separate passes and interlaces them together. Once your eye is aware of interlacing it is very hard to un-see, and is quite annoying. Progressive scanning is much nicer to watch. It draws each frame from start to finish in a progressive line. We are going to set Handbrake up so it doesn’t matter what kind your source video is, your output will be progressive. For “Interlace Detection” make sure it is set to “Default”. For “Deinterlace” select “Decomb”, and make sure the preset is set to “Default”. The default decomb method is quick and does a pretty good job.
Next is an optional step. If your source video is an old production it might be quite coarse to look at. If you want to clean it up and smooth it to look nicer on that big HD TV you can follow the next step. If you want to leave it in its original state (Like if you want to preserve the film grain look) you can skip this step.
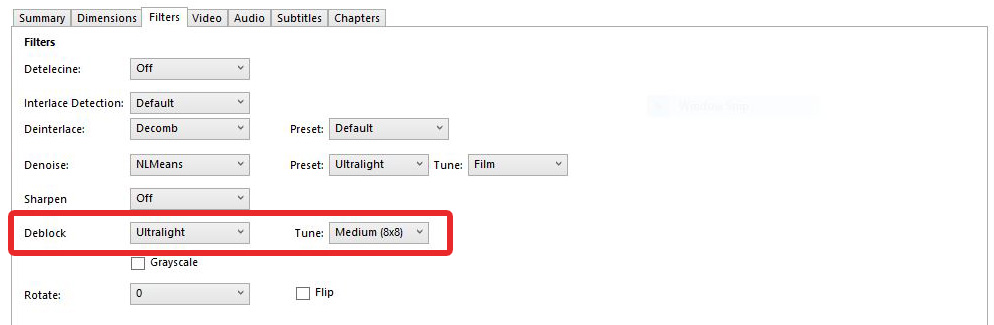
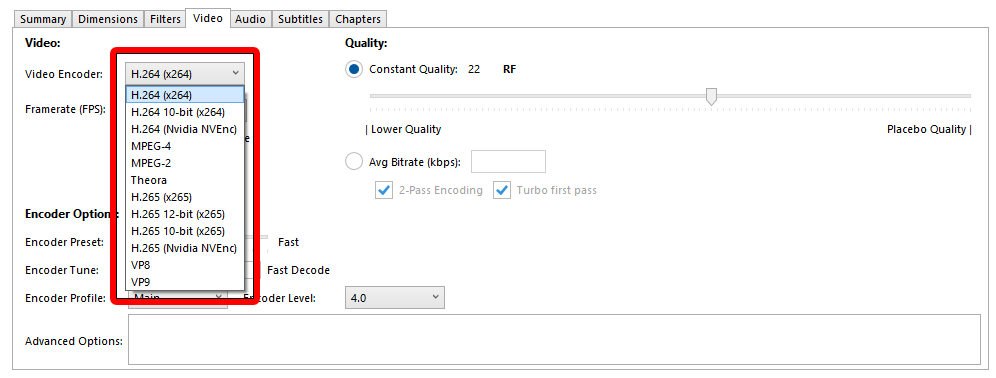
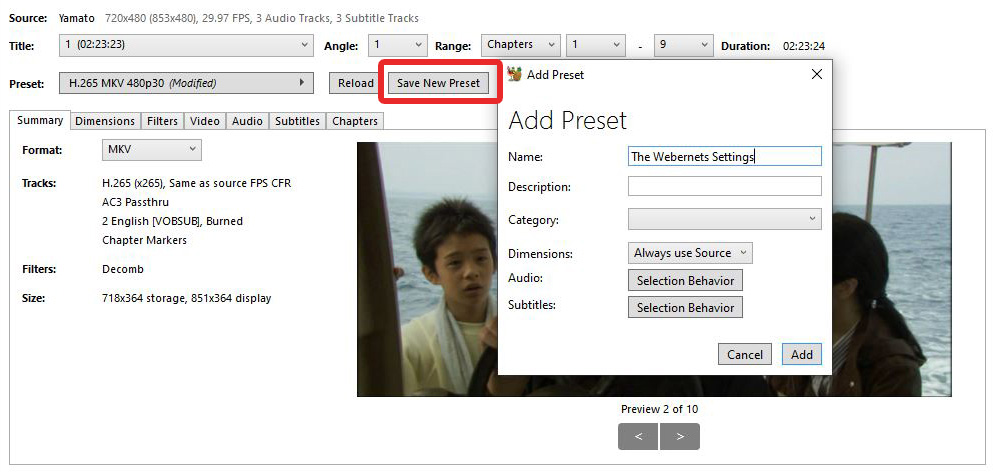
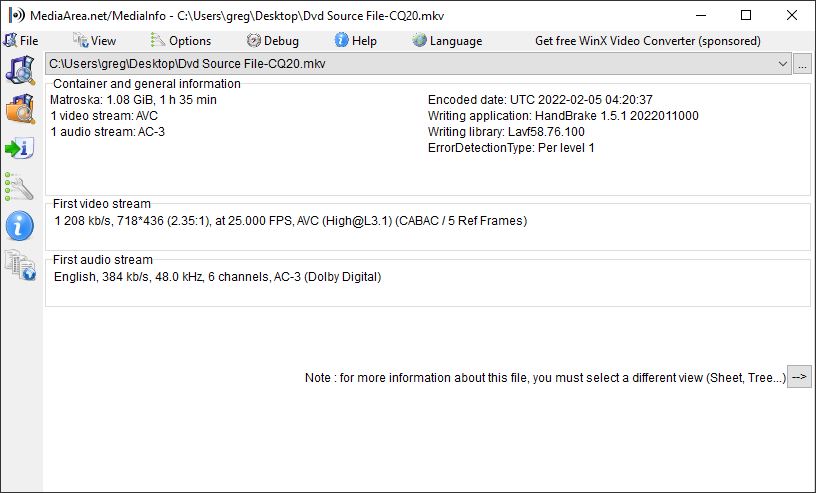
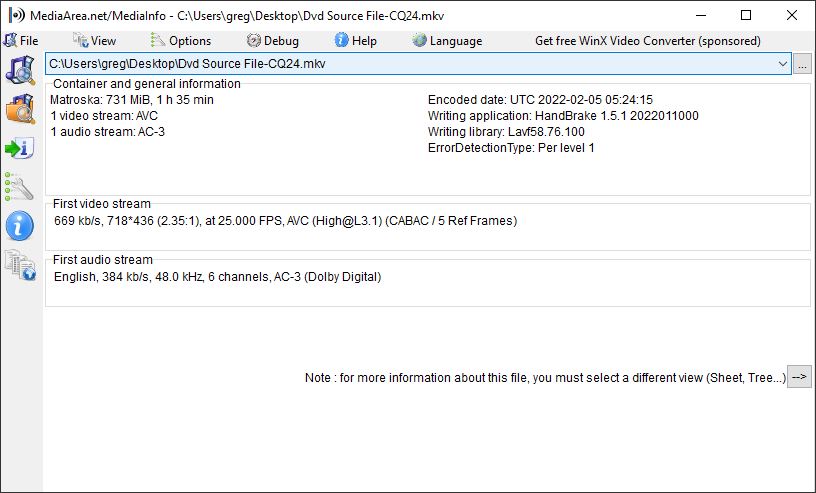
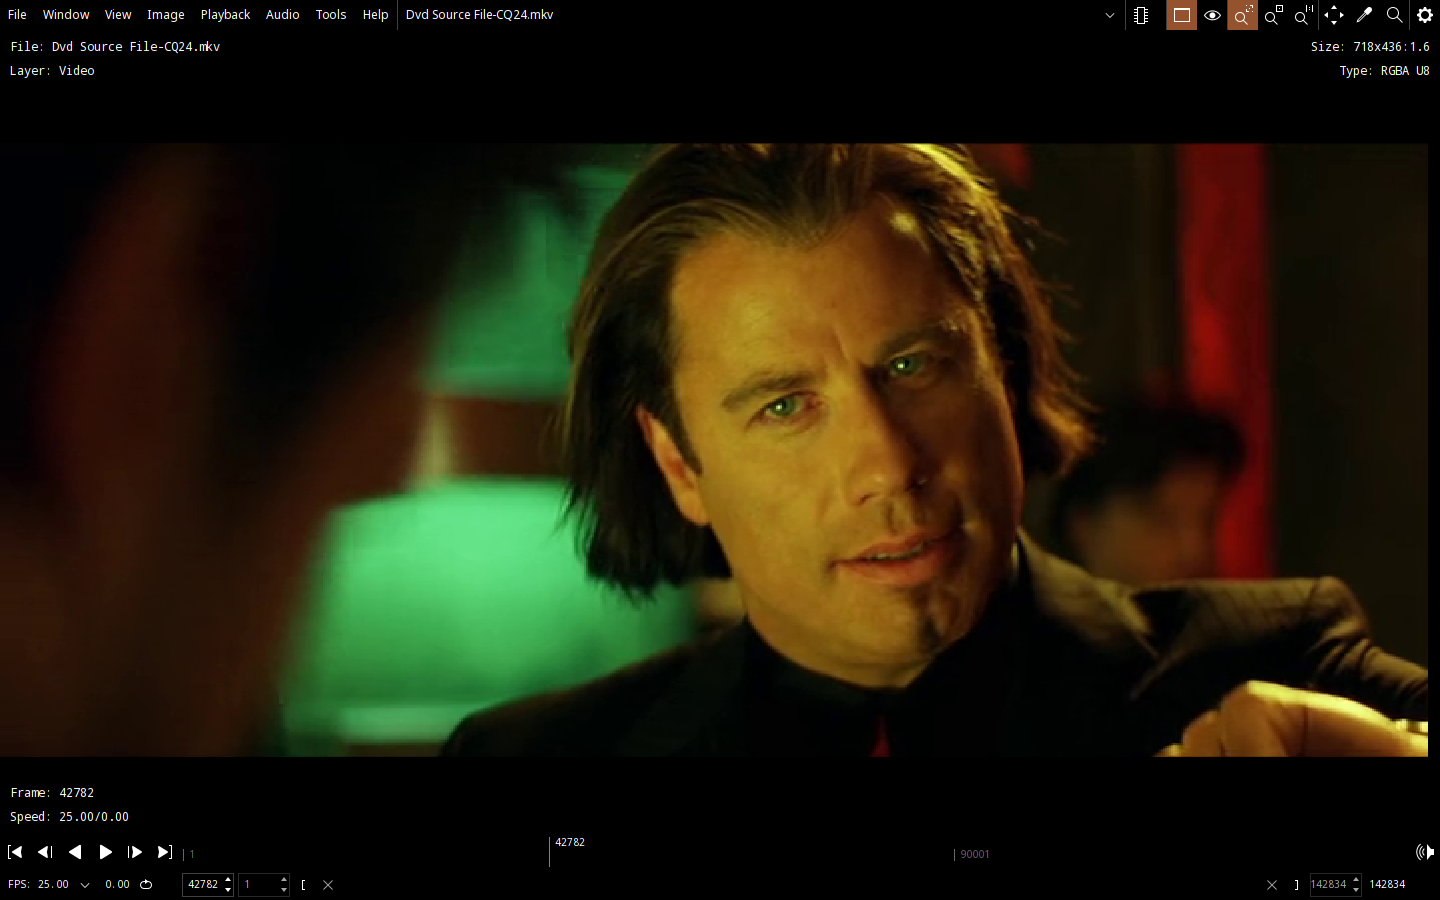
Click Here To Expand and Show Optional Filter Instructions For the Denoise drop down option select “NLMeans”. Whilst it is a bit slower than the “hqdn3d” option it produces a nicer result. Once you have selected “NLMeans” two more selections will appear. This is where it becomes difficult to create a “one setting fixes all” solution, as every source video will have different imperfections and artifacts. What I have found is that “Less is More”, so try to go as sparingly as possible to avoid introducing new issues. Start with setting the “Preset” to “Ultralight”. For the “Tune” drop down, in most cases “Film” is going to be the preferred option here. If your source video was poorly encoded and has “block” artifacts (squares or tile effect in the picture) you can tune it out here by turning “Deblock” on and selecting “Ultralight” or “Light”. Again, less is more here as well so don’t choose “Strong” or you will end up with a unpleasant video encode. Next, click the Video tab. This is where the magic happens. First up we need to select the “H.264 (x264)” codec, so select it from the “Video Codec” drop down menu. Next we need to select the framerate. In most cases there will be no need to modify the framerate so select “Same As Source” In the past when playing with Variable Framerates I have had occasional sync issues, where video and audio tracks skew. For this reason I recommend sticking with “Constant Framerate”. Variable framerates are also not supported by some players. And now the part that we all struggle with, the speed vs quality setting. We all want our encodes to finish quickly and be the highest possible quality, but you cant really have both. It is a sliding scale where fast encodes = poor quality and good quality = slow encodes. Avoid the temptation to go fast and stick with “Very Slow”, as it is actually faster encoding a file slowly only once, as opposed to having to do it again because it looks bad. Filesize is also affected at different speeds. For “Encoder Tune” select “Film” Set the “Encoder Profile” option to “High” For “Encoder Level”, set this to “3.1” Next is the “Quality” slider. This will determine the overall file size and affect the encode quality considerably. Again, it is a sliding scale between file size and quality. If you are like me and spend more time looking for artifact’s in the encode than watching the actual movie you will want to select “20” on the “Constant Quality” slider. If a slightly softer picture doesn’t bother you and you would prefer to reduce the file size even more, move the slider to “24”. Now it’s time for the secret sauce. Adding additional arguement’s in the “Advanced Options” window allows even greater tuning of the codecs performance. Copy and paste the following: Once you have completed all of these steps, move to the Audio Tab. My source video has two audio tracks, and you can definitely keep them all if you want to. To reduce file size I am only going to keep number 1, the 5.1 AC3 track so I have selected it in the drop down box. I want to preserve the Dolby Digital sound in its entirety, so I am going to select “AC3 Passthru” which allows the audio track to pass through Handbrake untouched and un-modified. If you want to compress it down to 2 channels and reduce file size even further by using an audio codec like mp3 you can do so here as well. The next step is the “Subtitles” tab. If your source file contains subtitles and you don’t want to retain them, click the “X” at the right side to remove the subtitle track from the encode. If your using a Mac click where it says “Foreign Audio Scan” and select “None” If you want to keep the subtitles, select the track you want from the drop down box. Uncheck “Forced Only”, as this will keep the subtitles for the whole movie. You will also want to uncheck “Burn In” as this will give you the option to turn the subtitle on and off as desired. On to the final tab, click “Chapters” If your source file contains chapter markers, Handbrake will recognise them and set them up automatically. I will leave the default “Create Chapter Markers” setting checked. If you do not wish to create chapter markers simply uncheck this setting. As most media players now allow you to scroll pretty quickly through video files, chapter markers are not really required anymore. NOW ITS TIME TO ENCODE! If you are only doing one file, press “Start Encode”, and your computer will start crunching down the video. If you want to encode multiple files using these settings, click “Add to Queue”, then drag in your second title. Once it has finished importing, just press “Add to Queue” again to add it for encoding using the same settings. Once all of your subsequent files have been added to the queue, press “Start Encode” to get things moving. It might also be a good idea at this time to create a Preset for these settings, so you don’t have to enter them all manually each time you want to use them. Click Here to Expand and Learn How To Create A Preset Go back to the summary tab and click on “Save New Preset”. Give your preset a name. Clicking “Add” now will save only the video settings, which I recommend as most of your subtitle and audio track details will be different from title to title. If you are encoding an entire season of a show it will definitely be worthwhile configuring the audio and subtitle preferences as they should be the same throughout all episodes. RESULTS – I encoded the source DVD twice. Once at a Constant Quality of 20, and another at 24. The encode at 20 reduced the file from 4.04 GB down to 1.08GB, a reduction of about 73%. The quality is extremely good and almost indistinguishable from the source. Click Here to Expand and View Detailed Encode Results The second encode at “Constant Quality 24” produced a file of only 731 MB, which is about 82% smaller than the source. It is still very watchable, with no block artifacts, but the picture is softer (not sharp). I have really struggled trying to find artefacts in these encodes. However, using Darby Johnston’s awesome and free video review tool DJV I have been able to isolate a frame of interest. Below you can see frame 42782. Just to the left of JT’s head you can see another actors hair. In the CQ20 encode it is ever so slightly grainier than the original source DVD. But at CQ24 you can see some blocking starting to occur. JT’s eyes look sharp in the source DVD, but are also slightly softer in CQ20, and just a little bit softer again in CQ24 I tried to find a dark frame with action, as this is usually where artefacts hide. But again it was difficult to find a real show stopper. Handbrake has done a excellent job with this DVD. WHERE TO GO FROM HERE – As I said earlier, this is a guideline, and a great place for a beginner to start. I recommend starting with these settings and then tweaking here and there to get things perfect for your set up. The best way to do this is to use a free movie splitter and take out 1-2 minutes of your movie and encode that first as a test. This way you can make adjustments fast without having to wait for the whole movie to encoded. Adjust your test segment then play it on your TV, if it needs adjusting, fix it up and re-encode it again and again until it is just perfect, then do the whole movie. The only setting you will need to adjust if you find the picture contains artifacts is the “Constant Quality” slider.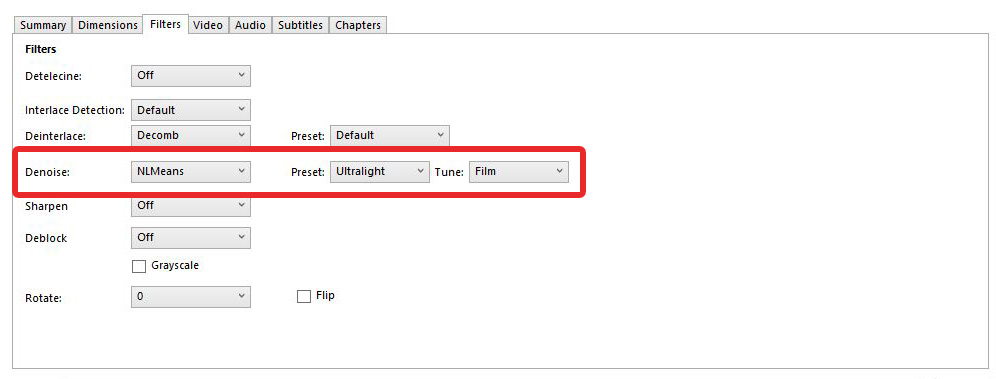
**TIME SAVING TIP** – If you want to quickly see what effects your settings have on the video your best bet is to cut off a 1-2 minute chunk of your source video file. Then you can quickly run it through Handbrake and see how your settings look before encoding the whole file. See how it’s done in my article HERE.
![]()
ref=5:bframes=5
![]()
 If you want to preserve a second audio track click “Tracks” and select “Add Track” and it will add another line of options, and you can select the second track you want to keep in the same way you selected the first track.
![]()
![]()


Hi, Great article and it was very helpful. Are you going to do one on th Handbrake CLI?
I’m learning Python so thought I would write a simple script to run though a directory converting every mp4, mkv, avi, etc. to mkv and encode with my fav preset ‘h.264 mkv 480 p30. I can get it to produce the output but the GUI version and the CLI versions produce slightly different sizes so I’m clearly using using different parameters. How can I find what parameters are set in the GUI preset to identify what is the delta between default CLI and GUI preset.
Hi, I haven’t played with Handbrake from the command line, so I can’t offer any assistance on this one sorry.
Hi, Thanks for the write up, a great starting point.
I’ve been messing about with a episodic PAL DVD set for weeks with these setting (mid 90’s show). Encoding with CQ between 16-20. Added filters…with/out denoise, with/out sharpening, with/out hardware nvenc options (faster but larger)…and have never been happy with the results, only getting marginal improvements. Was even looking at MediaInfo output for various sources and trying to duplicate settings. Finally went back to the source DVD and played it direct to TV (55″ Sony) to check what I was encoding…
Sigh…I forgot the old adage, garbage in-garbage out…ok, maybe not garbage, but I’m never going to be able to improve on the source material. Guess I’m so used to all the more recent encodes from a higher quality source that give a better output. LOL
Hi David, thanks for your comment. I agree, its always hard going back to old content, it can be painful to watch. You will never make it fantastic, but you can make it watchable. I bought the box set of Malcolm In The Middle back in the day, and the quality was just horrible. But I did manage to smooth it out and sharpen it, and whilst it was far from perfect, I took comfort in the fact that I had been able to improve the quality greatly from the crap that was on those DVD’s, and make something I could live with. Its an old article (2015 I think) and the settings have changed, but maybe this article might help salvage your source material. I hope it helps, and yes, its probably time for an updated article – https://www.thewebernets.com/2015/02/28/easiest-best-optimal-settings-for-handbrake-dvd-video-conversion-on-mac-windows-and-linux/
Thanks for this write up. I’ve used it to deinterlace DVDs which contain VHS home video recordings.
I don’t know if you’ve played around with it yet but if you want to go down another rabbit hole, you can trying using AI to upscale these deinterlaced 480 video files into 1920×1080 HD videos, I wouldn’t go so far as trying to make 4k videos out 480 videos although you could try. Topaz AI Video Enhance is the best known at the moment. It’s not simply upscaling but it’s also using AI to increase the amount of detail in the video. I’m currently doing this at the moment. Be warned, it’s much more taxing on your PC than Handbrake.
Hi Joe, thanks for your comment. I haven’t tried this software yet but it looks interesting. I will download the trial and give it a go. Thanks for the tip!
I appreciate the write up, thank you – but seriously how different is this than just banging ‘hq 1080p surround’ and saying “OK run”?
Hi Steve, thanks for stopping by and leaving some feedback, I really appreciate it. If you rip a DVD which is 480P and you encode it with a 1080P preset, you aren’t really making the most of the compression capabilities of the codec. When you compress a 1080P source down, the final bit rate is generally still larger than a raw DVD, so you could potentially end up with a file larger than the source file. 1080P is a large screen resolution, 480P is small, so using the large settings on a smaller source file is not going to be as efficient as settings optimised for a smaller source file. I hope that makes sense. Thanks again for the great question!
Hi GP,
Thank you for posting these suggestions. Unfortunately, following them did not seem to do very much to help clarify my image, Like you, I sometimes find myself looking at the image itself rather than the content, and I find the image less than sharp. Here’s the deal.
DVD rips of a tv show.
episode length just under 45 min.
format avi,
file size 350mb more or less
frame width 512 frame height 382, a bit too “boxy” for me
data rate 976kps
total bitrate 1091kps
frame rate 23.98
In VLAN I can change the ratio, but that does not really help.
I am sort of concerned that he image clarity is/will be limited by the original source material.
The show ran from 1997-2001, and it might be that the original encode was simply not that good.
I am no expert, but I follow instructions well. Any ideas?
File size is not a problem — I have plenty of space.
Also, I am fortunate enough to have a machine with a Ryzen Threadripper 3970x — it eats this stuff for breakfast :-), so it is easy to fool around.
Cheers,
John
Thanks for creating this article it’s going to be super helpful for me! I do have a question though is 20 RF the limit for this? I’m only asking because I don’t want to go any higher if it you can notice the difference compared to 20 RF maybe if I only go up to 21 do you think it will look the same without a softer picture like you said? Thanks for taking the time to reading and responding to my question I appreciate it!
I just checked your previous post on h264 settings and you set the RF at 22 and I’m wondering why is it at 20 in this one? How high can you set the rf until you notice the quality isn’t as good as RF 20? I know handbrake says 20-24 for 1080 so it’s a little confusing for me sorry if I asked too many questions thank you for the help.
Hi John,
I gave some filter settings in my 2019 article that may help. Hopefully they are still current. – https://www.thewebernets.com/2019/02/10/easiest-best-optimal-settings-for-handbrake-dvd-video-conversion-updated-feb19/
Hi Gabriel,
Every video and viewing environment is different. As always, my best advice is to use some video splitting software and create a small 1-2 minute chunk out of your original source file. Play around with the settings until it looks good, then encode the whole file. Hope this helps.
Hi Max,
In the older articles I had a 42 inch HD screen, but bigger screens are getting cheaper, and the resolution is getting higher (4K) now, so the settings were updated to suit
Thanks for responding I’ll try that but I have another question if you don’t mind should I use the optional filter settings you did or is that only if I need it? I don’t know much about those settings I usually leave filter settings to default.
Hi again Gabriel, I would only add filters if you are unhappy with the quality of the video. If you add them when no problem exists you could potentially create problems that are not there in your source video.
I have used The Webernets settings for Handbrake for a long time and found them very good.
I was using version 1.5.1 and the settings listed here. I just recently got a new computer with windows 11. My handbrake is now version 1.9.2. I copied the settings from here, but my file sizes are larger. I think there’s something in the cropping or sizing which may be different in the newer version.
Can you give some suggestions for version 1.9.2 for encoding H264 standard def material? Thanks.
Hello. I’ve used your recommendations for Handbrake with great success for some time.
I used the above settings for version 1.5.1.
I have a new computer running Windows 11. When I went to install Handbrake, I was asked to install .NET to make Handbrake 1.5.1 work. I can’t make that change to this computer, so I opted for a newer version of Handbrake. I’m now running Handbrake 1.9.2 but using the same settings my file sizes are larger. I’m also struggling a bit with the cropping which appears different in that version. I’d like to maintain the aspect ratio of my captures.
Any advise on using 1.9.2? Thank you.