
Convert BluRay to H.264 with Handbrake

Convert BluRay to the smallest file size in Handbrake without having to know or understand all of the settings. Just copy my settings and you’re done!
|
H.264 Vs H.265 – Which one should I use? |
*Whilst your user interface may appear slightly different than shown here (depending on if you are using Windows, Mac or Linux), the settings and results will be the same across all platforms.
**NOTE** – These settings are for 1080P BLURAY to H.264 Video ONLY
Use these settings if you have a 1080 HD Television and older media player
To convert 1080P BLURAY to H.265 – CLICK HERE!
To convert DVD to H.265 – CLICK HERE!
To convert DVD to H.264 – CLICK HERE!
To convert 4K BLURAY to H.265 – CLICK HERE!
THE SHORT VERSION
1 Open source file in Handbrake and make sure you are on the “Summary” tab
2 Set file format to “MP4’ and deselect “Passthru Common Metadata”
3 Click “Dimensions” tab and set Resolution Limit to 1080p and leave Anamorphic as Automatic, leave cropping “Automatic” and borders “None”
4 Click the “Filters” tab
5 Leave Interlace Detection set to Default, De-interlace set to Decomb, and Preset at “Default”
6 Click the “Video” tab
7 Select “H.264 (x264)” from the Video Codec drop down
8 Select “Same As Source” in “Framerate”
9 Check the “Constant Framerate” button
10 Set “Encoder Preset” slider to “Very Slow”
11 Set “Encoder Tune” to “Film”
12 Set “Encoder Profile” to “High”
13 Set “Encoder Level” to “4.1” – If this wont play on your system drop it back to “3.1”
14 Set the “Constant Quality” slider to “24”
15 In the “Additional Options” box add ref=5:bframes=5
16 Click the “Audio” tab
17 Select the preferred 7.1 or 5.1 channel soundtrack
18 Set “Codec” to “AC3” and the Bitrate to 448kb
19 Set Mixdown to “5.1 Channels” and Samplerate to “48”
20 Click the “Subtitles” tab
21 Click the “X” in the circle at the right side to remove the subtitles track on Windows, or select “None” from dropdown on Mac
22 Click the “Chapters” tab
23 Uncheck the “Create Chapter Markers” option if you don’t want them or leave it checked if you do
24 Give your output file a unique name and save it somewhere easy to find
25 Make a preset to save the settings and Press the Green “Start Encode” button
THE LONG VERSION
THE GOAL – To produce the highest quality video with the smallest possible file size, whilst creating a 5.1 Digital Sound Track that is compatible with most players and TV’s
DISCLAIMER – This method will produce very nice quality videos, but may take SEVERAL hours to process each hour of video! Unfortunately, good quality video with small file size cant be done quickly, it just doesn’t work that way.
THE TECHNICAL STUFF – My Test TV is a 42″ Samsung 1080 HD. The viewing position was about 10-12 feet back. I played the media from a WD TV media player. The video is encoded on a 2 year iMac with I7 processor. The version of Handbrake used in this tutorial is v1.6.1 which is the current stable release for March 2023.
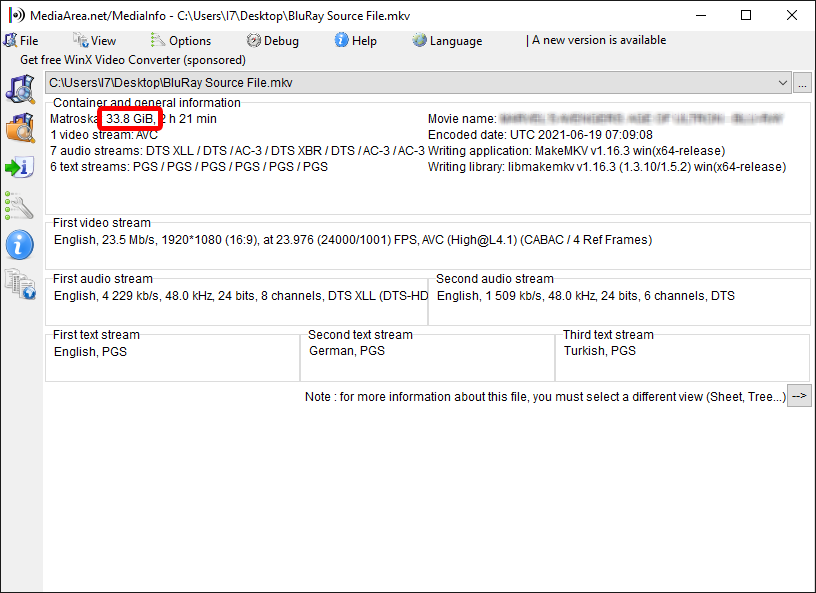
MY SOURCE FILE – My source file straight off the BluRay weighs in at a hefty 33.8 GB and contains many audio tracks. We will be able to reduce the size of this significantly! (Info provided by Mediainfo – free download HERE)
LETS ENCODE!
Once you have the current version installed and have ripped your Blu Ray video, drop your file into Handbrake, or you can also click the “Open Source” button in the top bar to load your video file. Handbrake utilises 7 tabs to help you navigate though setting up the desired video file output parameters. Once your video has loaded you should find yourself on the “Summary” tab. If not, click Summary
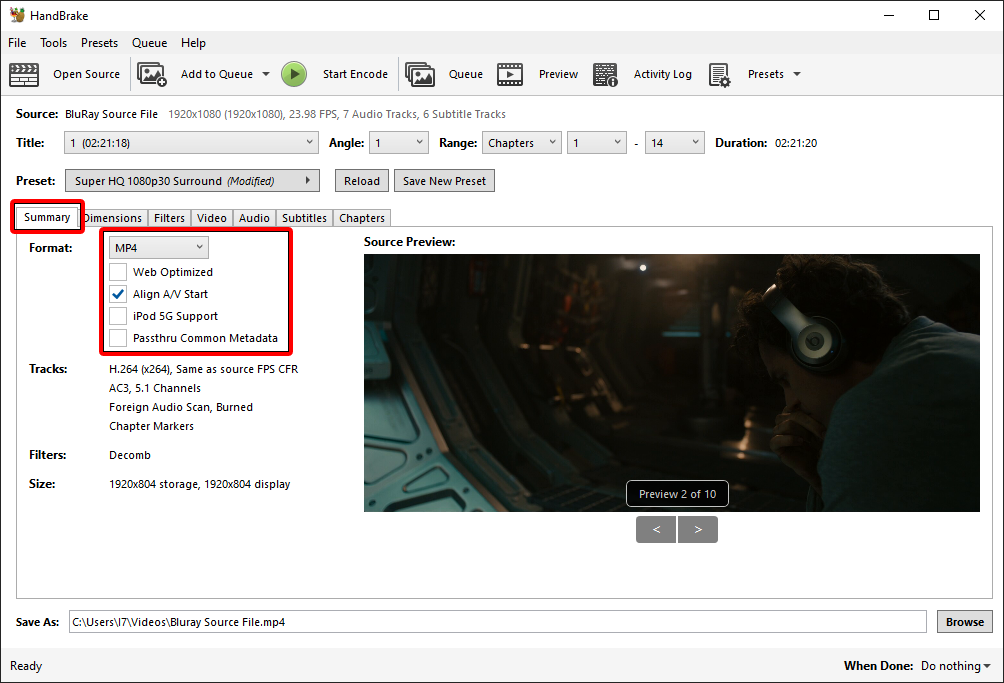
Select “MP4” as your output file format and uncheck “Passthru Common Metadata”. Now click the “Dimensions” tab.
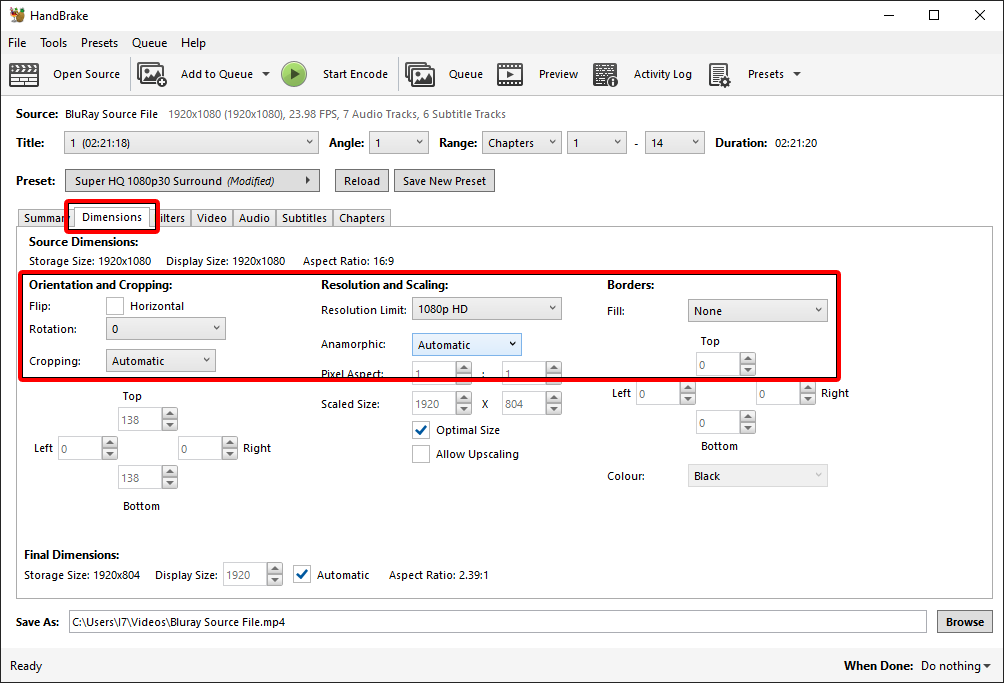
Handbrake defaults here are good, but I would double check and make sure Cropping is set to automatic. If your movie has black bars at the top and bottom this will remove them. They add to the file size and aren’t needed, so let’s get rid of them. Set your resolution to 1080P HD and leave Anamorphic at Automatic. Borders should be “None” by default. Your final dimension may look different, as each file you encode will likely be different. This is not an issue, and we can now move on to the Filters Tab.
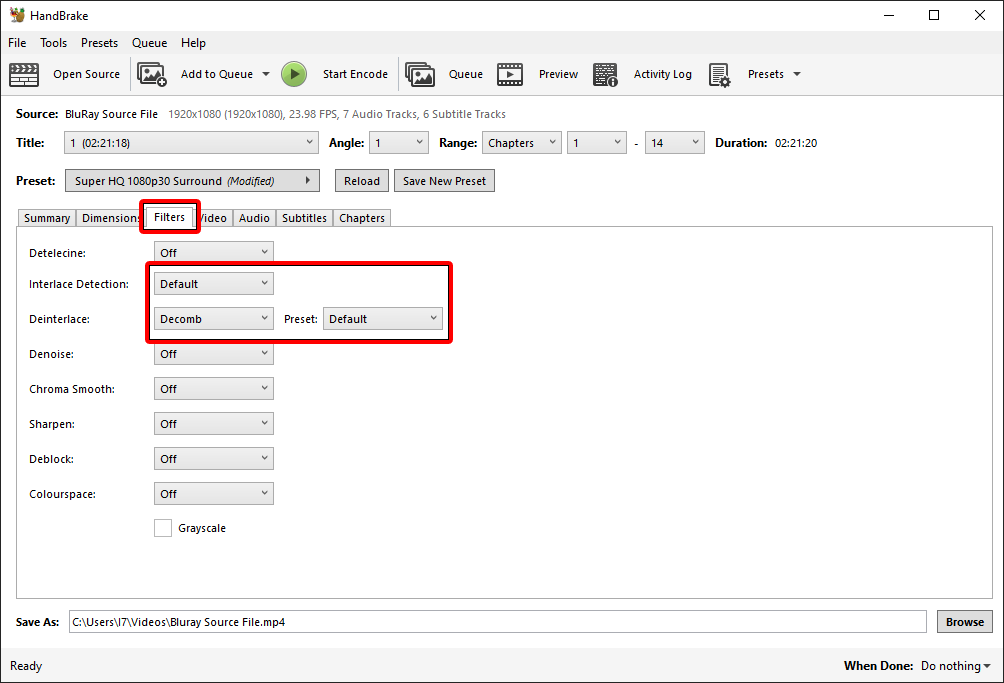
The default settings here are also good. Regardless of your source file these settings result in a nice decombed progressively drawn video. If your settings look like mine above we can move on to the Video Tab.
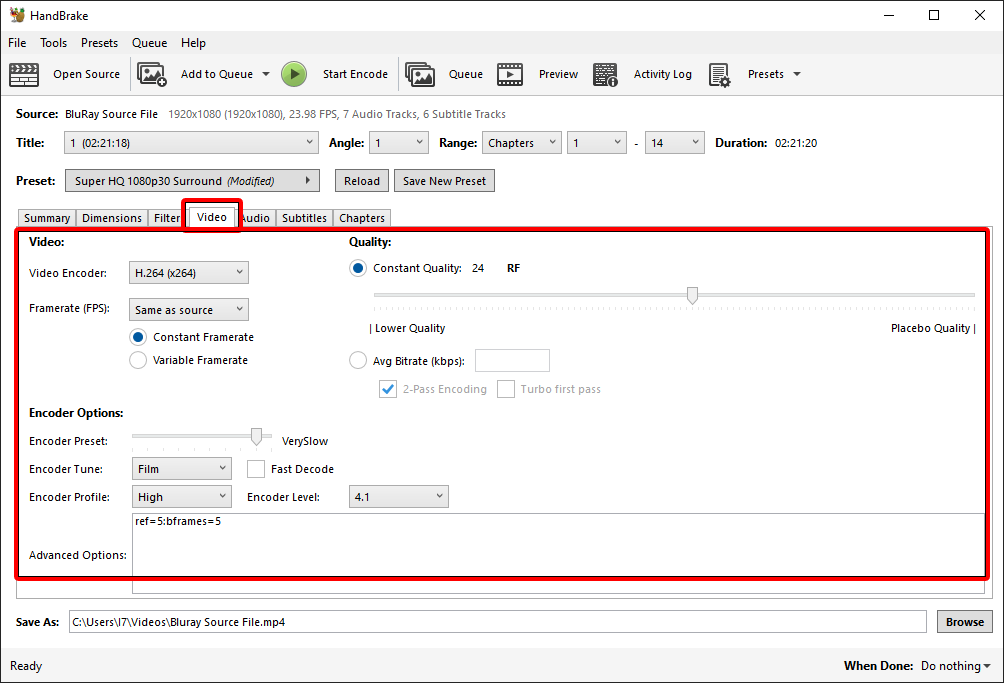
This is where the magic happens. Select H.264 (x264) as the Video Encoder, then for Framerate, change it to “Same As Source” and make sure “Constant Frame Rate” is selected. I find this really helps keep the video and audio in sync. In the “Encoder Preset” section, set the encode speed to Very Slow. This is a critical step, as if you pick a faster encode rate the quality will suffer dramatically. (I know it’s frustrating, but this is just the way encoding works. A work around solution could be let it run while you sleep). Set Encoder Tune to “Film”, Encoder Profile to “High”, and Encoder Level to “4.1. Now select “Constant Quality” and drag the slider to 24. The next step is to copy and paste the following code into the Advanced Options window
ref=5:bframes=5
| **TIME SAVING TIP** – If you want to quickly see what effects your settings have on the video your best bet is to copy off a 1-2 minute chunk of your source video file. Then you can quickly run it through Handbrake and see how your settings look before encoding the whole movie – See how it’s done in my article HERE. |
Once you have completed all of these steps, move to the Audio Tab.
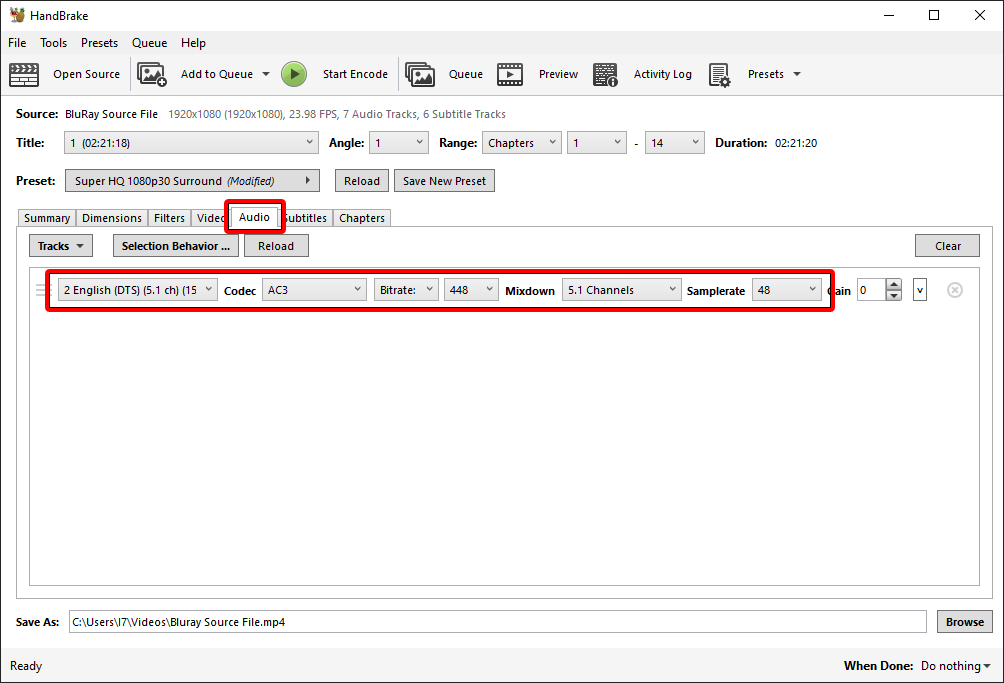
For maximum compatibility we are looking to make an AC-3 5.1 channel sound track. If your source file has a Dolby Digital 5.1 track in your desired language select that, if not select the next best thing. In my case the disk has a DTS 5.1 Soundtrack so I will use that. Change the codec to AC-3 and Mixdown to 5.1. Set the sample rate to 48 and the Bitrate to 448. Next is the Subtitles tab.
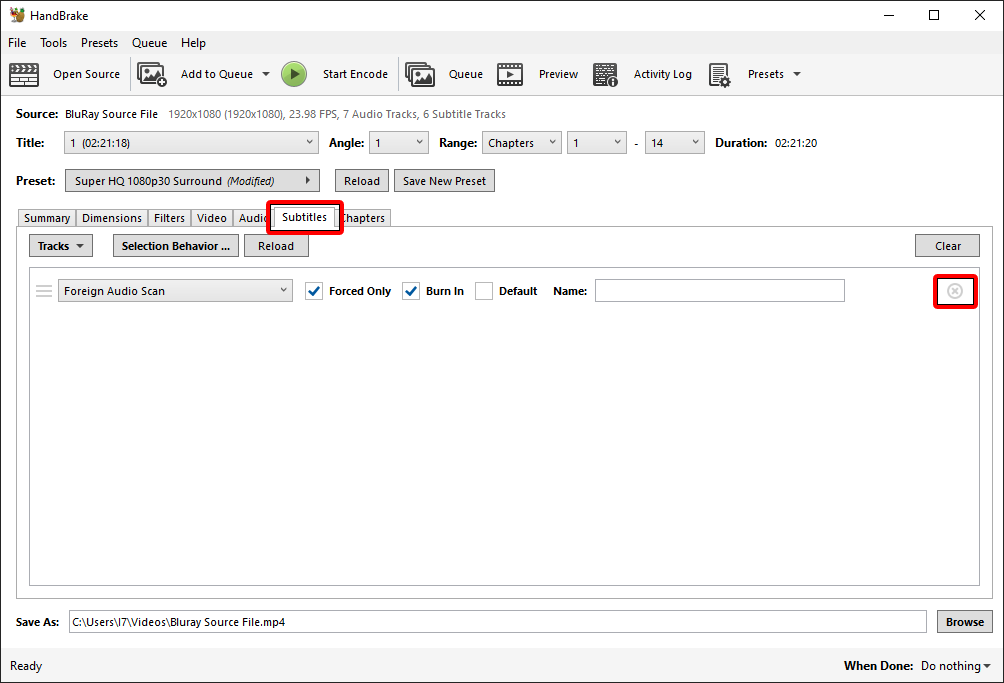
Set to “None” to remove all subtitles on MAC, and on Windows click the greyed out “X” on the right hand side to remove subtitles. And finally the Chapters Tab.
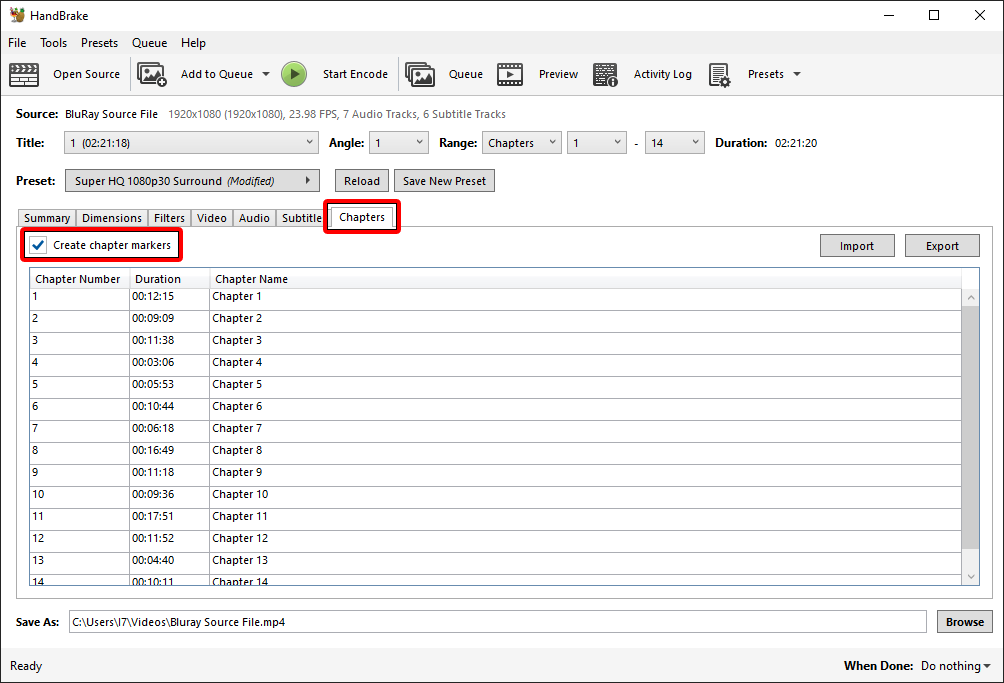
If you want to retain the chapters leave the “Create Chapter Markers” checkbox ticked, they don’t use much space and can be quite handy. If you don’t want them, uncheck the box. Now, its time to encode. Press the start button and Handbrake will start doing it’s thing.
Once your encode has completed (Mine took about 2.5 hrs) open Mediainfo and drop the converted file in. You should see a great reduction in file size.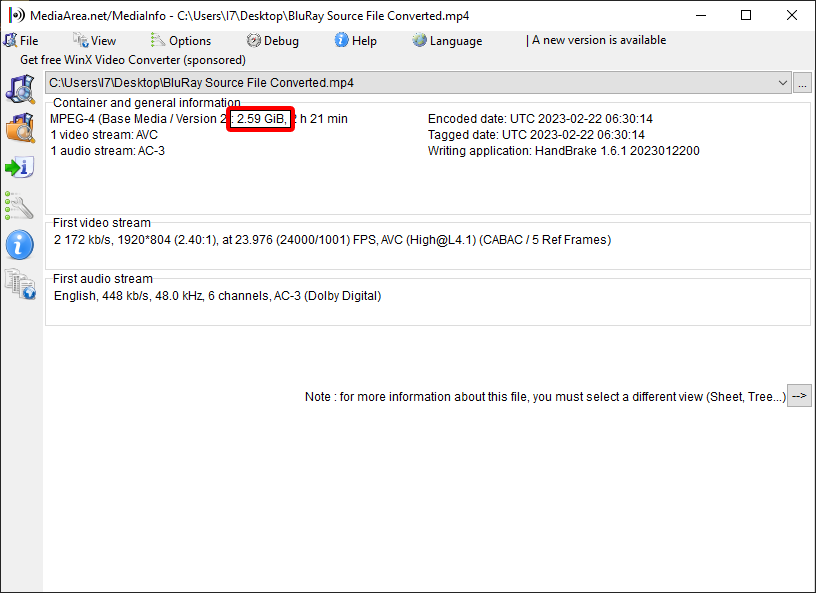
I was able to reduce the file size from just under 34GB down to 2.6GB, a reduction of 92% – with minimal picture and sound quality impacts. Pretty cool huh!
Thanks for this! I am ripping my library to add to my Plex Media Server and have been looking for a way to create quality videos that play on my (aging) hardware!
Thanks also for this. I just converted a bluray of Prometheus and it came out nice, but on Plex it is listed as being 720. My intent was to retain 1080 what did I miss in the process? Thanks for your input. Randy
Hi – Without knowing how you ripped your Bluray its hard to say, but my guess is that it is either your source file that has converted to 720p during ripping, or perhaps a Handbrake preset glitch. I find the best way to start is to click “SUPER HQ 1080P” in the presets first, and then make the tweaks in my guide from there. Hope this helps!
Hi. Thanks for this! Will there be a tutorial for 4k uhd bluray? Carsten
Hi Carsten, Not at this time. I don’t have any 4k content or equipment to play with. It would be fun though! I would love to see how small I could get it.
Great article! I really appreciate how you keep the steps simple and have a great explanation for each part. Maybe you said this in another post, but have you done comparisons between your settings and Handbrakes preset ones? For instance, the Matroska – H.264 MKV 1080p30 one? I haven’t tried your settings compared to that default yet, but I have tinkered with my own and couldn’t find much of a difference when it came to picture quality.
Absolutly incredible!!!
In these days some people keep complicated things more complicated. You just nailed it by simplicity!
Maybe you can give us a Tutorial for x265 encoding for 1080p. There is a lot of controversy in comparison to x264 encoding.
Keep up the good work!
Greetings from Germany
This is awesome, Greg – thank you very much! Using your settings I’m reducing 32GB MKV files down to 7 or 8GB M4V files, which is great. Just wondering though, is there a way to get them just a wee bit smaller, maybe in the 5 to 6GB range, without sacrificing much quality? Not sure if bump of the constant quality to 23 would have a noticeable effect?
Thanks!
Roger
Hi Greg, very good tutorial.
I have one question…I converted some movies and it took about 2-3 hours but some other movies are taking about 7 hours and the file size isn’t that much compressed. So why is the time and file compression so different? Is it normal?
Great guide! Been fiddling around with HandBrake to convert my 4K movie rips to BluRay 1080p (I have one 4K TV but the other is only 1080p). This guide is the one I have found to be the most direct and simple.
Greg, there are debates on using variable frame rate vs constant frame rate. In your guide above, you selected constant, but others say that is not appropriate because films usually have variable frame rates. Any thoughts?
Hi Nelson. I personally prefer constant frame rates because of audio-video syncing. I have had delayed audio issues from time to time when using variable frame rates in the past, so constant has become my default.
That makes total sense. Been converting 4K to 1080p using your recommended settings (including using constant frame rate) and have not had any issues. Thanks again.
First of all, thanks Greg for the clear explanation on this topic. After reading your text, I jave decided to follow your settings.
I have extracted, with MakeMKV, a TV show from a Blu-ray with 4 episodes, each file with a final size of 10.3 GB and a duration (t) of 1h30m-1h40m.
I have installed the last Handbrake version 1.3.3 (2020061300) for Windows 10.
I am using an Intel NUC 10 with Intel Core i7-10710U processor @ 1.10GHz-1.61GHz, 6 cores, and 32GB of RAM. Windows 10 Pro x64 installed.
Well, with these software and hardware specifications, Handbrake takes 1 day and 10 hours for coding just one file of 10,3GB and 1h30min of duration.
The settings used in Gandbrake were the ones you wrote above.
What do you is happening?
What can I do to improve the process?
Thanks in advance,
Thank you for this great guide! I converted over 600 movies for Plex using this and it has gained me sooooo much storage on my NAS. There’s one change I made that maybe others might find handy.
I noticed that a for a handful of conversions the video bitrate was kept extraordinarily high, resulting in an enormous file size….sometimes larger than the source file itself. I noticed that the vast majority of my encodes usage your settings would peak at about a 15k bitrate, so I added the following to the additional options of the video tab to force the conversion to max out at that bitrate: vbv-maxrate=15000.
Thank you again for all your effort and hard work. I hope your wife’s recovery is going quickly and smoothly.
can you please make one for 4k blurays as well
Yes Vithusan – I hope to be making a tutorial for 4k UHD Bluray soon! I dont currently have a UHD compatible player I can rip from though, so if you come across any downloadable UHD .iso files online that I can use as source material please let me know
Do you have a updated version of this for version 1.4.2 (2021100300) of Handbrake that has additional features and settings?
Hi, Updating the DVD and BluRay articles is definitely on the to-do list, but lately I haven’t had the time to put into the research, its a big job. Hopefully time will free up soon. Thanks for your comment and visiting the site.
Hey Greg, are there any extra considerations for videos that have a really high bit-rate, have a higher frame-rate (60 FPS or more) or are 4K?
e.g.
– Data rate around 50000 kbps
– Total bitrate around 50000 kbps
Hi Dean, 4K and 60FPS will be more compressible than 1080 and 480, so the settings will definitely be different. I am keen to test 4K but finding a source file is difficult, and I don’t have a UHD drive to rip from.
Are these settings still up to date? I know you made a new one last year but those were for regular DVD and not Bluray just wanted to make sure thank you for creating this for us it’s really helpful.
I have another question I just thought of if I’m encoding a 720P video would I need to use the Fast 720 preset? I didn’t know if it mattered if I used the fast 1080P one or not.
Hi Sam, I did a heap of testing with the intention of making a new tutorial for 1080P but its becoming increasingly harder to make a “one setting for all video”, especially where H265 is concerned. It just takes so long to encode and as you can see by the poll I put on the front page, most people aren’t willing to wait. Regarding 720p, you definitely want to use a 720p specific profile as if you use a 1080p profile you will be upscaling the video, it wont look as good, and the file size will be bigger.
Please revise your settings, as handbrake has revised many times…..
Hi Maxxlab, As requested, settings have been updated. Let me know how they work for you!
how about an update with quicksync and Nvidia nvec coders?
Hi, I don’t have any supported hardware, so I am not able to assist here sorry.
Just want to say THANK YOU. I rip blurays to make web content like reels and other short videos. The quality is never great when you have to zoom, until now!
You are most welcome. Im glad you found it useful.
Query for you – how do I get Handbrake to just pass through the audio from the source file leaving it completely alone and can I make it pass more than one audio track in this fashion?
Also the options for Encoder Tune and Encoder profile have changed – don’t quite know what to do about that either.
Hi, Its easy, select the audio track you want from the drop down, and then in the codec box directly to the right select that format and pass thru – EG if you want to keep the AC3 5.1 DD sound track – Select AC3 Passthru. If you want to keep a 5.1 DTS sound track, select DTS Passthru etc etc. To add a second audio track to your encode, click the “Tracks” drop down just above and add another track there.
Hi Greg,
Thanks for this tutorial, I finally found the answer to my question about the framerate setting: constant or variable with same as source.
The answer is constant.
Here are my settings for Blu-ray ripping:
Dimensions : cropping, anamorphic, and border are set to none.
Filter: all off.
Video:
– H.264 with RF at 22
– Framerate : Same as source with constant framerate
– Preset: medium
– Tune: none
– Profile: main
– Encode level: 4.0
I tried the settings from the tutorial and compared them to my own.
Yours creates a smaller video file than mine, but I don’t see the difference between the two.
I assume my settings are correct.
Can you confirm?
Quick question, can you tell me what the peak framerate is for?
Thanks
Hi Greg,
Thanks for this tutorial, I finally found the answer to my question about the framerate setting: constant or variable with same as source.
The answer is constant.
Here are my settings for Blu-ray ripping:
Dimensions: cropping, anamorphic, and border are set to none.
Filter: all off.
Video:
– H.264 with RF at 22
– Framerate: Same as source with constant framerate
– Preset: medium
– Tune: none
– Profile: main
– Encode level: 4.0
I tried the settings from the tutorial and compared them to my own.
Yours creates a smaller video file than mine, but I don’t see the difference between the two.
I assume my settings are correct.
Can you confirm? ^^
Quick question, can you tell me what the peak framerate is for?
Thanks