
Convert BLURAY to H.265 HEVC with Handbrake

Convert BLURAY to H.265 HEVC with Handbrake without having to know or understand all of the settings. Just copy my settings and you’re done!
|
H.264 Vs H.265 – Which one should I use? |
*Whilst your user interface may appear slightly different than shown here (depending on if you are using Windows, Mac or Linux), the settings and results will be the same across all platforms.
**NOTE** – These settings are for 1080P BLURAY to H.265 HEVC Video
Use these settings if you have a recent 4K UHD Television and newer media player like the Apple TV 4K.
To convert 1080P BLURAY to H.264 – CLICK HERE!
To convert DVD to H.265 – CLICK HERE!
To convert DVD to H.264 – CLICK HERE!
To convert 4K BLURAY to H.265 – CLICK HERE!
THE SHORT VERSION
1 Open source file in Handbrake and make sure you are on the “Summary” tab
2 Set file format to “MKV’ and deselect “Passthru Common Metadata”
3 Click “Dimensions” tab and set Resolution Limit to 1080p and leave Anamorphic as Automatic, leave cropping “Automatic” and borders “None”
4 Click the “Filters” tab
5 Leave Interlace Detection set to Default, De-interlace set to Decomb, and Preset at “Default”
6 Click the “Video” tab
7 Select “H.265 10-Bit (x265)” from the Video Codec drop down
8 Select “Same As Source” in “Framerate”
9 Check the “Constant Framerate” button
10 Set “Encoder Preset” slider to “Slow”
11 Set “Encoder Tune” to “None”
12 Set “Encoder Profile” to “Main 10”
13 Set “Encoder Level” to “5.1” – If this wont play on your system drop it back to “4.1”
14 Set the “Constant Quality” slider to “24”
15 In the “Additional Options” box add strong-intra-smoothing=0:rect=0:aq-mode=1:rd=4:psy-rd=0.75:psy-rdoq=4.0:rdoq-level=1:rskip=2
16 Click the “Audio” tab
17 Select the preferred 7.1 or 5.1 channel soundtrack
18 Set “Codec” to “AC3” and the Bitrate to 448kb
19 Set Mixdown to “5.1 Channels” and Samplerate to “48”
20 Click the “Subtitles” tab
21 Click the “X” in the circle at the right side to remove the subtitles track on Windows, or select “None” from dropdown on Mac
22 Click the “Chapters” tab
23 Uncheck the “Create Chapter Markers” option if you don’t want them or leave it checked if you do
24 Give your output file a unique name and save it somewhere easy to fid
25 Make a preset to save the settings and Press the Green “Start Encode” button
THE LONG VERSION
THE GOAL – To produce the highest quality video with the smallest possible file size, whilst creating a 5.1 Digital Sound Track that is compatible with most players and TV’s
DISCLAIMER – This method will produce very nice quality videos, but may take SEVERAL hours to process each hour of video! Unfortunately, good quality video with small file size cant be done quickly, it just doesn’t work that way.
THE TECHNICAL STUFF – My TV is a 65″ Samsung 4K UHD. I viewing position is about 10-12 feet back. I play the media from a Apple TV 4K, and use the Infuse Pro player app. The video is encoded on a 2 year iMac with I7 processor. The version of Handbrake used in this tutorial is v1.6.1 which is the current stable release for March 2023.
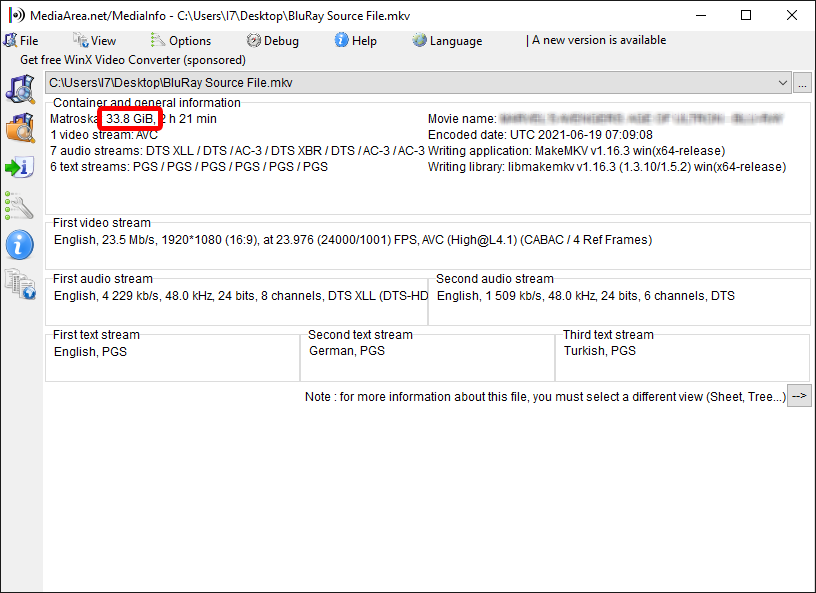
MY SOURCE FILE – My source file straight off the BluRay weighs in at a hefty 33.8 GB and contains many audio tracks. We will be able to reduce the size of this significantly! (Info provided by Mediainfo – free download HERE)
LETS ENCODE!
Once you have dropped your source file into Handbrake, you should find yourself on the Summary Tab.
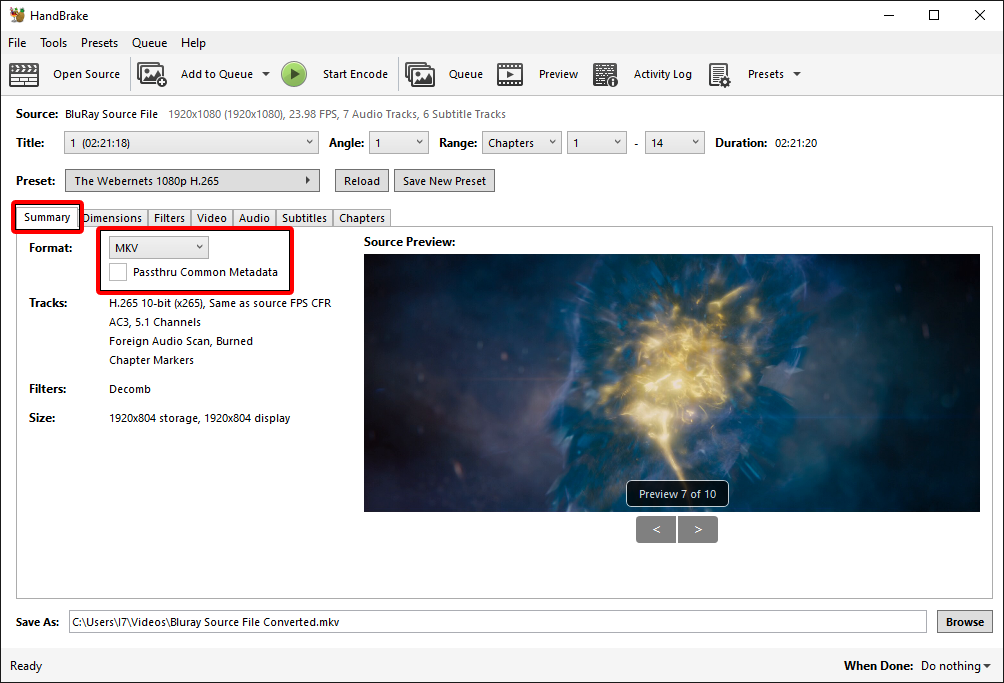
There isn’t much to be done here, Make sure you have selected MKV as your output format, and I usually uncheck the Metadata option as I don’t want to add to the file size with info I won’t use. Next is the Dimensions Tab.
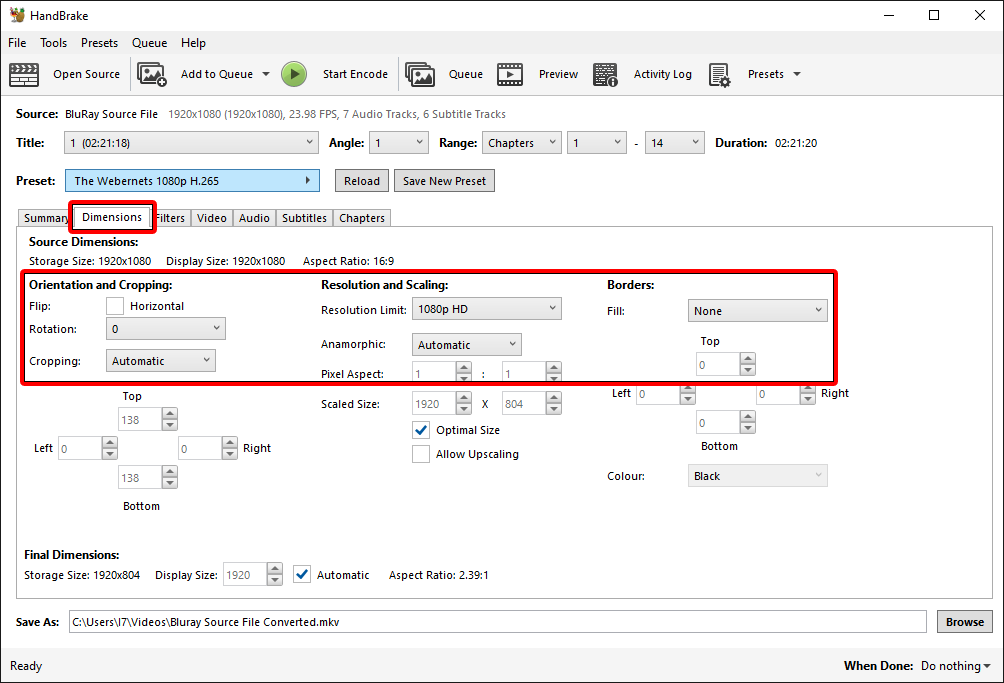
Handbrake defaults here are good, but I would double check and make sure Cropping is set to automatic. If your movie has black bars at the top and bottom this will remove them. They add to the file size and aren’t needed, so let’s get rid of them. Set your resolution to 1080P HD and leave Anamorphic at Automatic. Borders should be “None” by default. Your final dimension may look different, as each file you encode will likely be different. This is not an issue, and we can now move on to the Filters Tab.
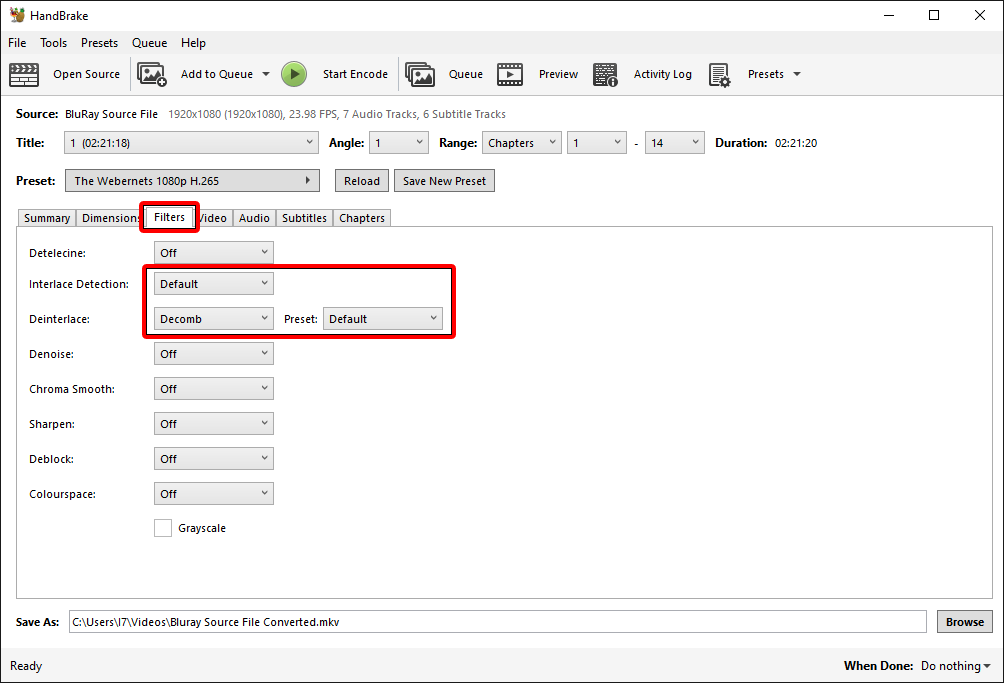
The default settings here are also good. Regardless of your source file these settings result in a nice decombed progressively drawn video. If your settings look like mine above we can move on to the Video Tab.

Let’s get down to the nitty gritty. Select the H.265 10-Bit encoder. 10-Bit allows for a much wider range of available colours, and gives a cleaner encode with less artefacts. If your media player can handle H.265 video, there’s a pretty good chance it will play 10-Bit video as well. For Framerate, select “Same As Source”, and check “Constant Framerate”. Set the preset to “Slow”, leave tune at “None”, select “Main10” for the profile and set the level to 5.1. Drag the constant Quality slider to 24 and paste the following code into the Additional Options box:
strong-intra-smoothing=0:rect=0:aq-mode=1:rd=4:psy-rd=0.75:psy-rdoq=4.0:rdoq-level=1:rskip=2
Next click the Audio Tab.
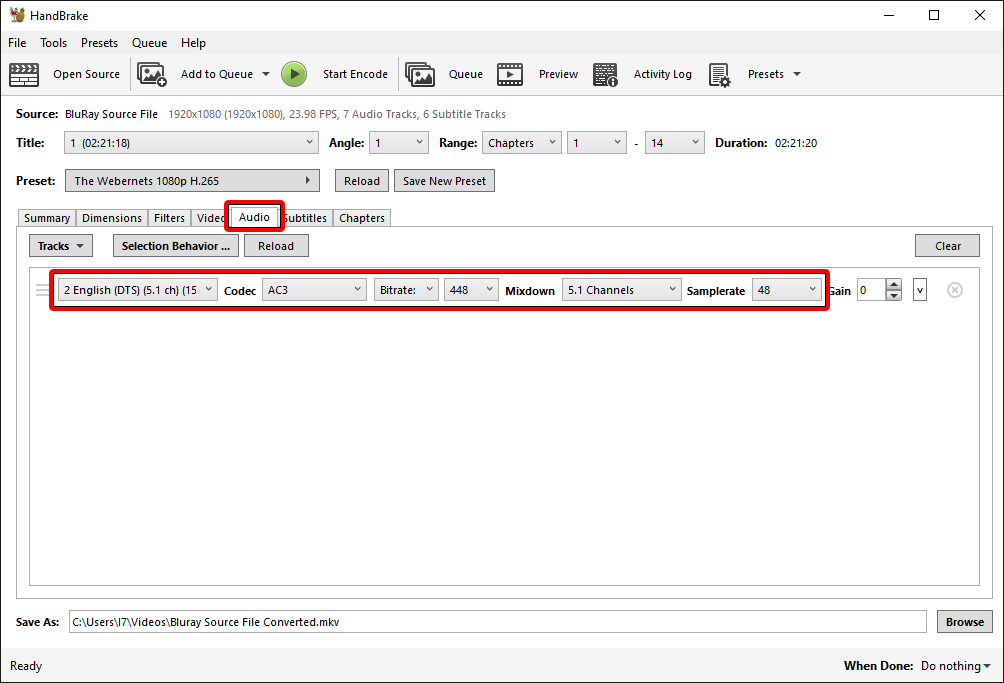
For maximum compatibility we are looking to make an AC-3 5.1 channel sound track. If your source file has a Dolby Digital 5.1 track in your desired language select that, if not select the next best thing. In my case the disk has a DTS 5.1 Soundtrack so I will use that. Change the codec to AC-3 and Mixdown to 5.1. Set the sample rate to 48 and the Bitrate to 448.
| **TIME SAVING TIP** – If you want to quickly see what effects your settings have on the video your best bet is to cut off a 1-2 minute chunk of your source video file. Then you can quickly run it through Handbrake and see how your settings look before encoding the whole file. See how it’s done in my article HERE. |
Next it’s on to the Subtitles Tab.
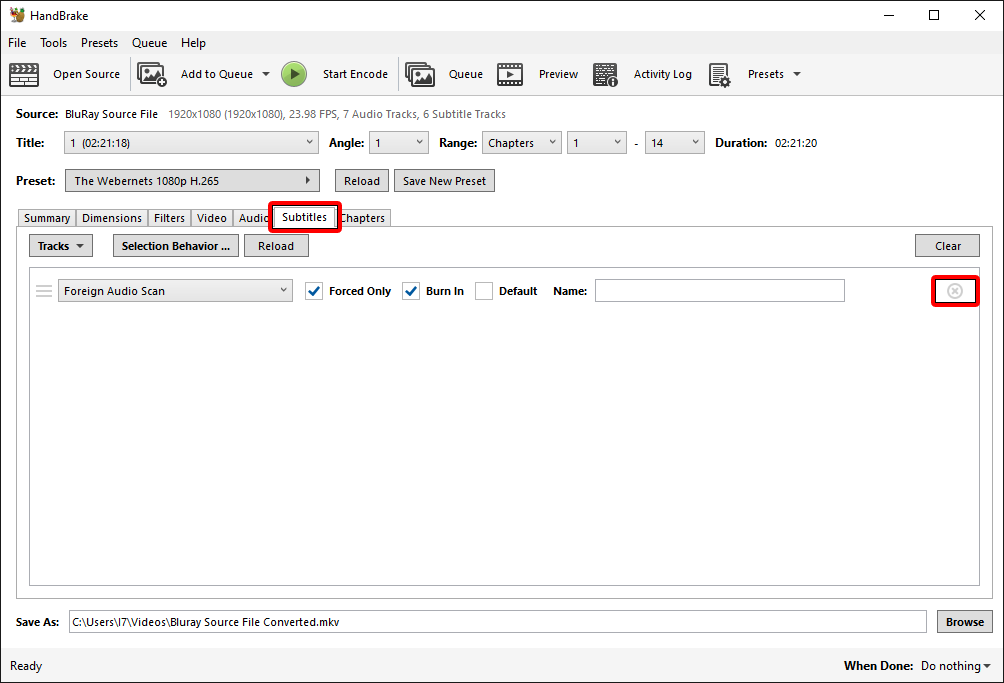
Set to none to remove all subtitles on MAC, and on Windows click the greyed out “X” on the right hand side to remove subtitles. And finally the Chapters Tab.
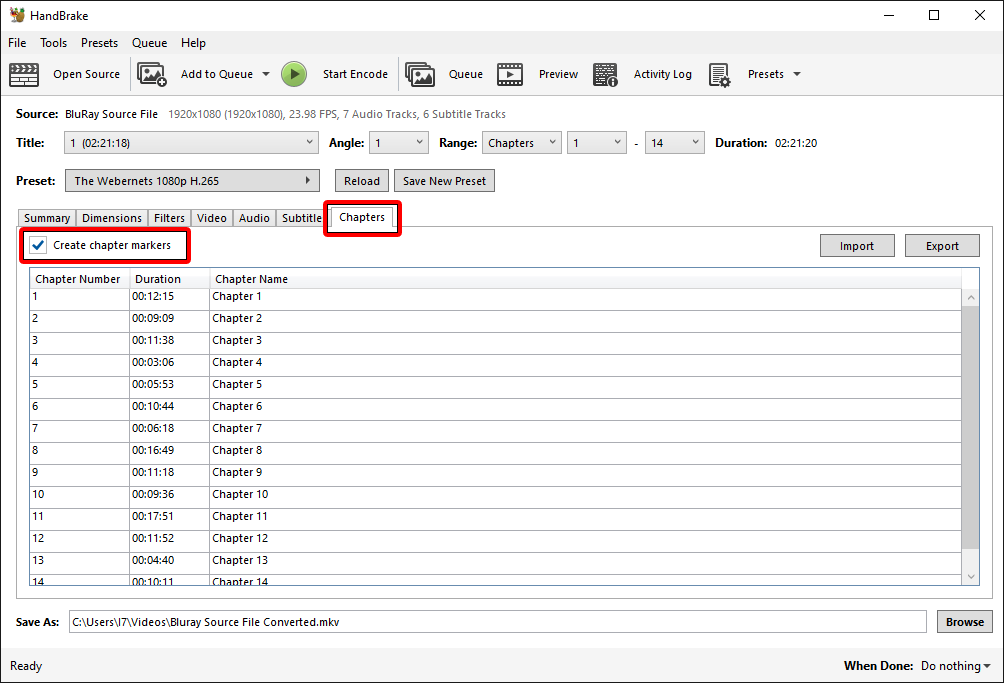
If you want to retain the chapters leave the “Create Chapter Markers” checkbox ticked, they don’t use much space and can be quite handy. If you don’t want them, uncheck the box. Now, its time to encode. Press the start button and Handbrake will start doing it’s thing.
Once your encode has completed (Mine took about 4 hrs) you should see a great reduction in file size.
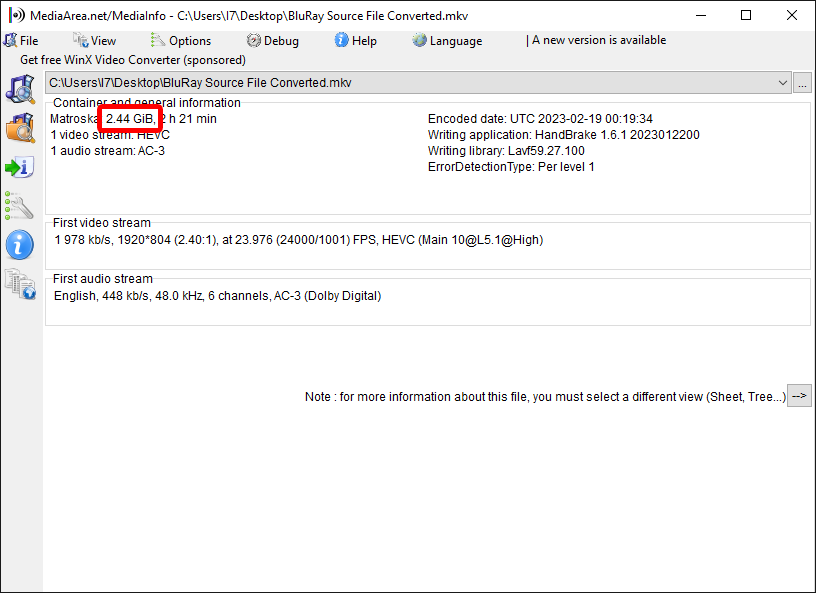
I was able to reduce the file size from just under 34GB down to 2.4GB, a reduction of 92% – with minimal picture and sound quality impacts. Pretty cool huh!
This is amazing. Thank you!
But what if I want the English subtitles? I’m getting older and can’t “hear” the movie unless the subtitles are available. It’s good if I can turn them on and off, as the test if my family doesn’t like them.
What is the best setting for that please?
Thank you!
Hi Mark. Subtitles in BluRays is a little tricky. They don’t use text files like DVD’s, they actually use a kind of graphic image for each line, so to put them in the format you are talking about, you need to run them through Optical Character Recognition software to create text files. The results are hit and miss, you often have to spend a great del of time going back through them to correct the OCR errors, and it becomes very time consuming. It is something I might write an article about one day, but at the moment its a long way down the to-do list.
Thank you very much for your article, I was searching for something like this! I have one question is this the lossless compression possible or it’s the best way regarding file size-quality?
What should we change for more quality? Thank you very much!
Hi Valentin, Thanks for taking the time to comment with your great question! I think the closest to lossless we can get with Bluray video is once we rip the disc with Make MKV. The output file is usually 30-40 gigs, but it is pretty much everything that is on the disc. The second you start trying to reduce the file size you are discarding or “losing” data. It’s a sliding scale. If you want smaller file size, you lose picture quality. If you want better quality, your file size goes up. My articles are about trying to find that sweet spot. The best possible quality with the smallest possible file size. It is going to be different for everybody, as we all have different systems. But if I can get people in the ball park, and they only need to make a few small custom tweaks to suit their viewing environment, I am happy. If my settings don’t look right for your system, and you want more quality, it is super easy, its all in the “Constant Quality” handle. Slide it back to 20 or 18 and hopefully that should help. There will be a tradeoff, your file size will be much larger, but this should give you the extra detail you are looking for.
Any chance you could do a guide for 4k Blurays? Your 1080p guide is fantastic and has helped me out but I’m stuck with 4k.
Hi Jack F – I don’t currently have a 4k drive I can rip from. I hope to be able to purchase one soon though, so a 4k article is definitely top of the list when I get it.
Second for a 4K guide, that would be awesome
The Age Of Adaline = 1.5GB lol .. Not bad
Hi, thank you very much for this. I have a question : because i use FFMPEG in command line, is it possible to you to give me the total command line with all your parameters ? (because i’m affraid to forget some param who are in handbrake per false) (excuse my english, i’m starnger…)
Hi, Im not familiar with how to use command line for FFMPEG, sorry.
I found that these settings, while striking a great balance between quality, speed, and file size, unfortunately leave pretty significant “halo” artifacts on some of my disks. Bumping the Constant Quality slider up to around 19 helps tremendously and although it does add to the overall encode time/file size, I think it’s worth it to stop seeing fuzzy artifacts around the character’s heads!
why dont use NVEnc?
Not everyone reading has a supported Nvidia graphics card
I have a 4K-TV but I’m not shure if x265 recodes are “better” than x264 with the settings posted here.
x264 seems to be by far the better supported format.
I dont’t want to encode my whole stuff from BR again and again so I’d like to ask here what your opinion is concerning the picture quality on an 4K-TV: x264 or x265?
Correct, H.264 is better supported for now, but that will likely change in the future. Visually, it will be difficult to spot the difference between a good H.264 and H.265 encode. However, H.265 is a more efficient codec, and can save a lot of space. It all comes back to your system. If your system can play 10 Bit H.265 and you can tolerate the longer encode times, in my opinion it is the way to go.
Could you explain why you chose the audio settings you did (mixdown, bitrate, sample rate)?
I’m not sure if it is still relevant in 2024, but most guides I’ve seen say to do AC3 as passthru and then a second AAC track down-mixed for stereo. The idea for the stereo AAC track was for compatibility — most info I can find points to default clients (Apple mainly) not being able to handle AC3.
My aim has always been maximum audio and video quality for smallest file size. 5.1 AC3 seems to be the most compatible for home theatre set ups so that’s what I went with. Mobile devices are not considered in the scope of these articles, hence I don’t include a stereo mix down. The reason I don’t choose Passthru is there is considerable space savings to be had by further compressing the audio track down to about 448k. I leave the sample rate at 48 as that is generally what the original is.
Can I use H265 10 bit NVEnc and get the same results but faster. Or would i need to change some more settings to get the same results?
what does the added code do? I cant see any visible difference
@Rob
1. strong-intra-smoothing=0:
This parameter controls the amount of smoothing applied to intra-predicted (I-frame) blocks. A value of 0 means no smoothing is applied, which can result in sharper details but also a higher risk of artifacts in the image.
2. rect=0:
This parameter relates to the motion estimation process. It specifies the block partitioning method for inter-predicted (P/B-frame) blocks. A value of 0 means that the encoder will consider both square and rectangular block shapes for more precise motion estimation.
3. aq-mode=1:
AQ stands for Adaptive Quantization, which adjusts the level of quantization (the process that reduces the accuracy of the video signal) based on the complexity of the content. This parameter sets the mode of adaptive quantization. A value of 1 enables adaptive quantization, which can improve visual quality by allocating more bits to areas with more detail.
4. rd=4:
RD stands for Rate-Distortion optimization. It balances the trade-off between bitrate (file size) and video quality. This parameter controls the level of optimization. A higher value, such as 4, indicates a more thorough analysis of different encoding options to find the optimal balance.
5. psy-rd=0.75:
Psy-RD is a technique that combines perceptual and rate-distortion optimization. It takes into account human visual perception to allocate bits more efficiently. This parameter sets the strength of the perceptual optimization. A higher value, such as 0.75, means a stronger emphasis on visual perception.
6. psy-rdoq=4.0:
Psy-RDOQ (Psycho-visual Rate-Distortion Optimization Quantization) is another perceptual optimization technique. It adjusts the quantization process based on visual perception. This parameter sets the strength of Psy-RDOQ. A higher value, like 4.0, means a stronger emphasis on perceptual optimization during quantization.
7. rdoq-level=1:
RDOQ (Rate-Distortion Optimization Quantization) adjusts the quantization process based on rate-distortion optimization. This parameter sets the RDOQ level, with 1 being a moderate level of optimization.
8. rskip=2:
RSKIP is a technique that allows skipping the encoding process for some blocks if they are similar to previously encoded blocks. This parameter controls the RSKIP level. A value of 2 indicates more blocks will be considered for potential skipping, which can improve encoding speed but might reduce compression efficiency.
@AgentOOP
No, good quality encodes take time.
If the source video is 8 bits, does it still make sense to use the 10-bit setting in Handbrake?
When the source video is 8 bits, does it still make sense to use the 10-bit Handbrake setting?
What would be the option for a DTS-MA track in order to get the best quality:size ratio?
Will there be any noticeable quality loss when choosing AAC over AC3? Thanks
I use “video-compare-GUI-v1.0.3.3” to compare the quality!
I’ve tested many different settings and compared them with the tool,
8-bit or 10-bit, with and without strong-intra…..
With Main10 5.1 or Main 4.1 etc.
I find Main 4.1 CRF20 very good at 1080p in H265 8-bit, and the file size is also small.
My conclusion:
The setting Handbrake specifies for SuperHQ 1080p is very good.
This can, of course, vary from film to film!
Best regards