
Convert DVD to H265 with Handbrake
Convert DVD to H265 HEVC with Handbrake without having to know or understand all of the settings. Just copy my settings and you’re done!
|
H.264 Vs H.265 – Which one should I use? |
*Whilst your user interface may appear slightly different than shown here (depending on if you are using Windows, Mac or Linux), the settings and results will be the same across all platforms.
**NOTE** – These settings are for DVD to H265 HEVC Video
Use these settings if you have a recent 4K UHD Television and newer media player like the Apple TV 4K.
To convert DVD to H.264 – CLICK HERE!
To convert 1080P BLURAY to H.264 – CLICK HERE!
To convert 1080P BLURAY to H.265 – CLICK HERE!
To convert 4K BLURAY to H.265 – CLICK HERE!
INSTRUCTIONAL VIDEO COMING SOON!
THE SHORT VERSION
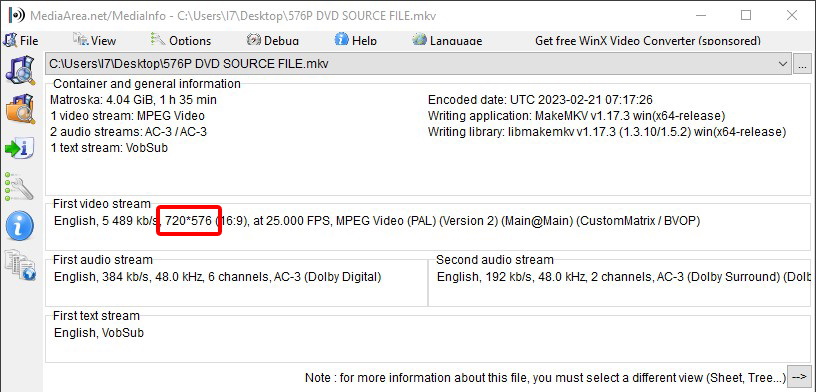
IMPORTANT – Before you begin, drop your source DVD file into Mediainfo and identify if the video stream is 480 or 576 size! (Different countries use different sizes)
1 Open source file in Handbrake and make sure you are on the “Summary” tab
2 Set file format to “MKV’ and deselect “Passthru Common Metadata”
3 Click “Dimensions” tab and set Resolution Limit to 480p or 576p (depending on your source file) and leave Anamorphic as Automatic, leave cropping “Automatic” and borders “None”
4 Click the “Filters” tab
5 Leave Interlace Detection set to Default, De-interlace set to Decomb, and Preset at “Default”
6 Click the “Video” tab
7 Select “H.265 10-Bit (x265)” from the Video Codec drop down
8 Select “Same As Source” in “Framerate”
9 Check the “Constant Framerate” button
10 Set “Encoder Preset” slider to “Slow”
11 Set “Encoder Tune” to “None”
12 Set “Encoder Profile” to “Main 10”
13 Set “Encoder Level” to “4.1”
14 Set the “Constant Quality” slider to “22”
15 In the “Additional Options” box ad strong-intra-smoothing=0:rect=0:aq-mode=1:rd=4:psy-rd=0.75:psy-rdoq=4.0:rdoq-level=1:rskip=2
16 Click the “Audio” tab
17 Select the preferred 5.1 channel soundtrack – If it is AC-3/Dolby Digital 5.1 click pass thru and go to step 20
18 Set “Codec” to “AC3” and the Bitrate to 448kb
19 Set Mixdown to “5.1 Channels” and Samplerate to “48”
20 Click the “Subtitles” tab
21 Click the “X” in the circle at the right side to remove the subtitles track on Windows, or select “None” from dropdown on Mac
22 Click the “Chapters” tab
23 Uncheck the “Create Chapter Markers” option if you don’t want them, or leave it checked if you do
24 Give your output file a unique name and save it somewhere easy to find
25 Make a preset to save the settings and Press the Green “Start Encode” button
THE LONG VERSION
THE GOAL – To produce the highest quality video with the smallest possible file size, whilst creating a 5.1 Digital Sound Track that is compatible with most players and TV’s
DISCLAIMER – This method will produce very nice quality videos, but may take SEVERAL hours to process each hour of video! Unfortunately, good quality video with small file size cant be done quickly, it just doesn’t work that way.
THE TECHNICAL STUFF – My TV is a 65″ Samsung 4K UHD. I viewing position is about 10-12 feet back. I play the media from a Apple TV 4K, and use the Infuse Pro player app. The video is encoded on a 2 year iMac with I7 processor. The version of Handbrake used in this tutorial is v1.6.1 which is the current stable release for March 2023.
MY SOURCE FILE – DVD Video from different countries generally comes in two different sizes, 480 pixels high and 576 pixels high. Before we start encoding we need to identify which one your source file is. Thankfully there is a great free tool called Mediainfo you can use to find out what you have. You can download Mediainfo HERE.
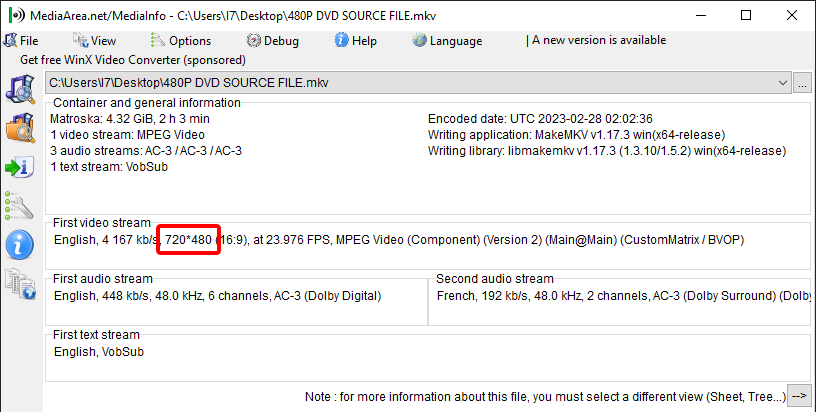
If your DVD is 480 lines high, you will see something like 720*480 in the first video streams details. If your DVD is 576 lines high, you will see something like below:
Now we have identified what kind of video our source file is, it’s time to open handbrake and drop it in. You should find yourself on the “Source” tab.
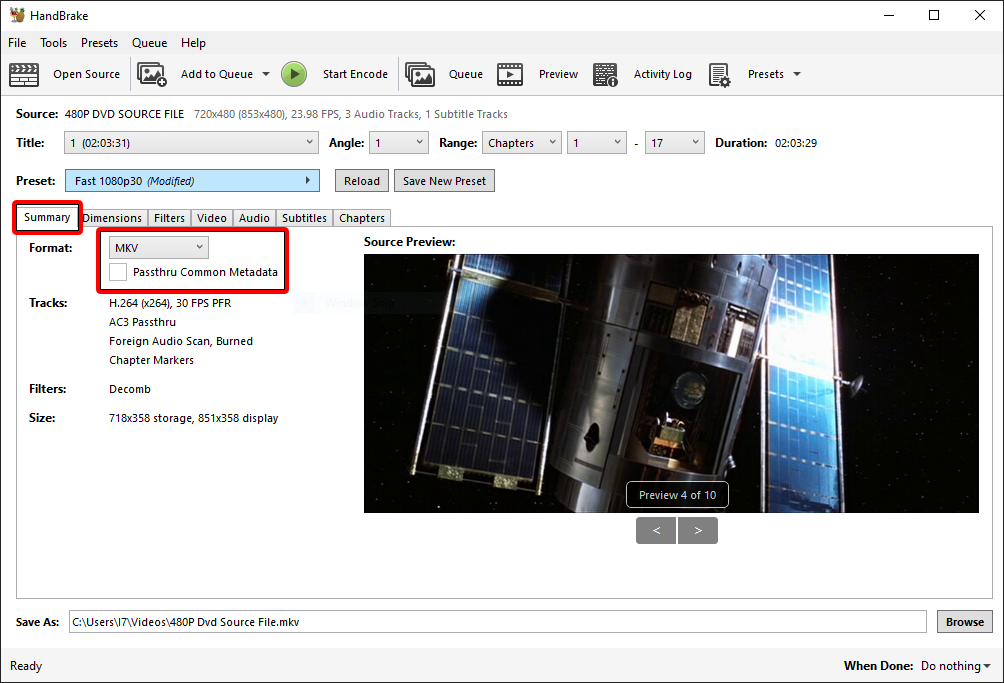
There is not much to do in this tab, just make sure the format is set to MKV and Passthru Common Metadata is unchecked. Then go on to the “Dimensions” tab

Everything should be ok here by default. Just be sure to select either 576p or 480p from the resolution limit, depending on your source file dimensions. Leave Cropping set to Automatic, Anamorphic set to Automatic, and Fill set to None. Now move on to “Filters”
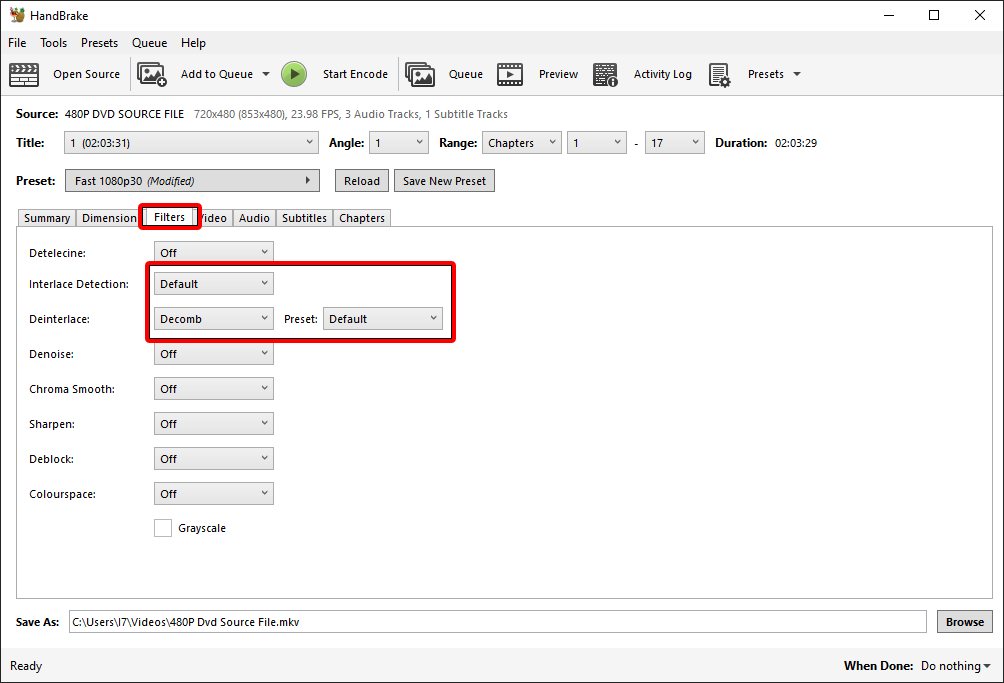
Default settings here are also correct. Regardless of your source file, these settings will give you a nicely combed progressive file. Move on to the “Video” tab
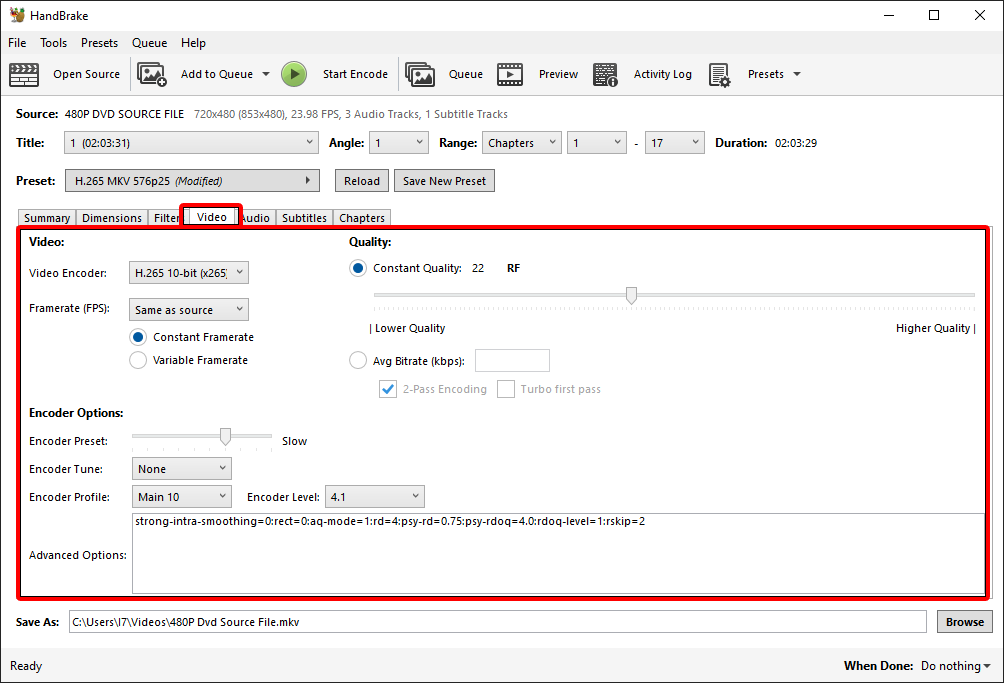
Let’s get down to the nitty gritty. Select the H.265 10-Bit encoder. 10-Bit allows for a much wider range of available colours, and gives a cleaner encode with less artefacts. If your media player can handle H.265 video, there’s a pretty good chance it will play 10-Bit video as well. For Framerate, select “Same As Source”, and check “Constant Framerate”. Set the preset to “Slow”, leave tune at “None”, select “Main10” for the profile and set the level to 4.1. Drag the constant Quality slider to 22 and paste the following code into the Additional Options box:
strong-intra-smoothing=0:rect=0:aq-mode=1:rd=4:psy-rd=0.75:psy-rdoq=4.0:rdoq-level=1:rskip=2
Next click the Audio Tab.
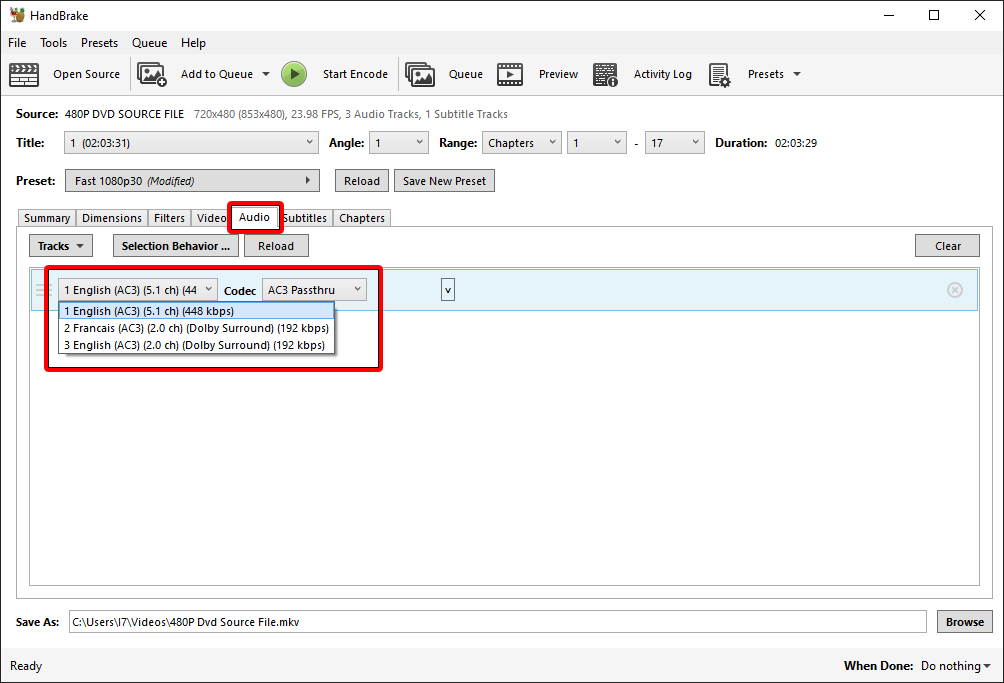
Select the preferred 5.1 channel soundtrack – If it is AC-3/Dolby Digital 5.1 choose “Pass Thru” from the Codec drop down and move on to the “Subtitles” tab. If the best soundtrack is something else, like DTS 5.1, select that and set “Codec” to “AC3” and the Bitrate to “448kb”, set Mixdown to “5.1 Channels” and Samplerate to “48”.
| **TIME SAVING TIP** – If you want to quickly see what effects your settings have on the video your best bet is to cut off a 1-2 minute chunk of your source video file. Then you can quickly run it through Handbrake and see how your settings look before encoding the whole file. See how it’s done in my article HERE. |
Next it’s on to the Subtitles Tab.
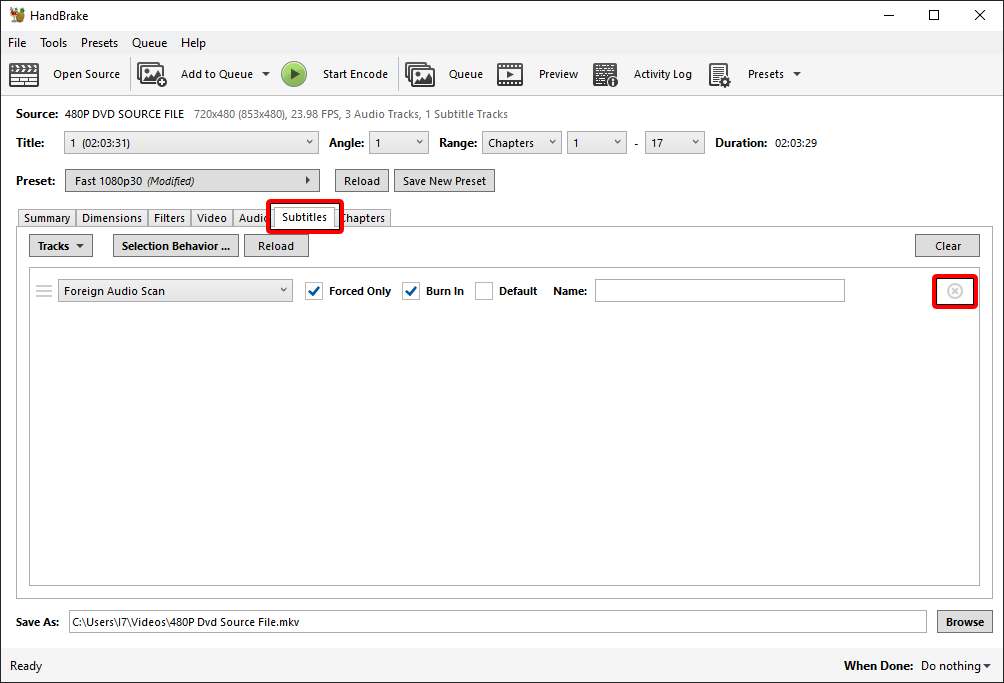
Set the subtitles track to “None” to remove all subtitles on MAC, and on Windows click the greyed out “X” on the right hand side to remove subtitles. And finally the Chapters Tab.
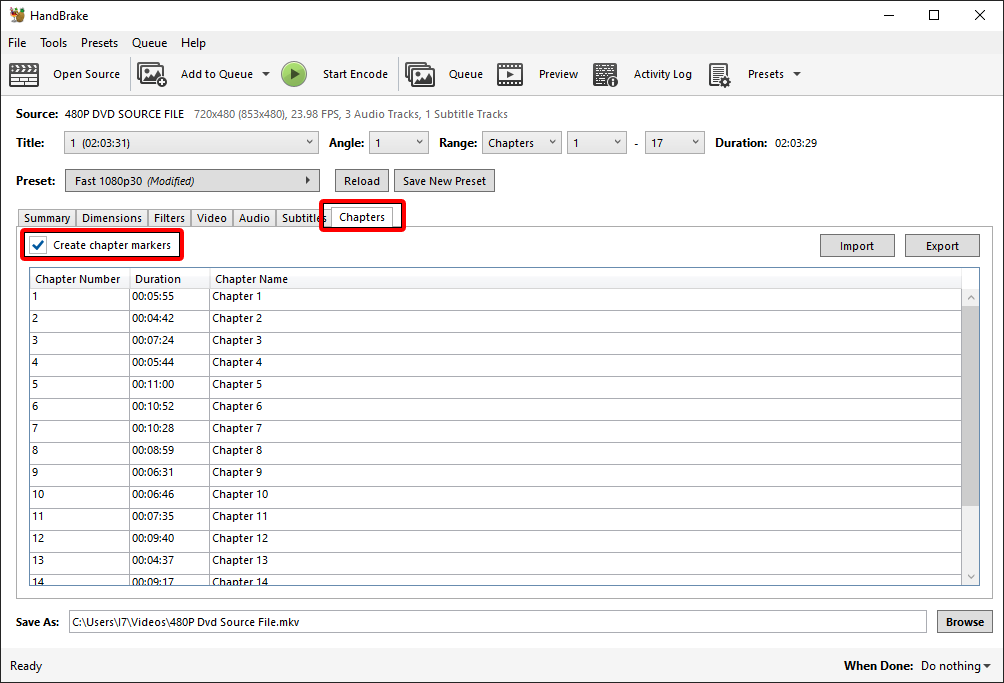
If you want to retain the chapters leave the “Create Chapter Markers” checkbox ticked, they don’t use much space and can be quite handy. If you don’t want them, uncheck the box. Now, its time to encode. Press the start button and Handbrake will start doing it’s thing. Once your encode has completed (Mine took about 2 hrs) you should see a great reduction in file size.
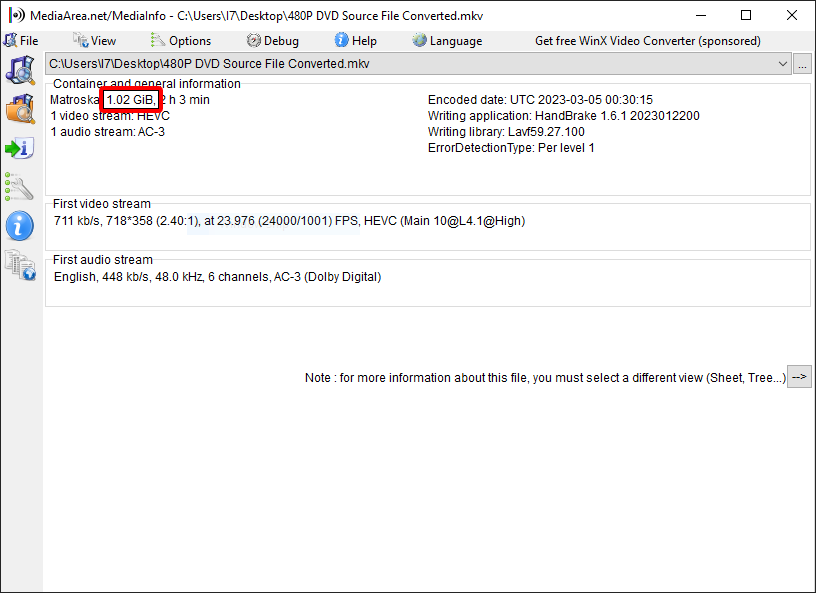
My source file was 4.32GB and I have now reduced it down to 1.02GB, a reduction of a little over 76% – Not bad huh!
Would the same settings be ok for a 1366×768 streaming video screen capture?
Yes, these settings should produce a nice result. Given the higher resolution you should still have a nice encode at Constant Quality setting of 21 or 22
Thank-you SOOOO much for these detailed walkthroughs/tutorials! I’m new to video encoding (I’ve been watching my movies the old-fashioned way, by swapping the discs), but I’ve grown tired of that and I’m in process of setting up a new Plex server, using MakeMKV and Handbrake. Your writeups are BY FAR the best I’ve found after tons of searching, especially for newer options and settings, as a lot of forum posts are from years ago and are wildly out of date. Thank-you again!
Thank you for your kind words. Im glad you found the article useful.
I had used your guide from 2019 to encode a number of DVDs and all of them turned out beautifully. Recently I picked up a newer system and wanted to encode some more stuff for my Plex server. I followed this newer guide but for reasons I am struggling to understand everything is coming out quite pixelated. All of my settings are exactly as you have indicated. I’m using Handbrake 1.3.3 on Linux. Any recommendations on what to lookk at for clues or advice on how to solve would be appreciated.
Interesting – I will open up Ubuntu and see if I can re-create your issue Steve.
Thank you so much for this tutorial. The files work great on my AppleTV 4K and are significantly smaller now. Would you recommend the same settings for Blu-ray files?
Hi – Im glad you have had some success! These setting are not recommended/optimal for BluRay video. I am currently testing H265 with 1080P and 4K video and will have new articles with optimised settings available soon.
What would be the difference between your upcoming article on blu rays and your older one in 2019? Also, how soon will this new article come? Thanks
Hi drazby. The difference between the upcoming article and the one I wrote in 2019 is that the new one will be using the H.265 codec to compress the video, and the old article uses the less efficient H.264 codec. As to how soon will it be done, well Im trying and I am sorry to keep you all waiting. I write this blog in my spare time, and recently my wife had a very serious accident, so my spare time after my day job is pretty much all taken up providing care for her. But I promise you that when I can, I am very keen to resume my testing and write an article that will help you create some gorgeous looking video files at the smallest possible size. Thanks for the great question drazby!
Could you do a tutorial on the best optimal settings for converting not only to H.265 HEVC codec but also to H.266 VVC and AV1. All the best and fast recovery for your wife.
Hey Greg been following you for a while now. Could you do an update version for H264 (the problem with H265 is compatibility).
The new handbrake is pretty cool, but an high quality low size for h264 would be awesome
Hi, I agree it’s time for some updates. Recently I was playing around with Dolby Digital sound on another project and I learned just how compressible it is without noticeable quality loss, which when combined with H 264/265 should make file sizes even smaller again. I will get the new Handbrake downloading soon and get to testing and writing. Thanks for your comment and visiting the site.
How is the wife? Since some of us (me) have to use H264, will the overall settings be the same?
Hi Leo, unfortunately the settings for optimal encoding using H264 and H265 codecs are different. I do have an article on DVD conversion using H264 HERE that might help, but it is in need of an update.
Thanks for all your efforts.. I have been using your H264 settings for DVD’s with good results. Anything for 1366×768 OBS movie/TV recordings?
Hi Leo, I have written a new DVD to H264 article using Handbrake 1.5.1, which is the current version for FEB 22. I hope you like it. I have also updated DVD to H265. I have done a massive amount of testing with BluRay and am hoping to have an article ready soon. Regarding OBS, what a great piece of software! I should definitely write some tutorials on it, I love what it can do. Your best bet for H264 encoding your 1366×768 captures would be to click presets, then Matroska, and select H264 at 720P.
I must say I find this new x265 preset pretty much perfect for my needs! I’m converting all my Game of Thrones Blu Ray rips and I initially followed your guide for x264. I only did S1 up to now, so I’m just glad I found this guide soon enough to not cause an issue having to redo them all!
My PC is pretty strong so I followed your guide, and I even managed to test and see that encode times were reasonable for 10-bit encodes too. I’m looking at about 45 minute encodes per 1Hr episode, and the file size is cut from 13GB for the original MKV rip, down to 2.5-3GB, so I think that is entirely reasonable.
Thank you so much for your informative guides!
Hi Chris, glad you found the tutorial useful and have had some success with it.
This is probably a dumb question but I have been using your recommended settings for about a year now to great success with much higher quality over the standard settings in handbrake which I have been using for at least 10 years now. Just recently I have started compressing blu-ray content however and I was curious if I should use one size fits all setting for blu-rays and standard DVD’s or should I have two different presets that I use for each one separately? Just curious about this since I seem to bounce around a lot when I start running handbrake.
Hi Chris, I would definitely recommend using settings specifically for Bluray as the picture area is much larger than DVD, there for the compression ratios will be different. DVD specific settings will not produce an optimal file size or quality
I don’t know if this is a dumb question, but If I use NVidia h265 NVENC preset, do you recommend to add “strong-intra-smoothing=0:rect=0:aq-mode=1” to the “rc-lookahead=10” (this is there by the preset)…btw I want to thank you for this great work!
Hi!! Do you know why your advanced settings are unknown for H.265 Nvidia NVENC? It is not the same standard??
HandBrake 1.5.1 (2022011000)
—-
[11:51:51] encavcodecInit: H.265 (Nvidia NVENC)
[11:51:51] encavcodec: encoding at rc=vbr, multipass=fullres, 22.00
[11:51:51] encavcodec: encoding with stored aspect 64/45
[11:51:51] encavcodecInit: Unknown avcodec option strong-intra-smoothing
[11:51:51] encavcodecInit: Unknown avcodec option rect
[11:51:51] encavcodecInit: Unknown avcodec option aq-mode
Hi Gerardo – I have not played around with those hardware specific presets, so I am not able to offer a great deal of assistance. My guess would be that when using these presets perhaps Handbrake is offloading the encoding task to the graphics card for hardware encoding and it is not capable of performing all of the functions that may be possible in software encoding
I stumbled across this site trying to work out the best way to encode my bluray/dvd collection. The 3 guides that you have provided here were a complete game changer. Thank you for taking the time to script these guides and for sharing.
Hi Felthamn – You are most welcome, glad you found them useful!
Hi, as a beginner this guide was very very helpfull. Thank you a lot. I have only one question left. Regarding “subtitles” .. you suggest to just unchek them. How to you handle “forced” subtitles. I am from germany, so my audio Track is set to “german”. But there are often (I guess in english, too) Audio spoken in native language like (russian, spain, italian, whatever…) that normaly is handled in a “forced” subtitle.
I would like to have the “forced” subtitle to be “burned in”…. Do I just use
[foreign audio scan] X Forced only X Burn in ? … or what would be the best way ?
Thank you !
Hi,
The 5.1 channels isn’t showing up as an option in the “Mixdown” menu in the “Audio” tab.
It’s just mono, mono (left)/(right), and stereo.
What should I do?
Does this work with the Animation preset?
Hello Greg.
Do you happen to know if it would be better to use more filters, for old DVDs with many fragments in the video, throughout the movie?
Thanks for this guide!
Hi James. I wrote an article that might help you, check it out – https://www.thewebernets.com/2023/03/27/fix-bad-dvd-with-handbrake-on-mac-windows-and-linux-2023/
i’ve been using these settings for awhile now for (dvd conversions), and once again, thank you for a well laid out guide. recently, one of the conversions came out quite bad, however. it is extremely washed out, losing nearly all of the red tones of the original. any idea why that might be, and is there a setting i could tweak to fix it? i can send details if needed.
Why level 5.1 here but level 4.1 for the Blu-ray to H.265 settings?
Using these settings but swapped H265 10-bit to H265 10-bit Intel QSV in the Video Encoder. Using an Intel ARC A380 it is processing at ~1200 FPS